2018 TOYOTA PROACE VERSO checking oil
[x] Cancel search: checking oilPage 9 of 504

9
Maintenance - Technical data
Dimensions 323Identification markings 327
Running out of fuel, (primimg pump) 322
Checking levels 273 -275- oil- brake fluid- power steering fluid- coolant- screenwash, headlamp wash fluid
- additive (Diesel with particle filter)
Changing bulbs 298-310- front- rear
12V battery 316 -320
Opening the bonnet 271Under the bonnet 272Engines 324-326AdBlue® 278 -281
Weights 324-326
Load reduction, economy mode 266
Engine compartment fuses 311- 312, 315
.
Over view
Page 29 of 504
29
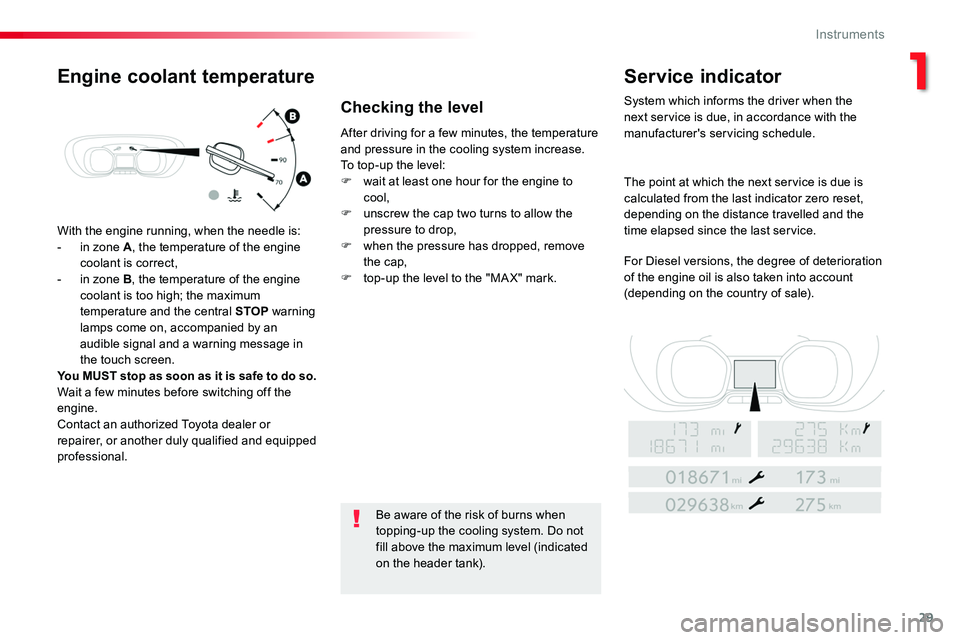
With the engine running, when the needle is:- in zone A, the temperature of the engine coolant is correct,- in zone B, the temperature of the engine coolant is too high; the maximum temperature and the central STOP warning lamps come on, accompanied by an audible signal and a warning message in the touch screen.You MUST stop as soon as it is safe to do so.Wait a few minutes before switching off the engine.Contact an authorized Toyota dealer or repairer, or another duly qualified and equipped professional.
After driving for a few minutes, the temperature and pressure in the cooling system increase.To top-up the level:F wait at least one hour for the engine to cool,F unscrew the cap two turns to allow the pressure to drop,F when the pressure has dropped, remove the cap,F top-up the level to the "MA X" mark.
Be aware of the risk of burns when topping-up the cooling system. Do not
fill above the maximum level (indicated on the header tank).
Engine coolant temperatureService indicator
System which informs the driver when the next service is due, in accordance with the manufacturer's servicing schedule.
The point at which the next service is due is calculated from the last indicator zero reset, depending on the distance travelled and the time elapsed since the last service.
For Diesel versions, the degree of deterioration of the engine oil is also taken into account (depending on the country of sale).
Checking the level
1
Instruments
Page 273 of 504
273
Checking levels
Take care when working under the bonnet, as certain areas of the engine may be extremely hot (risk of burns) and the cooling fan could start at any time (even with the ignition off).
Engine oil level
The check is carried out either when the ignition is switched on using the oil level indicator in the instrument panel for vehicles so equipped, or using the dipstick.
Checking using the dipstick
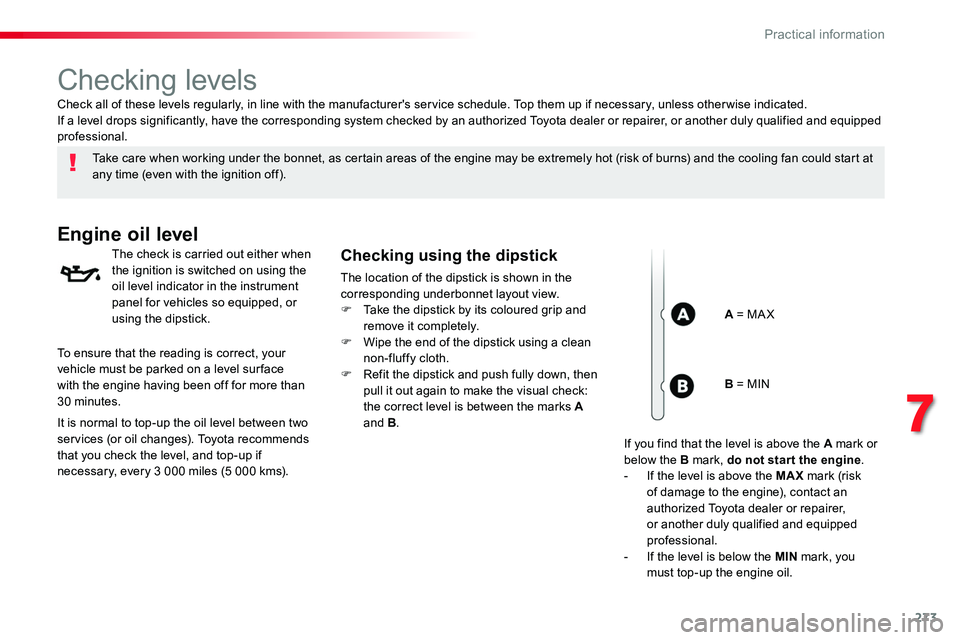
The location of the dipstick is shown in the corresponding underbonnet layout view.F Take the dipstick by its coloured grip and remove it completely.F Wipe the end of the dipstick using a clean non-fluffy cloth.F Refit the dipstick and push fully down, then pull it out again to make the visual check: the correct level is between the marks A and B.
Check all of these levels regularly, in line with the manufacturer's service schedule. Top them up if necessary, unless other wise indicated.If a level drops significantly, have the corresponding system checked by an authorized Toyota dealer or repairer, or another duly qualified and equipped professional.
A = MA X
To ensure that the reading is correct, your vehicle must be parked on a level sur face with the engine having been off for more than 30 minutes.
It is normal to top-up the oil level between two services (or oil changes). Toyota recommends that you check the level, and top-up if necessary, every 3 000 miles (5 000 kms).
B = MIN
If you find that the level is above the A mark or below the B mark, do not star t the engine.- If the level is above the MAX mark (risk of damage to the engine), contact an authorized Toyota dealer or repairer, or another duly qualified and equipped professional.- If the level is below the MIN mark, you must top-up the engine oil.
7
Practical information
Page 274 of 504
274
Oil grade
Before topping-up the oil or changing the oil, check that the oil is the correct grade for your engine and conforms to the manufacturer's recommendations.
Topping-up the engine oil level
The location of the oil filler cap is shown in the corresponding underbonnet layout view.F Unscrew the oil filler cap to reveal the filler aperture.F Add oil in small quantities, avoiding any spills on engine components (risk of fire).F Wait a few minutes before checking the level again using the dipstick.F Add more oil if necessary.F After checking the level, carefully refit the oil filler cap and the dipstick in its tube.
After topping-up the oil, the check when switching on the ignition with the oil level indicator in the instrument panel is not valid during the 30 minutes after topping up.
Engine oil change
Refer to the manufacturer's service schedule for details of the interval for this operation.In order to maintain the reliability of the engine and emission control system, never use additives in the engine oil.
The brake fluid level should be close to the "MA X" mark. If it is not, check the brake pad wear.
Brake fluid level
Changing the fluid
Refer to the manufacturer's service schedule for details of the interval for this operation.
Fluid specification
The brake fluid must conform to the manufacturer's recommendations.
Coolant level
The coolant level should be close to the "MA X" mark but should never exceed it.
In addition, as the cooling system is pressurised, wait at least one hour after switching off the engine before carrying out any work.To avoid any risk of scalding, unscrew the cap by two turns to allow the pressure to drop. When the pressure has dropped, remove the cap and top up the level.
The cooling fan may star t after switching
off the engine: take care with ar ticles and clothing that might be caught by the fan blades.
When the engine is warm, the temperature of the coolant is regulated by the fan.
Check the coolant level regularly, according to the use made of your vehicle (every 3 000 miles or 5 000 kms / 3 months); if necessary, top-up using coolant recommended by the manufacturer.Topping-up the coolant between services is normal.
Power steering fluid level
The power steering fluid level should be close to the "MA X" mark. With the engine cold, unscrew the cap to check the level.
Practical information
Page 276 of 504
276
Checks
12 V battery
The battery does not require any maintenance.However, check regularly that the terminals are correctly tightened (versions without quick release terminals) and that the connections are clean.
Refer to the manufacturer's service schedule for details of the replacement intervals for these components.
Air filter and passenger compartment filter
Replace the oil filter each time the engine oil is changed.Refer to the manufacturer's service schedule for details of the replacement interval for this component.
Oil filter
Particle filter (Diesel)
The start of saturation of the particle filter is indicated by the temporary illumination of this warning lamp accompanied by a message in the multifunction screen.
As soon as the traffic conditions permit, regenerate the filter by driving at a speed of at least 40 mph (60 km/h) until the warning lamp goes off.If the warning lamp stays on, this indicates a low additive level.For more information on Checking levels, refer to the corresponding section.
On a new vehicle, the first particle filter regeneration operations may be accompanied by a "burning" smell, which is per fectly normal.Following prolonged operation of the
vehicle at very low speed or at idle, you may, in exceptional circumstances, notice the emission of water vapour at the exhaust on acceleration. This does not affect the behaviour of the vehicle or the environment.
Unless other wise indicated, check these components in accordance with the manufacturer's service schedule and according to your engine.Other wise, have them checked by an authorized Toyota dealer or repairer, or another duly qualified and equipped professional.
For more information and the precautions to take before starting work on the 12 V batter y, refer to the corresponding section.
Depending on the environment (e.g. dusty atmosphere) and the use of the vehicle (e.g. city driving), replace them twice as often if necessary.A clogged passenger compartment filter may have an adverse effect on the per formance of the air conditioning system and generate undesirable odours.
Versions equipped with Stop & Start are fitted with a 12 V lead-acid battery of specific technology and specification.Its replacement should be carried out only by an authorized Toyota dealer or repairer, or another duly qualified and equipped professional.
Practical information
Page 277 of 504
277
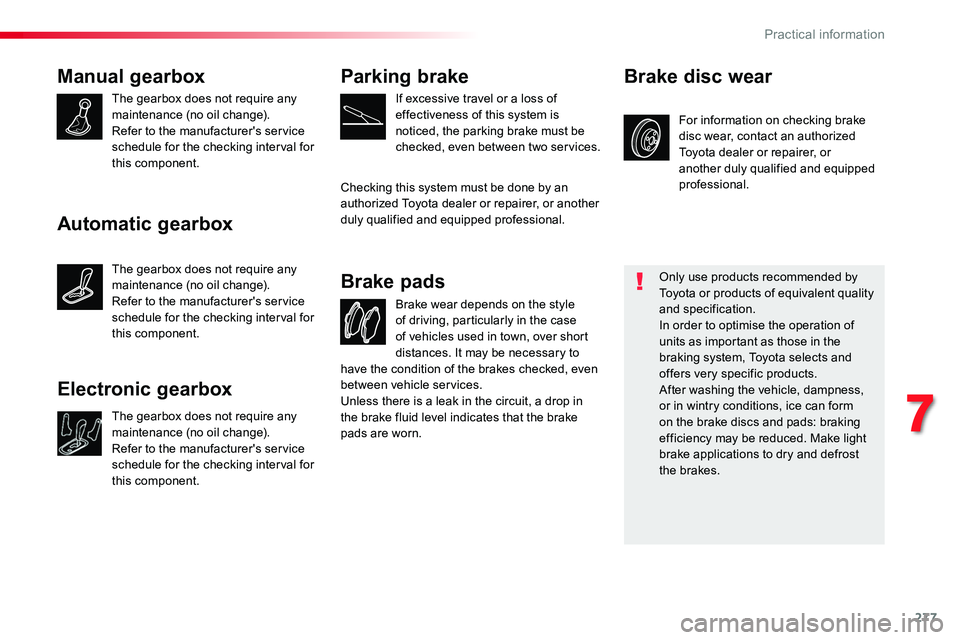
Manual gearbox
The gearbox does not require any maintenance (no oil change).Refer to the manufacturer's service schedule for the checking interval for this component.
Brake wear depends on the style of driving, particularly in the case of vehicles used in town, over short distances. It may be necessary to
Brake pads
For information on checking brake disc wear, contact an authorized Toyota dealer or repairer, or another duly qualified and equipped professional.
Brake disc wear
Only use products recommended by Toyota or products of equivalent quality and specification.In order to optimise the operation of units as important as those in the braking system, Toyota selects and offers very specific products.After washing the vehicle, dampness, or in wintry conditions, ice can form on the brake discs and pads: braking efficiency may be reduced. Make light brake applications to dry and defrost the brakes.
Parking brake
If excessive travel or a loss of effectiveness of this system is noticed, the parking brake must be checked, even between two services.
Checking this system must be done by an authorized Toyota dealer or repairer, or another duly qualified and equipped professional.
have the condition of the brakes checked, even between vehicle services.Unless there is a leak in the circuit, a drop in the brake fluid level indicates that the brake pads are worn.
Automatic gearbox
The gearbox does not require any maintenance (no oil change).Refer to the manufacturer's service schedule for the checking interval for this component.
Electronic gearbox
The gearbox does not require any maintenance (no oil change).Refer to the manufacturer's service schedule for the checking interval for this component.
7
Practical information
Page 290 of 504
290
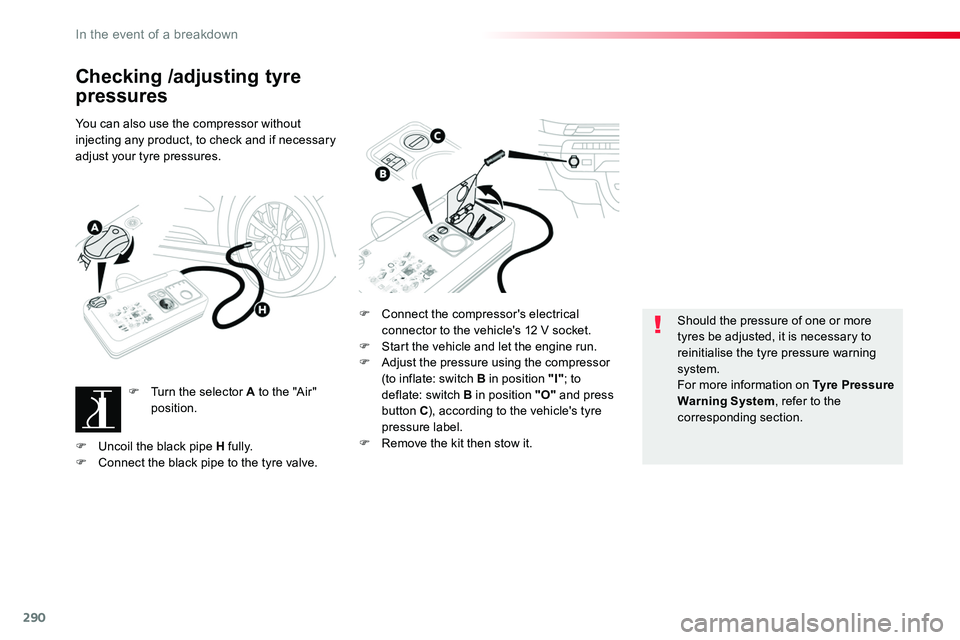
Checking /adjusting tyre
pressures
You can also use the compressor without injecting any product, to check and if necessary adjust your tyre pressures.
F Turn the selector A to the "Air" position.
F Connect the compressor's electrical connector to the vehicle's 12 V socket.F Start the vehicle and let the engine run.F Adjust the pressure using the compressor (to inflate: switch B in position "I"; to deflate: switch B in position "O" and press button C), according to the vehicle's tyre pressure label.F Remove the kit then stow it.
Should the pressure of one or more tyres be adjusted, it is necessary to reinitialise the tyre pressure warning system.For more information on Tyre Pressure Warning System, refer to the corresponding section.
F Uncoil the black pipe H fully.F Connect the black pipe to the tyre valve.
In the event of a breakdown
Page 496 of 504
496
180° rear vision .............................................255ABS ...............................................................159Access, AdBlue tank .....................................280Accessories ................................................. 267Access to the spare wheel ............................292AdBlue® .....................................24, 33, 278-281Additive, Diesel .....................................275, 276Adjusting headlamp beam height ................................................153Adjusting head restraints ..........................91, 93Adjusting front seats .................................87, 90Adjusting the air distribution .................125, 129Adjusting the air flow .............................127, 129Adjusting the date ...........................44, 410, 466Adjusting the height and reach of the steering wheel ........................................87Adjusting the lumbar support ....................................................88, 92Adjusting the seat belt height ..........................................................16 4Adjusting the temperature ....................125, 127Adjusting the time ...........................44, 411, 467Advice on driving ...................................192-19 4Airbags ............................................22, 168, 176Airbags, curtain .....................................171, 172Airbags, front.........................................169, 172Airbags, lateral ......................................170, 172Air conditioning, dual-zone automatic ............................................127, 134Air conditioning, manual ................................125, 131, 13 4, 13 5Air intake ...............................................125, 134Alarm ...............................................................83Anti-lock braking system (ABS) ..............................................159Anti-pinch ........................................................86Anti-theft ...........................................49, 59, 201Armrest, front ..................................................91ASR ...............................................................159
Assistance call ......................................15 8, 328Assistance, emergency braking ................................................159, 243Audible warning ............................................159Audio streaming (Bluetooth) .................................388, 444, 485Audio system ...................................77, 148-150, 152, 153, 15 6, 216, 222, 2 41, 243, 245, 247, 250, 253, 260, 473Autonomous emergency braking ....21, 239, 242Auxiliary ...............................................388, 444
A
C
B
Brake lamps .........................305, 306, 308, 309Brakes .......................................................16, 20Braking, automatic emergency ....................................21, 239, 242Bulbs (changing) ...........................................298
Cable, audio .........................................388, 444Capacity, fuel tank ........................................261Cap, fuel filler ................................................261CarPlay connection...............................376, 432CD, MP3 ....................................................... 484Central locking ..........................................45, 52Changing a bulb ..........................................................298Changing a bulb (tailgate) .............................308Changing a bulb (rear wing doors with glass windows) ........305Changing a fuse ............................................311Changing a wheel .........................................291Changing a wiper blade ........................157, 269Changing the remote control battery.........................................51, 62Checking the engine oil level ..................................................32, 273Checking the levels ...............................273-275Checking tyre pressures (using the kit) ..............................................290Checks ..........................................272, 276, 277
Battery .......................................... 276, 316-320Battery capacity ............................................320Battery, charging ...........................................318Battery, remote control .......................................51, 62, 63, 13 8Bench seat, one-piece, fixed ..............................................................95Blind, skyview® ..............................................120Blind spot monitoring system ............................................2 7, 249-2 51Blinds, side ....................................................118BlueHDi ....................................29, 33, 204, 278Bluetooth (telephone) .................................396, 452, 487Bonnet ...........................................................271Boot ........................................56, 58, 61, 79, 81Brake discs ....................................................277
Alphabetical index