2018 TOYOTA PROACE VERSO Main battery
[x] Cancel search: Main batteryPage 9 of 504

9
Maintenance - Technical data
Dimensions 323Identification markings 327
Running out of fuel, (primimg pump) 322
Checking levels 273 -275- oil- brake fluid- power steering fluid- coolant- screenwash, headlamp wash fluid
- additive (Diesel with particle filter)
Changing bulbs 298-310- front- rear
12V battery 316 -320
Opening the bonnet 271Under the bonnet 272Engines 324-326AdBlue® 278 -281
Weights 324-326
Load reduction, economy mode 266
Engine compartment fuses 311- 312, 315
.
Over view
Page 31 of 504

31
The distance remaining may be weighted by the time factor, depending on the driving conditions.Therefore, the spanner may also come on if you have exceeded the period since the last service, indicated in the manufacturer's service schedule.For Diesel versions, the spanner may also be brought on earlier than
expected, depending on the degree of deterioration of the engine oil (depending on the country of sale).The rate of deterioration of the engine oil depends on the driving conditions in which the vehicle is used.
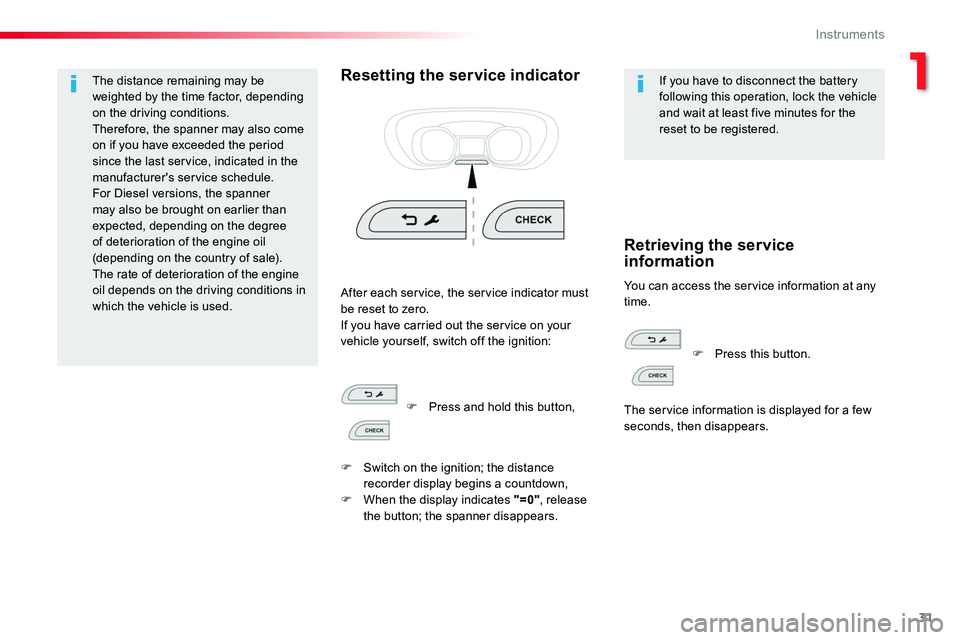
Resetting the service indicatorIf you have to disconnect the battery following this operation, lock the vehicle and wait at least five minutes for the reset to be registered.
You can access the service information at any time.After each service, the service indicator must be reset to zero.If you have carried out the service on your vehicle yourself, switch off the ignition:
Retrieving the service information
F Press and hold this button,
F Switch on the ignition; the distance recorder display begins a countdown,F When the display indicates "=0", release the button; the spanner disappears.
F Press this button.
The service information is displayed for a few seconds, then disappears.
1
Instruments
Page 81 of 504

81
For more information on the Key, Remote control or Smar t Entr y & Start System and in particular unlocking the vehicle, refer to the corresponding section.
For more information on the Key, Remote control or Smar t Entr y & Start System and in particular on locking the vehicle, refer to the corresponding section.
Rear tailgate
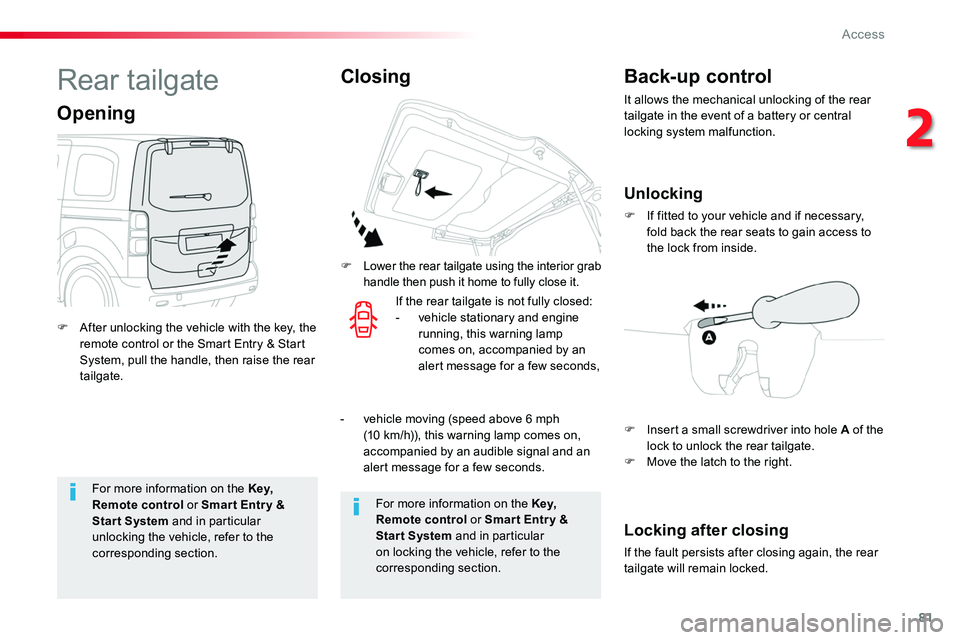
F After unlocking the vehicle with the key, the remote control or the Smart Entry & Start System, pull the handle, then raise the rear tailgate.
Opening
F Lower the rear tailgate using the interior grab handle then push it home to fully close it.
ClosingBack-up control
It allows the mechanical unlocking of the rear tailgate in the event of a battery or central locking system malfunction.
Unlocking
F If fitted to your vehicle and if necessary, fold back the rear seats to gain access to the lock from inside.
Locking after closing
If the fault persists after closing again, the rear tailgate will remain locked.
If the rear tailgate is not fully closed:- vehicle stationary and engine running, this warning lamp comes on, accompanied by an alert message for a few seconds,
F Insert a small screwdriver into hole A of the lock to unlock the rear tailgate.F Move the latch to the right.
- vehicle moving (speed above 6 mph
(10 km/h)), this warning lamp comes on, accompanied by an audible signal and an alert message for a few seconds.
2
Access
Page 199 of 504

199
The presence in the recognition zone of the remote control of the "Smart Entry & Start System" is essential.Never leave the vehicle with the engine running and with the remote control on your person.If the remote control leaves the recognition zone, a message is displayed.
Move the remote control into the zone to be able to start the engine.
If one of the starting conditions is not met, a message appears in the instrument panel screen. In some circumstances, it is necessary to turn the steering wheel slightly while pressing the "START/STOP" button
to assist unlocking of the steering; a message warns you when this is needed.
If the vehicle is not immobilised, the engine will not stop.
Switching off
F Immobilise the vehicle.
F With the remote control in the recognition zone, press the "START/STOP" button.
The engine stops and the steering column is locked.
Ignition on
(without starting)
With the ignition on, the system automatically goes into energy economy mode to maintain an adequate state of charge in the battery.
With the Smart Entry & Start System remote control inside the vehicle, pressing the "START/STOP" button, with no action on the pedals, allows the ignition to be switched on.This also allows the accessories to be used (for example: audio system, lighting...).
F Press the "START/STOP" button, the instrument panel comes on but the engine does not start.
F Press the button again to switch off the ignition and allow the vehicle to be locked.
To avoid any risk of jamming of the pedals:- only use mats which are suited to the fixings already present in the vehicle; these fixings must be used,- never fit one mat on top of another.The use of mats not approved by Toyota may inter fere with access to the pedals and hinder the operation of the cruise control / speed limiter.The mats approved by Toyota have two fixings located below the seat.
6
Driving
Page 215 of 504

215
Going into engine
START mode
START mode is invoked automatically in certain temporary conditions (examples: battery charge, engine temperature, braking assistance, air conditioning setting) to assure correct operation of the system and mainly when:- you open the driver's door,
- you open a sliding side door,- you unfasten the driver's seat belt,- the speed of the vehicle exceeds 15 mph (25 km/h) or 2 mph (3 km/h) (depending on the engine) with a manual gearbox,- the speed of the vehicle exceeds 2 mph (3 km/h) with an automatic gearbox.
Special cases: START invoked automatically
In this case the "ECO" warning lamp flashes for a few seconds, then goes of f.
This operation is perfectly normal.
If your vehicle has a manual gearbox, the "ECO" indicator lamp goes off in the instrument panel and the engine restarts automatically when you fully depress the clutch pedal.
If your vehicle has an automatic gearbox, the "ECO" lamp goes off in the instrument panel and the engine restarts automatically when:- you release the brake pedal with the gear selector in position D or M,- you are in position N with the brake pedal released and you move the gear selector to position D or M,- you engage reverse.
If your vehicle has an electronic gearbox, the "ECO" lamp goes off in the instrument panel and the engine restarts automatically when:- you release the brake pedal with the gear selector in position A ou M,- you are in position N with the brake pedal released and you move the gear selector to position A or M,- you enegage reverse.
Special cases: STOP mode not available
STOP mode is not invoked in certain temporary conditions (examples: battery charge, engine temperature, braking assistance, ambient temperature) to assure correct operation of the system and mainly when:- the vehicle is on a steep slope (rising or falling),
- the driver's door is open,- a sliding side door is open,- the driver's seat belt is not fastened,- the vehicle has not exceeded 6 mph (10 km/h) since the last engine start by the driver,- the electric parking brake is applied or being applied,- the engine is needed to maintain a comfortable temperature in the passenger compartment,- demisting is active.
In this case, the "ECO" warning lamp flashes for a few seconds then goes of f.
This operation is perfectly normal.
6
Driving
Page 266 of 504

266
Energy economy mode
System which manages the duration of use of certain functions to conserve a sufficient level of charge in the battery.After the engine has stopped, you can still use functions such as the audio and telematics system, windscreen wipers, dipped beam headlamps, courtesy lamps, etc. for a maximum combined duration of about forty minutes.
Switching to economy
mode
A message appears in the instrument panel screen indicating that the vehicle has switched to economy mode and the active functions are put on standby.
If a telephone call is being made at this time, it will be maintained for around 10 minutes with the Bluetooth hands-free system of your audio system.
Exiting economy mode
These functions are reactivated automatically next time the vehicle is driven.In order to restore the use of these functions immediately, start the engine and let it run:- for less than ten minutes, to use the equipment for approximately five minutes,- for more than ten minutes, to use the equipment for up to approximately thirty minutes.Let the engine run for the duration specified to ensure that the battery charge is sufficient.Do not repeatedly and continuously restart the engine in order to charge the battery.A flat battery prevents the engine from starting.For more information on the 12 V batter y, refer to the corresponding section.
Load reduction mode
System which manages the use of certain functions according to the level of charge remaining in the battery.When the vehicle is being driven, the load reduction function temporarily deactivates certain functions, such as the air conditioning, the heated rear screen...The deactivated functions are reactivated automatically as soon as conditions permit.
Practical information
Page 272 of 504

272
* According to engine.
Diesel engine
1. Screenwash and headlamp wash reservoir.2. Coolant header tank.3. Engine oil filler cap.4. Engine oil dipstick.5. Priming pump*.6. Brake fluid filler cap.7. Battery.8. Remote earth point ("-" terminal).
9. Fusebox.10. Power steering fluid reservoir.11. A i r f i l t e r.
This engine is shown as an example. The locations of the engine oil dipstick and filler cap may vary.
The Diesel fuel system operates under high pressure:- Never carry out any work on this system yourself.- HDi engines make use of advanced technology.All maintenance and repairs require specially trained staff, which only an authorized Toyota dealer or repairer, or another duly qualified and equipped professional can provide.
Practical information
Page 276 of 504

276
Checks
12 V battery
The battery does not require any maintenance.However, check regularly that the terminals are correctly tightened (versions without quick release terminals) and that the connections are clean.
Refer to the manufacturer's service schedule for details of the replacement intervals for these components.
Air filter and passenger compartment filter
Replace the oil filter each time the engine oil is changed.Refer to the manufacturer's service schedule for details of the replacement interval for this component.
Oil filter
Particle filter (Diesel)
The start of saturation of the particle filter is indicated by the temporary illumination of this warning lamp accompanied by a message in the multifunction screen.
As soon as the traffic conditions permit, regenerate the filter by driving at a speed of at least 40 mph (60 km/h) until the warning lamp goes off.If the warning lamp stays on, this indicates a low additive level.For more information on Checking levels, refer to the corresponding section.
On a new vehicle, the first particle filter regeneration operations may be accompanied by a "burning" smell, which is per fectly normal.Following prolonged operation of the
vehicle at very low speed or at idle, you may, in exceptional circumstances, notice the emission of water vapour at the exhaust on acceleration. This does not affect the behaviour of the vehicle or the environment.
Unless other wise indicated, check these components in accordance with the manufacturer's service schedule and according to your engine.Other wise, have them checked by an authorized Toyota dealer or repairer, or another duly qualified and equipped professional.
For more information and the precautions to take before starting work on the 12 V batter y, refer to the corresponding section.
Depending on the environment (e.g. dusty atmosphere) and the use of the vehicle (e.g. city driving), replace them twice as often if necessary.A clogged passenger compartment filter may have an adverse effect on the per formance of the air conditioning system and generate undesirable odours.
Versions equipped with Stop & Start are fitted with a 12 V lead-acid battery of specific technology and specification.Its replacement should be carried out only by an authorized Toyota dealer or repairer, or another duly qualified and equipped professional.
Practical information