Page 95 of 504
95
Fixed one-piece bench seat
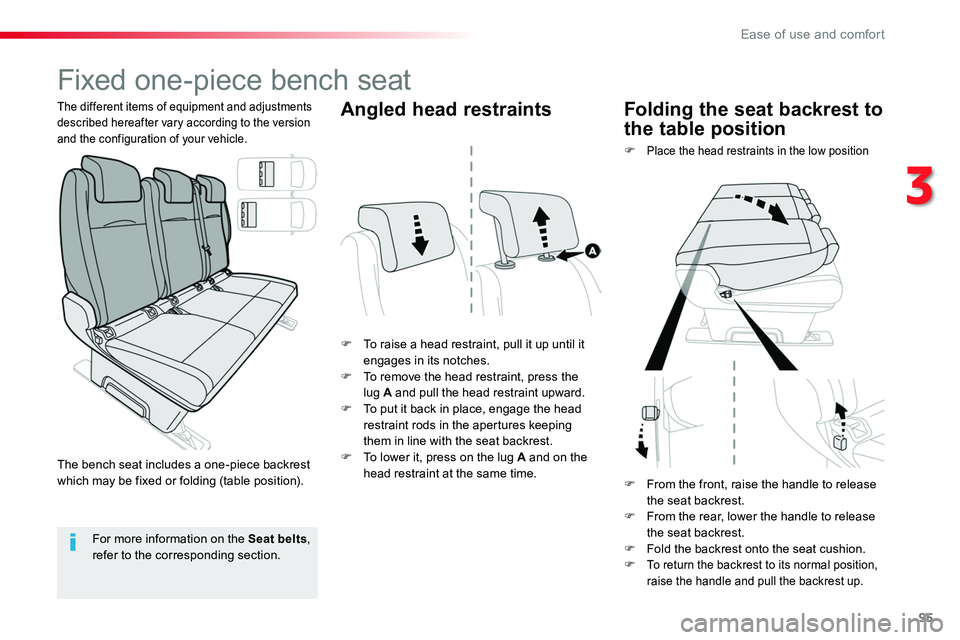
F To raise a head restraint, pull it up until it engages in its notches.F To remove the head restraint, press the lug A and pull the head restraint upward.F To put it back in place, engage the head restraint rods in the apertures keeping them in line with the seat backrest.F To lower it, press on the lug A and on the head restraint at the same time.
F Place the head restraints in the low position
The different items of equipment and adjustments described hereafter vary according to the version and the configuration of your vehicle.
Angled head restraintsFolding the seat backrest to
the table position
For more information on the Seat belts, refer to the corresponding section.
The bench seat includes a one-piece backrest which may be fixed or folding (table position).F From the front, raise the handle to release the seat backrest.F From the rear, lower the handle to release the seat backrest.F Fold the backrest onto the seat cushion.F To return the backrest to its normal position, raise the handle and pull the backrest up.
3
Ease of use and comfort
Page 98 of 504
98
Folding the backrest to the
table position
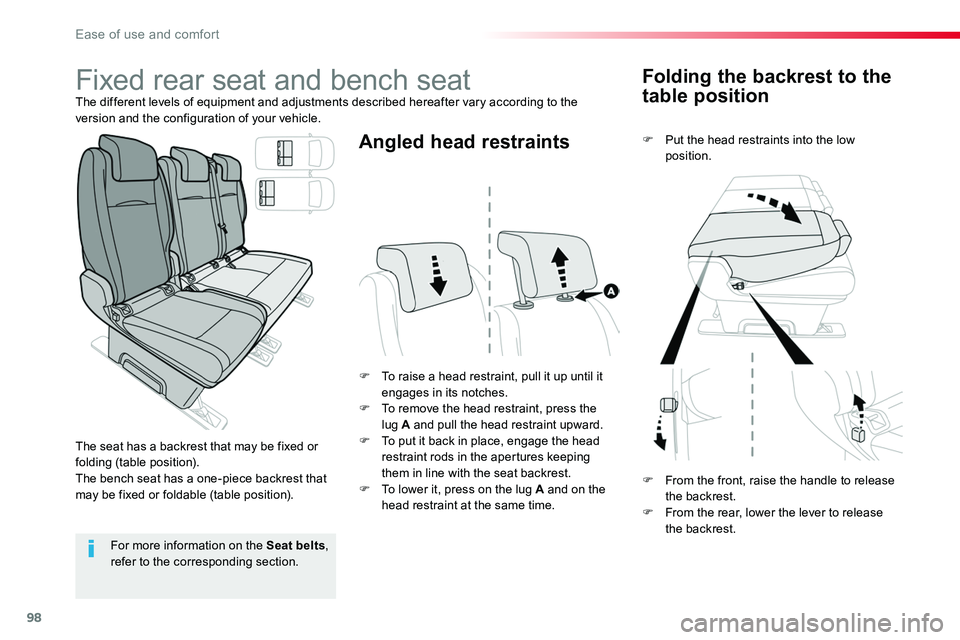
F Put the head restraints into the low position.
F To raise a head restraint, pull it up until it engages in its notches.F To remove the head restraint, press the lug A and pull the head restraint upward.F To put it back in place, engage the head restraint rods in the apertures keeping them in line with the seat backrest.F To lower it, press on the lug A and on the head restraint at the same time.
Angled head restraints
For more information on the Seat belts, refer to the corresponding section.
F From the front, raise the handle to release the backrest.F From the rear, lower the lever to release the backrest.
Fixed rear seat and bench seatThe different levels of equipment and adjustments described hereafter vary according to the version and the configuration of your vehicle.
The seat has a backrest that may be fixed or folding (table position).The bench seat has a one-piece backrest that may be fixed or foldable (table position).
Ease of use and comfort
Page 101 of 504
101
Head restraints
F To raise a head restraint, pull it up until it engages in its notch.F To remove it, press the lug A and pull the head restraint up.F To refit it, engage the head restraint rods in the apertures keeping them in line with the seat backrest.F To lower it, press on the lug A and on the head restraint at the same time.
Rear seat and bench seat on rails
The different equipment and adjustments described hereafter vary according to the version and configuration of your vehicle.
For more information on the Seat belts, refer to the corresponding section.
F To recline the backrest, raise the control (from the rear, lower the lever).F Release the control when the desired position is obtained.
Reclining the backrest
The reclining backrest can be adjusted to several positions.
The individual seat is always on the right and the bench seat on the left (facing for ward).The bench seat has two independent backrests.
3
Ease of use and comfort
Page 105 of 504
105
Captain seat(s) on rails
The different equipment and adjustments described hereafter vary according to the version and configuration of your vehicle.
F To raise a head restraint, pull it up until it engages in its notch.F To remove it press the lug A and pull the head restraint up.F To refit it, engage the head restraint rods in the apertures keping them in line with the seat backrest.F To lower it, press on the lug A and on the head restraint at the same time.
Head restraints
The armrest has notches.F Pull the armrest fully up.F Lower it fully down.F Raise the armrest to the desired position.
Ar mrest(s)
It can be placed forward facing or rearward facing.
The captain seat is fitted with a three-point inertia reel seat belt.
For more information on the Seat belts, refer to the corresponding section.
3
Ease of use and comfort
Page 143 of 504

143
Rear view mirror
Equipped with an anti-dazzle system, which darkens the mirror glass and reduces the nuisance to the driver caused by the sun, headlamps from other vehicles...
Manual model
AdjustmentF Adjust the mirror so that the glass is directed correctly in the "day" position.
In order to ensure optimum visibility during your manoeuvres, the mirror lightens automatically when reverse gear is engaged.
Day / night positionF Pull the lever to change to the "night" anti-dazzle position.F Push the lever to change to the normal "day" position.
Automatic "Electrochromatic rear-view mirror" model
This system automatically and progressively changes between the day and night uses by means of a sensor, which measures the light from the rear of the vehicle.
Conversation mirror
This mirror, placed on top of the central mirror, enables the driver or front passenger to observe all the rear seats.Fitted on its own ball joint, its manual adjustment is simple and provides a view of the rear interior of the vehicle.
It can also be adjusted for improved visibility during manoeuvres or when overtaking.
4
Lighting and visibility
Page 153 of 504
153
In the vehicle settings menu, activate/deactivate "Mood lighting".
With the touch screen
With the audio system
In the "Personalisation-configuration" menu, activate/deactivate "Ambiance lighting".
Programming
The activation, deactivation and brightness of the mood lighting can be set.
Interior mood
lighting
The dimmed passenger compartment lighting improves visibility in the vehicle when the light is poor.
At night, the front roof lighting and skyview® lighting (if fitted to your vehicle) come on automatically when the sidelamps are switched on.The interior mood lighting switches off automatically when the sidelamps are switched off.
Switching on
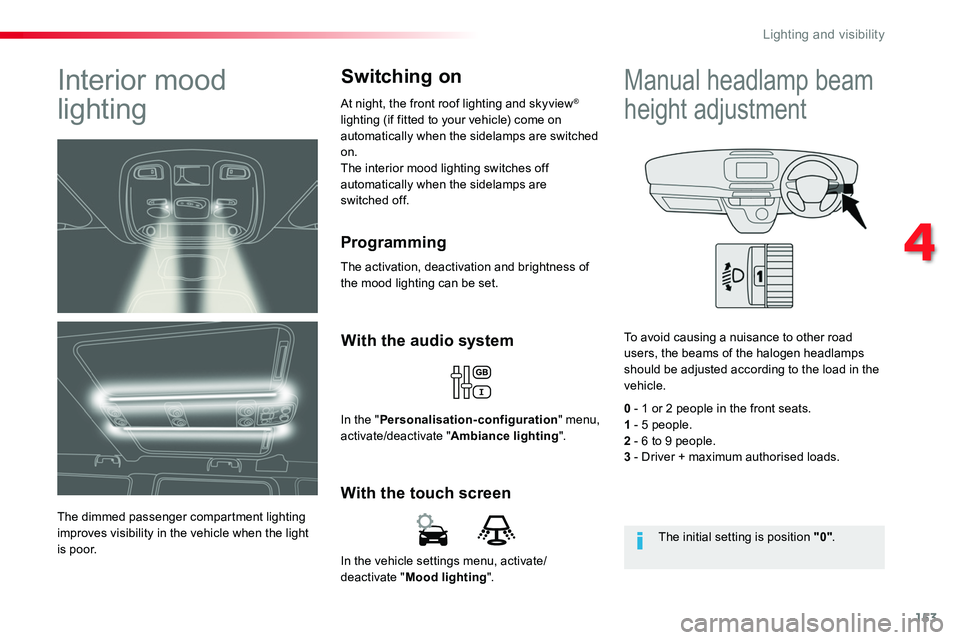
To avoid causing a nuisance to other road users, the beams of the halogen headlamps should be adjusted according to the load in the vehicle.
0 - 1 or 2 people in the front seats.1 - 5 people.2 - 6 to 9 people.3 - Driver + maximum authorised loads.
The initial setting is position "0".
Manual headlamp beam
height adjustment
4
Lighting and visibility
Page 164 of 504
164
Seat belts
Front seat beltsFastening
Unfastening
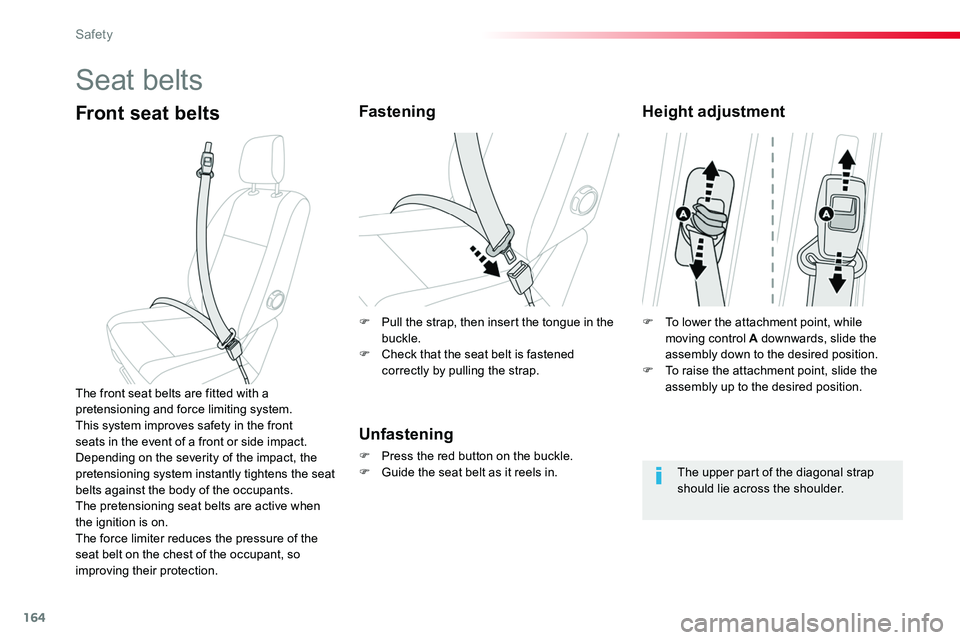
F Press the red button on the buckle.F Guide the seat belt as it reels in.
The front seat belts are fitted with a pretensioning and force limiting system.This system improves safety in the front seats in the event of a front or side impact. Depending on the severity of the impact, the pretensioning system instantly tightens the seat belts against the body of the occupants.The pretensioning seat belts are active when the ignition is on.The force limiter reduces the pressure of the seat belt on the chest of the occupant, so improving their protection.
Height adjustment
The upper part of the diagonal strap should lie across the shoulder.
F To lower the attachment point, while moving control A downwards, slide the assembly down to the desired position.F To raise the attachment point, slide the assembly up to the desired position.
F Pull the strap, then insert the tongue in the buckle.F Check that the seat belt is fastened correctly by pulling the strap.
Safety
Page 167 of 504
167
Advice
In the event of an impact
Depending on the nature and seriousness of the impact, the pretensioning device may be deployed before and independently of the airbags. Deployment of the pretensioners is accompanied by a slight discharge of harmless smoke and a noise, due to the activation of the pyrotechnic cartridge incorporated in the system.In all cases, the airbag warning lamp comes on.Following an impact, have the seat belts system checked, and if necessary replaced, by an authorized Toyota dealer or repairer,
or another duly qualified and equipped professional.
In order to be effective, a seat belt must:- be tightened as close to the body as possible,- be pulled in front of you with a smooth movement, checking that it does not twist,- be used to restrain only one person,- not bear any trace of cuts or fraying,- not be converted or modified to avoid affecting its performance.In accordance with current safety regulations, for all repairs on your vehicle's seat belts, go to a qualified workshop with the skills and equipment needed, which a Toyota dealer is able to provide.Have your seat belts checked regularly by an authorized Toyota dealer or repairer, or another duly qualified and equipped professional, particularly if the straps show signs of damage.
Clean the seat belt straps with soapy water or a textile cleaning product, sold by Toyota dealers.After folding or moving a seat or rear bench seat, ensure that the seat belt is positioned and reeled in correctly.
Recommendations for children
Use a suitable child seat if the passenger is less than 12 years old or shorter than one and a half metres.Never use the same seat belt to secure more than one person.Never allow a child to travel on your lap.For more information on Child seats, refer to the corresponding section.
The driver must ensure that passengers use the seat belts correctly and that they are all fastened before setting off.Wherever you are seated in the vehicle, always fasten your seat belt, even for short journeys.Do not interchange the seat belt buckles as they will not fulfill their role fully.The seat belts are fitted with an inertia reel permitting automatic adjustment of the length of the strap to your size. The seat belt is stowed automatically when not in use.Before and after use, ensure that the seat belt is reeled in correctly.The lower part of the strap must be positioned as low as possible on the pelvis.The upper part must be positioned in the hollow of the shoulder.The inertia reels are fitted with an automatic locking device which comes into operation in
the event of a collision, emergency braking or if the vehicle rolls over. You can release the device by pulling the strap firmly and then releasing it so that it reels in slightly.
5
Safety