Page 115 of 516

115
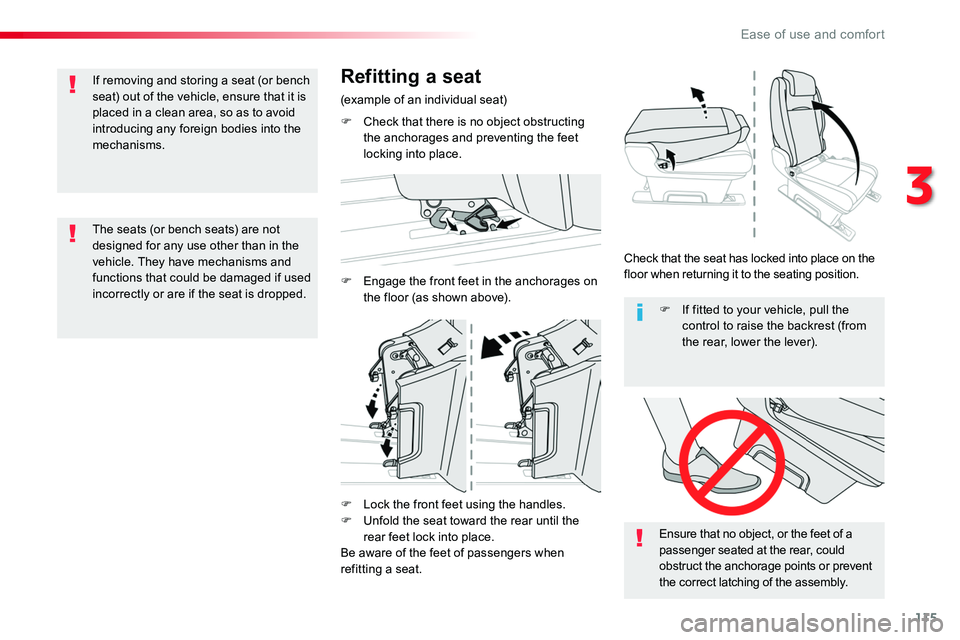
F Lock the front feet using the handles.F Unfold the seat toward the rear until the
rear feet lock into place.Be aware of the feet of passengers when refitting a seat.
Ensure that no object, or the feet of a passenger seated at the rear, could obstruct the anchorage points or prevent the correct latching of the assembly.
F If fitted to your vehicle, pull the control to raise the backrest (from the rear, lower the lever).
The seats (or bench seats) are not designed for any use other than in the vehicle. They have mechanisms and functions that could be damaged if used incorrectly or are if the seat is dropped.
If removing and storing a seat (or bench seat) out of the vehicle, ensure that it is placed in a clean area, so as to avoid introducing any foreign bodies into the mechanisms.
Refitting a seat
(example of an individual seat)
F Check that there is no object obstructing the anchorages and preventing the feet locking into place.
F Engage the front feet in the anchorages on the floor (as shown above).
Check that the seat has locked into place on the floor when returning it to the seating position.
3
Ease of use and comfort
Page 116 of 516

116
Precautions for the
seats and bench
seats
Following the various handling operations:- do not remove a head restraint without storing it and fixing it to a support,- check that the seat belts are always accessible to the passenger and easy to fasten,- a passenger must not take their seat without adjusting the seat's head restraint correctly and adjusting and fastening the seat belt.
Loading luggage or objects
behind the row 3 seat and
bench seat
If you want to load luggage onto the backrests in row 3 while in the table position, the backrests in row 2 must also be in the table position.
Labels
When driving, carrying a passenger is prohibited:- in row 3 if the backrest in front (row 2) is in the table position.
- in row 3 if the seat /bench in front (row 2) is in the fully folded position.- in rows 2 and 3, in the outer right seat, if the bench is in the fully folded position,- on the centre seat if the outer right seat is in the fully folded position.
Ease of use and comfort
Page 117 of 516
117
Fixed crew cab
This comprises a bench seat, seat belts, storage spaces (depending on equipment) and side windows.It is separated from the loading area by a high-strength partition offering comfort and safety.
Rear bench seatStorage boxes
If fitted to your vehicle, a storage box is provided at the front, under the bench seat.
This ergonomic bench seats three people.The two outer seats are equipped with ISOFIX mountings.
Storage boxes below the
seats
For more information on the ISOFIX mountings, refer to the corresponding section.
If fitted to your vehicle, they are located below the centre and outer left seat.For access to them from the cab, tip the seat cushion in question forward.
3
Ease of use and comfort
Page 123 of 516
123
Load retainer
On the floor, behind the front seats, a horizontal partition protects the driver and front passengers against the risk of load movement.Panel or glazed partitions separate the loading area from the cab.
High load retaining
net
Seating area
fittings
Depending on the vehicle's equipment, the various fittings below are located in the seating area.
This allows the use of the entire load space, up to the roof:- behind the front seats in row 1, when the rear seats (and bench seats) in rows 2 and 3 are folded or removed.- behind the rear seats and bench seats in row 2, when the rear seats (and bench seats) in row 3 are folded or removed.
Upper fixings
Lower fixings (behind row 1)
If your vehicle has fixed one-piece bench seats or seats and bench seats:
F Unclip the anchorage cover in the roof on
each side.
F On each side in row 2, insert the fixings in the floor anchorages (as shown above).
3
Ease of use and comfort
Page 124 of 516

124
Fit the net
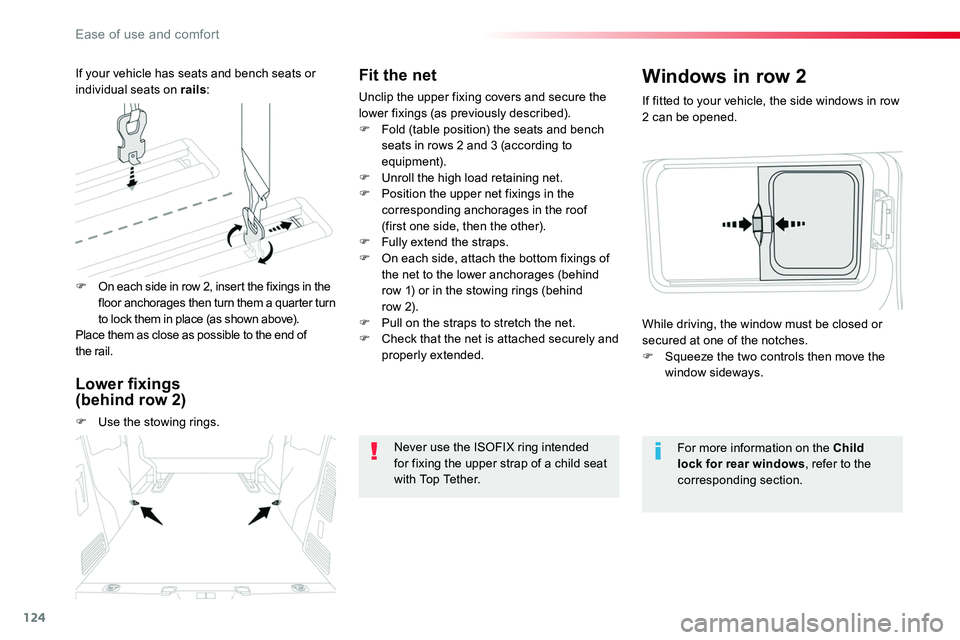
Unclip the upper fixing covers and secure the lower fixings (as previously described).F Fold (table position) the seats and bench seats in rows 2 and 3 (according to equipment).F Unroll the high load retaining net.F Position the upper net fixings in the corresponding anchorages in the roof (first one side, then the other).F Fully extend the straps.F On each side, attach the bottom fixings of the net to the lower anchorages (behind row 1) or in the stowing rings (behind row 2).F Pull on the straps to stretch the net.F Check that the net is attached securely and properly extended.
Never use the ISOFIX ring intended for fixing the upper strap of a child seat with Top Tether.
If fitted to your vehicle, the side windows in row 2 can be opened.
Windows in row 2
For more information on the Child lock for rear windows, refer to the corresponding section.
While driving, the window must be closed or secured at one of the notches.F Squeeze the two controls then move the window sideways.
F On each side in row 2, insert the fixings in the floor anchorages then turn them a quarter turn to lock them in place (as shown above).Place them as close as possible to the end of the rail.
If your vehicle has seats and bench seats or individual seats on rails:
Lower fixings (behind row 2)
F Use the stowing rings.
Ease of use and comfort
Page 155 of 516
155
To avoid causing a nuisance to other road users, the beams of the halogen headlamps should be adjusted according to the load in the vehicle.
0 - 1 or 2 people in the front seats.1 - 5 people.2 - 6 to 9 people.3 - Driver + maximum authorised loads.
The initial setting is position "0".The initial setting is position "0".
Manual headlamp beam height adjustment
To avoid causing a nuisance to other road users, the beams of the halogen headlamps should be adjusted according to the load in the vehicle.
0 Unladen.1 Part load.2 Medium load.3 Maximum authorised load.
4
Lighting and visibility
Page 166 of 516

166
Seat belts
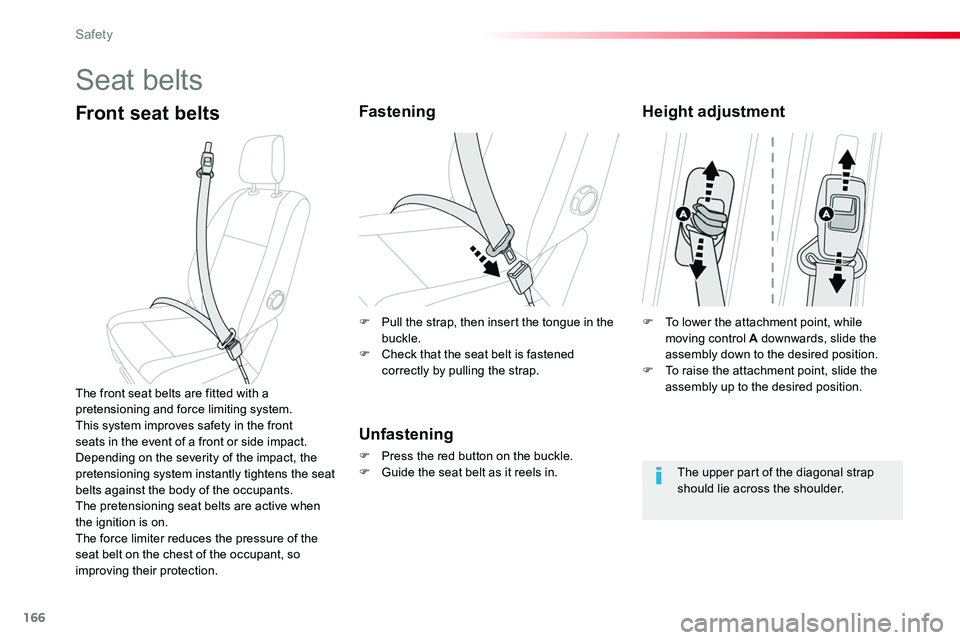
Front seat beltsFastening
Unfastening
F Press the red button on the buckle.F Guide the seat belt as it reels in.
The front seat belts are fitted with a pretensioning and force limiting system.This system improves safety in the front seats in the event of a front or side impact. Depending on the severity of the impact, the pretensioning system instantly tightens the seat belts against the body of the occupants.The pretensioning seat belts are active when the ignition is on.The force limiter reduces the pressure of the seat belt on the chest of the occupant, so improving their protection.
Height adjustment
The upper part of the diagonal strap should lie across the shoulder.
F To lower the attachment point, while moving control A downwards, slide the assembly down to the desired position.F To raise the attachment point, slide the assembly up to the desired position.
F Pull the strap, then insert the tongue in the buckle.F Check that the seat belt is fastened correctly by pulling the strap.
Safety
Page 167 of 516

167
2 seat front bench seat
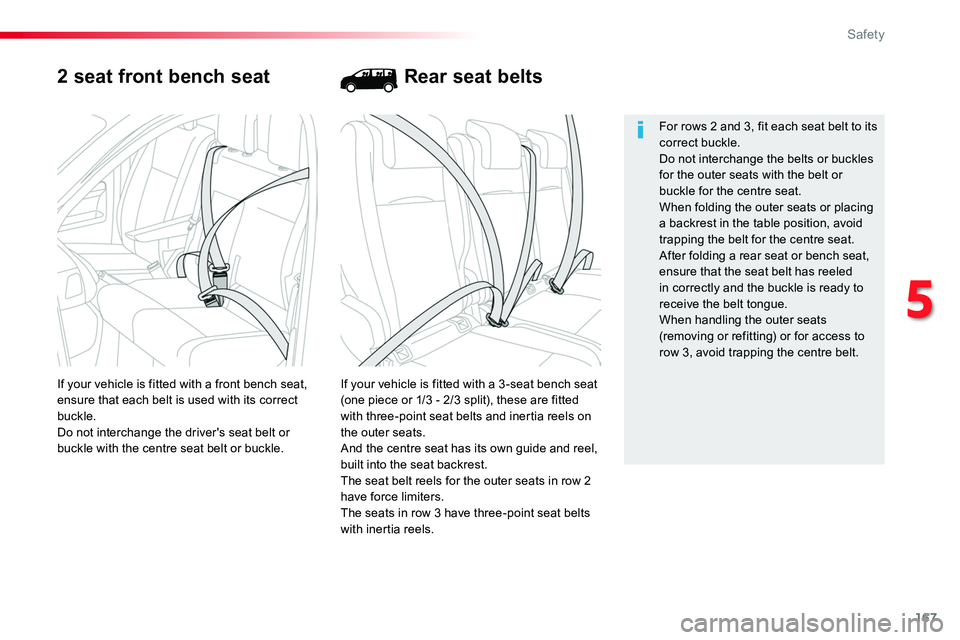
If your vehicle is fitted with a 3 -seat bench seat (one piece or 1/3 - 2/3 split), these are fitted with three-point seat belts and inertia reels on the outer seats.And the centre seat has its own guide and reel, built into the seat backrest.The seat belt reels for the outer seats in row 2 have force limiters.The seats in row 3 have three-point seat belts with inertia reels.
If your vehicle is fitted with a front bench seat, ensure that each belt is used with its correct buckle.Do not interchange the driver's seat belt or buckle with the centre seat belt or buckle.
For rows 2 and 3, fit each seat belt to its correct buckle.Do not interchange the belts or buckles for the outer seats with the belt or buckle for the centre seat.When folding the outer seats or placing
a backrest in the table position, avoid trapping the belt for the centre seat.After folding a rear seat or bench seat, ensure that the seat belt has reeled in correctly and the buckle is ready to receive the belt tongue.When handling the outer seats (removing or refitting) or for access to row 3, avoid trapping the centre belt.
Rear seat belts
5
Safety