Page 284 of 516

284
Topping-up the AdBlue®
Filling the AdBlue® tank is an operation included in every routine service on your vehicle by an authorized Toyota dealer or repairer, or another duly qualified and equipped professional.Nevertheless, given the capacity of the tank, it may be necessary to top-up the fluid between services, more particularly if an alert (warning lamps and a message) signals the requirement.You can go to an authorized Toyota dealer or repairer, or another duly qualified and equipped professional.If you envisage topping-up yourself, please read the following warnings carefully.
Precautions in use
Keep AdBlue® out of the reach of children, in its original bottle.Never transfer AdBlue® to another container: it would lose its purity.
Use only AdBlue® fluid that meets the ISO 22241 standard.
Never dilute AdBlue® with water.Never pour AdBlue® into the Diesel fuel tank.
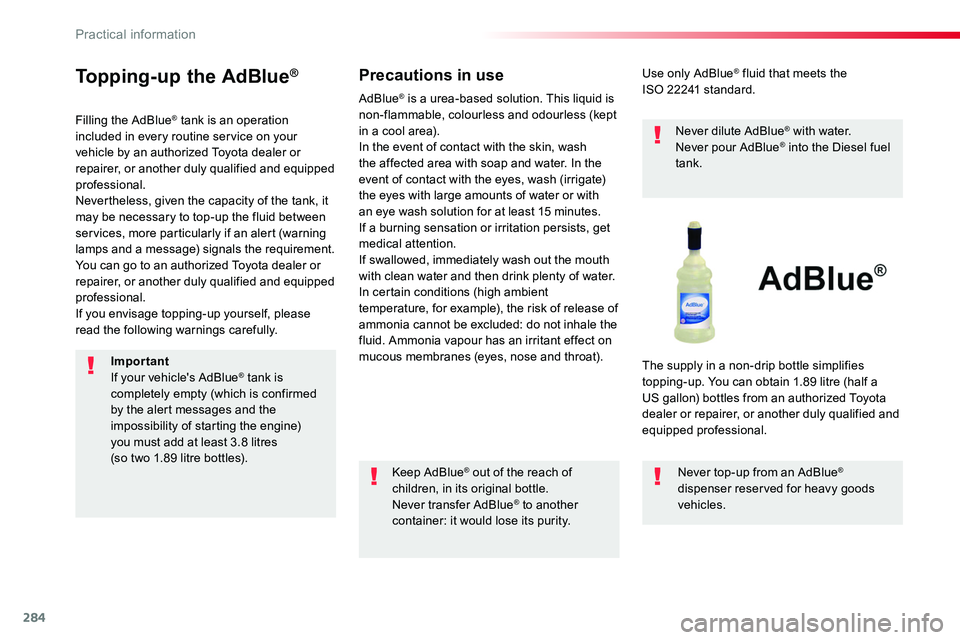
The supply in a non-drip bottle simplifies topping-up. You can obtain 1.89 litre (half a US gallon) bottles from an authorized Toyota dealer or repairer, or another duly qualified and equipped professional.
Never top-up from an AdBlue® dispenser reserved for heavy goods vehicles.
AdBlue® is a urea-based solution. This liquid is non-flammable, colourless and odourless (kept in a cool area).In the event of contact with the skin, wash the affected area with soap and water. In the event of contact with the eyes, wash (irrigate) the eyes with large amounts of water or with an eye wash solution for at least 15 minutes. If a burning sensation or irritation persists, get medical attention.If swallowed, immediately wash out the mouth with clean water and then drink plenty of water.In certain conditions (high ambient temperature, for example), the risk of release of ammonia cannot be excluded: do not inhale the fluid. Ammonia vapour has an irritant effect on mucous membranes (eyes, nose and throat).ImportantIf your vehicle's AdBlue® tank is completely empty (which is confirmed by the alert messages and the impossibility of starting the engine) you must add at least 3.8 litres (so two 1.89 litre bottles).
Practical information
Page 287 of 516
287
Warning triangle (stowing)
Before leaving your vehicle to set up and install the triangle, switch on the hazard warning lamps and put on your
high visibility vest.
This safety equipment should be used in addition to the hazard warning lamps.Its presence in the vehicle is mandatory.
Placing the triangle in the
road
Refer to the manufacturer's instructions on unfolding and assembly supplied with the triangle.
F Place the triangle behind the vehicle, as required by the legislation in force in your c o unt r y.
The triangle is available as an accessory; contact an authorized Toyota dealer or repairer, or another duly qualified and equipped professional.
Tool box
Access
The tool box is located under the left-hand front seat.
As a safety measure, the bars 1 and 2
prevent the box escaping from its housing, if it is not correctly secured.
8
In the event of a breakdown
Page 295 of 516
295
Checking / adjusting tyre
pressures
You can also use the compressor without injecting any product, to check and if necessary adjust your tyre pressures.
F Turn the selector A to the "Air" position.
F Connect the compressor's electrical connector to the vehicle's 12 V socket.F Start the vehicle and let the engine run.F Adjust the pressure using the compressor (to inflate: switch B in position "I"; to deflate: switch B in position "O" and press button C), according to the vehicle's tyre pressure label.F Remove the kit then stow it.
Should the pressure of one or more tyres be adjusted, it is necessary to reinitialise the tyre pressure warning system.For more information on Tyre Pressure Warning System, refer to the corresponding section.
F Uncoil the black pipe H fully.F Connect the black pipe to the tyre valve.
8
In the event of a breakdown
Page 299 of 516

299
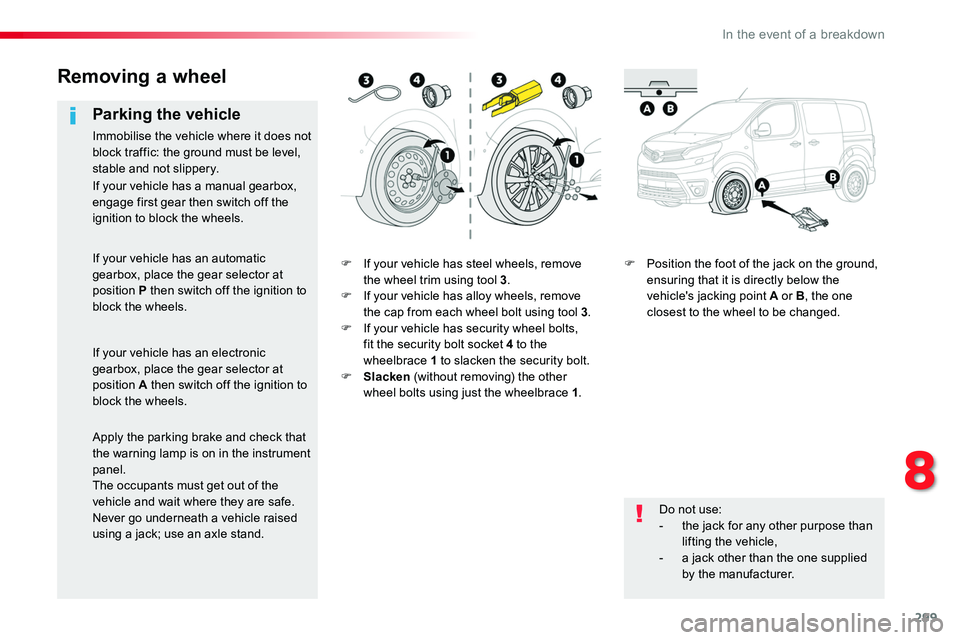
F If your vehicle has steel wheels, remove the wheel trim using tool 3.F If your vehicle has alloy wheels, remove the cap from each wheel bolt using tool 3.F If your vehicle has security wheel bolts, fit the security bolt socket 4 to the wheelbrace 1 to slacken the security bolt.F Slacken (without removing) the other wheel bolts using just the wheelbrace 1.
F Position the foot of the jack on the ground, ensuring that it is directly below the vehicle's jacking point A or B, the one closest to the wheel to be changed.
Removing a wheel
Parking the vehicle
Immobilise the vehicle where it does not block traffic: the ground must be level, stable and not slippery.
Do not use:- the jack for any other purpose than lifting the vehicle,- a jack other than the one supplied by the manufacturer.
If your vehicle has a manual gearbox, engage first gear then switch off the ignition to block the wheels.
If your vehicle has an automatic gearbox, place the gear selector at position P then switch off the ignition to block the wheels.
If your vehicle has an electronic gearbox, place the gear selector at position A then switch off the ignition to block the wheels.
Apply the parking brake and check that the warning lamp is on in the instrument panel.The occupants must get out of the vehicle and wait where they are safe.Never go underneath a vehicle raised using a jack; use an axle stand.
8
In the event of a breakdown
Page 302 of 516

302
F If your vehicle is so equipped, tighten the security bolt using the wheelbrace 1 fitted with the security socket 4.F Tighten the other bolts using the wheelbrace 1 o n l y.F Stow the tools in the tool box.
The tyre inflation pressures are given on this label.
After changing a wheel
Stow the punctured wheel in the carrier.Have the tightening of the bolts and the pressure of the spare wheel checked by an authorized Toyota dealer or repairer, or another duly qualified and equipped professional without delay.Have the punctured wheel repaired and refitted to the vehicle as soon as possible.
If your vehicle has tyre pressure warning system, check the tyre pressures and reinitialise the system.
Tyre Pressure Warning System (TPWS)
The steel spare wheel does not have a sensor.
Wheel with wheel trim
When refitting the wheel, refit the wheel trim by placing its cut-out at the valve, and press round its edge with the palm of your hand.
For more information on Under-inflation detection, refer to the corresponding section.
In the event of a breakdown
Page 307 of 516
307
Be aware that the area behind the right-hand headlamp (facing for wards) may be hot, with the risk of burns (over flow p i p e).
Faster flashing of a direction indicator
warning lamp (left or right) indicates a failed bulb on that side.
Direction indicators
(halogen headlamps)
Ty p e B, PY21W-21W (amber)
Main beam headlamps
(halogen headlamps)
Ty p e C, H1-55W
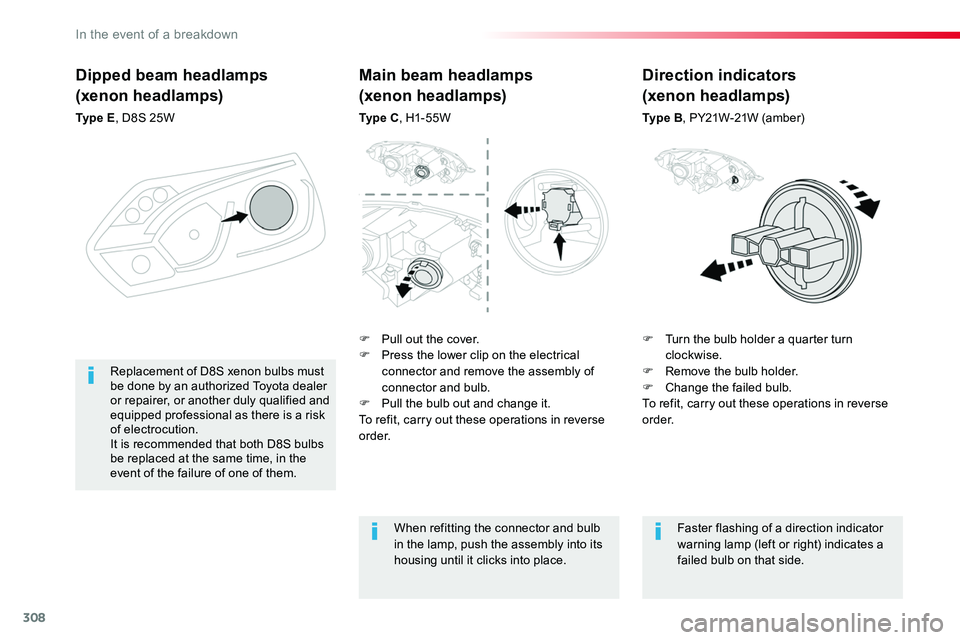
F Pull out the cover.F Press the lower clip on the electrical connector and remove the assembly of connector and bulb.F Pull the bulb out and change it.To refit, carry out these operations in reverse o r d e r.
F Turn the bulb holder a quarter turn clockwise.F Remove the bulb holder.F Change the failed bulb.To refit, carry out these operations in reverse o r d e r.
8
In the event of a breakdown
Page 308 of 516

308
Dipped beam headlamps
(xenon headlamps)
Ty p e E, D8S 25W
F Turn the bulb holder a quarter turn clockwise.F Remove the bulb holder.F Change the failed bulb.To refit, carry out these operations in reverse o r d e r.
Replacement of D8S xenon bulbs must be done by an authorized Toyota dealer or repairer, or another duly qualified and equipped professional as there is a risk of electrocution.It is recommended that both D8S bulbs be replaced at the same time, in the event of the failure of one of them.
Main beam headlamps
(xenon headlamps)
Ty p e C, H1-55W
When refitting the connector and bulb in the lamp, push the assembly into its housing until it clicks into place.
Faster flashing of a direction indicator warning lamp (left or right) indicates a failed bulb on that side.
Direction indicators
(xenon headlamps)
Ty p e B, PY21W-21W (amber)
F Pull out the cover.F Press the lower clip on the electrical connector and remove the assembly of connector and bulb.F Pull the bulb out and change it.To refit, carry out these operations in reverse
o r d e r.
In the event of a breakdown
Page 326 of 516

326
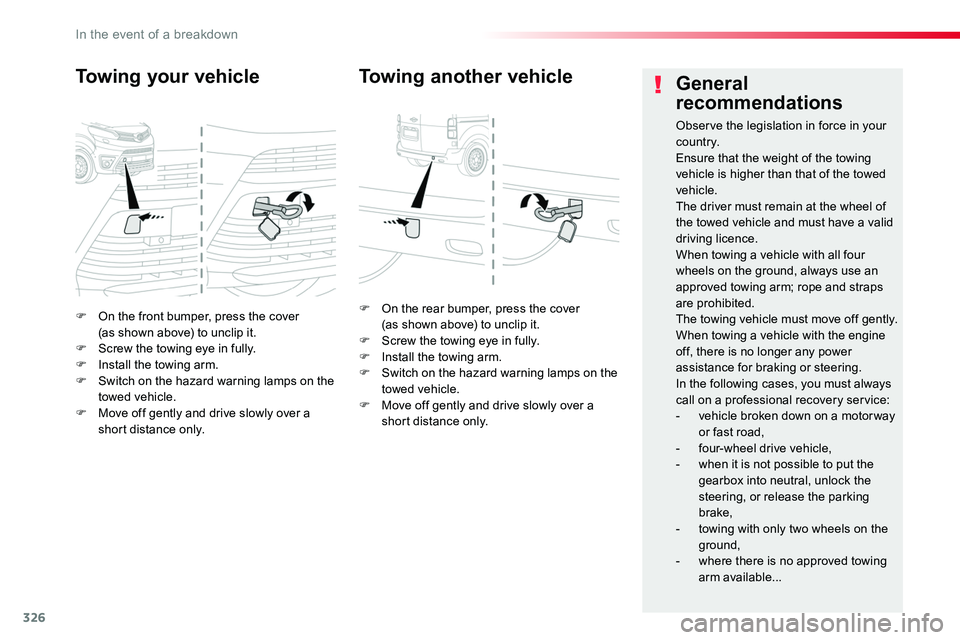
F On the front bumper, press the cover (as shown above) to unclip it.F Screw the towing eye in fully.F Install the towing arm.F Switch on the hazard warning lamps on the towed vehicle.F Move off gently and drive slowly over a short distance only.
Towing your vehicle
F On the rear bumper, press the cover (as shown above) to unclip it.F Screw the towing eye in fully.F Install the towing arm.F Switch on the hazard warning lamps on the towed vehicle.F Move off gently and drive slowly over a short distance only.
Towing another vehicleGeneral
recommendations
Observe the legislation in force in your c o unt r y.Ensure that the weight of the towing vehicle is higher than that of the towed vehicle.The driver must remain at the wheel of the towed vehicle and must have a valid driving licence.When towing a vehicle with all four wheels on the ground, always use an approved towing arm; rope and straps are prohibited.The towing vehicle must move off gently.When towing a vehicle with the engine off, there is no longer any power assistance for braking or steering.In the following cases, you must always call on a professional recovery service:- vehicle broken down on a motor way or fast road,- four-wheel drive vehicle,- when it is not possible to put the gearbox into neutral, unlock the
steering, or release the parking brake,- towing with only two wheels on the
ground,- where there is no approved towing arm available...
In the event of a breakdown