Page 163 of 820

PRIUS_OM_OM47B89U_(U)
1632. Instrument cluster
2
Instrument cluster
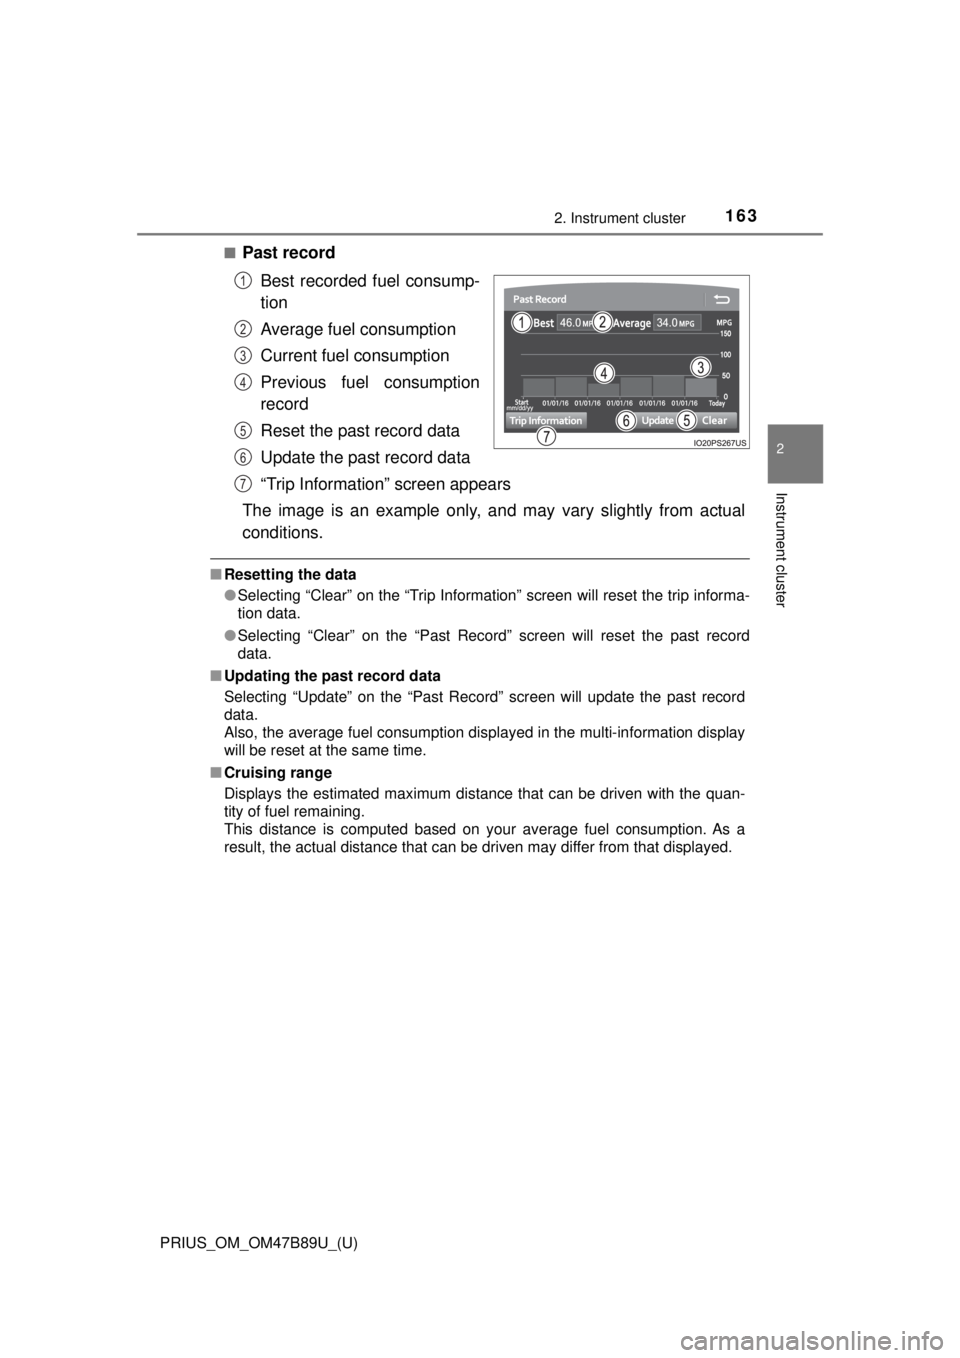
■Past recordBest recorded fuel consump-
tion
Average fuel consumption
Current fuel consumption
Previous fuel consumption
record
Reset the past record data
Update the past record data
“Trip Information” screen appears
The image is an example only, an d may vary slightly from actual
conditions.
■ Resetting the data
●Selecting “Clear” on the “Trip Information” screen will reset the trip informa-
tion data.
● Selecting “Clear” on the “Past Record” screen will reset the past record
data.
■ Updating the past record data
Selecting “Update” on the “Past Record” screen will update the past record
data.
Also, the average fuel consumption displa yed in the multi-information display
will be reset at the same time.
■ Cruising range
Displays the estimated maximum distance that can be driven with the quan-
tity of fuel remaining.
This distance is computed based on your average fuel consumption. As a
result, the actual distance that can be driven may differ from that displayed.
1
2
3
4
5
6
7
Page 435 of 820
435
PRIUS_OM_OM47B89U_(U)
5-2. Setup
5
Audio system
Audio settings
Press the “SETUP” button.
Select “Audio” on the “Setup” screen.Number of Radio Presets
Select the number of radio
preset stations.
Display Cover Art on/off.
Automatic Sound Levelizer
Select “Automatic Sound Levelizer” on the “Audio Settings” screen.
Select a screen button for the
desired setting.
■ About Automatic Sou nd Leveliser (ASL)
ASL automatically adjusts the volume and tone quality according to the vehi-
cle speed.
Settings are available for adjusting the radio operation, cover
art, etc.
Screen for audio settings
1
2
1
2
3
Automatic Sound Leveliser (ASL)
1
2
Page 442 of 820
442
PRIUS_OM_OM47B89U_(U)
5-4. Using the radio
Radio operation
Pressing the “AUDIO” button displays the audio control screen from
any screens of the selected source.
Audio source selection screen
appears
Preset stations
Select to display RBDS text
messages
*
Scanning for receivable station
Select to display a list of receiv-
able stations
Setting the sound ( →P. 441)
*:FM only
Tune in to the desired station us ing one of the following methods.
■Seek tuning
Press the “>” or “<” button on “SEEK•TRACK”.
The radio will begin seeking up or down for a station of the nearest
frequency and will stop when a station is found.
■Manual tuning
Turn the “TUNE•SCROLL” knob.
■Preset stations
Select the desired preset station.
Select “AM” or “FM” on the audio source selection screen to
begin listening to the radio.
Audio control screen
1
2
3
4
5
6
Selecting a station
Page 443 of 820
PRIUS_OM_OM47B89U_(U)
4435-4. Using the radio
5
Audio system
Search for desired stations by turning the “TUNE•SCROLL” knob or
pressing the “>” or “<” button on “SEEK•TRACK”.
Select “(add new)”.
To change the preset station to a different one, select and hold the preset
station.
Select “Yes”.
Select “OK” after setting the new preset station.
■Refreshing the station list
Select “Refresh” on the “Station List” screen.
To cancel the refresh, select “Cancel Refresh”.
■ Reception sensitivity
Maintaining perfect radio reception at all times is difficult due to the continu-
ally changing position of the antenna, differences in signal strength and sur-
rounding objects, such as trains, transmitters, etc.
Setting station presets
1
2
3
4
Page 453 of 820

PRIUS_OM_OM47B89U_(U)
4535-6. Using an external device
5
Audio system
■iPod problems
To resolve most problems encountered when using your iPod, disconnect
your iPod from the vehicle iPod connection and reset it. For instructions on
how to reset your iPod, refer to your iPod Owner’s Manual.
■ Error messages
If an error message is displayed, refer to the following table and take the
appropriate measures. If the problem is not rectified, take the vehicle to your
Toyota dealer.
MessageCause/Correction procedures
“Connection error. Please
consult your Owner’s
Manual for instructions on
how to connect the iPod.”
This indicates a problem in the iPod or its con-
nection.
“There are no songs avail-
able for playback. Please
add compatible files to
your iPod.”
This indicates that there is no music data in
the iPod.
“Please check the iPod
firmware version.”
This indicates that the software version is not
compatible.
Please check the compatible models.
(→P. 454)
“iPod authorization
unsuccessful.”This indicates that the display audio system
failed to authorize the iPod.
Please check your iPod.
Page 490 of 820

490
PRIUS_OM_OM47B89U_(U)
5-9. Bluetooth® phone
Contact/Call History Settings
Display the “Phone/Message Settings” screen. (→P. 489)
Select “Contact/Call History Settings”.
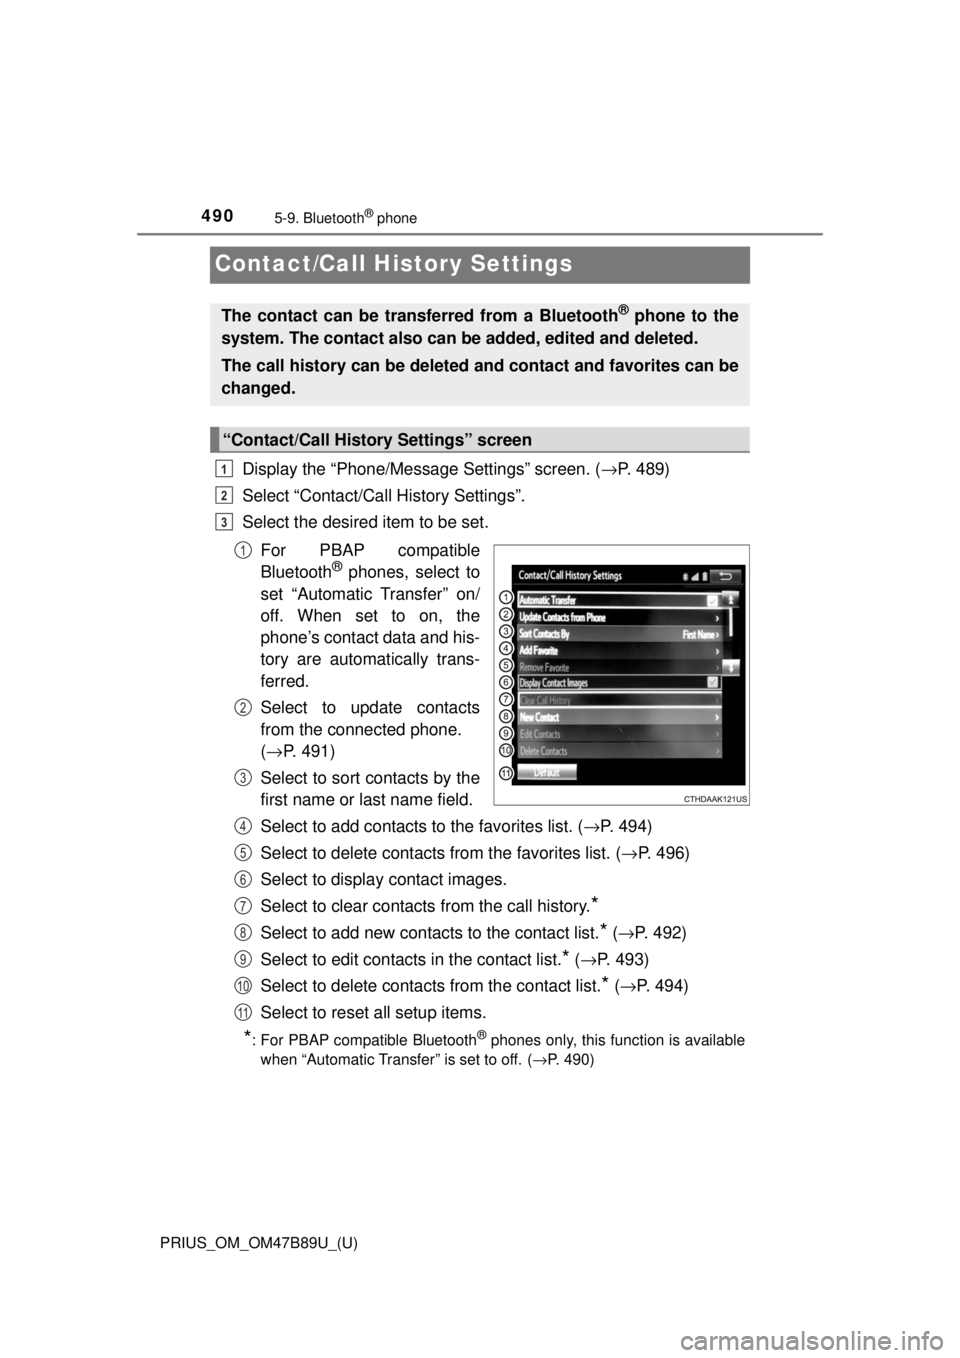
Select the desired item to be set.
For PBAP compatible
Bluetooth
® phones, select to
set “Automatic Transfer” on/
off. When set to on, the
phone’s contact data and his-
tory are automatically trans-
ferred.
Select to update contacts
from the connected phone.
( → P. 491)
Select to sort contacts by the
first name or last name field.
Select to add contacts to the favorites list. ( →P. 494)
Select to delete contacts from the favorites list. ( →P. 496)
Select to display contact images.
Select to clear contacts from the call history.
*
Select to add new contacts to the contact list.* ( → P. 492)
Select to edit contacts in the contact list.
* (→ P. 493)
Select to delete contacts from the contact list.
* ( → P. 494)
Select to reset all setup items.
*: For PBAP compatible Bluetooth® phones only, this function is available
when “Automatic Transfer” is set to off.
( →P. 490)
The contact can be transferred from a Bluetooth® phone to the
system. The contact also can be added, edited and deleted.
The call history can be deleted and contact and favorites can be
changed.
“Contact/Call History Settings” screen
1
2
3
1
2
3
4
5
6
7
8
9
10
11
Page 592 of 820

592
PRIUS_OM_OM47B89U_(U)
7-2. Maintenance
■Repair and replacement
It is recommended that genuine Toyota parts be used for repairs to ensure
performance of each system. If non-Toyota parts are used in replacement or if
a repair shop other than a Toyota dealer performs repairs, confirm the war-
ranty coverage.
■ Resetting the message indicating maintenance is required (U.S.A. only)
After the required maintenance is preformed according to the maintenance
schedule, please reset the message.
To reset the message, follow the procedures described below:
While the hybrid system is operating, switch the multi-information display to
the screen. ( →P. 139)
Press
or of the meter control switches, select “ (Vehicle
Settings)”, and then press .
Press
or of the meter control switches, select “Maintenance Sys-
tem”, and then press .
Press
or of the meter control switches, select “Oil Maintenance”,
and then press .
Press
or of the meter control switches, select “Yes”, and then press
.
■ Allow inspection and repairs to be performed by a Toyota dealer
●Toyota technicians are well-trained specialists and are kept up to date with
the latest service information. They are well informed about the operation of
all systems on your vehicle.
● Keep a copy of the repair order. It proves that the maintenance that has
been performed is under warranty cove rage. If any problem should arise
while your vehicle is under warranty, your Toyota dealer will promptly take
care of it.
A message will be displayed when the
reset procedure has been completed.
1
2
3
4
5
Page 624 of 820

624
PRIUS_OM_OM47B89U_(U)
7-3. Do-it-yourself maintenance
■Situations in which the tire pressure warning system may not oper-
ate properly
●In the following cases, the tire pressure warning system may not operate
properly.
• If non-genuine Toyota wheels are used.
• When a replacement tire is used , the system may not operate cor-
rectly due to the structure of the replacement tire.
• A tire has been replaced with a tire that is not of the specified size.
• Tire chains etc. are equipped.
• An auxiliary-supported run- flat tire is equipped.
• If a window tint that affects the radio wave signals is installed.
• If there is a lot of snow or ice on the vehicle, particularly around the wheels or wheel housings.
• If the tire inflation pressure is extremely higher than the specified level.
• If wheel without the tire pressure warning valve and transmitter is
used.
• If the ID code on the tire pressure warning valves and transmitters is not registered in the tire pressure warning computer.
●Performance may be affected in the following situations.
• Near a TV tower, electric power plant, gas station, radio station, largedisplay, airport or other facility that generates strong radio waves or
electrical noise
• When carrying a portable radio, cellular phone, cordless phone or other wireless communication device
●When the vehicle is parked, the time taken for the warning to start or go
off could be extended.
●When tire inflation pressure declines rapidly for example when a tire has
burst, the warning may not function.
■The initialization operation
●Make sure to carry out in itialization after adjusting the tire inflation pres-
sure.
Also, make sure the tires are cold be fore carrying out initialization or tire
inflation pressure adjustment.
●If you have accidentally turned the po wer switch off during initialization,
it is not necessary to press the reset switch again as initialization will
restart automatically when the powe r switch has been turned to ON
mode for the next time.
●If you accidentally press the reset s witch when initialization is not neces-
sary, adjust the tire inflation pressu re to the specified level when the
tires are cold, and conduct initialization again.