Page 128 of 292

128
1. VOICE COMMAND SYSTEM OPERATION
MIRAI_Navi_USA_OM62029U_17CY
Registered POIs, registered names in the
contacts list etc., can be said in the place
of the “<>” next to the commands.
( P.131)
For example: Say “Find a restaurant” ,
“Call John Smith” etc.
If a desired outcome is not shown, or if no
selections are available, perform one of
the following to return to the previous
screen:
•Say “Go back” .
•Select .
To cancel voice recognition, select ,
say
“Cancel”, or press and hold the talk
switch.
To perform the voice command operation
again, select “Start Over” or say “Start
over”.
To suspend voice command operation,
select “Pause”. To resume the voice com-
mand operation, select “Resume” or
press the talk switch.
Selecting “Help” or saying “Help”
prompts the voice command system to
offer examples of commands and oper-
ation methods.INFORMATION
● If the system does not respond or the
confirmation screen does not disappear,
press the talk switch and try again.
● If a speech command cannot be recog-
nized 3 consecutive times, the system
suggest the way to increase the voice
recognition performance. ( P.129)
● The amount of spoken feedback
received from the system while using
the voice command system (voice rec-
ognition prompts) can be changed on
the voice settings screen. ( P. 6 4 )
● Some voice guidance can be canceled
by setting voice prompts to off. Use this
setting when it is desirable to say a com-
mand immediately after pressing the talk
switch and hearing a beep.
Page 185 of 292

185
2. SETUP
PHONE
7
MIRAI_Navi_USA_OM62029U_17CY
■EDITING A VOICE TAG
1Select “Edit”.
2Select the desired contact to edit.
3Follow the steps in “REGISTERING A
VOICE TAG” from “STEP 3”. ( P.184)
■DELETING THE VOICE TAG
1Select “Delete” .
2Select the desired contact and select
“Delete”.
3Select “Yes” when the confirmation
screen appears.
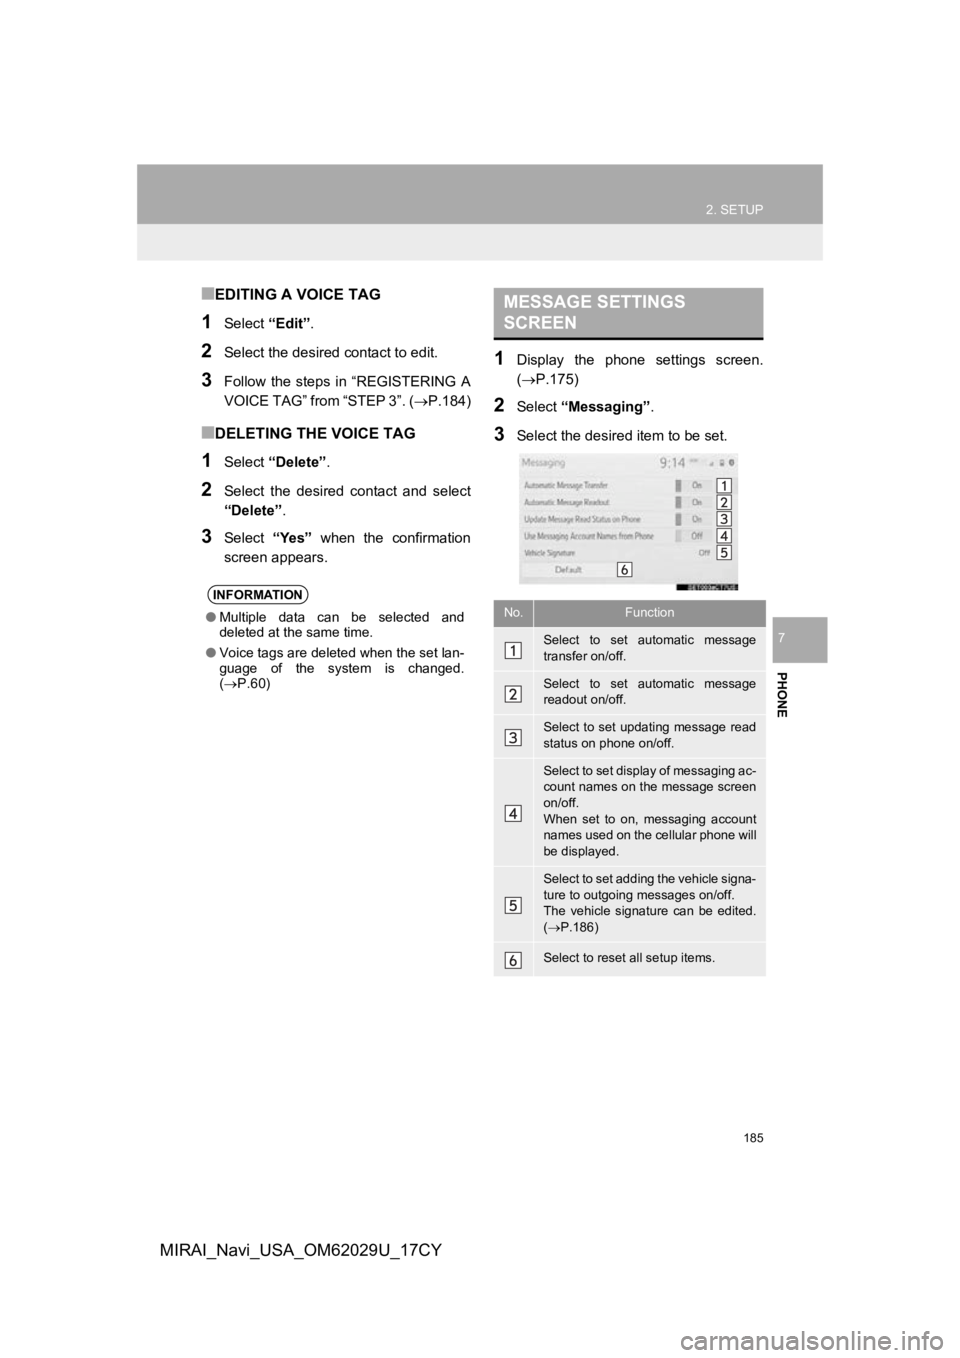
1Display the phone settings screen.
(P.175)
2Select “Messaging” .
3Select the desired item to be set.
INFORMATION
●Multiple data can be selected and
deleted at the same time.
● Voice tags are deleted when the set lan-
guage of the system is changed.
( P.60)
MESSAGE SETTINGS
SCREEN
No.Function
Select to set automatic message
transfer on/off.
Select to set automatic message
readout on/off.
Select to set updating message read
status on phone on/off.
Select to set display of messaging ac-
count names on the message screen
on/off.
When set to on, messaging account
names used on the cellular phone will
be displayed.
Select to set adding the vehicle signa-
ture to outgoing messages on/off.
The vehicle signature can be edited.
( P.186)
Select to reset all setup items.
Page 191 of 292

191
3. WHAT TO DO IF...
PHONE
7
MIRAI_Navi_USA_OM62029U_17CY
In other situations
SymptomLikely causeSolution
Page
Cellular
phoneThis
system
The Bluetooth® con-
nection status is dis-
played at the top of
the screen each time
the power switch is
turned to ACCESSO-
RY or ON mode.
Connection confir-
mation display on
this system is set to
on.To turn off the display,
set connection confir-
mation display on this
system to off.
52
Even though all con-
ceivable measures
have been taken, the
symptom status does
not change.
The cellular phone
is not close enough
to this system.Bring the cellular
phone closer to this
system.
Radio interference
has occurred.Turn off Wi-Fi® devices
or other devices that
may emit radio waves.
The cellular phone
is the most likely
cause of the symp-
tom.
Turn the cellular phone
off, remove and rein-
stall the battery pack,
and then restart the
cellular phone.
Enable the cellular
phone’s Bluetooth®
connection.
Disable the Wi-Fi®
connection of the cellu-
lar phone.
Stop the cellular
phone’s security soft-
ware and close all ap-
plications.
Before using an appli-
cation installed on the
cellular phone, careful-
ly check its source and
how its operation might
affect this system.
: For details, refer to the owner’s manual that came with the ce llular phone.
Page 206 of 292

206
1. BASIC OPERATION
MIRAI_Navi_USA_OM62029U_17CY
1Display the traffic incidents screen.
(P.204)
2Select “Predictive Traffic Map” .
3Scroll the map to the desired point and
set the time of predictive traffic infor-
mation.
The time of the predictive traffic informa-
tion can be changed in 15-minute intervals
up to +45 minutes.
“<”: Moves the time forward 15 minutes.
“
>”: Moves the time back 15 minutes.
1Display the traffic incidents screen.
( P.204)
2Select “My Traffic Routes” .
If map data has been updated, a confirma-
tion screen will be displayed. Select “OK”
or “Do Not Tell Me Again” .
3Select the desired route.
“Options”: Select to add, edit or delete
personal routes.( P.247)
If routes have not been registered yet, a
confirmation screen will be displayed.
Select “Yes” to register the route.
4Select the desired traffic information.
5Check that the traffic information is dis-
played.
“Detail” : Select to display detailed traffic
information.
DISPLAYING PREDICTIVE
TRAFFIC INFORMATION
A map with predictive traffic data can
be displayed.MY TRAFFIC ROUTES
Traffic information along the saved
routes can be displayed. To use this
function, it is necessary to register a
route. ( P.247)
Page 217 of 292

217
2. DESTINATION SEARCH
NAVIGATION SYSTEM
8
MIRAI_Navi_USA_OM62029U_17CY
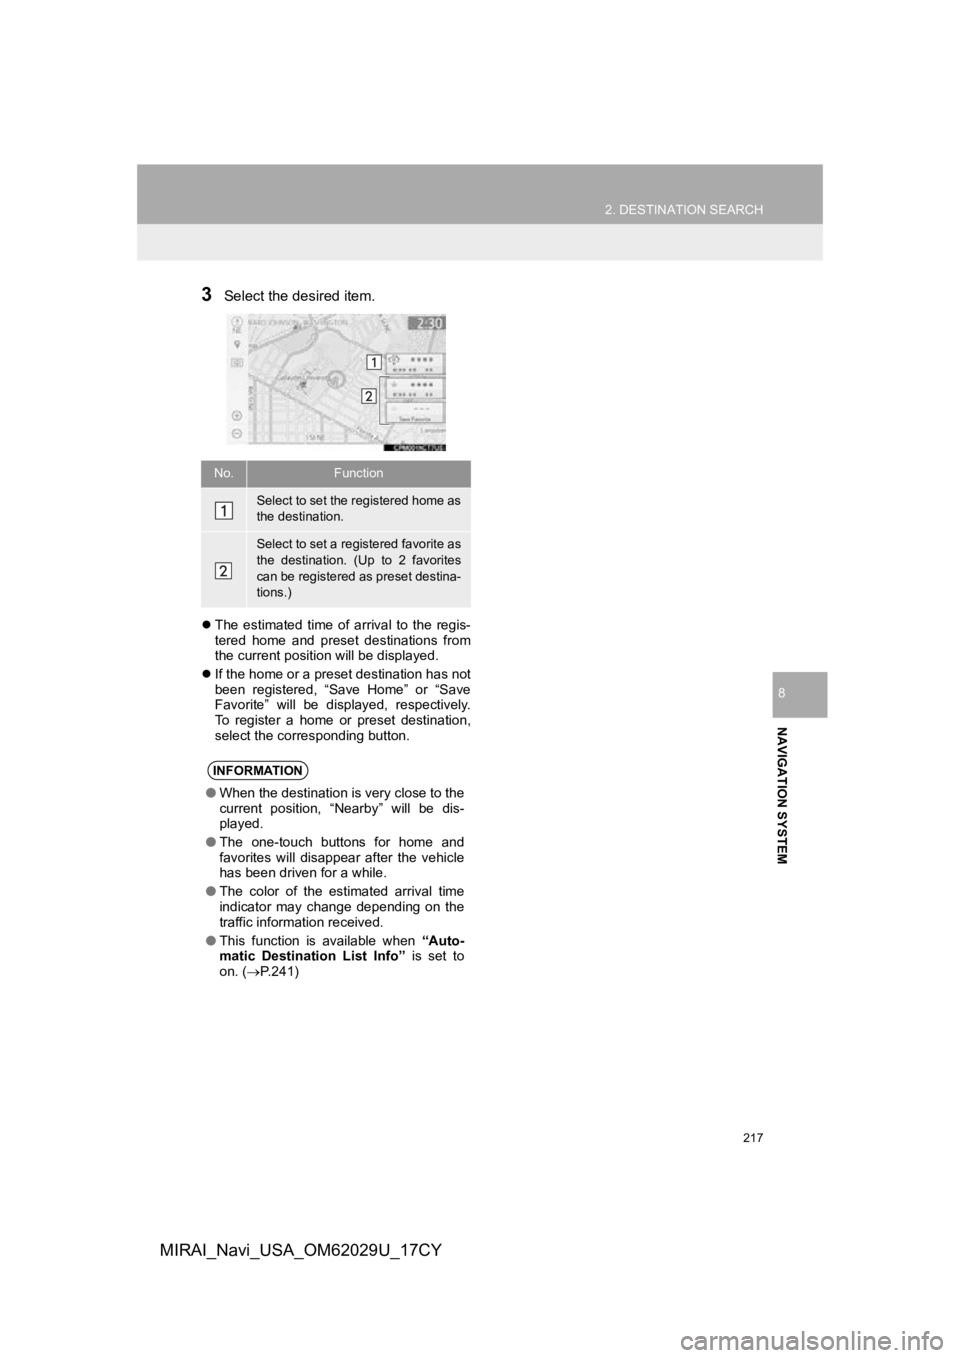
3Select the desired item.
The estimated time of arrival to the regis-
tered home and preset destinations from
the current position will be displayed.
If the home or a preset destination has not
been registered, “Save Home” or “Save
Favorite” will be displayed, respectively.
To register a home or preset destination,
select the corresponding button.
No.Function
Select to set the registered home as
the destination.
Select to set a registered favorite as
the destination. (Up to 2 favorites
can be registered as preset destina-
tions.)
INFORMATION
●When the destination is very close to the
current position, “Nearby” will be dis-
played.
● The one-touch buttons for home and
favorites will disappear after the vehicle
has been driven for a while.
● The color of the estimated arrival time
indicator may change depending on the
traffic information received.
● This function is available when “Auto-
matic Destination List Info” is set to
on. ( P.241)
Page 224 of 292

224
3. ROUTE GUIDANCE
MIRAI_Navi_USA_OM62029U_17CY
When the set destination is 1
1Select the route information bar to
change the display of the route infor-
mation bar between the estimated trav-
el time and the estimated arrival time.
When the set destinations are more than
1
1Select the route information bar.
2Check that the list of the distance and
time is displayed.
“Arrival Time” : Select to display the esti-
mated arrival time.
“Time to Dest.” : Select to display the es-
timated travel time.
By selecting one of the number buttons,
the desired route information is displayed.DISTANCE AND TIME TO
DESTINATION
When the vehicle is on the guidance
route, the route information bar dis-
plays the distance with the estimated
travel/arrival time to the destination.
INFORMATION
● When the vehicle is on the guidance
route, the distance measured along the
route is displayed. Travel time and
arrival time are calculated based on the
average speed of the specified speed
limits and current traffic information.
● When the vehicle gets off the guidance
route, the arrow facing the destination is
displayed instead of the estimated
travel/arrival time.
● The route information bar fills from left to
right as the vehicle progresses along the
route.
Page 237 of 292
237
4. MEMORY POINTS
NAVIGATION SYSTEM
8
MIRAI_Navi_USA_OM62029U_17CY
1Select “Edit”.
2Select the desired favorites list entry.
Each time a star icon is selected, its color
will change. Colored star icons indicate
that the favorite is registered to the corre-
sponding preset destination button. Up to
2 entries can be registered as quick favor-
ite destinations. ( P.216)
3Select the desired item to be edited.4Select “OK”.
EDITING FAVORITE LIST
ENTRIES
The icon, name, location and/or phone
number of a registered favorites list en-
try can be edited.No.FunctionPage
Select to edit the favorites
list entry name.238
Select to set display of the
favorites list entry name on/
off.
Select to edit location infor-
mation.238
Select to edit the phone
number.238
Select to change the icon
to be displayed on the map
screen.
238
Page 242 of 292

242
5. SETUP
MIRAI_Navi_USA_OM62029U_17CY
No.FunctionPage
Select to set unverified
roads guidance warning
on/off.
Select to set IPD road
(roads that are not com-
pletely digitized in our data-
base) guidance on/off.
Select to set the voice guid-
ance for the next street
name on/off.
Select to set favorite POI
categories that are used for
POI selection to display on
the map screen.
243
Select to adjust the current
position mark manually or
to adjust miscalculation of
the distance caused by tire
replacement.
243
Select to set automatic
destination list info on/off.
When set to on, the esti-
mated time of arrival to the
registered home and pre-
set destinations from the
current position will be dis-
played.
Select to set automatic
zoom function on/off. When
it is enabled, as the vehicle
approaches a guidance
point, the map will change
to a detailed map automat-
ically.
Select to set the map dis-
play color.
*
Select to enable/disable
routes sourced from the
Toyota Entune center.
222
Select to reset all setup
items.
*: This function is not available in some countries and areas.
No.FunctionPage