2018 TESLA MODEL X warning light
[x] Cancel search: warning lightPage 64 of 213

High Beam HeadlightsPush the left-hand steering column lever away
from you. To cancel, pull the lever toward you.
The high beam headlights can automatically
switch to low beam when there is light
detected in front of Model X (for example,
from an oncoming vehicle). To turn this feature
on, touch Controls > Auto High Beam .
Note: Your chosen setting is retained until you
manually change it. It can also be saved in
your driver
profile.
In situations where high beams are turned offbecause AUTO HIGH BEAM is turned on and
light is detected in front of Model X, you can temporarily turn on high beams by pulling thelever all the way toward you.
The following indicator lights are visible on the
instrument panel when high beams are turned
on:
High beam headlights are on.
Illuminates when high beams are on but the Auto High Beam setting is
turned
off or if the Auto High Beam
setting is turned on but is
termporarily unavaible.
High beams are currently turned on,
and Auto High Beam is ready to turn
off the high beams if light is
detected in front of Model X.
High beams are temporarily turnedoff because Auto High Beam is on
and is detecting light in front of
Model X. When light is no longer
detected, the high beams will
automatically turn back on.
To flash the headlight high beams, pull the
lever fully toward you and release.
Warning: Auto High Beam is an aid only
and is subject to limitations. It is the
driver
Page 65 of 213
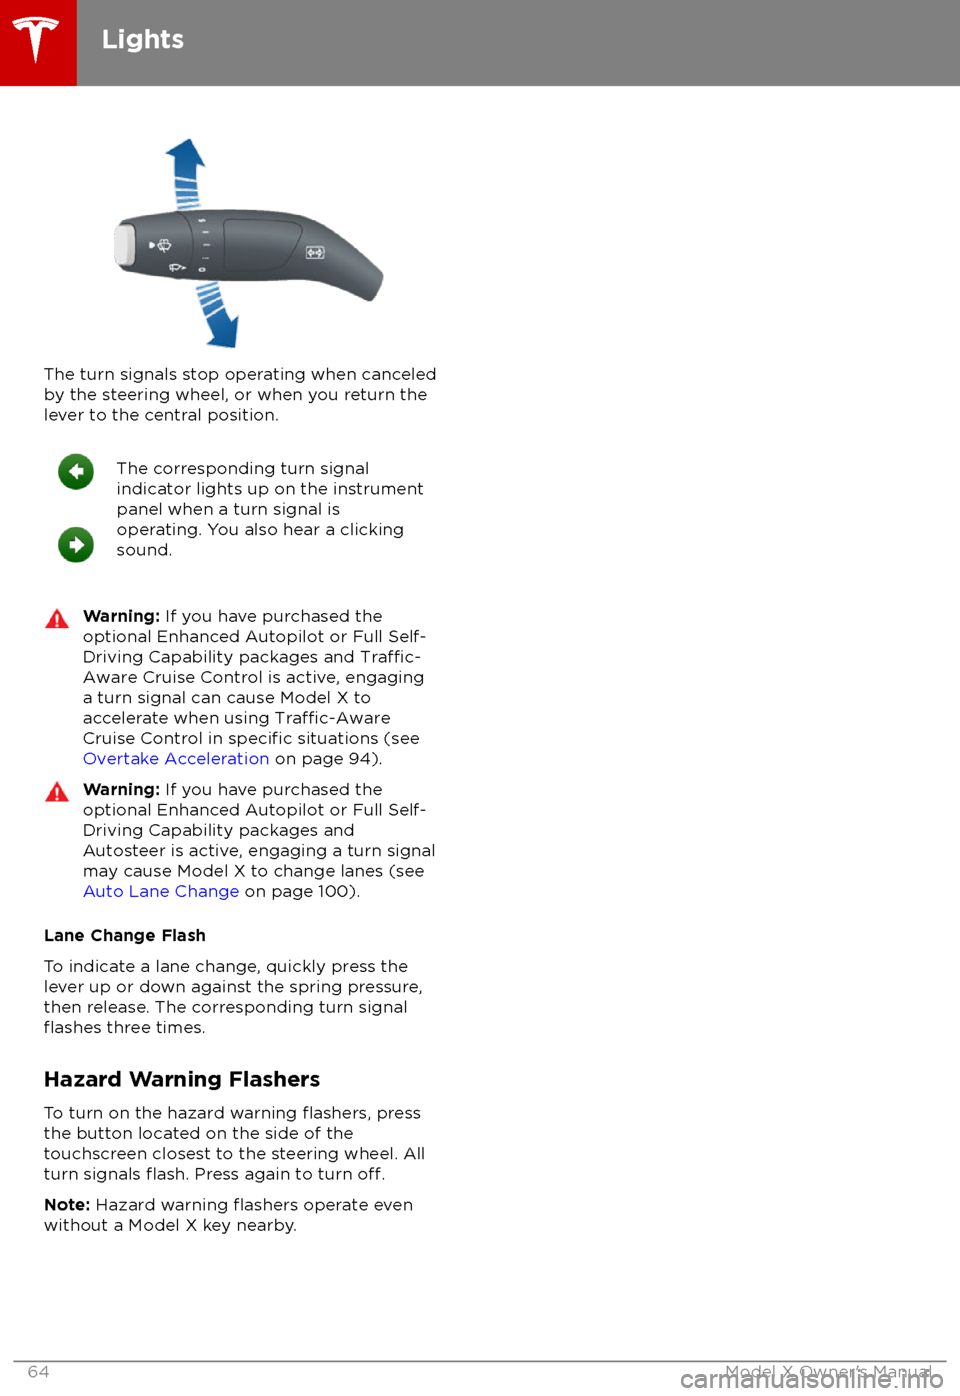
The turn signals stop operating when canceledby the steering wheel, or when you return the
lever to the central position.
The corresponding turn signal
indicator lights up on the instrument
panel when a turn signal is
operating. You also hear a clicking
sound.Warning: If you have purchased the
optional Enhanced Autopilot or Full Self-
Driving Capability packages and
Traffic-
Aware Cruise Control is active, engaging
a turn signal can cause Model X to
accelerate when using
Traffic-AwareCruise Control in specific situations (see
Overtake Acceleration on page 94).
Warning: If you have purchased the
optional Enhanced Autopilot or Full Self-
Driving Capability packages and
Autosteer is active, engaging a turn signal
may cause Model X to change lanes (see
Auto Lane Change on page 100).
Lane Change Flash
To indicate a lane change, quickly press the
lever up or down against the spring pressure,
then release. The corresponding turn signal
flashes three times.
Hazard Warning Flashers
To turn on the hazard warning
flashers, press
the button located on the side of the
touchscreen closest to the steering wheel. All
turn signals
flash. Press again to turn off.
Note: Hazard warning flashers operate even
without a Model X key nearby.
Lights
64Model X Owner
Page 67 of 213
Braking SystemsWarning: Properly functioning braking
systems are critical to ensure safety. If you experience a problem with the brake
pedal, brake caliper, or any component of
a Model X braking system, contact Tesla
immediately.
Model X has an anti-lock braking system
(ABS) that prevents the wheels from locking
when you apply maximum brake pressure. This
improves steering control during heavy
braking in most road conditions.
During emergency braking conditions, the
ABS constantly monitors the speed of each
wheel and varies the brake pressure according
to the grip available.
The alteration of brake pressure can be felt as
a pulsing sensation through the brake pedal.
This demonstrates that the ABS is operating
and is not a cause for concern. Keep
firm and
steady pressure on the brake pedal while
experiencing the pulsing.
The ABS indicator flashes briefly on
the instrument panel when you firststart Model X. If this indicator lights
up at any other time, an ABS fault
has occurred and the ABS is not
operating. Contact Tesla. The braking
system remains fully operational and
is not
affected by an ABS failure.
However, braking distances may
increase.
If the instrument panel displays this
indicator at any time other than
displaying
briefly when you first start
Model X, a brake system fault is
detected or the brake
fluid level is
low. Contact Tesla immediately.
Emergency Braking
In an emergency, fully press the brake pedal and maintain
firm pressure, even on low
traction surfaces. The ABS varies the braking
pressure to each wheel according to the
amount of traction available. This prevents
wheels from locking and ensures that you stop
as safely as possible.
Warning: Do not pump the brake pedal.
Doing so interrupts operation of the ABS
and can increase braking distance.Warning: Always maintain a safe distance
from the vehicle in front of you and beaware of hazardous driving conditions.
While the ABS can improve stopping
distance, it cannot overcome the laws of physics. It also does not prevent the
danger of hydroplaning (where a layer of
water prevents direct contact between the tires and the road).
Automatic Emergency Braking automatically
applies full braking in situations where a
collision is considered imminent (see Automatic Emergency Braking on page 109).
Warning: Automatic Emergency Braking
is not designed to prevent a collision. At best, it can minimize the impact of a
frontal collision by attempting to reduce
your driving speed. Depending on Automatic Emergency Braking to avoid a
collision can result in serious injury or death.
Brake Wear
Model X brake pads are equipped with wear indicators. A wear indicator is a thin metal
strip attached to the brake pad that squeals as
it rubs against the rotor when the pad wears
down. This squealing sound indicates that the
brake pads have reached the end of their service life and require replacement. To
replace the brake pads, contact Tesla Service.
Brakes must be periodically inspected visually by removing the tire and wheel. For detailed
specifications and service limits for rotors and
brake pads, see Brakes on page 184.
Warning:
Neglecting to replace worn
brake pads damages the braking system
and can result in a braking hazard.
Regenerative Braking
Whenever Model X is moving and your foot is
off the accelerator, regenerative braking slows
down Model X and feeds any surplus energy
back to the Battery.
By anticipating your stops and reducing or
removing pressure from the accelerator pedal
to slow down, you can take advantage of regenerative braking to increase driving range.
Of course, this is no substitute for regular
braking when needed for safety.
Note: If regenerative braking is aggressively
slowing Model X (such as when your foot is
completely
off the accelerator pedal at
highway speeds), the brake lights turn on to
alert others that you are slowing down.
Brakes
66Model X Owner
Page 83 of 213
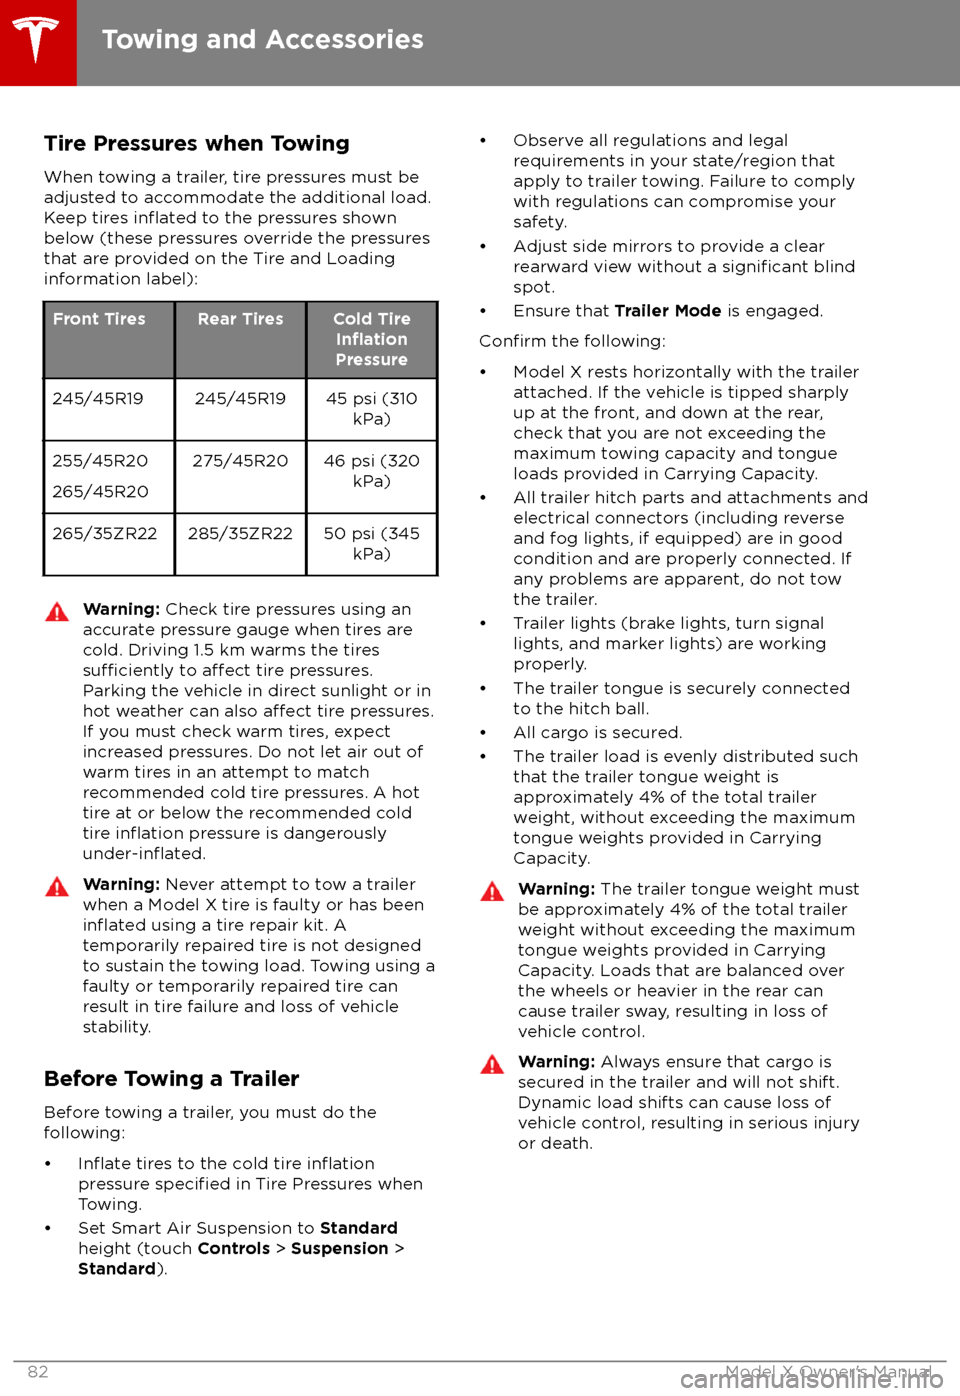
Tire Pressures when Towing
When towing a trailer, tire pressures must be
adjusted to accommodate the additional load.
Keep tires
inflated to the pressures shown
below (these pressures override the pressures
that are provided on the Tire and Loading
information label):
Front TiresRear TiresCold TireInflationPressure
245/45R19245/45R1945 psi (310 kPa)255/45R20
265/45R20275/45R2046 psi (320 kPa)265/35ZR22285/35ZR2250 psi (345kPa)Warning: Check tire pressures using an
accurate pressure gauge when tires are
cold. Driving 1.5 km warms the tires
sufficiently to affect tire pressures.
Parking the vehicle in direct sunlight or in
hot weather can also
affect tire pressures.
If you must check warm tires, expect increased pressures. Do not let air out of
warm tires in an attempt to match
recommended cold tire pressures. A hot
tire at or below the recommended cold
tire
inflation pressure is dangerouslyunder-inflated.
Warning: Never attempt to tow a trailer
when a Model X tire is faulty or has been
inflated using a tire repair kit. A
temporarily repaired tire is not designed
to sustain the towing load. Towing using a
faulty or temporarily repaired tire can result in tire failure and loss of vehicle
stability.
Before Towing a Trailer
Before towing a trailer, you must do the
following:
Page 127 of 213
Overview of Climate Controls
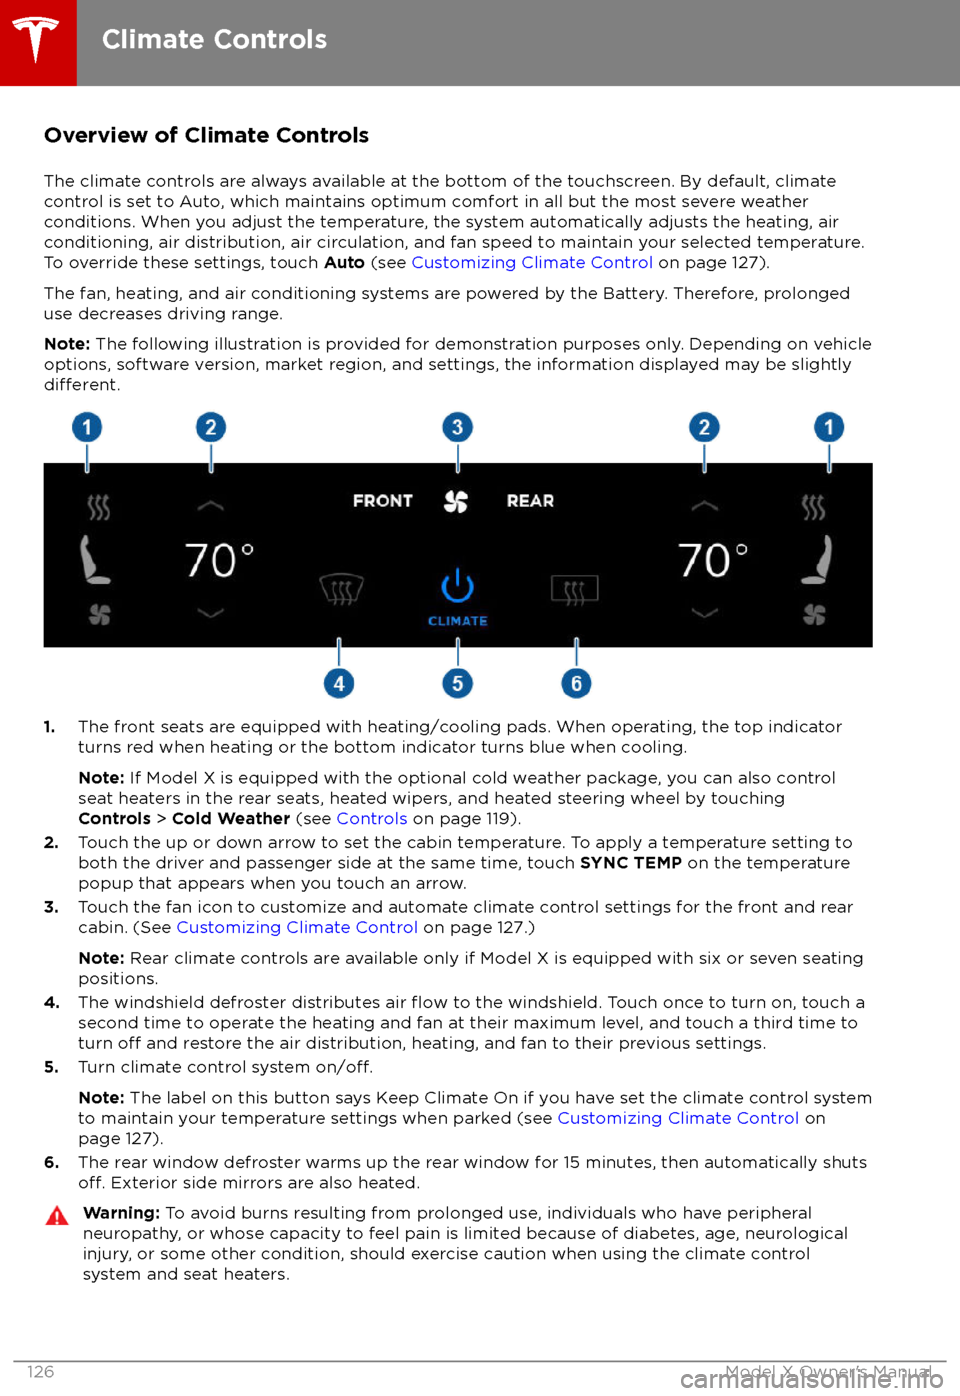
The climate controls are always available at the bottom of the touchscreen. By default, climate control is set to Auto, which maintains optimum comfort in all but the most severe weather conditions. When you adjust the temperature, the system automatically adjusts the heating, air
conditioning, air distribution, air circulation, and fan speed to maintain your selected temperature. To override these settings, touch Auto (see Customizing Climate Control on page 127).
The fan, heating, and air conditioning systems are powered by the Battery. Therefore, prolonged
use decreases driving range.
Note: The following illustration is provided for demonstration purposes only. Depending on vehicle
options, software version, market region, and settings, the information displayed may be slightly
different.
1. The front seats are equipped with heating/cooling pads. When operating, the top indicator
turns red when heating or the bottom indicator turns blue when cooling.
Note: If Model X is equipped with the optional cold weather package, you can also control
seat heaters in the rear seats, heated wipers, and heated steering wheel by touching Controls > Cold Weather (see Controls on page 119).
2. Touch the up or down arrow to set the cabin temperature. To apply a temperature setting to
both the driver and passenger side at the same time, touch SYNC TEMP on the temperature
popup that appears when you touch an arrow.
3. Touch the fan icon to customize and automate climate control settings for the front and rear
cabin. (See Customizing Climate Control on page 127.)
Note: Rear climate controls are available only if Model X is equipped with six or seven seating
positions.
4. The windshield defroster distributes air
flow to the windshield. Touch once to turn on, touch a
second time to operate the heating and fan at their maximum level, and touch a third time to
turn
off and restore the air distribution, heating, and fan to their previous settings.
5. Turn climate control system on/off.
Note: The label on this button says Keep Climate On if you have set the climate control system
to maintain your temperature settings when parked (see Customizing Climate Control on
page 127).
6. The rear window defroster warms up the rear window for 15 minutes, then automatically shuts
off. Exterior side mirrors are also heated.
Warning:
To avoid burns resulting from prolonged use, individuals who have peripheral
neuropathy, or whose capacity to feel pain is limited because of diabetes, age, neurological injury, or some other condition, should exercise caution when using the climate control
system and seat heaters.
Climate Controls
126Model X Owner
Page 159 of 213
If the charge port light turns red while
charging, a fault is detected. Check the instrument panel or touchscreen for a
message describing the fault. A fault can
occur due to something as common as a power outage. If a power outage occurs,
charging resumes automatically when power
is restored.
Note: When charging, particularly at high
currents, the refrigerant compressor and fan
operate as needed to keep the Battery cool. Therefore, it is normal to hear sounds during
charging.
Note: Air conditioning performance is
generally not
affected by charging. However,
under certain circumstances (for example, you
are charging at high currents during a
particularly warm day), the air coming from
the vents may not be as cool as expected and
a message displays on the instrument panel.
This is normal behavior and ensures that the Battery stays within an optimum temperature
range while charging to support longevity and
optimum performance.
Warning: Never spray liquid at a high
velocity (for example, if using a pressure
washer) towards the charge port while
charging. Failure to follow these
instructions can result in serious injury or
damage to the vehicle, charging
equipment, or property.
Stopping Charging
Stop charging at any time by disconnecting
the charge cable or touching Stop Charging
on the touchscreen.
Note: To prevent unauthorized unplugging of
the charge cable, Model X must be unlocked
or able to recognize your key before you can
disconnect the charge cable.
To disconnect the charge cable:
1. Press and hold the button on a Tesla
connector to release the latch. You can
also touch Stop Charging on the charging
screen (see Changing Charge Settings on
page 158).
2. Pull the connector from the charge port.
3. Push the charge port door closed.
Note: If Model X is equipped with a motorized
charge port door, it automatically closes when
you remove the charge cable.
Caution: Tesla strongly recommends
leaving Model X plugged in when not inuse. This maintains the Battery at the
optimum level of charge.
Charge Port Light
Page 166 of 213

Replacing Tires and Wheels
Tires degrade over time due to the
effects of
ultraviolet light, extreme temperatures, high
loads, and environmental conditions. It is
recommended that tires are replaced every six
years, or sooner if required.
Wheel and tires are matched to suit thehandling characteristics of the vehicle.
Replacement tires must comply with the
original
specification. If tires other than thosespecified are used, ensure that the load and
speed ratings marked on the tire (see Understanding Tire Markings on page 187)
equal or exceed those of the original
specification.
Ideally, you should replace all four tires at the same time. If this is not possible, replace the
tires in pairs, placing the new tires on the rear.
Always balance the wheel after replacing a
tire.
If you replace a wheel, the TPMS (Tire Pressure
Monitoring System) sensors need to be reset to ensure they provide accurate warnings
when tires are under- or
over-inflated (see
Automatic Resetting of TPMS Sensors on
page 167).
For the
specification of the original wheels
and tires installed on Model X, see Wheels and
Tires on page 186.
Warning:
For your safety, use only tires
and wheels that match the original
specification. Tires that do not match the
original specification can affect the
operation of the TPMS.
Warning: Never exceed the speed rating
of your vehicle
Page 169 of 213

Replacing a Tire SensorIf the Tire Pressure warning indicator displaysfrequently, contact Tesla to determine if a tire
sensor needs to be replaced. If a non-Tesla Service Center repairs or replaces a tire, the
tire sensor may not work until Tesla performs
the setup procedure.
TPMS Malfunction
Model X has also been equipped with a TPMS
malfunction indicator to indicate when the
system is not operating properly.The TPMS malfunction indicator is
combined with the tire pressure
indicator light. When the system
detects a malfunction, the indicator
flashes for approximately one minute
after Model X powers on, and then
remains continuously lit. This
sequence continues upon
subsequent vehicle start-ups as long
as the malfunction exists. When the
TPMS malfunction indicator is on,
the system might not be able to
detect or signal under- and
over-
inflated tires as intended.
TPMS malfunctions can occur for a variety of
reasons, including installing replacement or
alternate tires or wheels that prevent the
TPMS from functioning properly. Always check
the TPMS malfunction indicator light after replacing one or more tires or wheels on yourvehicle to ensure that the replacement tires or
wheels allow the TPMS to continue to function
properly.
Note: If a tire has been replaced or repaired
using a
different tire sealant than the one
available from Tesla, and a low tire pressure is
detected, it is possible that the tire sensor has
been damaged. Contact Tesla to have the fault repaired as soon as possible.
Tire Care and Maintenance
168Model X Owner