2018 TESLA MODEL S ECO mode
[x] Cancel search: ECO modePage 8 of 195

Child-protection LockModel S has child-protection locks on the rear
doors and liftgate to prevent them from being
opened using interior handles. Use the
touchscreen to turn child protection locks on
or
off. Touch Controls > Settings > Doors &
Locks > CHILD-PROTECTION LOCK .
Note: It is recommended that you turn child-
protection locks on whenever children are
seated in the rear seats.
Drive-away Locking Model S automatically locks all doors
(including the trunks) whenever your driving
speed exceeds 8 km/h.
Walk-away Locking
Doors and trunks can automatically lock whenever you walk away carrying the key.
To turn this feature on or
off, touch Controls >
Settings > Doors & Locks > WALK-AWAY
DOOR LOCK .
Note: Depending on date of manufacture and
options selected at time of purchase, some Model S vehicles are not equipped with the
Walk-way Door Lock feature.
Note: If all doors are closed and you use the
key to unlock Model S, walk-away locking is
temporarily suspended for one minute. If you
open a door within this minute, it does not re-
lock until after all the doors are closed and
you have walked away with the key.
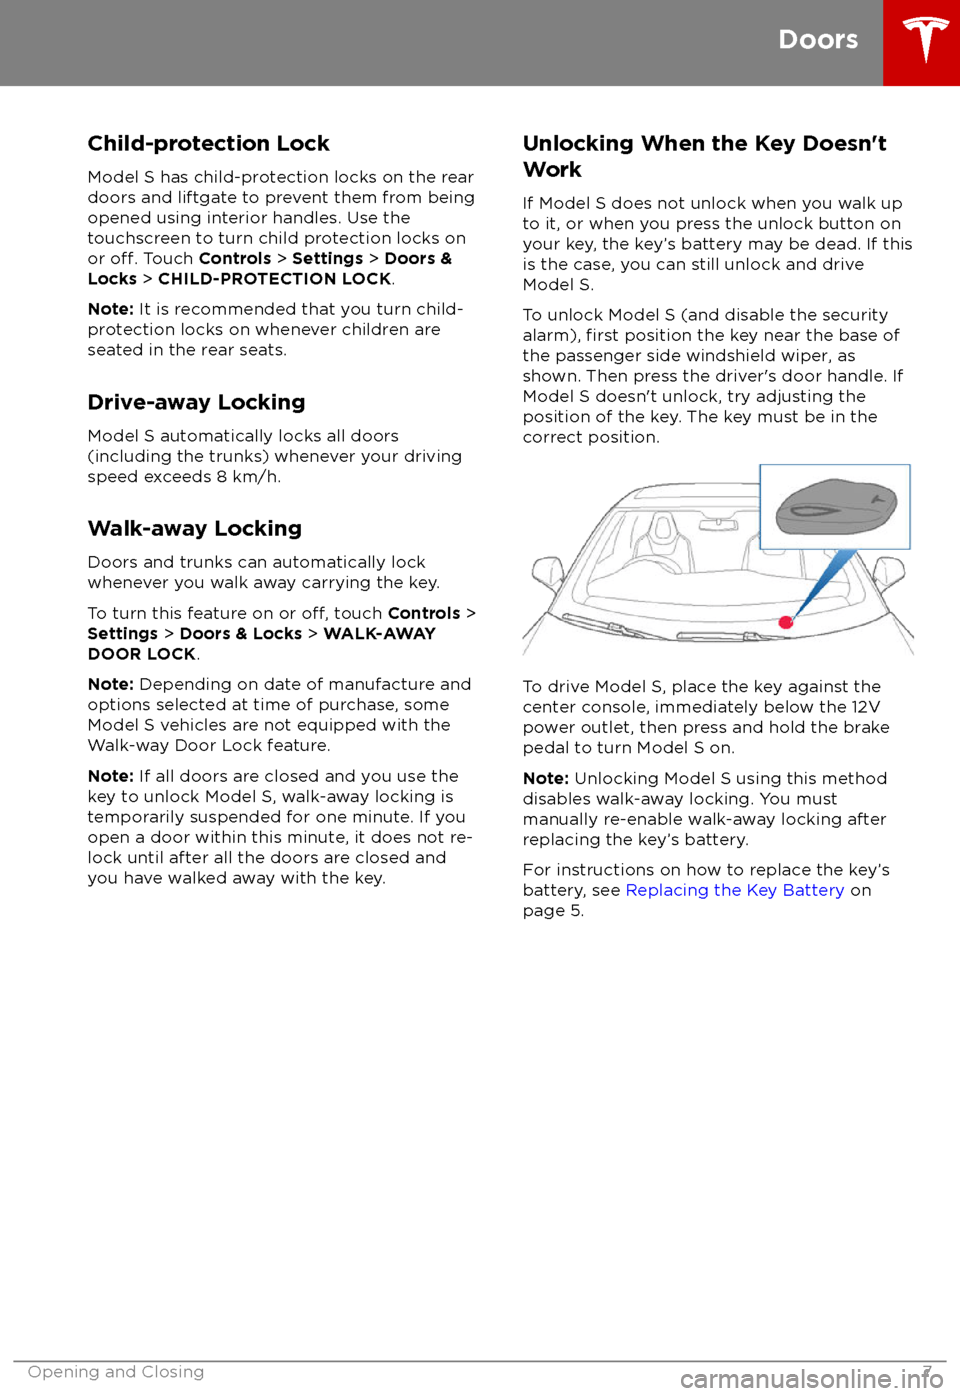
Unlocking When the Key Doesn
Page 12 of 195

2.Press and hold the button on the
underside of the liftgate for two seconds
until you hear a
confirmation chime.
3.Confirm that you have set it to the desired
height by closing the liftgate, then
reopening it.
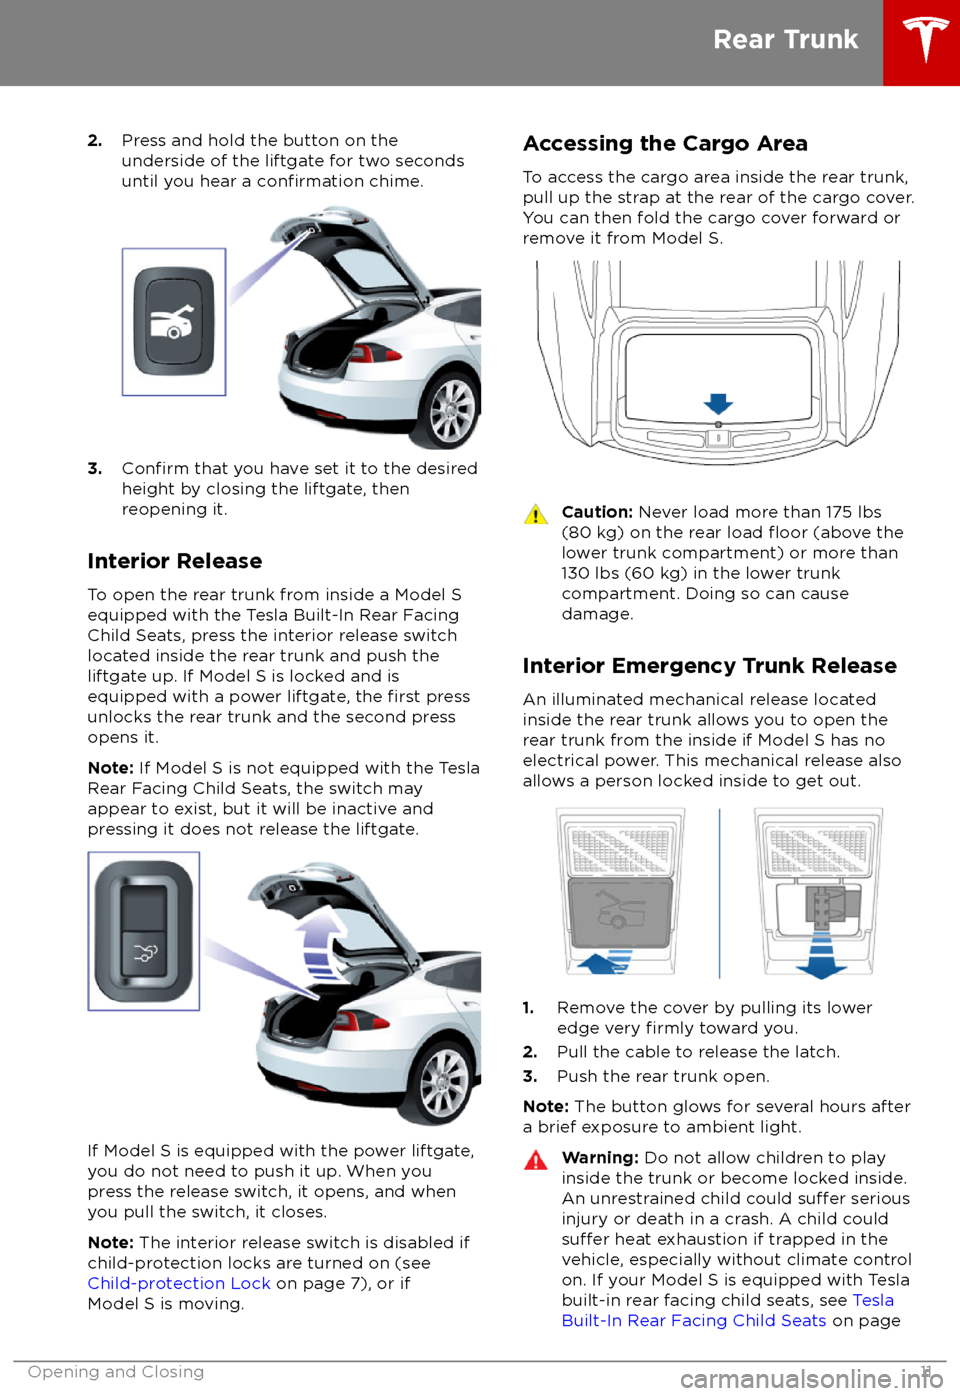
Interior Release To open the rear trunk from inside a Model S
equipped with the Tesla Built-In Rear Facing
Child Seats, press the interior release switch
located inside the rear trunk and push the liftgate up. If Model S is locked and is
equipped with a power liftgate, the
first press
unlocks the rear trunk and the second press
opens it.
Note: If Model S is not equipped with the Tesla
Rear Facing Child Seats, the switch may
appear to exist, but it will be inactive and
pressing it does not release the liftgate.
If Model S is equipped with the power liftgate,
you do not need to push it up. When you
press the release switch, it opens, and when you pull the switch, it closes.
Note: The interior release switch is disabled if
child-protection locks are turned on (see
Child-protection Lock on page 7), or if
Model S is moving.
Accessing the Cargo Area
To access the cargo area inside the rear trunk,
pull up the strap at the rear of the cargo cover.
You can then fold the cargo cover forward or
remove it from Model S.Caution: Never load more than 175 lbs
(80 kg) on the rear load floor (above the
lower trunk compartment) or more than
130 lbs (60 kg) in the lower trunk
compartment. Doing so can cause
damage.
Interior Emergency Trunk Release
An illuminated mechanical release located
inside the rear trunk allows you to open the
rear trunk from the inside if Model S has no
electrical power. This mechanical release also
allows a person locked inside to get out.
1. Remove the cover by pulling its lower
edge very firmly toward you.
2. Pull the cable to release the latch.
3. Push the rear trunk open.
Note: The button glows for several hours after
a brief exposure to ambient light.
Warning: Do not allow children to play
inside the trunk or become locked inside.
An unrestrained child could
suffer serious
injury or death in a crash. A child could
suffer heat exhaustion if trapped in the
vehicle, especially without climate control
on. If your Model S is equipped with Tesla
built-in rear facing child seats, see Tesla
Built-In Rear Facing Child Seats on page
Rear Trunk
Opening and Closing11
Page 21 of 195

The second row seats have integrated non-
removable head supports that can not be
adjusted.
Seat Heaters The front seats are equipped with heating
pads that operate at three levels from 3
(highest) to 1 (lowest). To operate the seat heaters, see Climate Controls on page 111.
If Model S is equipped with the optional cold
weather package, you can also control seat
heaters in all rear seating positions, as well as
heated wipers and washer nozzles by
touching Controls > Cold Weather (see
Controls on page 104).Warning: To avoid burns resulting from
prolonged use, individuals who have
peripheral neuropathy, or whose capacity
to feel pain is limited because of diabetes,
age, neurological injury, or some other
condition, should exercise caution when
using the climate control system and seat heaters.
Seat Covers
Warning: Do not use seat covers in
Model S. Doing so could restrict
deployment of the seat-mounted side air
bags if a collision occurs.
Front and Rear Seats
20Model S Owner
Page 55 of 195

1.If you turn on DOME lights, all interior dome (map) lights turn on when you unlock Model S,
open a door upon exiting, or shift into P (Park). They turn off after 60 seconds, when you lock
Model S, or when you shift into a driving gear. If set to AUTO, dome lights turn on only when
little or no light is detected.
You can also manually turn an individual dome light on or
off by pressing its lens. If you
manually turn a dome light on, it turns off when Model S powers off. If Model S was already
powered off when you manually turned the light on, it turns off after 60 minutes.
2. If you turn on AMBIENT lights, the lights on the door armrests turn on whenever the
headlights are on.
3. If you turn on AUTO HIGH BEAM, high beam headlights turn on and
off automatically based
on whether or not light is detected in front of Model S (see High Beam Headlights on page
56).
4. Touch to turn fog lights (if equipped) on or
off. Fog lights operate only when low beam
headlights are on. Fog lights do not operate when headlights are turned off or when high
beam headlights are on.
The Front Fog indicator displays on the instrument panel whenever front fog
lights are on.The Rear Fog indicator displays on the instrument panel whenever rear fog
lights are on.
Note: Depending on the market region and vehicle options, your vehicle may not be equipped
with front and/or rear fog lights.
Note: In some regions, there is no control for the front fog lights. They operate in conjunction
with the headlights and turn on only in situations where low beam headlights are on.
5. If Model S is equipped with a coil suspension system, you can adjust the angle of the
headlights to accommodate the load you are carrying. You may need to lower the angle of theheadlights to avoid blinding oncoming drivers in situations when you are carrying a
significantamount of weight in the rear trunk. After touching LEVEL, drag the slider to the desired
position:
0Headlights are not lowered. No change is needed when all front and rear seats are
occupied and only the front trunk is laden.1Headlights are lowered one level. Suitable when the front and rear seats are occupied and the rear trunk is laden.2Headlights are lowered two levels. Suitable when carrying heavy loads.
Note: Headlight adjustments are not available if Model S is equipped with Smart Air
Suspension because Model S levels automatically.
Lights
54Model S Owner
Page 62 of 195

Warning: In snowy or icy conditions
Model S may experience traction loss
during regenerative braking, particularly
when in the Standard setting and/or not
using winter tires. Tesla recommends
using the Low setting (see To Set the
Regenerative Braking Level on page 61)
in snowy or icy conditions to help maintain vehicle stability.
The Energy app displays real-time feedbackon the amount of energy being gained by
regenerative braking. You can also display the
power meter on either side of the instrument
panel by choosing Energy using the scroll
button on the steering wheel (see Steering
Wheel on page 41).
The amount of energy fed back to the Battery using regenerative braking can depend on the
current state of the Battery and the charge
level setting that you are using. For example, regenerative braking may be limited if theBattery is already fully charged or if the
ambient temperature is too cold.
Note: If regenerative braking is limited, a
dashed yellow line displays on the power
meter.
To Set the Regenerative Braking Level
You can use the touchscreen to change the
level of regenerative braking:
1. Touch Controls > Driving > Regenerative
Braking .
2. Choose from two levels:
Page 80 of 195

Note: Your set speed will use your current
driving speed if you move the cruise control lever up or down.
Note: If Speed Assist is unable to determine a
speed limit, your set speed does not change
when you pull the cruise control lever toward
you.Warning: Do not rely on Speed Assist orTraffic-Aware Cruise Control to
determine an accurate or appropriate
cruising speed. Always cruise at a safe
speed based on road conditions and
applicable speed limits.
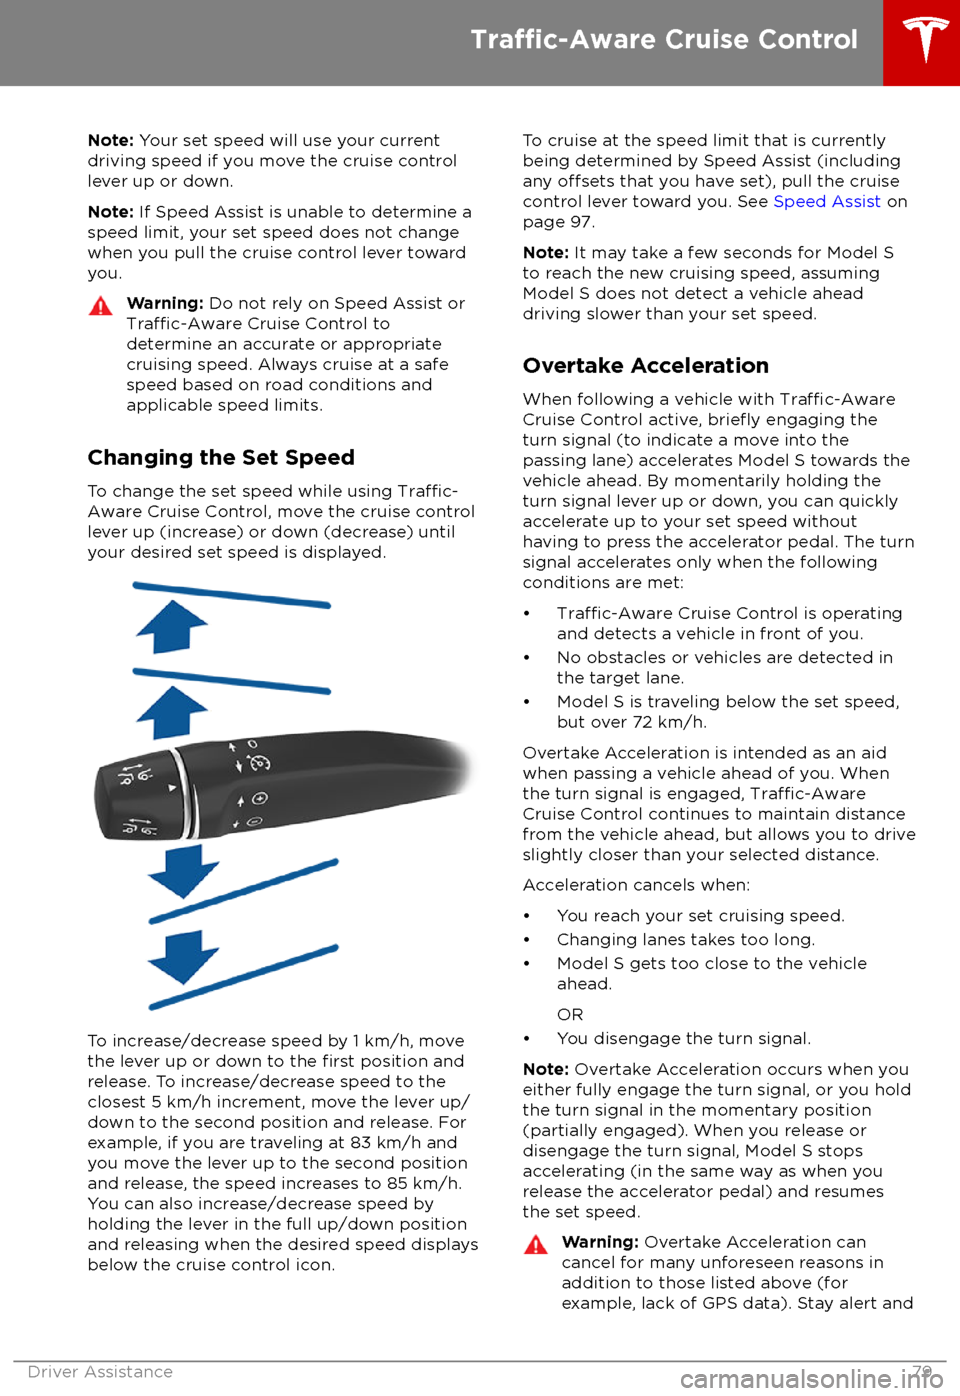
Changing the Set Speed
To change the set speed while using
Traffic-
Aware Cruise Control, move the cruise control
lever up (increase) or down (decrease) until
your desired set speed is displayed.
To increase/decrease speed by 1 km/h, move
the lever up or down to the first position and
release. To increase/decrease speed to the closest 5 km/h increment, move the lever up/
down to the second position and release. For
example, if you are traveling at 83 km/h and you move the lever up to the second position
and release, the speed increases to 85 km/h.
You can also increase/decrease speed by
holding the lever in the full up/down position
and releasing when the desired speed displays
below the cruise control icon.
To cruise at the speed limit that is currently
being determined by Speed Assist (including any
offsets that you have set), pull the cruise
control lever toward you. See Speed Assist on
page 97.
Note: It may take a few seconds for Model S
to reach the new cruising speed, assuming
Model S does not detect a vehicle ahead
driving slower than your set speed.
Overtake Acceleration
When following a vehicle with
Traffic-AwareCruise Control active, briefly engaging the
turn signal (to indicate a move into the
passing lane) accelerates Model S towards the
vehicle ahead. By momentarily holding the
turn signal lever up or down, you can quickly
accelerate up to your set speed without
having to press the accelerator pedal. The turn
signal accelerates only when the following conditions are met:
Page 98 of 195

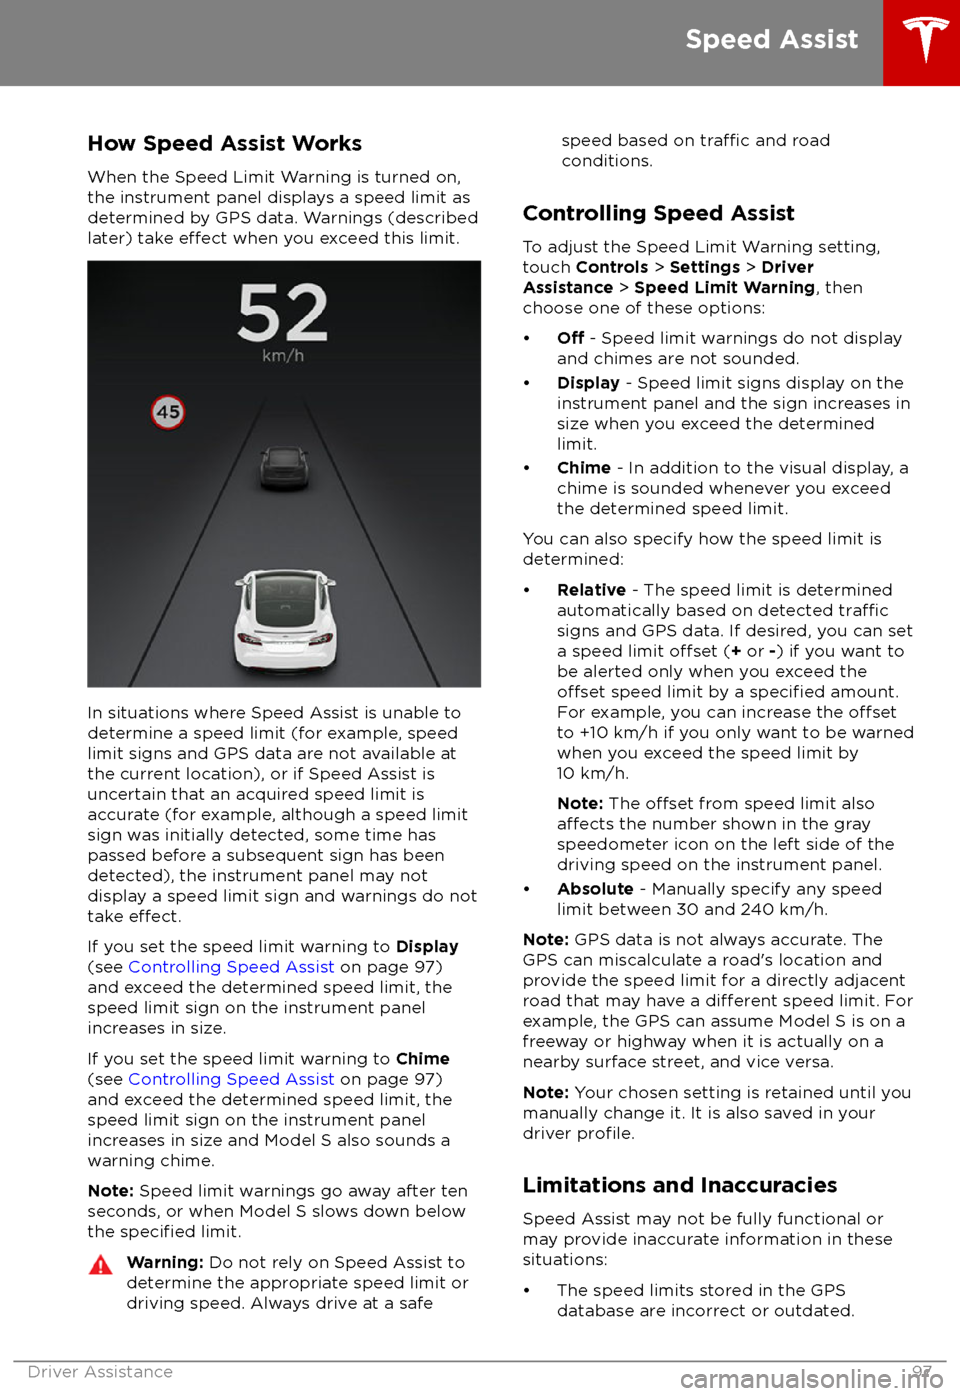
How Speed Assist Works
When the Speed Limit Warning is turned on,
the instrument panel displays a speed limit as
determined by GPS data. Warnings (described
later) take
effect when you exceed this limit.
In situations where Speed Assist is unable to determine a speed limit (for example, speed
limit signs and GPS data are not available at
the current location), or if Speed Assist is
uncertain that an acquired speed limit is
accurate (for example, although a speed limit sign was initially detected, some time has
passed before a subsequent sign has been
detected), the instrument panel may not
display a speed limit sign and warnings do not take
effect.
If you set the speed limit warning to Display
(see Controlling Speed Assist on page 97)
and exceed the determined speed limit, the
speed limit sign on the instrument panel
increases in size.
If you set the speed limit warning to Chime
(see Controlling Speed Assist on page 97)
and exceed the determined speed limit, the
speed limit sign on the instrument panel
increases in size and Model S also sounds a
warning chime.
Note: Speed limit warnings go away after ten
seconds, or when Model S slows down below
the
specified limit.
Warning: Do not rely on Speed Assist to
determine the appropriate speed limit or driving speed. Always drive at a safespeed based on traffic and road
conditions.
Controlling Speed Assist
To adjust the Speed Limit Warning setting,
touch Controls > Settings > Driver
Assistance > Speed Limit Warning , then
choose one of these options:
Page 112 of 195

Overview of Climate Controls
The climate controls are always available at the bottom of the touchscreen. By default, climate control is set to Auto, which maintains optimum comfort in all but the most severe weather conditions. When you adjust the temperature, the system automatically adjusts the heating, air
conditioning, air distribution, air circulation, and fan speed to maintain your selected temperature. To override these settings, touch Auto (see Customizing Climate Control on page 112).
The fan, heating, and air conditioning systems are powered by the Battery. Therefore, prolonged
use decreases driving range.
Note: The following illustration is provided for demonstration purposes only. Depending on vehicle
options, software version, market region, and settings, the information displayed may be slightly
different.
1. The front seats are equipped with heating pads that operate at three levels from 3 (highest) to
1 (lowest). When operating, the indicator turns red and displays the setting number.
Note: If Model S is equipped with the optional cold weather package, you can also control
seat heaters in the rear seats, heated wipers, and heated steering wheel by touching Controls > Cold Weather (see Controls on page 104). When equipped with the optional
executive rear seats, you can control the seat and the backrest separately in each second row
passenger seat.
2. Touch the up or down arrow to set the cabin temperature. To apply a temperature setting to
both the driver and passenger side at the same time, touch SYNC TEMP on the temperature
popup that appears when you touch an arrow.
3. Touch the fan icon to customize and automate climate control settings (See Customizing
Climate Control on page 112.)
4. The windshield defroster distributes air
flow to the windshield. Touch once to turn on, touch a
second time to operate the heating and fan at their maximum level, and touch a third time to
turn
off and restore the air distribution, heating, and fan to their previous settings.
5. Turn climate control system on/off.
Note: The label on this button says Keep Climate On if you have set the climate control system
to maintain your temperature settings when parked (see Customizing Climate Control on
page 112).
6. The rear window defroster warms up the rear window for 15 minutes, then automatically shuts
off. Exterior side mirrors are also heated.
Note: Depending on date of manufacture and options selected at time of purchase, some
vehicles are not equipped with a heater in the exterior side mirrors.
Warning: To avoid burns resulting from prolonged use, individuals who have peripheral
neuropathy, or whose capacity to feel pain is limited because of diabetes, age, neurological injury, or some other condition, should exercise caution when using the climate control
system and seat heaters.
Climate Controls
Using the Touchscreen111