2018 TESLA MODEL 3 trunk
[x] Cancel search: trunkPage 45 of 165

Electronic stability control systems are
actively minimizing wheel spin by
controlling brake pressure and motor
power (indicator
flashes). See Traction
Control on page 51. If this indicator
stays illuminated, a fault is detected
(contact Tesla immediately).
Electronic stability control systems are
no longer minimizing wheel spin. See
Traction Control on page 51.Vehicle Hold is actively applying the
brakes. See Vehicle Hold on page
54.A door or trunk is open. See Doors on
page 9, Rear Trunk on page 12, or
Front Trunk on page 14.Flashes green when the left turn
signal is operating. Both turn signal
indicators
flash green when the
hazard warning flashers are operating.
Flashes green when the right turn
signal is operating. Both turn signal
indicators
flash green when the
hazard warning flashers are operating.
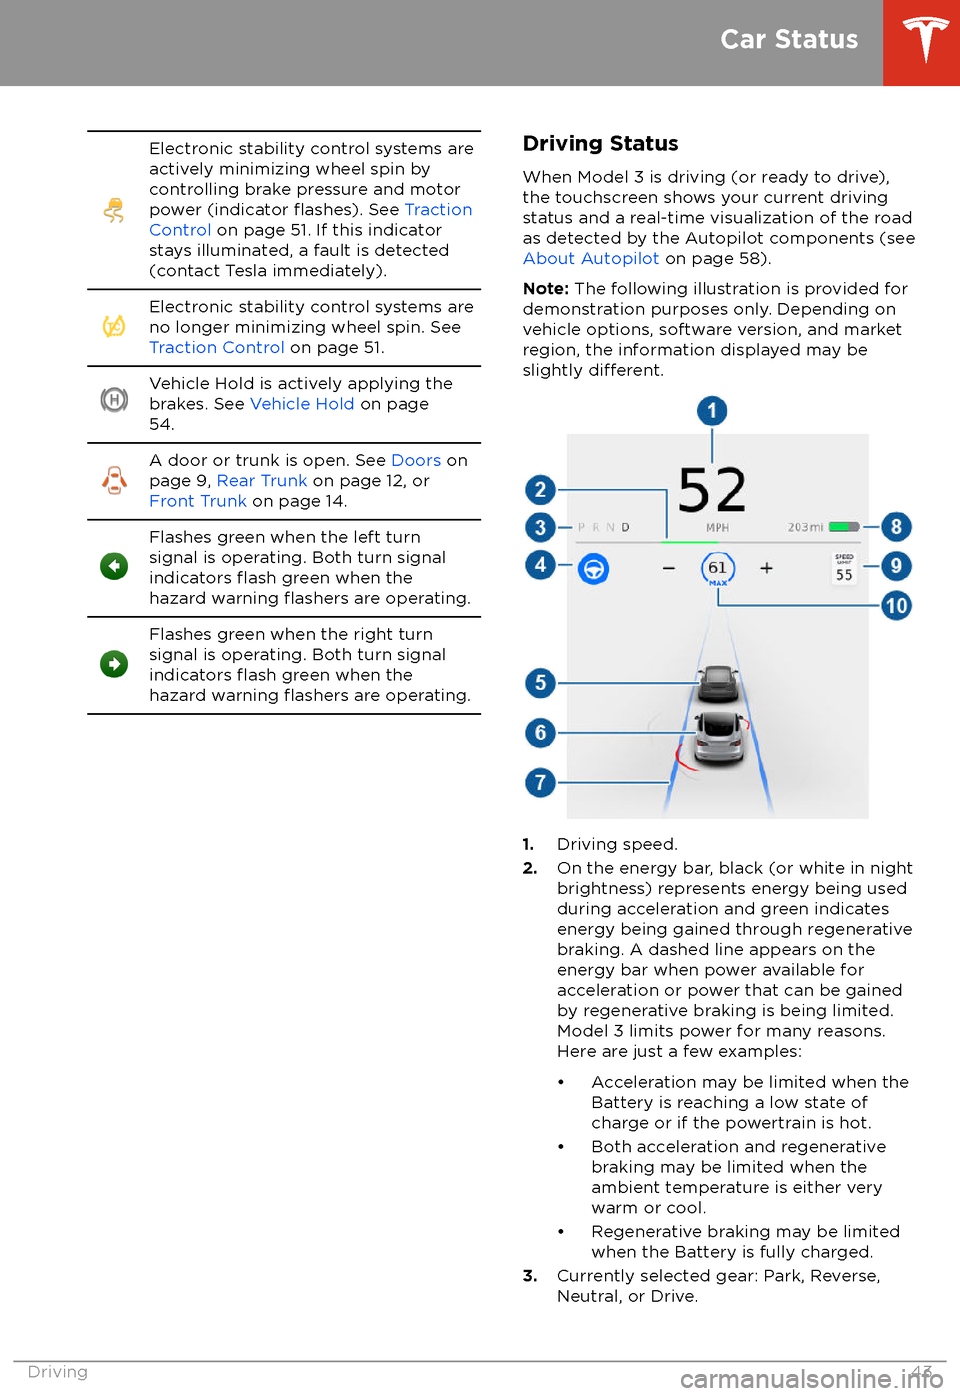
Driving Status
When Model 3 is driving (or ready to drive),
the touchscreen shows your current driving
status and a real-time visualization of the road
as detected by the Autopilot components (see About Autopilot on page 58).
Note: The following illustration is provided for
demonstration purposes only. Depending on vehicle options, software version, and market
region, the information displayed may be
slightly
different.
1. Driving speed.
2. On the energy bar, black (or white in night
brightness) represents energy being used
during acceleration and green indicates
energy being gained through regenerative
braking. A dashed line appears on the
energy bar when power available for
acceleration or power that can be gained
by regenerative braking is being limited. Model 3 limits power for many reasons.
Here are just a few examples:
Page 48 of 165

To briefly flash the high beam headlights, pull
the lever towards you and release.
The following indicator lights are visible on the
touchscreen to show the status of the
headlights:
Low beam headlights are on.High beam headlights are on.
Headlights After Exit
When you stop driving and park Model 3 in
low lighting conditions, the exterior lights
automatically turn on. They automatically turn
off after one minute or when you lock Model 3.
To turn this feature on or
off, touch Controls >
Lights > Settings > Headlights after Exit .
When Headlights After Exit is turned
off,headlights turn off when you engage the Park
gear.
Headlight Adjustments You can adjust the angle of the headlights toaccommodate the load you are carrying. For
example, in situations when you are carrying a
significant amount of weight in the rear trunk,
you may need to lower the angle of the
headlights to avoid creating glare for other
drivers. To adjust the headlights, touch
Controls > Service > Adjust Headlights , then
follow the onscreen instructions. You can
choose which headlight you would like to adjust by selecting it on the touchscreen.
Warning: Proceed with caution when
adjusting headlights. Tesla has carefully
calibrated the position of the headlights
to be in an optimum position for most
driving scenarios. Tesla recommends that
you do not adjust headlights unless you
are familiar with how headlights should
be adjusted. Once adjusted, you will be
unable to automatically restore them to their originally calibrated position.
Contact Tesla for assistance when
adjusting headlights.
Turn Signals
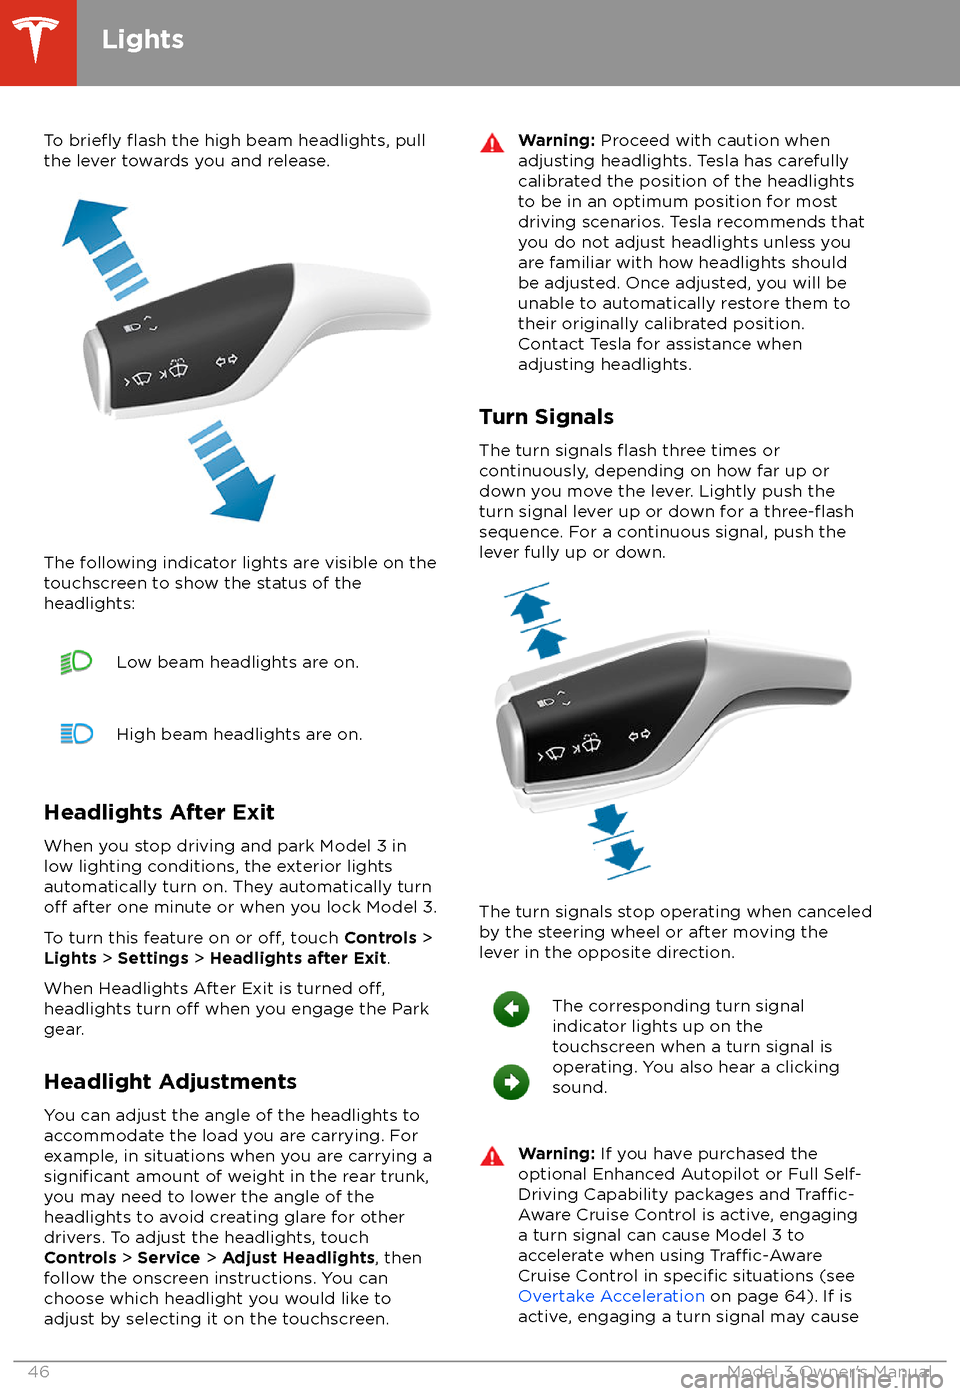
The turn signals
flash three times or
continuously, depending on how far up or
down you move the lever. Lightly push the
turn signal lever up or down for a
three-flashsequence. For a continuous signal, push the lever fully up or down.
The turn signals stop operating when canceled
by the steering wheel or after moving the
lever in the opposite direction.
The corresponding turn signal
indicator lights up on the
touchscreen when a turn signal is
operating. You also hear a clicking
sound.Warning: If you have purchased the
optional Enhanced Autopilot or Full Self-
Driving Capability packages and
Traffic-
Aware Cruise Control is active, engaging
a turn signal can cause Model 3 to accelerate when using
Traffic-AwareCruise Control in specific situations (see
Overtake Acceleration on page 64). If is
active, engaging a turn signal may cause
Lights
46Model 3 Owner
Page 102 of 165

About the Security SystemIf Model 3 does not detect an authenticated
phone or the key card and a locked door or
trunk is opened, an alarm sounds and the
headlights and turn signals
flash. To deactivate
the alarm, press any button on the mobile app
or tap your key card against the card reader
located below the Autopilot camera on the
driver
Page 126 of 165

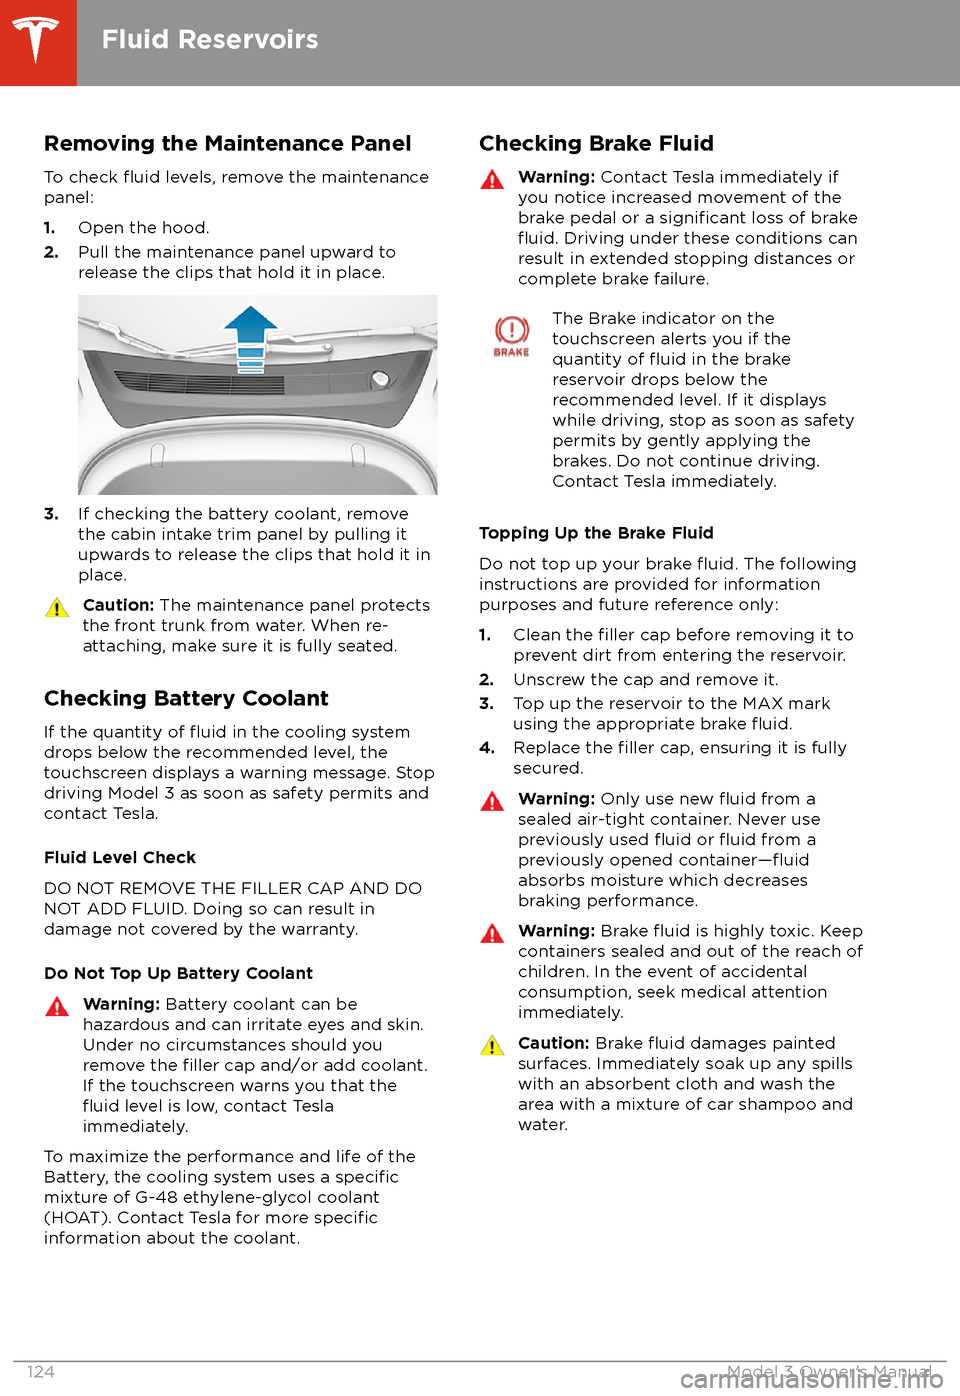
Removing the Maintenance PanelTo check
fluid levels, remove the maintenance
panel:
1. Open the hood.
2. Pull the maintenance panel upward to
release the clips that hold it in place.
3. If checking the battery coolant, remove
the cabin intake trim panel by pulling it
upwards to release the clips that hold it in
place.
Caution: The maintenance panel protects
the front trunk from water. When re-
attaching, make sure it is fully seated.
Checking Battery Coolant
If the quantity of
fluid in the cooling system
drops below the recommended level, the
touchscreen displays a warning message. Stop
driving Model 3 as soon as safety permits and
contact Tesla.
Fluid Level Check
DO NOT REMOVE THE FILLER CAP AND DO
NOT ADD FLUID. Doing so can result in damage not covered by the warranty.
Do Not Top Up Battery Coolant
Warning: Battery coolant can be
hazardous and can irritate eyes and skin.
Under no circumstances should you
remove the
filler cap and/or add coolant.
If the touchscreen warns you that the
fluid level is low, contact Tesla
immediately.
To maximize the performance and life of the
Battery, the cooling system uses a specificmixture of G-48 ethylene-glycol coolant
(HOAT). Contact Tesla for more specificinformation about the coolant.
Checking Brake FluidWarning: Contact Tesla immediately if
you notice increased movement of the brake pedal or a
significant loss of brakefluid. Driving under these conditions can
result in extended stopping distances or complete brake failure.
The Brake indicator on the
touchscreen alerts you if the
quantity of
fluid in the brake
reservoir drops below the
recommended level. If it displays
while driving, stop as soon as safety
permits by gently applying the
brakes. Do not continue driving.
Contact Tesla immediately.
Topping Up the Brake Fluid
Do not top up your brake
fluid. The following
instructions are provided for information purposes and future reference only:
1. Clean the
filler cap before removing it to
prevent dirt from entering the reservoir.
2. Unscrew the cap and remove it.
3. Top up the reservoir to the MAX mark
using the appropriate brake
fluid.4. Replace the filler cap, ensuring it is fully
secured.
Warning: Only use new fluid from a
sealed air-tight container. Never use
previously used
fluid or fluid from a
previously opened container
Page 127 of 165

Topping Up Washer FluidThe only reservoir into which you can add
fluidis the washer fluid reservoir, which is located
behind the front trunk. When the level is low, a
message displays on the touchscreen.
Caution: Do not add formulated washerfluids that contain water repellent or bug
wash. These fluids can cause streaking,
smearing, and squeaking or other noises.
Operate the washers periodically to check that
the nozzles are clear and properly directed.
See Wipers and Washers on page 48.
To top up the washer
fluid:
1. Open the hood.
2. Clean around the filler cap before opening
it to prevent dirt from entering the reservoir.
3. Open the
filler cap.
4.Fill the reservoir until the fluid level is
visible just below the filler neck.
5. Replace the filler cap.
Note: Some national or local regulations
restrict the use of Volatile Organic
Compounds (VOCs). VOCs are commonly
used as antifreeze in washer
fluid. Use a
washer fluid with limited VOC content only if it
provides adequate freeze resistance for all climates in which you drive Model 3.
Caution: Under no circumstances do you
need to inspect or top up other fluidreservoirs. Two additional fluid reservoirs
are located next to the washer fluid, but
underneath the maintenance panel. In the
unlikely event that you see a message on the touchscreen that one of these
fluidlevels is low, stop driving Model 3 as soon
as safe to do so, and contact Tesla.
Caution: Do not spill washer fluid on
body panels. Doing so can cause damage.
Wipe up spills immediately and wash the
affected area with water.
Warning: In temperatures below
40
Page 133 of 165

Load Capacity Labeling
It is important to understand how much weight your Model 3 can safely carry. Thisweight is called the vehicle capacity weight
and includes the weight of all occupants, cargo and any additional equipment added toyour Model 3 since it was manufactured.
Two labels attached to the center door pillar
indicate how much weight Model 3 can safely
carry. Labels are visible when the front door is
open.
Note: If your Model 3 is
fitted with Tesla
accessory wheels or tires, some information
may be
different from the labels on the
vehicle. See Accessory Wheels and Tires on
page 127.
1. Tire and Loading Information Label
2. Vehicle Certification Label
Warning:
Overloading Model 3 has an
adverse effect on braking and handling,
which can compromise your safety or cause damage.Caution: Never load more than 55 lbs
(25 kg) in the front trunk. Doing so can
cause damage.Caution: Never load more than 130 lbs
(60 kg) on the rear load floor (above the
lower trunk compartment) or more than
130 lbs (60 kg) in the lower trunk
compartment. Doing so can cause
damage.Caution: Never store large amounts of
liquid in Model 3. A significant spill can
cause electrical components to
malfunction.Tire and Loading Information Label
The Tire and Loading Information label
provides:
Page 149 of 165

Caution: Transport Mode automatically
cancels and the parking brake is applied if
Model 3 is rolled faster than 5 mph
(8 km/h), 12V power is low, or if Transport
Mode has been continuously enabled for
20 minutes. Model 3 sounds its horn to warn you that Transport Mode is about tocancel.
Pull onto the Flatbed Truck
Note: If Model 3 has no 12V power, you need
an external 12V power supply to open the
hood or use the touchscreen. See If Model 3
Has No Power on page 148.
1. Activate Transport Mode.
2. Locate the tow eye. The tow eye is located
under the carpet in the front trunk.
3. Release the tow eye cover by pressingfirmly on the top right perimeter of the
cover until it pivots inward, then gently pulling the raised section toward you.
Note: The tow eye cover is connected to
the vehicle
Page 161 of 165

contact information (continued)Tesla 154coolantBattery, checking level of 124
Battery, replacement interval 112
copyrights 151
cruise control 61
D
dashboard overview 2
data recording 152
data sharing 152
declarations of conformity 155
delivery mileage 153
devicesBluetooth, playing audio files 92
connecting 16
playing audio
files from 92
dimensions 134
dome (map) lights 45
door handles 9
door labels 131
doorsChild Lock 10
exterior door handles 9
interior locking and unlocking 10
keyless entry 9
locking 9
opening from exterior 9
opening from interior 9
Unlock on Park 10
unlocking 9
Walk Away Lock 10
Drive gear 41
driverprofiles 34
seat adjustment 18drivingseating position 18
starting 39
E
Easter Eggs 150
easy entry, driver
profile 34
EDR (event data recorder) 152
electric parking brake 50
emergency braking 76
emergency
flashers 47
emission label 130
energygained from regenerative braking 49
range information 42
energy use predictions (navigating) 97
event data recording 152
exteriorexterior (continued)car cover 121
cleaning 119
dimensions 134
lights 45
overview 3
polishing, touch up, & repair 120
F
fan speed, interior 87
favorite destinations 98
Favorites (Media Player) 91
Favorites (navigation) 95
FCC
certifications 155
features, downloading new 104
firmware (software) updates 104flash drives, playing audio files from 92flashers, warning 47floor mats 121
fluidsreplacement intervals 112
reservoirs, checking 124
fog lights 45
forward collision warning 76
front passenger detection 32
front trunk 14
G
garage doors, opening 101
gates, opening 101
GAWR 131
gears 41
glovebox 16
Gross Axle Weight Rating 131
Gross Vehicle Weight Rating 131
ground clearance 134
GVWR 131
H hazard warning
flashers 47
head supports 19
headlightsafter exit 46
controlling 45
high beams 45
heating 86
high beam headlights 45
high voltageBattery specifications 136
components 105
safety 112
hills, stopping on 54
hitches 132
Index
Index159