Page 65 of 505
2-42
BEFORE DRIVING
75RM4-01E
65D60865D609
WA R N I N G
(Vehicle with the front passenger air
bag deactivation system)
When using a child restraint system
on the front passenger’s seat, the
front passenger’s air bag system
must be deactivated; otherwise
deployment of the
front passenger’s
air bag could result in the death or
serious injury of the child.
WA R N I N G
If you install a child restraint system
in the rear seat, slide the front seat
far enough forward so that the child’s
feet do not touch the front seatback.
This will help avoid injury to the child
in the event of an accident.
WA R N I N G
Children could be endangered in a
crash if their child restraint systems
are not properly secured in the vehi-
cle. When installing a child restraint
system, follow the instructions
below. Secure the child in the
restraint system according to the
manufacturer’s instructions.
Page 66 of 505

2-43BEFORE DRIVING
75RM4-01E
Child restraint system for countries applied for UN Regulation No.16Child restraintThe suitability of each passenger’s seat position for carriage of children and fitting of child restraint system is shown in t he table below.
Whenever you carry children under 12 years of age or smaller th an 150 cm, properly use the child restraints which conform to UN Regu-
lation No. 44, the standard for child restraints, referring to the table.
Installation suitability of chi ld restraint systems (For models with front passenger air bag deactivation system)
CAUTION
Adjust the height of the rear head restraint or remove it for f itting the child restraint, as necessary. However, if a booster
cushion not equipped with the head restraint is fitted, the rea r seat head restraint should not be removed. If the rear head
restraint is removed for fitting the child restraint, you need to install it again after removing the child restraint.
If the child restraint is fitted improperly, a child sitting in it could be injured in a crash. (Refer to “Installation with l ap-shoul-
der seat belts” section, “Instal lation with ISOFIX type anchora ges” section and “Installation of child restraint with top teth er”
section in this sect ion for details.)
Mass Group Seating position (or other site)
Front Passenger
Rear Outboard Rear Center
2)
Intermediate Outboard Intermediate
Center
Front passenger
airbag is
activated Front passenger
airbag is
deactivated
group 0 up to 10 kg X U U U N.A. N.A.
group 0+ up to 13 kg X U
1)
U1)
U1)
N.A. N.A.
group I 9 to 18 kg X U U U N.A. N.A.
group II 15 to 25 kg X UF UF UF N.A. N.A.
group III 22 to 36 kg X UF UF UF N.A. N.A.
Page 67 of 505

2-44
BEFORE DRIVING
75RM4-01E
Installation suitability of child restraint systems (For models without front passenger air bag deactivation system)
Key of letters to be inse rted in the above table:
U =Suitable for ‘universal’ category restraints approved for use in this mass group
UF =Suitable for forward-facing ‘ universal’ category restraints approved for use in this mass group
L =Suitable for particular child r estraints given on attached list.
These restraints may be of the ‘ specific vehicle’, ‘restricted’ or ‘semi-universal’ categories.
B =Built-in restraint approved for this mass group
X =Seat position not suitable fo r children in this mass group
NOTE:
1) SUZUKI recommends “Britax Röme r Baby Safe i-Size” child seat.
This child restraint system is SUZUKI Genu ine Accessory, refer to the accessories cata log. However, there are countries which d o not
sell this child restraint system.
2) Child restraint system with support leg is prohibited in this seating position.
NOTE:
‘universal’ is the category in UN Regulation No. 44. Mass Group
Seating position (or other site)
Front Passenger Rear Outboard Rear Center
2)
Intermediate Outboard Intermediate
Center
group 0 up to 10 kg X U U N.A. N.A.
group 0+ up to 13 kg X U
1)
U1)
N.A. N.A.
group I 9 to 18 kg UF U U N.A. N.A.
group II 15 to 25 kg UF UF UF N.A. N.A.
group III 22 to 36 kg UF UF UF N.A. N.A.
Page 68 of 505
2-45BEFORE DRIVING
75RM4-01E
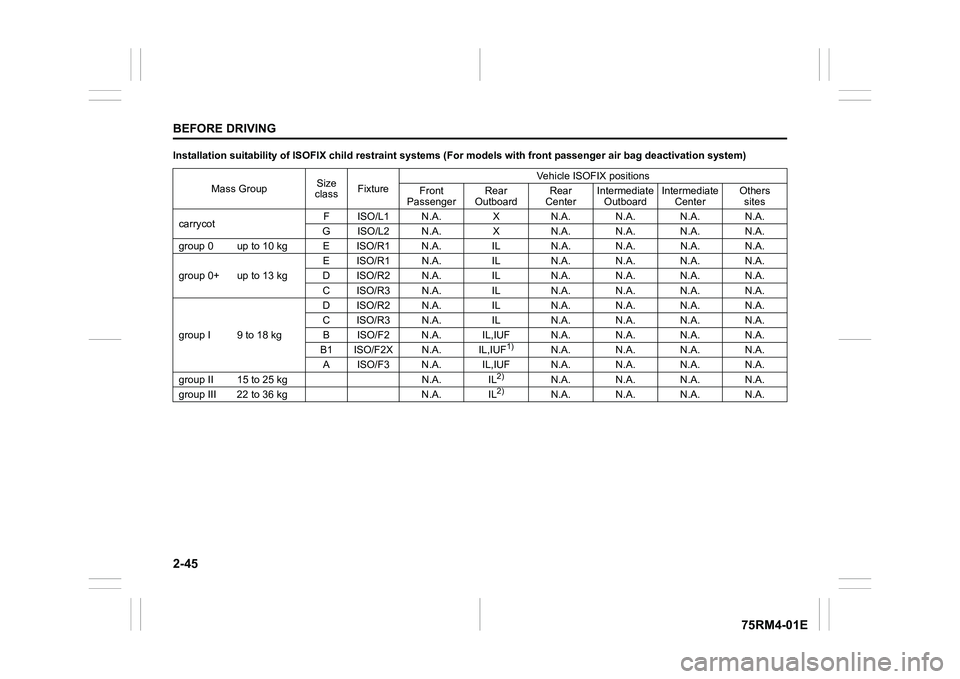
Installation suitability of ISOFIX child restraint systems (For models with front passenger air bag deactivation system)
Mass Group Size
class Fixture Vehicle ISOFIX positions
Front
Passenger Rear
Outboard Rear
Center Intermediate
Outboard Intermediate
Center Others
sites
carrycot F ISO/L1 N.A. X N.A. N.A. N.A. N.A.
G ISO/L2 N.A. X N.A. N.A. N.A. N.A.
group 0 up to 10 kg E ISO/R1 N.A. IL N.A. N.A. N.A. N.A.
group 0+ up to 13 kg E ISO/R1 N.A. IL N.A. N.A. N.A. N.A.
D ISO/R2 N.A. IL N.A. N.A. N.A. N.A.
C ISO/R3 N.A. IL N.A. N.A. N.A. N.A.
group I 9 to 18 kg D ISO/R2 N.A. IL N.A. N.A. N.A. N.A.
C ISO/R3 N.A. IL N.A. N.A. N.A. N.A.
B ISO/F2 N.A. IL,IUF N.A. N.A. N.A. N.A.
B1 ISO/F2X N.A. IL,IUF
1)
N.A. N.A. N.A. N.A.
A ISO/F3 N.A. IL,IUF N.A. N.A. N.A. N.A.
group II 15 to 25 kg N.A. IL
2)
N.A. N.A. N.A. N.A.
group III 22 to 36 kg N.A. IL
2)
N.A. N.A. N.A. N.A.
Page 69 of 505
2-46
BEFORE DRIVING
75RM4-01E
Installation suitability of ISOFIX child restraint systems (For models without front passenge r air bag deactivation system)
Mass Group Size
class Fixture Vehicle ISOFIX positions
Front
Passenger Rear
Outboard Rear
Center Intermediate
Outboard Intermediate
Center Others
sites
carrycot F ISO/L1 N.A. X N.A. N.A. N.A. N.A.
G ISO/L2 N.A. X N.A. N.A. N.A. N.A.
group 0 up to 10 kg E ISO/R1 N.A. IL N.A. N.A. N.A. N.A.
group 0+ up to 13 kg E ISO/R1 N.A. IL N.A. N.A. N.A. N.A.
D ISO/R2 N.A. IL N.A. N.A. N.A. N.A.
C ISO/R3 N.A. IL N.A. N.A. N.A. N.A.
group I 9 to 18 kg D ISO/R2 N.A. IL N.A. N.A. N.A. N.A.
C ISO/R3 N.A. IL N.A. N.A. N.A. N.A.
B ISO/F2 N.A. IL,IUF N.A. N.A. N.A. N.A.
B1 ISO/F2X N.A. IL,IUF
1)
N.A. N.A. N.A. N.A.
A ISO/F3 N.A. IL,IUF N.A. N.A. N.A. N.A.
group II 15 to 25 kg N.A. X N.A. N.A. N.A. N.A.
group III 22 to 36 kg N .A. X N.A. N.A. N.A. N.A.
Page 70 of 505

2-47BEFORE DRIVING
75RM4-01E
Key of letters to be inserted in the above table
IUF =Suitable for ISOFIX forward child restraints systems of universal category approved for use in this mass group
IL =Suitable for particular ISOFI X CRS are those of “specific vehicle”, “restricted” or “semi-universal” categories.
X =ISOFIX position not suitable fo r ISOFIX child restraint systems in this mass group and/or this size class.
NOTE:
1) SUZUKI recommends “Britax Römer Duo Plus” child seat.
2) SUZUKI recommends “Britax Römer KidFix XP” child seat.
These child restraint systems are SUZUKI Ge nuine Accessory, refer to the accessories catalog. However, there are countries which do
not sell these child restraint system.
NOTE:
‘universal’ is the category in UN Regulation No. 44.
Installation suitability of i-Size child restraint systems
Key of letters to be inse rted in the above table
i-U =Suitable for i-Siz e “universal” Child Restraint Systems for ward and rearward facing.
i-UF =Suitable for forward-facing i-Size “universal” Child Restraint Systems only.
X =Seating position not suitable for i-Size “universal” Child Re straint Systems.
NOTE:
‘universal’ is the category in UN Regulation No. 44. Seating position
Front
Passenger Outboard Rear
Outboard Left Rear
Outboard Right Rear
Center Intermediate
Outboard Left Intermediate
Outboard Right Intermediate
Center
i-Size Child
Restraint N.A. i-U i-U N.A. N.A. N.A. N.A.
Page 71 of 505

2-48
BEFORE DRIVING
75RM4-01E
Installation with lap-shoulder seat beltsNOTE:
Stow the removed head restraint in the lug-
gage compartment so it will not cause
inconvenience to the occupants.ELR type belt
80JC021
(For models with front passenger air bag
deactivation system)
Whenever possible, SUZUKI recom-
mends that child restraint systems be
installed on the rear seat. According to
accident statistics, children are safer when
properly restrained in rear seating posi-
tions than in front seating positions.
• If you must install the child restraint sys-
tem on the front passe nger’s seat, follow
instructions below.
– Deactivate the front passenger’s front air bag by the front passenger air bag
deactivation system.
– Slide the seat to t he most rear position
by the seat position adjustment lever.
– Adjust the seatba ck at the 5th step
inclined position (counted from most
upright position) w ith the seatback
angle adjustment lever. – If your vehicle is equipped with the
seat height adjustment lever, raise the
seat to the uppermost position by the
seat height adjustment lever.
Install your child restraint system accord-
ing to the instructions provided by the child
restraint system manufacturer.
Check that the seat belt is securely
latched.
Move the child restraint system in all direc-
tions to check that it is securely installed.
When you put your child in the child
restraint system, appr opriately slide the
front seat forward not to touch a part of
your child’s body.
CAUTION
Adjust the height of the rear head
restraint or remove it for fitting the
child restraint, as necessary. How-
ever, if a booster cushion not
equipped with the head restraint is
fitted, the rear seat head restraint
should not be removed. If the rear
head restraint is removed for fitting
the child restraint, you need to install
it again after removing the child
restraint.
If the child restraint is fitted improp-
erly, a child sitting in it could be
injured in a crash.
EXAMPLE
Page 72 of 505

2-49BEFORE DRIVING
75RM4-01E
Installation with ISOFIX type anchorages
75RM040
Your vehicle is equipped with the lower
anchorages in the rear seat outboard seat-
ing positions for securing a ISOFIX type of
child restraints with the connecting bars.
The lower anchorages are located where
the rear of the seat cushion meets the bot-
tom of the seatback.Install the ISOFIX type child restraint sys-
tem according to the instructions provided
by the child restraint system manufacturer.
After installation, try moving the child
restraint system in all
directions especially
forward to check that connecting bars are
securely latched t o the anchorages.
84MM00252
Your vehicle is equipped with the top tether
anchorages. Use the top tether strap of the
child restraint according to the instructions
provided by the child restraint system man-
ufacturer. Here is a genera
l instruction:
NOTE:
Stow the removed head restraint in the lug-
gage compartment so it will not cause
inconvenience to the occupants.
WA R N I N G
Install the ISOFIX type of child
restraint(s) in the o nly outboard seat-
ing positions, not in the central posi-
tion for the rear seat.
EXAMPLE
EXAMPLE
CAUTION
Adjust the height of the rear head
restraint or remove it for fitting the
child restraint, as necessary. How-
ever, if a booster cushion not
equipped with the head restraint is
fitted, the rear seat head restraint
should not be removed. If the rear
head restraint is removed for fitting
the child restraint, you need to install
it again after removing the child
restraint.
If the child restraint is fitted improp-
erly, a child sitting in it could be
injured in a crash.