2018 SUBARU CROSSTREK headlight bulb
[x] Cancel search: headlight bulbPage 15 of 474

(14,1)
北米Model "A1320BE-C" EDITED: 2017/ 10/ 10
Illustrated index&Exterior
1) Engine hood (page 11-5)
2) Front wipers (page 3-77)
3) Headlights (page 3-67)
4) Replacing bulbs (page 11-36)
5) Moonroof (page 2-32)
6) Roof rails (page 8-13)
7) Outside mirror (page 3-88)
8) Door locks (page 2-21)
9) Tire pressure (page 11-23)
10) Flat tires (page 9-5)
11) Snow tires (page 8-10)
12) Fog lights (page 3-74)
13) Tie-down hooks (page 9-13)
14) Towing hook (page 9-13)
12
Page 145 of 474

(150,1)
北米Model "A1320BE-C" EDITED: 2017/ 10/ 10
Illumination brightness con-
trolThe illumination brightness of the instru-
ment panel illuminates under the following
conditions.
.when the light switch is in the“
”or
“
”position
.when the light control switch is in the
“AUTO”position and the headlights illumi-
nate automatically
You can adjust the illumination brightness
for better visibility.
To brighten, turn the control dial upward.
To darken, turn the control dial downward.
NOTE.When the control dial is turned fully
upward, the illumination brightness
becomes the maximum and the auto-
matic dimming function does not work
at all.
.The brightness setting is not can-
celed even when the ignition switch is
turned to the“LOCK”/“OFF”position.&Auto dimmer cancel function
(if equipped)When the ambient light is bright, the
illumination brightness is set to the max-
imum regardless of the position of the
control dial. In this case, you cannot adjust
the illumination brightness by using the
control dial. When the ambient light is dark,
you can dim the illumination brightness as
described above.
The operational/non-operational setting
and sensitivity of the auto dimmer cancel
function can be changed by your SUBARU
dealer. Contact your SUBARU dealer for
details.
Warning and indicator&Initial illumination for system
checkSeveral of the warning and indicator lights
illuminate when the ignition switch is
initially turned to the“ON”position. This
permits checking the operation of the
bulbs.
Apply the parking brake and turn the
ignition switch to the“ON”position. For
the system check, several of the following
lights illuminate and then turn off after
several seconds or after the engine has
started.: Seatbelt warning light
(The seatbelt warning light turns off
only when the driver fastens the seat-
belt.): Front passenger’s seatbelt warning
light
(The seatbelt warning light turns off
only when the front seat passenger
fastens the seatbelt.): SRS airbag system warning light
ON /
: Front passenger’s frontal airbag
ON indicator light
/
: Front passenger’s frontal airbag
OFF indicator light
Instruments and controls/Illumination brightness control
3-12
Page 146 of 474
(151,1)
北米Model "A1320BE-C" EDITED: 2017/ 10/ 10
: CHECK ENGINE warning light/Mal-
function indicator light: Coolant temperature low indicator
light/Coolant temperature high warn-
ing light: Charge warning light: Oil pressure warning light: Engine low oil level warning light: Windshield washer fluid warning light: AT OIL TEMP warning light
(CVT models): Low tire pressure warning light
(U.S.- spec. models)/
: ABS warning light
/
: Brake system warning light
: Low fuel warning light: Hill start assist warning light/Hill start
assist OFF indicator light: Door open warning light: AWD warning light (CVT models): Power steering warning light: Vehicle Dynamics Control warning light/
Vehicle Dynamics Control operation
indicator light
: Vehicle Dynamics Control OFF indicator
light: Automatic headlight beam leveler
warning light (models with LED head-
lights): Hill descent control indicator light (if
equipped)
If any lights fail to illuminate, it indicates a
burned-out bulb or a malfunction of the
corresponding system.
Consult your authorized SUBARU dealer
for repair.
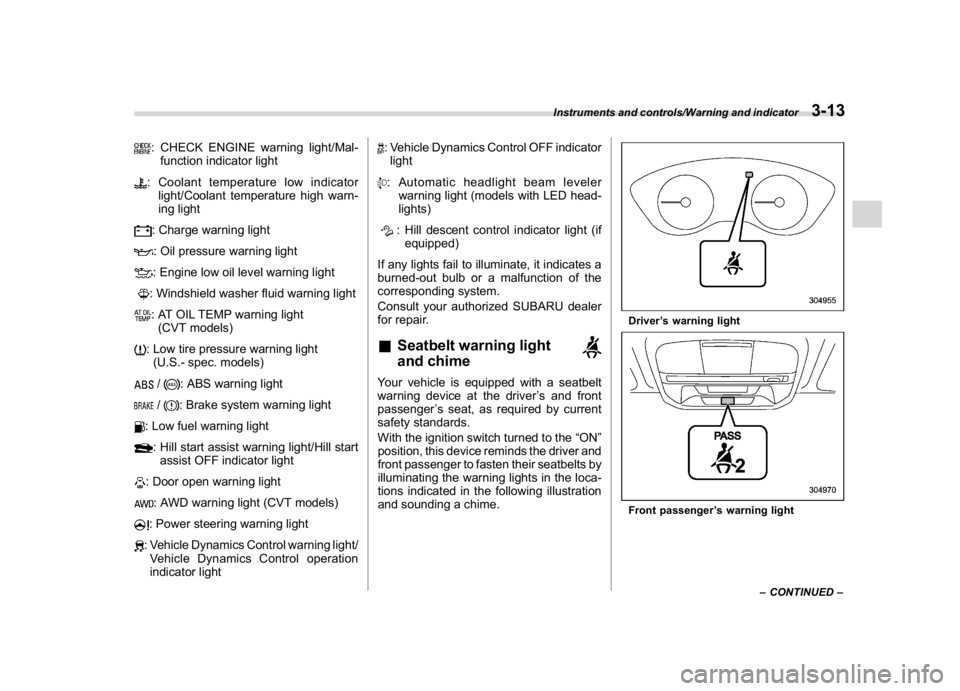
&Seatbelt warning light
and chimeYour vehicle is equipped with a seatbelt
warning device at the driver’s and front
passenger’s seat, as required by current
safety standards.
With the ignition switch turned to the“ON”
position, this device reminds the driver and
front passenger to fasten their seatbelts by
illuminating the warning lights in the loca-
tions indicated in the following illustration
and sounding a chime.
Driver’s warning lightFront passenger’s warning light
–CONTINUED–
Instruments and controls/Warning and indicator
3-13
3
Page 163 of 474
(168,1)
北米Model "A1320BE-C" EDITED: 2017/ 10/ 10
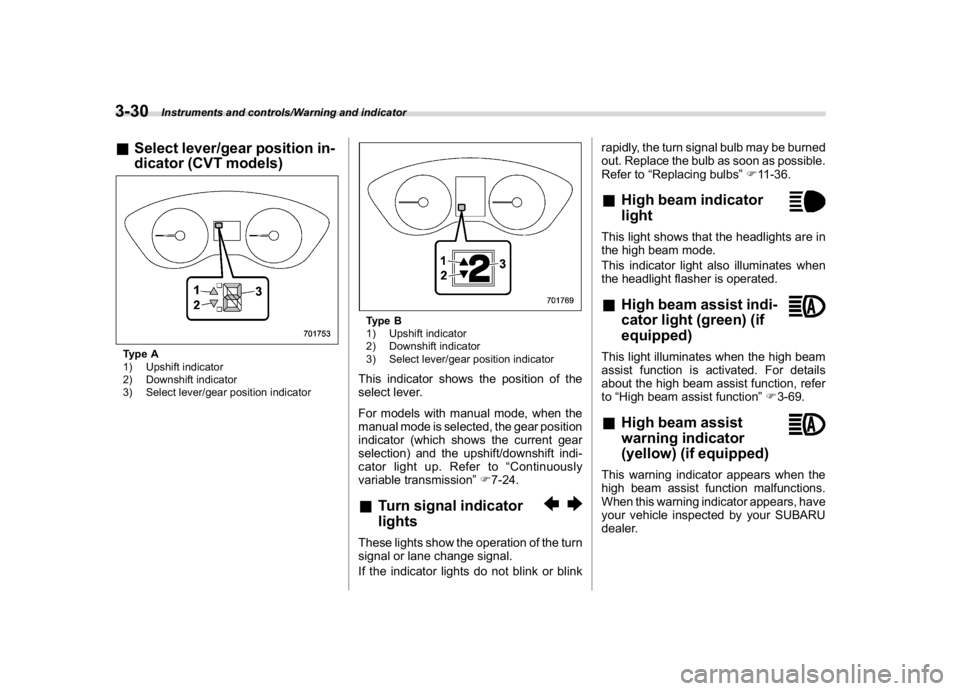
&Select lever/gear position in-
dicator (CVT models)Type A
1) Upshift indicator
2) Downshift indicator
3) Select lever/gear position indicator
Type B
1) Upshift indicator
2) Downshift indicator
3) Select lever/gear position indicatorThis indicator shows the position of the
select lever.
For models with manual mode, when the
manual mode is selected, the gear position
indicator (which shows the current gear
selection) and the upshift/downshift indi-
cator light up. Refer to“Continuously
variable transmission”F7-24.&Turn signal indicator
lightsThese lights show the operation of the turn
signal or lane change signal.
If the indicator lights do not blink or blinkrapidly, the turn signal bulb may be burned
out. Replace the bulb as soon as possible.
Refer to“Replacing bulbs”F11-36.
&High beam indicator
lightThis light shows that the headlights are in
the high beam mode.
This indicator light also illuminates when
the headlight flasher is operated.&High beam assist indi-
cator light (green) (if
equipped)This light illuminates when the high beam
assist function is activated. For details
about the high beam assist function, refer
to“High beam assist function”F3-69.&High beam assist
warning indicator
(yellow) (if equipped)This warning indicator appears when the
high beam assist function malfunctions.
When this warning indicator appears, have
your vehicle inspected by your SUBARU
dealer.
Instruments and controls/Warning and indicator
3-30
Page 186 of 474
(191,1)
北米Model "A1320BE-C" EDITED: 2017/ 10/ 10
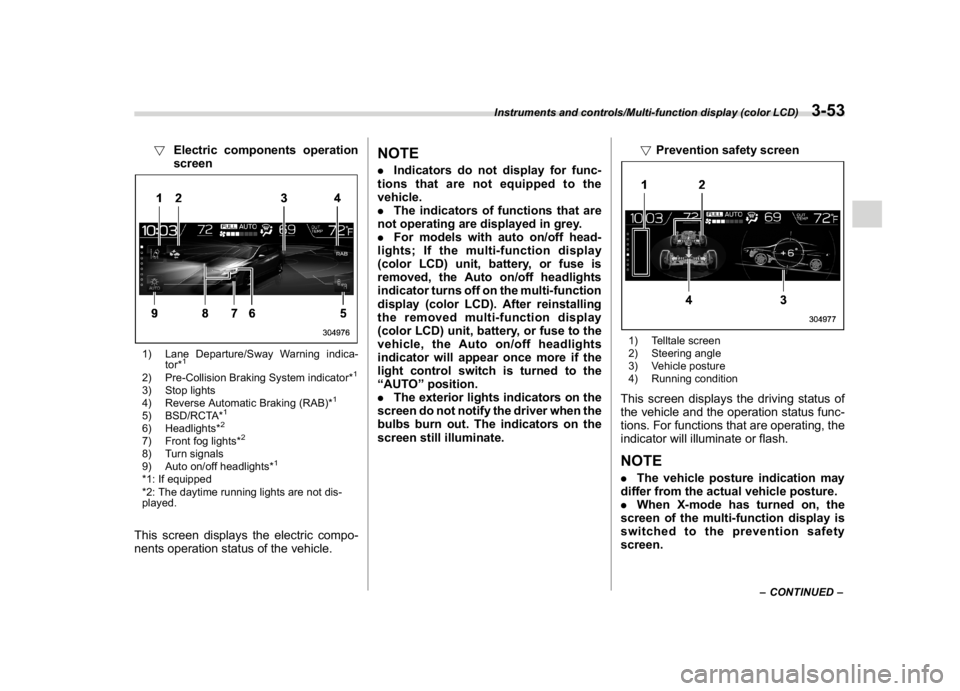
!Electric components operation
screen1) Lane Departure/Sway Warning indica-
tor*
1
2) Pre-Collision Braking System indicator*
1
3) Stop lights
4) Reverse Automatic Braking (RAB)*
1
5) BSD/RCTA*
1
6) Headlights*
2
7) Front fog lights*
2
8) Turn signals
9) Auto on/off headlights*
1
*1: If equipped
*2: The daytime running lights are not dis-
played.This screen displays the electric compo-
nents operation status of the vehicle.
NOTE.Indicators do not display for func-
tions that are not equipped to the
vehicle.
.The indicators of functions that are
not operating are displayed in grey.
.For models with auto on/off head-
lights; If the multi-function display
(color LCD) unit, battery, or fuse is
removed, the Auto on/off headlights
indicator turns off on the multi-function
display (color LCD). After reinstalling
the removed multi-function display
(color LCD) unit, battery, or fuse to the
vehicle, the Auto on/off headlights
indicator will appear once more if the
light control switch is turned to the
“AUTO”position.
.The exterior lights indicators on the
screen do not notify the driver when the
bulbs burn out. The indicators on the
screen still illuminate.!Prevention safety screen
1) Telltale screen
2) Steering angle
3) Vehicle posture
4) Running conditionThis screen displays the driving status of
the vehicle and the operation status func-
tions. For functions that are operating, the
indicator will illuminate or flash.NOTE.The vehicle posture indication may
differ from the actual vehicle posture.
.When X-mode has turned on, the
screen of the multi-function display is
switched to the prevention safety
screen.
–CONTINUED–
Instruments and controls/Multi-function display (color LCD)
3-53
3
Page 383 of 474
(396,1)
北米Model "A1320BE-C" EDITED: 2017/ 10/ 10
Rotational direction of tires................................. 11-25
Tire rotation........................................................ 11-25
Tire replacement................................................. 11-26
Wheel replacement............................................. 11-27
Alloy wheels........................................................ 11-27
Windshield washer fluid..................................... 11-28
Adding the windshield washer fluid..................... 11-28
Windshield washer fluid...................................... 11-28
Replacement of wiper blades............................ 11-29
Windshield wiper blade assembly........................ 11-29
Window wiper blade rubber................................. 11-30
Rear window wiper blade assembly..................... 11-31
Rear window wiper blade rubber......................... 11-32
Battery................................................................. 11-33
Fuses................................................................... 11-34
Installation of accessories................................. 11-35Replacing bulbs...................................................11-36
Headlights (models with LED headlights)............ 11-36
Headlights (models with halogen headlights) ...... 11-36
Front turn signal light......................................... 11-38
Parking light....................................................... 11-38
Front fog light (if equipped)................................ 11-38
Rear combination lights...................................... 11-38
Backup light....................................................... 11-40
License plate light.............................................. 11-40
Map light............................................................ 11-41
Vanity mirror light (if equipped)........................... 11-41
Dome light and cargo area light.......................... 11-41
Other bulbs........................................................ 11-42
Replacing key battery.........................................11-42
Safety precautions.............................................. 11-42
Replacing battery of access key fob................... 11-43
Replacing transmitter battery.............................. 11-44
Maintenance and service
Page 417 of 474
(430,1)
北米Model "A1320BE-C" EDITED: 2017/ 10/ 10
Replacing bulbs
WARNING
Bulbs may become very hot while
illuminated. Before replacing bulbs,
turn off the lights and wait until the
bulbs cool down. Otherwise, there is
a risk of sustaining a burn injury.
CAUTION
Replace any bulb only with a new
bulb of the specified wattage. Using
a bulb of different wattage could
result in a fire. For the specified
wattage of each bulb, refer to“Bulb
chart”F12-14.NOTEFor models with type B combination
meter, if SRH is malfunctioning, the
SRH OFF indicator appears on the
combination meter when the ignition
switch is in the“ON”position. It
indicates that SRH has been deacti-
vated. Contact a SUBARU dealer for an
inspection.
&Headlights (models with LED
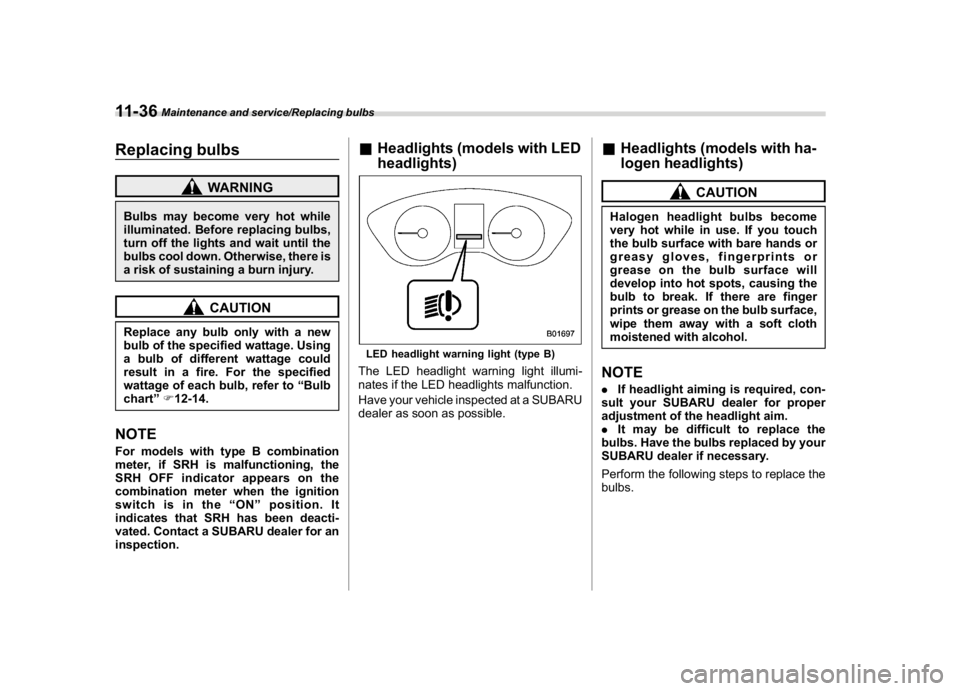
headlights)LED headlight warning light (type B)The LED headlight warning light illumi-
nates if the LED headlights malfunction.
Have your vehicle inspected at a SUBARU
dealer as soon as possible.
&Headlights (models with ha-
logen headlights)
CAUTION
Halogen headlight bulbs become
very hot while in use. If you touch
the bulb surface with bare hands or
greasy gloves, fingerprints or
grease on the bulb surface will
develop into hot spots, causing the
bulb to break. If there are finger
prints or grease on the bulb surface,
wipe them away with a soft cloth
moistened with alcohol.NOTE.If headlight aiming is required, con-
sult your SUBARU dealer for proper
adjustment of the headlight aim.
.It may be difficult to replace the
bulbs. Have the bulbs replaced by your
SUBARU dealer if necessary.
Perform the following steps to replace the
bulbs.
Maintenance and service/Replacing bulbs
11-36
Page 418 of 474
(431,1)
北米Model "A1320BE-C" EDITED: 2017/ 10/ 10
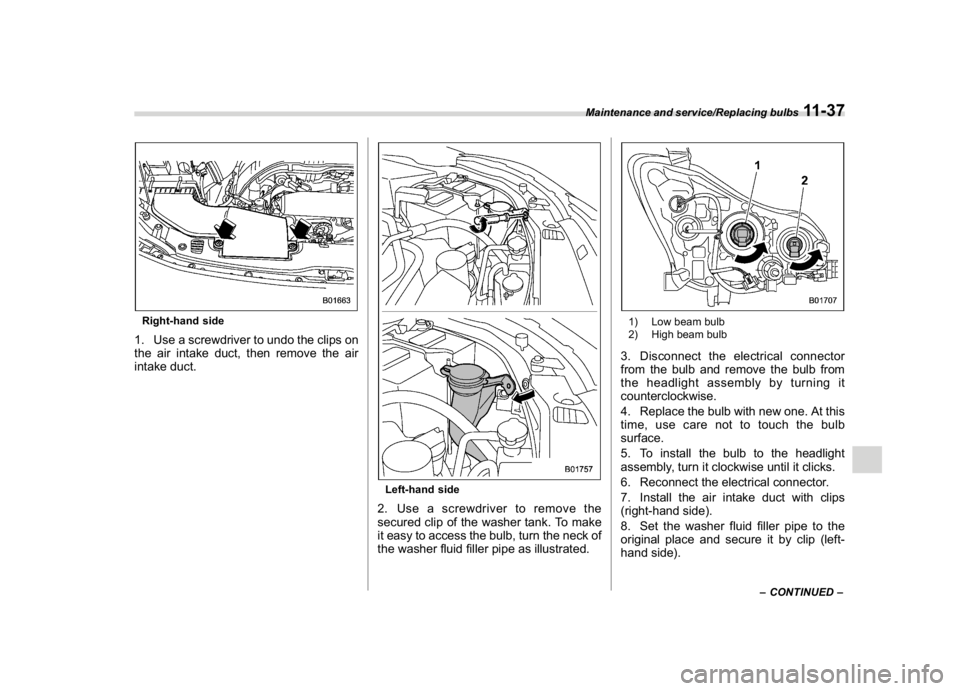
Right-hand side1. Use a screwdriver to undo the clips on
the air intake duct, then remove the air
intake duct.
Left-hand side2. Use a screwdriver to remove the
secured clip of the washer tank. To make
it easy to access the bulb, turn the neck of
the washer fluid filler pipe as illustrated.
1) Low beam bulb
2) High beam bulb3. Disconnect the electrical connector
from the bulb and remove the bulb from
the headlight assembly by turning it
counterclockwise.
4. Replace the bulb with new one. At this
time, use care not to touch the bulb
surface.
5. To install the bulb to the headlight
assembly, turn it clockwise until it clicks.
6. Reconnect the electrical connector.
7. Install the air intake duct with clips
(right-hand side).
8. Set the washer fluid filler pipe to the
original place and secure it by clip (left-
hand side).
–CONTINUED–
Maintenance and service/Replacing bulbs
11-37
11