Page 168 of 568

168 2-1. Driving procedures
BRZ_U (A4450BE-A)
WARNING
■When braking
●When the brakes are wet, drive more cautiously.
Braking distance increases when the brakes are wet, and this may cause
one side of the vehicle to brake differently than the other side. Also, the
parking brake may not securely hold the vehicle.
● If the power brake assist function does not operate, do not follow other
vehicles closely and avoid hills or sharp turns that require braking.
In this case, braking is still possible, but the brake pedal should be
depressed more firmly than usual. Also, the braking distance will increase.
Have your brakes fixed immediately.
● Do not pump the brake pedal if the engine stalls.
Each push on the brake pedal uses up the reserve for the power-assisted
brakes.
● The brake system consists of 2 individual hydraulic systems; if one of the
systems fails, the other will still operate. In this case, the brake pedal
should be depressed more firmly than usual and the braking distance will
increase.
Have your brakes fixed immediately.
CAUTION
■Pre-driving check
Trapping small animals in the cooling fan and belts of the engine may result
in a malfunction. Check that no small animal enters the engine compartment
and under the vehicle before starting the engine.
■ When driving the vehicle
Vehicles with an automatic transmission
●If the accelerator and brake pedals are depressed at the same time, driv-
ing torque may be restrained. This is not a malfunction.
● Do not use the accelerator pedal or depress the accelerator and brake
pedals at the same time to hold the vehicle on a hill.
Page 169 of 568

169
2-1. Driving procedures
2
When driving
BRZ_U (A4450BE-A)
CAUTION
Vehicles with a manual transmission
●
If the accelerator and brake pedals are depressed at the same time, driv-
ing torque may be restrained. This is not a malfunction.
● Do not shift gears unless the clutch pedal is fully depressed. After shifting,
do not release the clutch pedal abruptly. Doing so may damage the clutch,
transmission and gears.
● Observe the following to prevent the clutch from being damaged.
• Do not rest your foot on the clutch pedal while driving.
Doing so may cause clutch trouble.
• Do not use any gear other than the 1st gear when starting off and mov- ing forward.
Doing so may damage the clutch.
• Do not use the clutch to hold the vehicle when stopping on an uphill grade.
Doing so may damage the clutch.
● Do not shift the shift lever to R when the vehicle is still moving. Doing so
may damage the clutch, transmission and gears.
● Do not release the clutch pedal too quickly. Doing so may damage the
transmission.
■ When parking the vehicle
● Vehicles with an automatic transmission: Always shift the select lever to P.
Failure to do so may cause the vehicle to move or the vehicle may accel-
erate suddenly if the accelerator pedal is accidentally depressed. Also set
the parking brake.
● When parking the vehicle, be careful not to contact a wheel stop, etc. as
doing so may damage the bumpers, underside of the vehicle, etc.
Page 224 of 568

224 2-2. Instrument cluster
BRZ_U (A4450BE-A)
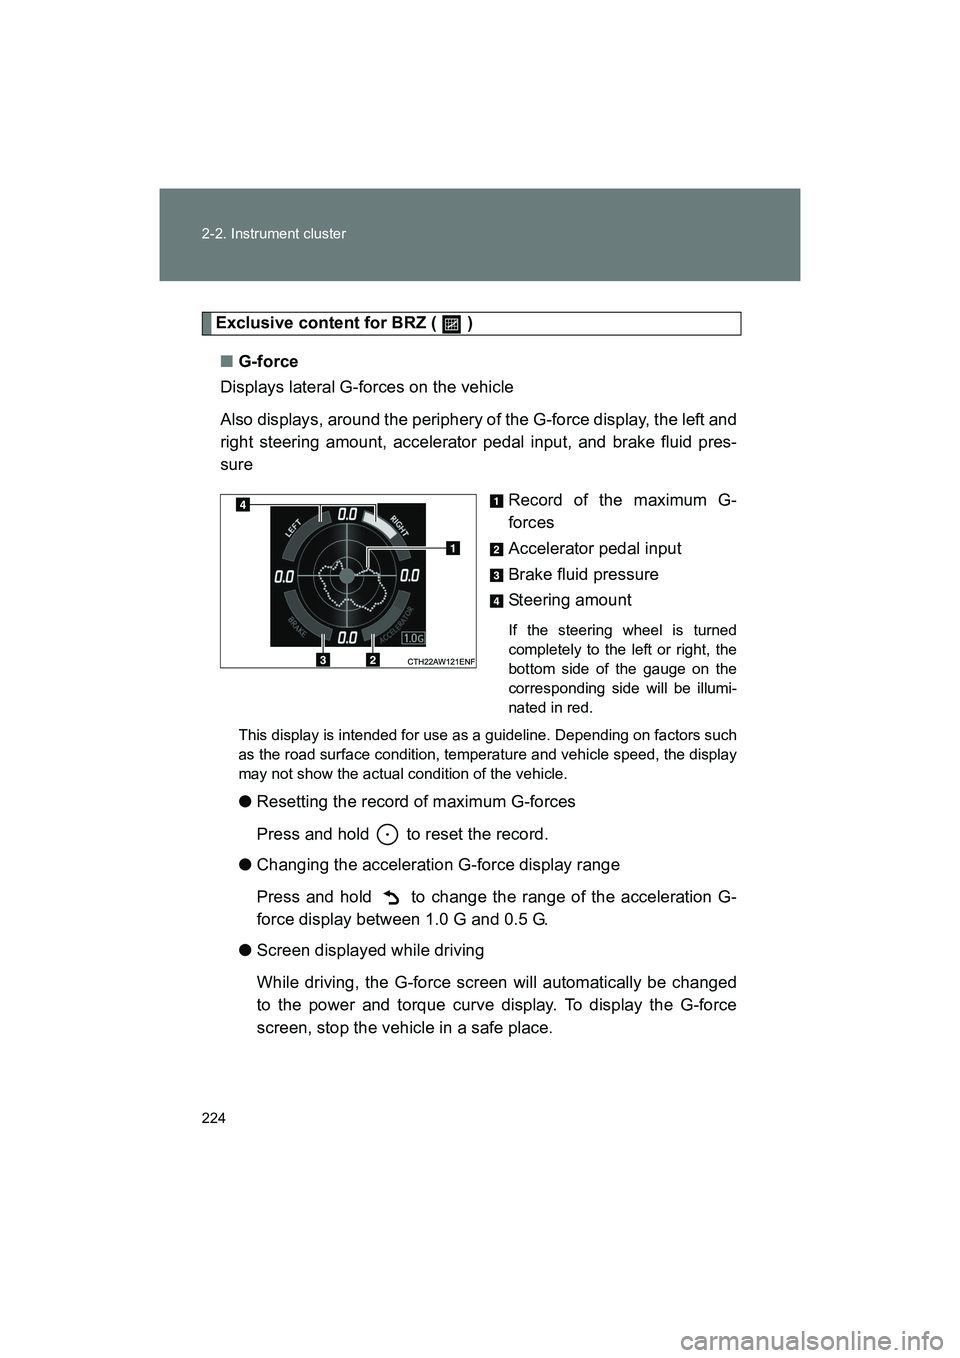
Exclusive content for BRZ ( )■ G-force
Displays lateral G-forces on the vehicle
Also displays, around the periphery of the G-force display, the left and
right steering amount, accelerator pedal input, and brake fluid pres-
sure
Record of the maximum G-
forces
Accelerator pedal input
Brake fluid pressure
Steering amount
If the steering wheel is turned
completely to the left or right, the
bottom side of the gauge on the
corresponding side will be illumi-
nated in red.
This display is intended for use as a guideline. Depending on factors such
as the road surface condition, temperature and vehicle speed, the display
may not show the actual condition of the vehicle.
● Resetting the record of maximum G-forces
Press and hold to reset the record.
● Changing the acceleration G-force display range
Press and hold to change the range of the acceleration G-
force display between 1.0 G and 0.5 G.
● Screen displayed while driving
While driving, the G-force screen will automatically be changed
to the power and torque curve display. To display the G-force
screen, stop the vehicle in a safe place.
Page 225 of 568
225
2-2. Instrument cluster
2
When driving
BRZ_U (A4450BE-A)
■
Power and torque curve
Power output
To r q u e
Current engine speed
The vertical bar will slide laterally
according to the current engine
speed.
This chart is intended for reference only and does not show the actual
engine torque or output.
Page 270 of 568
270 2-4. Using other driving systems
BRZ_U (A4450BE-A)■
Adjusting the angle of the rear wing
While holding the bolt on the rear
side with a TORX wrench, using
a wrench, socket wrench and
socket, or similar tool, remove
the nut and washers.
Remove the bolt and washers.
Adjust the angle of the rear wing.
Standard (initial delivery) posi-
tion
High downforce position
We recommend position for
attaining both stability at high
speeds and enhanced handling.
Install the bolt and washers.
While holding the bolt with a
TORX wrench, install the wash-
ers and nut and tighten the nut
using a wrench, socket wrench
and socket, or similar tool.
Tightening torque:
2.2 ft•lbf (3 N•m, 0.3 kgf•m)
Front of vehicleSTEP 1
STEP 2 Front of vehicle
STEP 3
STEP 4 Front of vehicle
Page 463 of 568
5
When trouble arises
463
5-2. Steps to take in an emergency
BRZ_U (A4450BE-A)
Lower the vehicle.
Firmly tighten each nut two or
three times in the order shown in
the illustration.
Tightening torque:
89 ft•lbf (120 N•m, 12.2 kgf•m)
Stow the flat tire, tire jack and all tools. (
→P. 465)
STEP 3
STEP 4
STEP 5
Page 467 of 568

5
When trouble arises
467
5-2. Steps to take in an emergency
BRZ_U (A4450BE-A)
WARNING
■Replacing a flat tire
●Do not touch the disc wheels or the area around the brakes immedi-
ately after the vehicle has been driven.
After the vehicle has been driven the disc wheels and the area around
the brakes will be extremely hot. Touching these areas with hands, feet
or other body parts while changing a tire, etc. may result in burns.
●Do not attach a heavily damaged wheel ornament, as it may fly off the
wheel while the vehicle is moving.
●Failure to follow these precautions could cause the wheel nuts to
loosen and the tire to fall off, resulting in death or serious injury.
• Have the wheel nuts tightened with a torque wrench to 89 ft•lbf (120
N•m, 12.2 kgf•m) as soon as possible after changing wheels.
• When installing a tire, only use wheel nuts that have been specifi- cally designed for that wheel.
• If there are any cracks or deformations in the bolt screws, nut threads or bolt holes of the wheel, have the vehicle inspected by
your SUBARU dealer.
• When installing the wheel nuts, be sure to install them with the tapered ends facing inward. ( →P. 387)
Page 502 of 568
502 6-1. Specifications
BRZ_U (A4450BE-A)
Steering
Tires and wheels (for vehicles sold in the U.S.A. and Canada)Ty p e A
Ty p e B
Free play Less than 1.2 in. (30 mm)
Tire size 215/45R17 87W, T135/80D16 101M
Tire inflation pressure
(Recommended cold tire
inflation pressure) Front
35 psi (240 kPa, 2.4 kgf/cm2 or bar)
Rear 35 psi (240 kPa, 2.4 kgf/cm
2 or bar)
Spare 60 psi (420 kPa, 4.2 kgf/cm
2 or bar)
Wheel size 17 × 7 J, 16 × 4T (spare)
Wheel nut torque 89 ft•lbf (120 N•m, 12.2 kgf•m)
Tire size 215/45R17 87W, T145/70D17 106M
Tire inflation pressure
(Recommended cold tire
inflation pressure)Front
35 psi (240 kPa, 2.4 kgf/cm
2 or bar)
Rear 35 psi (240 kPa, 2.4 kgf/cm
2 or bar)
Spare 60 psi (420 kPa, 4.2 kgf/cm
2 or bar)
Wheel size 17 × 7 1/2 J, 17 × 4T (spare)
Wheel nut torque 89 ft•lbf (120 N•m, 12.2 kgf•m)