Page 46 of 348

The essentials
Service due
When the ser v
ic
e date is due, an audible
warning is given when the ignition is switch-
ed on and the spanner displayed on the
screen flashes for a few seconds .
Vehicles with text messages : Service now
will be shown on the instrument panel dis-
play.
Reading a service notification
With the ignition switched on, the engine off
and the vehicle at a standstill, the current
service notification can be read:
Press and hold the button 0.0/SET for more
th an 5 sec
ond
s to consult the service mes-
sage 2 .
When the ser v
ic
e date has passed , a minus
sign is displayed in front of the number of kil-
ometres or days.
Vehicles with text messages : the following
message is displayed: Service --- km
(miles) or --- days ago .
Resetting service interval display
If the service was not carried out by a SEAT
dealership, the display can be reset as fol-
lows: ● Switch off the ignition, press and hold the
button 0.0/S
ET
2 .
● Switch ignition back on. ●
Rel
e
ase the button 0.0/SET and press it
ag ain f
or the ne
xt 20 seconds. Note
● The serv ic
e message disappears after a few
seconds, when the engine is started or when OK/RESET is pressed on the windscreen wiper
lev er
, or OK on the multifunction steering
wheel.
● In v
ehicles with the LongLife system in
which the batt
ery has been disconnected for
a long period of time, it is not possible to cal-
culate the date of the next service. Therefore
the service interval display may not be cor- rect. In this case, bear in mind the maximum
service intervals permitted in the ››› Booklet
Maintenance Programme.
● If you reset the display manually, the next
servic
e interval will be indicated as in vehi-
cles with fixed service intervals. For this rea-
son we recommend that the service interval
display be reset by a SEAT authorised Dealer. Cruise control
Oper atin
g the c
ruise control system
(CCS)* Fig. 49
On the left of the steering column:
sw it
c
hes and controls for operating the CCS Fig. 50
On the left of the steering column:
thir d l
ev
er to operate the CCS. 44
Page 49 of 348

The essentials
Front brake pads worn.›››
page
188
it lights up:
Fault in the ESC, or dis-
connection caused by the system.››› page
189
flashes: ESC or ASR activated.
ASR manually deactivated.›››
page
189ESC in Sport mode.
ABS faulty or does not work.
Rear fog light switched on.›››
page
144
lights up or flashes:
fault in the
emission control system.››› page
204
it lights up:
pre-heating of diesel
engine.
››› page
205
flashes: fault in the diesel engine
management.
fault in the petrol engine manage-
ment.›››
page
205
lights up or flashes:
fault in the
steering system.››› page
200
Tyre pressure too low, or fault in
the tyre pressure monitoring sys-
tem.›››
page
311
Fuel tank almost empty.›››
page
118
Fault in airbag system and seat
belt tensioners.›››
page
89
Lane Assist is switched on, but not
active.›››
page
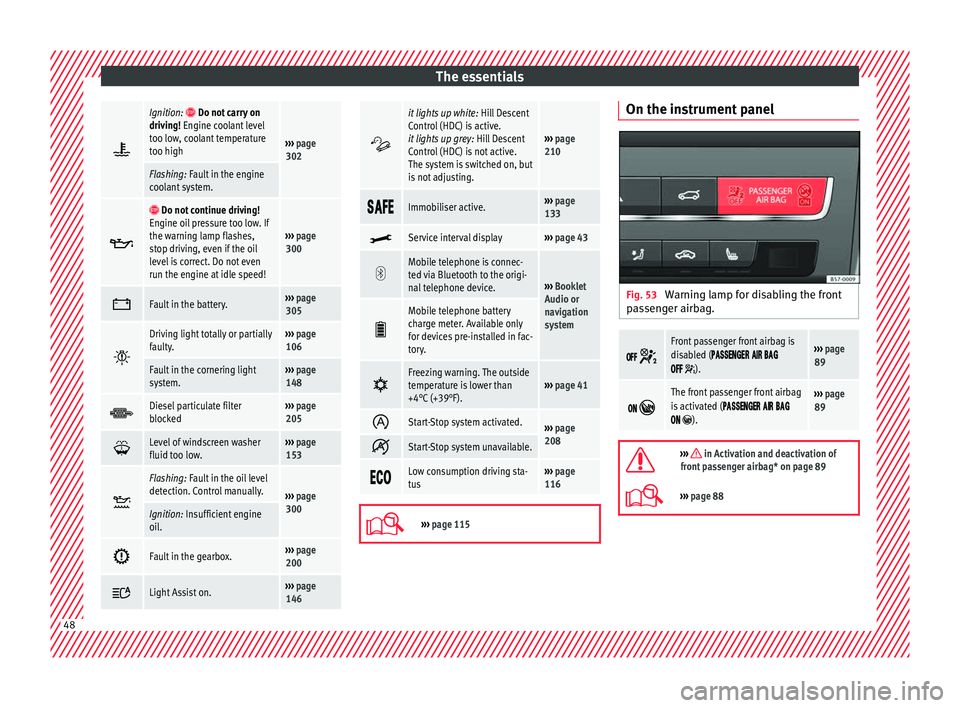
230 Other warning lamps
Left or right turn signal.›››
page
145
Hazard warning lights on.››› page
149
Trailer turn signals.›››
page
273
it lights up green:
Auto Hold activa-
ted.››› page
211
it lights up green:
Press the brake
pedal!
It blinks in green: the selector lever
locking button has not engaged.››› page
193
it lights up green:
cruise control ac-
tivated or speed limiter switched
on and active.
››› page
212
it blinks in green: the speed set by
the speed limiter has been excee-
ded.
it lights up green:
Lane Assist is
switched on and active.››› page
230
Main beam on or flasher on.›››
page
145
››› in Warning and control lamps on
page 119
››› page 119 On the instrument panel display
Fig. 52
On the instrument panel display: door
open.
Do not continue driving!
With the corresponding indi-
cation: door(s), rear lid or bon-
net open or not properly
closed.››› page
125
››› page
137
››› page
298
» 47
Page 50 of 348

The essentials
Ignition: Do not carry on
driving! Engine coolant level
too low, coolant temperature
too high
››› page
302
Flashing: Fault in the engine
coolant system.
Do not continue driving!
Engine oil pressure too low. If
the warning lamp flashes,
stop driving, even if the oil
level is correct. Do not even
run the engine at idle speed!
››› page
300
Fault in the battery.›››
page
305
Driving light totally or partially
faulty.›››
page
106
Fault in the cornering light
system.››› page
148
Diesel particulate filter
blocked›››
page
205
Level of windscreen washer
fluid too low.›››
page
153
Flashing: Fault in the oil level
detection. Control manually.
›››
page
300
Ignition: Insufficient engine
oil.
Fault in the gearbox.›››
page
200
Light Assist on.›››
page
146
it lights up white:
Hill Descent
Control (HDC) is active.
it lights up grey: Hill Descent
Control (HDC) is not active.
The system is switched on, but
is not adjusting.
››› page
210
Immobiliser active.›››
page
133
Service interval display›››
page 43
Mobile telephone is connec-
ted via Bluetooth to the origi-
nal telephone device.
›››
Booklet
Audio or
navigation
system
Mobile telephone battery
charge meter. Available only
for devices pre-installed in fac-
tory.
Freezing warning. The outside
temperature is lower than
+4°C (+39°F).›››
page 41
Start-Stop system activated.›››
page
208
Start-Stop system unavailable.
Low consumption driving sta-
tus›››
page
116
›››
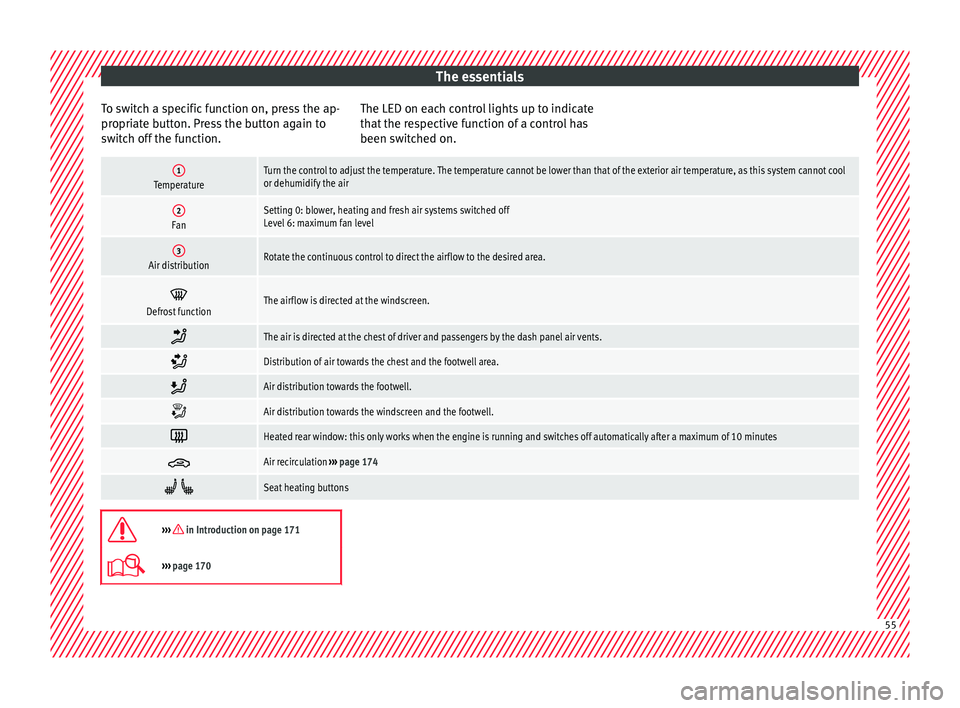
page 115 On the instrument panel
Fig. 53
Warning lamp for disabling the front
p a
s
senger airbag.
Front passenger front airbag is
disabled (
).
››› page
89
The front passenger front airbag
is activated (
).
››› page
89
››› in Activation and deactivation of
front passenger airbag* on page 89
››› page 88 48
Page 54 of 348

The essentials
Defrost functionThe air drawn in from outside the vehicle is directed at the windscreen and air recirculation is automatically switched off. To defrost the wind-
screen more quickly, the air is dehumidified at temperatures over approximately +3°C (+38°F) and the fan runs at maximum output.
The air is directed at the chest of driver and passengers by the dash panel air vents.
Air distribution towards the footwell.
Upward air distribution.
Heated rear window: this only works when the engine is running and switches off automatically after a maximum of 10 minutes.
Air recirculation
Seat heating buttons
Press the button to switch on or off the cooling system.
Press the button to make maximum cooling capacity available. The recirculation of air and the cooling system turn on automatically and air distri-
bution adjusts automatically to the position .
When the warning light for button lights up, the settings on the driver side also apply to the passenger side. Press the button or the temper-
ature control on the passenger side
Automatic adjustment of temperature, fan, and air distribution. Press the button: the warning lamp on the button will light up .
Press the configuration button : the air conditioning operation menu will be displayed on the Easy Connect system screen.
Switching offTurn the blower control to the position or press the button.
››› in Introduction on page 171
›››
page 170 52
Page 56 of 348
The essentials
Air distribution towards the footwell.
Air distribution towards the windscreen and the footwell.
Heated rear window: this only works when the engine is running and switches off automatically after a maximum of 10 minutes.
Air recirculation
Seat heating buttons
Maximum cooling power. The recirculation of air and the cooling system turn on automatically and air distribution adjusts automatically to the
position
››› in Introduction on page 171
›››
page 170 How does the heating and the fresh air system work?
Fig. 59
In the centre console: heating system and
fre sh air c
ontrols. 54
Page 57 of 348

The essentials
To switch a specific function on, press the ap-
pr opri
at
e button. Press the button again to
switch off the function. The LED on each control lights up to indicate
that the r
espective function of a control has
been switched on.
1TemperatureTurn the control to adjust the temperature. The temperature cannot be lower than that of the exterior air temperature, as this system cannot cool
or dehumidify the air
2FanSetting 0: blower, heating and fresh air systems switched off
Level 6: maximum fan level
3Air distributionRotate the continuous control to direct the airflow to the desired area.
Defrost functionThe airflow is directed at the windscreen.
The air is directed at the chest of driver and passengers by the dash panel air vents.
Distribution of air towards the chest and the footwell area.
Air distribution towards the footwell.
Air distribution towards the windscreen and the footwell.
Heated rear window: this only works when the engine is running and switches off automatically after a maximum of 10 minutes
Air recirculation
››› page 174
Seat heating buttons
››› in Introduction on page 171
›››
page 170 55
Page 58 of 348
The essentials
Fluid Level control Fi l
lin
g capacities
Tank level
Petrol and diesel
engines
Front-wheel drive vehicles :
50 l, of which approx. 7 l reserve
Four-wheel drive vehicles :
55 l, of which approx. 8.5 l reserve
Capacity of the windscreen washer fluid container
Versions without
headlight washer
systemapprox. 3 litres
Versions with
headlight washer
systemapprox. 5 litres Fuel
Fig. 60
Fuel tank flap with tank cap attached. The flap that covers the tank cap is unlocked
and loc
k
ed aut
omatically using the central
locking. Opening the fuel tank cap
● Open the fuel tank flap by pressing on the
left
side.
● Unscrew the cap by turning it to the left.
● Place it in the space on the hinge of the
open flap ››
› Fig. 60.
Closing the fuel tank cap
● Unscrew the cap by turning it to the right as
far as
it will go.
● Close the lid.
››› in Refuelling on page 292
››› page 292 56
Page 59 of 348
The essentials
Oil Fig. 61
Engine oil dipstick. Fig. 62
In the engine compartment: Engine
oil fi
ller cap. The level is measured using the dipstick loca-
t
ed in the en
gine c
ompartment
››› page 298.
The oil should leave a mark between zones A and
C . It should never exceed zone
A .
● Zone A : Do not add oil.
● Zone B : You can add oil but keep the level
in th at
zone. ●
Zone C : Add oil up to zone
B .
T op
pin
g up engine oil
● Unscrew cap from oil filler opening.
● Add oil slowly.
● At the same time, check the level to ensure
you do not a
dd too much. ●
When the oil l
evel reaches at least zone B ,
u n
s
crew the engine oil filler cap carefully.
Engine oil additives
No type of additive should be mixed with the
engine oil. The deterioration caused by these
additives is not covered by the warranty. » 57