Page 259 of 364

3.43
REAR SEATS (4/6)
To automatically fold down
the seats (flat position)
The rear seats are electrically unlocked
to fold down in order to create a flat
floor.
There are two ways to manoeuvre the
seats:
– from the boot using control 12;
– on the multifunction screen 13. Disabling the function
– With the engine running, a buckled
seat belt prevents the movement of
the relevant seat.
– Once the vehicle is moving the two controls are deactivated.
To raise the seats manually
Raise each seat as described on the
previous pages.
13
Conditions of use
With the vehicle at a standstill and the
rear seat belts unlocked:
– from control 12, with the boot lid
open;
– from the multifunction screen 13, with the engine running.
Note: Before performing any unlock-
ing operations to fold down the seats,
the trays on the back of the front seats
must be folded away.
12
When moving the rear
seats:
– check that no one is near
to any of the moving parts;
– check that there is sufficient space around the seat;
– check that nothing is obstructing the section of the boot reserved
for storing the seat;
For safety reasons, carry out any
adjustments when the vehicle is sta-
tionary.
Page 262 of 364
3.46
TAILGATE
2
Manual controls
To open
Press button 1 and lift the tailgate.
To close
Lower the boot lid using the handle
inside the boot 2 to assist you.
Opening the doors manually
from the inside
If it is impossible to unlock the tailgate,
it can be done manually from inside:
– access the luggage compartment by
folding forward the seatback(s) of
the rear bench seat;
– insert a pencil or similar object in recess 3 and slide the unit as shown
in the illustration;
– push the tailgate to open it.
The attaching of any carry-
ing device (bike rack, lug-
gage box, etc.) resting on
the luggage compartment
lid is prohibited. To install a carrying
device on your vehicle, contact an
Approved Dealer.
1
3
Page 264 of 364

3.48
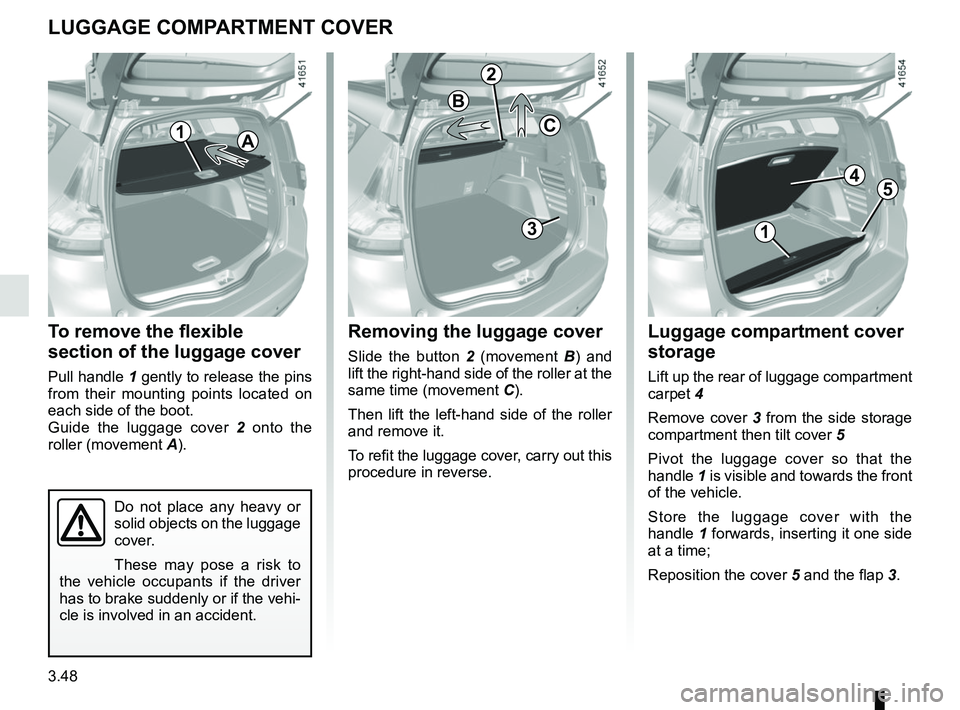
Removing the luggage cover
Slide the button 2 (movement B ) and
lift the right-hand side of the roller at the
same time (movement C).
Then lift the left-hand side of the roller
and remove it.
To refit the luggage cover, carry out this
procedure in reverse.
To remove the flexible
section of the luggage cover
Pull handle 1 gently to release the pins
from their mounting points located on
each side of the boot.
Guide the luggage cover 2 onto the
roller (movement A).
LUGGAGE COMPARTMENT COVER
1
Luggage compartment cover
storage
Lift up the rear of luggage compartment
carpet 4
Remove cover 3 from the side storage
compartment then tilt cover 5
Pivot the luggage cover so that the
handle 1 is visible and towards the front
of the vehicle.
Store the luggage cover with the
handle 1 forwards, inserting it one side
at a time;
Reposition the cover 5 and the flap 3.
2
B
A
31
C
45
Do not place any heavy or
solid objects on the luggage
cover.
These may pose a risk to
the vehicle occupants if the driver
has to brake suddenly or if the vehi-
cle is involved in an accident.
Page 265 of 364
3.49
LUGGAGE COMPARTMENT FITTINGS AND STORAGE (1/2)
Mobile floor 1
Depending on the vehicle, the mobile
floor is reversible.
Flat position
It allows you to have a flat floor by fold-
ing down the backs of the rear bench
seats and to compartmentalise the boot
into two distinct spaces.
The mobile floor is positioned on the
runners (2 and 3).
Maximum load allowed on the
mobile floor: 120 kg, evenly distrib-
uted.
Storage position
This allows for more space to store
things in the boot.
– Remove the mobile floor 1;
– place it in the boot under the runners (2 and 3).
3
Intermediate position
(depending on vehicle)
In the blocked position, it allows you to
access the tools stored under the boot
carpet.
– Remove the mobile floor 1 by moving
it back (movement A) and pivoting it
upwards (movement B);
– place it in the boot, letting it be guided by the runners ( 2 and 3).
1
2
A
B
1
1
Page 267 of 364
3.51
Always place the objects to be trans-
ported so that their largest side rests
against the back of the rear seat for
normal loads (e.g.: A), or against the
back of the front seats B when the rear
seatbacks are folded down.
If you have to place objects on the
folded seat back, it is vital that you
remove the headrests before folding
the seat back so that it can be folded as
flat as possible against the seat.
TRANSPORTING OBJECTS IN THE BOOT
A
Always position the heavi-
est items directly on the
floor. Use the lashing points
on the floor of the luggage
compartment, if these are fitted to
the vehicle. The luggage should be
loaded in such a way that no items
will be thrown forward and strike the
occupants if the driver has to brake
suddenly. Fasten the rear seat belts,
even if the seats are not occupied.
B
Page 270 of 364
3.54
LUGGAGE NET (2/3)
6
Fitting the luggage net
behind the rear seats
(behind the second row rear seats)
Inside the vehicle on each side:
– push the second row seats fully forward;
– fit the mobile floor in the storage po- sition (refer to the information on
“Boot storage space and fittings” in
Section 3) or remove it;
67
– lift cover 6 to access the luggage net
upper mounting rail;
– insert upper rod 7 for the net into the
rail;
Page 271 of 364
3.55
8
– attach the hook 10 of the luggage strap to the anchor points 8 closest
to the position of the mobile floor
(please refer to the information in
“Passenger Compartment Storage,
boot storage”, section 3);
– adjust net strap 9 so that it is taut.
– adjust the position of the second row seats: ensure that the seatbacks do
not touch the luggage net.
10
9
LUGGAGE NET (3/3)
8
The luggage net is de-
signed to retain a maximum
weight of 10 kg.
Risk of injury.
Page 295 of 364

5.3
PUNCTURE, EMERGENCY SPARE WHEEL (2/3)
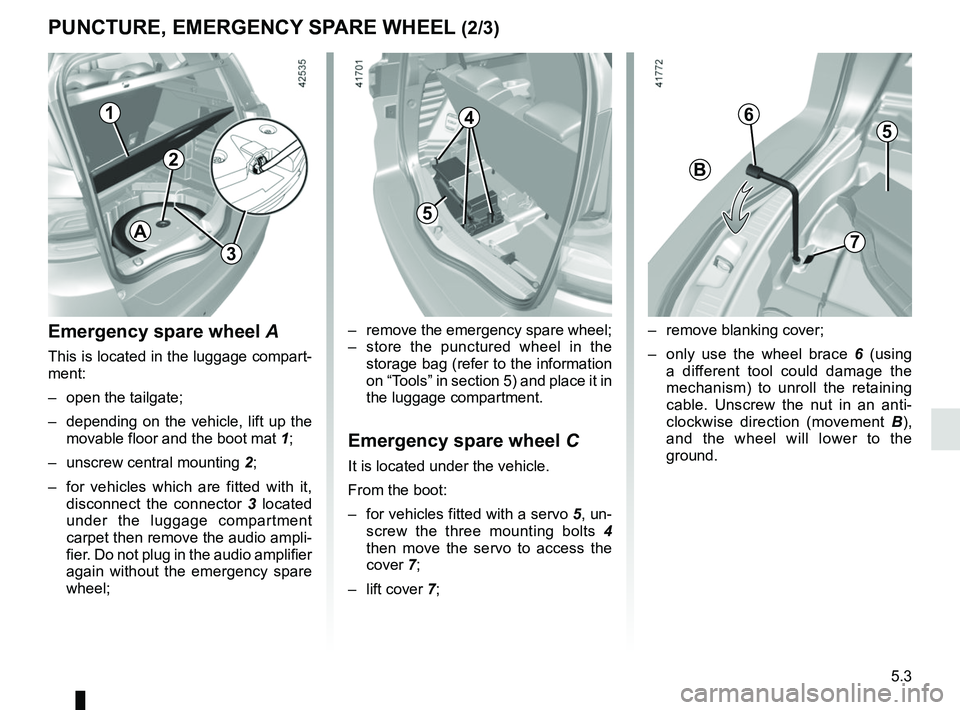
Emergency spare wheel A
This is located in the luggage compart-
ment:
– open the tailgate;
– depending on the vehicle, lift up the movable floor and the boot mat 1;
– unscrew central mounting 2;
– for vehicles which are fitted with it, disconnect the connector 3 located
under the luggage compartment
carpet then remove the audio ampli-
fier. Do not plug in the audio amplifier
again without the emergency spare
wheel;
2
A
6
7
B
– remove the emergency spare wheel;
– store the punctured wheel in the storage bag (refer to the information
on “Tools” in section 5) and place it in
the luggage compartment.
Emergency spare wheel C
It is located under the vehicle.
From the boot:
– for vehicles fitted with a servo 5, un-screw the three mounting bolts 4
then move the servo to access the
cover 7;
– lift cover 7; – remove blanking cover;
– only use the wheel brace
6 (using
a different tool could damage the
mechanism) to unroll the retaining
cable. Unscrew the nut in an anti-
clockwise direction (movement B),
and the wheel will lower to the
ground.
4
5
5
1
3