Page 107 of 364
1.101
HEADLIGHT BEAM ADJUSTMENT (1/2)
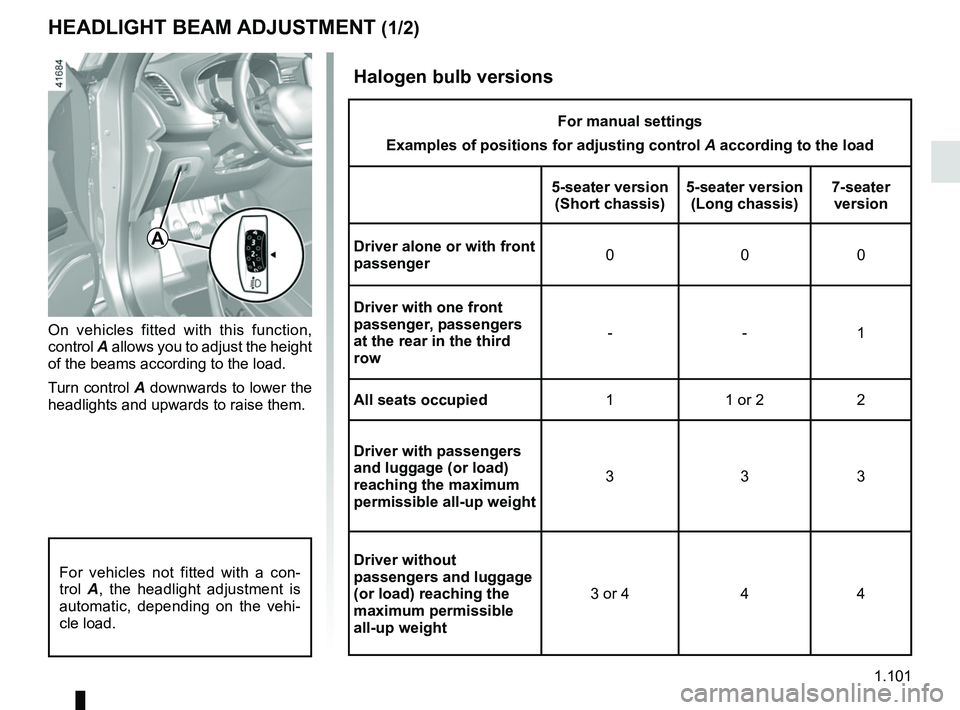
On vehicles fitted with this function,
control A allows you to adjust the height
of the beams according to the load.
Turn control A downwards to lower the
headlights and upwards to raise them.
A
For vehicles not fitted with a con-
trol A, the headlight adjustment is
automatic, depending on the vehi-
cle load.
Halogen bulb versions
For manual settings
Examples of positions for adjusting control A according to the load
5-seater version (Short chassis) 5-seater version
(Long chassis) 7-seater
version
Driver alone or with front
passenger 000
Driver with one front
passenger, passengers
at the rear in the third
row --1
All seats occupied 1 1 or 2 2
Driver with passengers
and luggage (or load)
reaching the maximum
permissible all-up weight 333
Driver without
passengers and luggage
(or load) reaching the
maximum permissible
all-up weight 3 or 4 4 4
Page 108 of 364
1.102
HEADLIGHT BEAM ADJUSTMENT (2/2)
LED versions
For manual settings
Examples of positions for adjusting control A according to the load
5-seater version (Short chassis) 5-seater version
(Long chassis) 7-seater
version
Driver alone or with front
passenger 000
Driver with one front
passenger, passengers
at the rear in the third
row --1
All seats occupied 1 or 2 1 or 2 2
Driver with passengers
and luggage (or load)
reaching the maximum
permissible all-up weight 2 or 3 3 3
Driver without
passengers and luggage
(or load) reaching the
maximum permissible
all-up weight 3 or 4 4 4
Page 225 of 364

3.9
10
AUTOMATIC CLIMATE CONTROL: Controls A (1/5)
15
6543
9
1216
17
18
19
11
Controls A
Press zone 14 to access the multifunc-
tion screen controls 1. The presence of
the controls detailed below will depend
on the vehicle model.
2 and 7 Left and right temperature indi-
cation adjustment.
3 De-icing/demisting of the rear screen and, depending on the vehicle, the
door mirrors.
4, 8, 9 and 10 automatic modes
5 Air recirculation.
6 “Clear View” function. 11
and 18 Ventilation speeds.
12 Passenger compartment air distri- bution.
13 Right and left temperature display.
14 Zone displaying air conditioning set- tings.
15 “DUAL” function.
16 “Automatic recirculation” function.
17 Air conditioning.
19 Stopping the system.
Automatic mode
The automatic climate control system
guarantees comfort in the passen-
ger compartment and good visibility
(except in the event of extreme condi-
tions), while optimising consumption.
The system controls the ventilation
speed, air distribution, air recirculation,
and starting and stopping the air condi-
tioning and air temperature.
This mode consists of a choice of three
programmes:
NORMAL : allows the selected comfort
level to be best attained, depending on
the exterior conditions. Press button 4
or key 9.
SOFT: reaches the desired comfort
level more gently and silently. Press
button 8.
FAST: increases the flow of air in the
passenger compartment. This mode
is recommended in particular to opti-
mise comfort in the rear seats. Press
button 10.8
14
13
72
13
1
Some buttons have a warning light
indicating their operative state.
A
Climate
Page 230 of 364

3.14
AUTOMATIC CLIMATE CONTROL: Controls B and C (1/5)
Indicators
The following indicators are displayed
on the screen 3:
1 Active mode, ventilation speed and air distribution in the passenger com-
partment (temporary display after
pressing the associated controls).
2 Outside air temperature.
4 Air temperature, left and right.
Automatic mode
The automatic climate control system
guarantees comfort in the passen-
ger compartment and good visibility
(except in the event of extreme condi-
tions), while optimising consumption.
The system controls the ventilation
speed, air distribution, air recirculation,
and starting and stopping the air condi-
tioning and air temperature.
This mode consists of a choice of three
programmes:
AUTO: allows the selected comfort
level to be best attained, depending
on the exterior conditions. Press the
button 15.
SOFT: reaches the desired comfort
level more gently and silently. Press the
button 14.
FAST: increases the flow of air in the
passenger compartment. This mode is
recommended in particular to optimise
comfort in the rear seats. Press the
button 16.
10
Some buttons have a warning light
indicating their operative state.
1113141512
89
6
Controls B and C
5 and 11 Left and right temperature in-
dication adjustment.
6 De-icing/demisting of the rear screen and, depending on the vehicle, the
door mirrors.
7 Passenger compartment air distribu- tion.
8 “Automatic recirculation” function.
9 Air recirculation.
10 “Clear View” function.
12 and 18 Ventilation speeds.
13 “DUAL" function.
14, 15, and 16 Automatic modes. 17 Air conditioning.
7
1851716
1
44
2
10
1113141512
89
6
7
1851716
1
44
2BC
33
Page 256 of 364
3.40
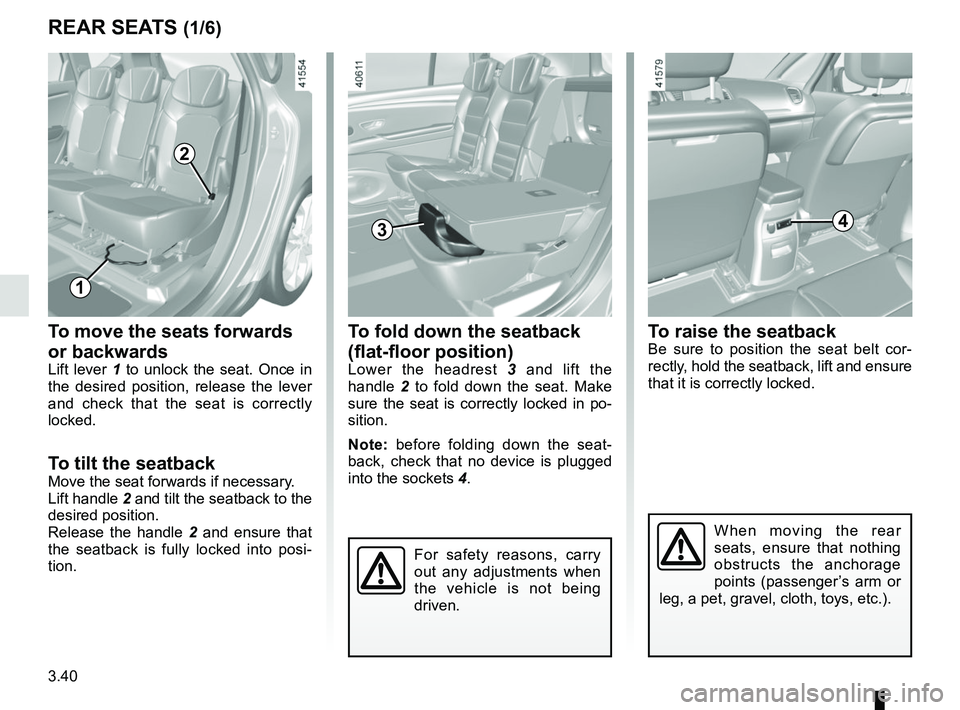
To move the seats forwards
or backwards
Lift lever 1 to unlock the seat. Once in
the desired position, release the lever
and check that the seat is correctly
locked.
To tilt the seatbackMove the seat forwards if necessary.
Lift handle 2 and tilt the seatback to the
desired position.
Release the handle 2 and ensure that
the seatback is fully locked into posi-
tion.
REAR SEATS (1/6)
2
When moving the rear
seats, ensure that nothing
obstructs the anchorage
points (passenger’s arm or
leg, a pet, gravel, cloth, toys, etc.).
3
To fold down the seatback
(flat-floor position)
Lower the headrest 3 and lift the
handle 2 to fold down the seat. Make
sure the seat is correctly locked in po-
sition.
Note: before folding down the seat-
back, check that no device is plugged
into the sockets 4.
1
For safety reasons, carry
out any adjustments when
the vehicle is not being
driven.
To raise the seatbackBe sure to position the seat belt cor-
rectly, hold the seatback, lift and ensure
that it is correctly locked.
4
Page 257 of 364
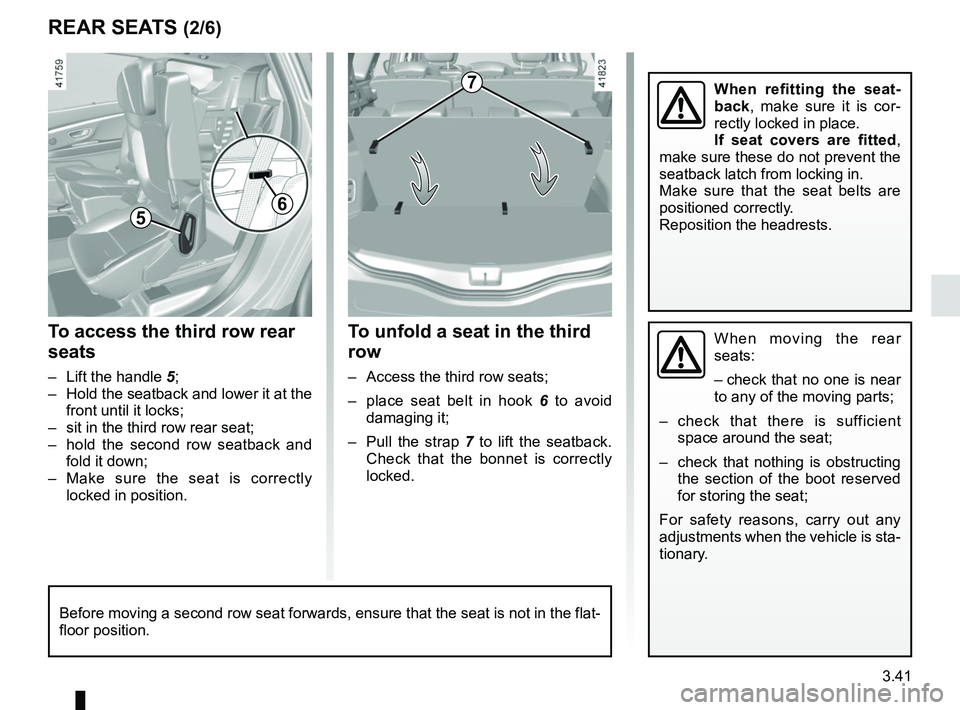
3.41
REAR SEATS (2/6)
To unfold a seat in the third
row
– Access the third row seats;
– place seat belt in hook 6 to avoid
damaging it;
– Pull the strap 7 to lift the seatback.
Check that the bonnet is correctly
locked.
To access the third row rear
seats
– Lift the handle 5;
– Hold the seatback and lower it at the front until it locks;
– sit in the third row rear seat;
– hold the second row seatback and fold it down;
– Make sure the seat is correctly locked in position.
56
When moving the rear
seats:
– check that no one is near
to any of the moving parts;
– check that there is sufficient space around the seat;
– check that nothing is obstructing the section of the boot reserved
for storing the seat;
For safety reasons, carry out any
adjustments when the vehicle is sta-
tionary.
Before moving a second row seat forwards, ensure that the seat is not in\
the flat-
floor position.
7When refitting the seat-
back, make sure it is cor-
rectly locked in place.
If seat covers are fitted ,
make sure these do not prevent the
seatback latch from locking in.
Make sure that the seat belts are
positioned correctly.
Reposition the headrests.
Page 258 of 364
3.42
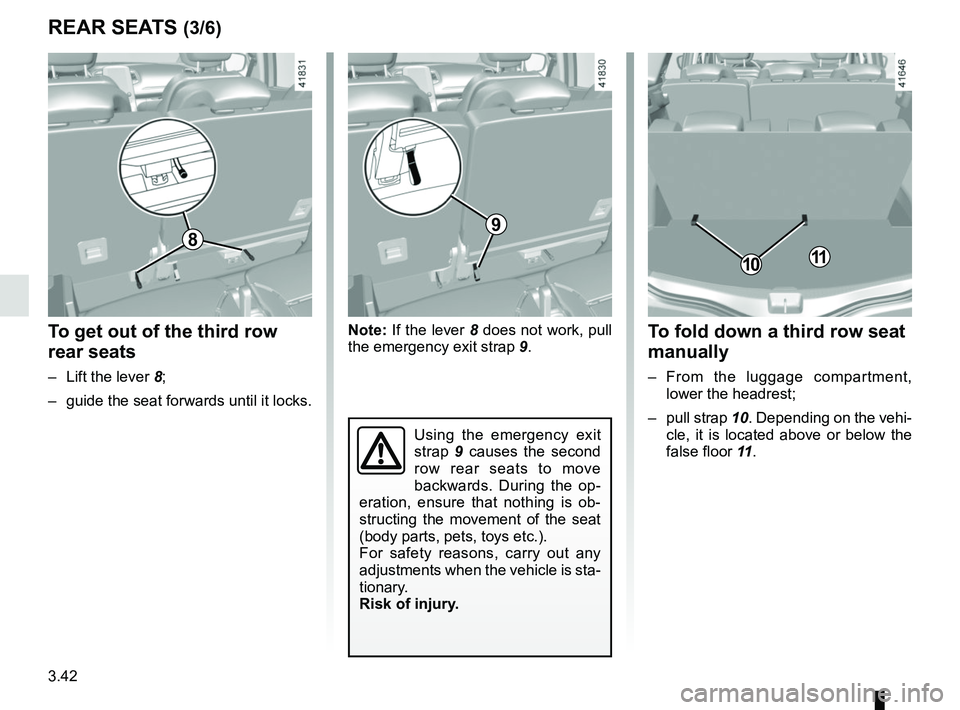
REAR SEATS (3/6)To fold down a third row seat
manually
– From the luggage compartment, lower the headrest;
– pull strap 10. Depending on the vehi-
cle, it is located above or below the
false floor 11 .
10
To get out of the third row
rear seats
– Lift the lever 8;
– guide the seat forwards until it locks.
11
Note: If the lever 8 does not work, pull
the emergency exit strap 9.
Using the emergency exit
strap 9 causes the second
row rear seats to move
backwards. During the op-
eration, ensure that nothing is ob-
structing the movement of the seat
(body parts, pets, toys etc.).
For safety reasons, carry out any
adjustments when the vehicle is sta-
tionary.
Risk of injury.
98
Page 259 of 364

3.43
REAR SEATS (4/6)
To automatically fold down
the seats (flat position)
The rear seats are electrically unlocked
to fold down in order to create a flat
floor.
There are two ways to manoeuvre the
seats:
– from the boot using control 12;
– on the multifunction screen 13. Disabling the function
– With the engine running, a buckled
seat belt prevents the movement of
the relevant seat.
– Once the vehicle is moving the two controls are deactivated.
To raise the seats manually
Raise each seat as described on the
previous pages.
13
Conditions of use
With the vehicle at a standstill and the
rear seat belts unlocked:
– from control 12, with the boot lid
open;
– from the multifunction screen 13, with the engine running.
Note: Before performing any unlock-
ing operations to fold down the seats,
the trays on the back of the front seats
must be folded away.
12
When moving the rear
seats:
– check that no one is near
to any of the moving parts;
– check that there is sufficient space around the seat;
– check that nothing is obstructing the section of the boot reserved
for storing the seat;
For safety reasons, carry out any
adjustments when the vehicle is sta-
tionary.