2018 RENAULT SCENIC gearbox
[x] Cancel search: gearboxPage 140 of 364
2.20
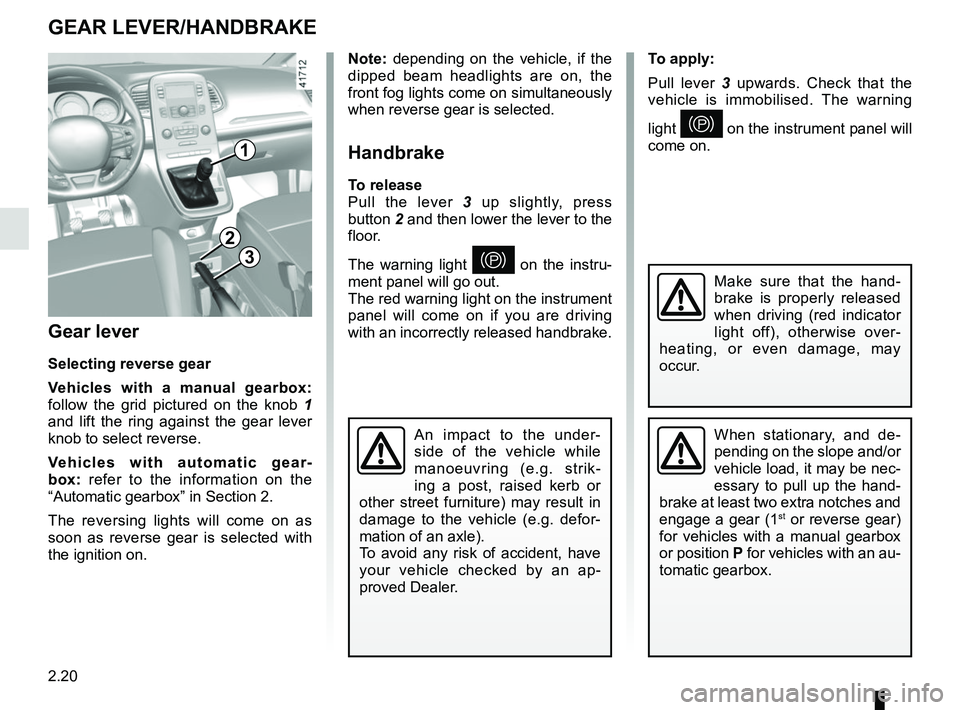
To apply:
Pull lever 3 upwards. Check that the
vehicle is immobilised. The warning
light
} on the instrument panel will
come on.
Gear lever
Selecting reverse gear
Vehicles with a manual gearbox:
follow the grid pictured on the knob 1
and lift the ring against the gear lever
knob to select reverse.
Vehicles with automatic gear-
box: refer to the information on the
“Automatic gearbox” in Section 2.
The reversing lights will come on as
soon as reverse gear is selected with
the ignition on.
1
GEAR LEVER/HANDBRAKE
Note: depending on the vehicle, if the
dipped beam headlights are on, the
front fog lights come on simultaneously
when reverse gear is selected.
Handbrake
To release
Pull the lever 3 up slightly, press
button 2 and then lower the lever to the
floor.
The warning light
} on the instru-
ment panel will go out.
The red warning light on the instrument
panel will come on if you are driving
with an incorrectly released handbrake.3
2
When stationary, and de-
pending on the slope and/or
vehicle load, it may be nec-
essary to pull up the hand-
brake at least two extra notches and
engage a gear (1
st or reverse gear)
for vehicles with a manual gearbox
or position P for vehicles with an au-
tomatic gearbox.
An impact to the under-
side of the vehicle while
manoeuvring (e.g. strik-
ing a post, raised kerb or
other street furniture) may result in
damage to the vehicle (e.g. defor-
mation of an axle).
To avoid any risk of accident, have
your vehicle checked by an ap-
proved Dealer.
Make sure that the hand-
brake is properly released
when driving (red indicator
light off), otherwise over-
heating, or even damage, may
occur.
Page 143 of 364

2.23
ELECTRONIC PARKING BRAKE (3/3)Operating faults
– If there is a fault, the © warning
light illuminates on the instrument
panel accompanied by the “Check
parking brake” message and, in
some cases, the
} warning
light.
Please contact an authorised dealer
as soon as possible.
– If there is an assisted parking brake fault, the warning light
® comes
on, along with the message “Braking
system fault”, a beep and, in some
cases, the warning light
}.
This means that you must stop as
soon as traffic conditions allow.
Versions with an automatic
gearbox
For safety reasons, automatic release
is deactivated when the driver’s door
is open or not shut properly and the
engine is running (in order to prevent
the vehicle from moving without the
driver). The “Release parking brake
manually” message appears on the
instrument panel when the driver de-
presses the accelerator.
It is therefore essential to
immobilise the vehicle by
engaging first gear (manual
gearbox) or position P (au-
tomatic gearbox). If the slope re-
quires it, chock the vehicle.
Never leave your vehicle
without moving the selec-
tor lever to position P and
switching off the engine.
This is because when the vehicle is
stationary with the engine running
and a gear engaged, the vehicle
may begin to move.
There is a risk of accidents.If no lights or sounds are ap-
parent, this indicates a fault
in the instrument panel. This
indicates that it is essential
to stop immediately (as soon as traf-
fic conditions allow). Ensure that the
vehicle is correctly immobilised and
contact an approved Dealer.
In the event of message
“Electric failure DANGER”
or “Check battery”, manu-
ally activate the electronic
parking brake by pulling switch 3 (or
position the gear lever in P for au-
tomatic gearboxes) before stopping
the engine.
Risk of loss of immobilisation of
the vehicle.
Contact an authorised dealer.
Page 193 of 364
2.73
CRUISE CONTROL (4/4)Switching off the function
The cruise control function is deacti-
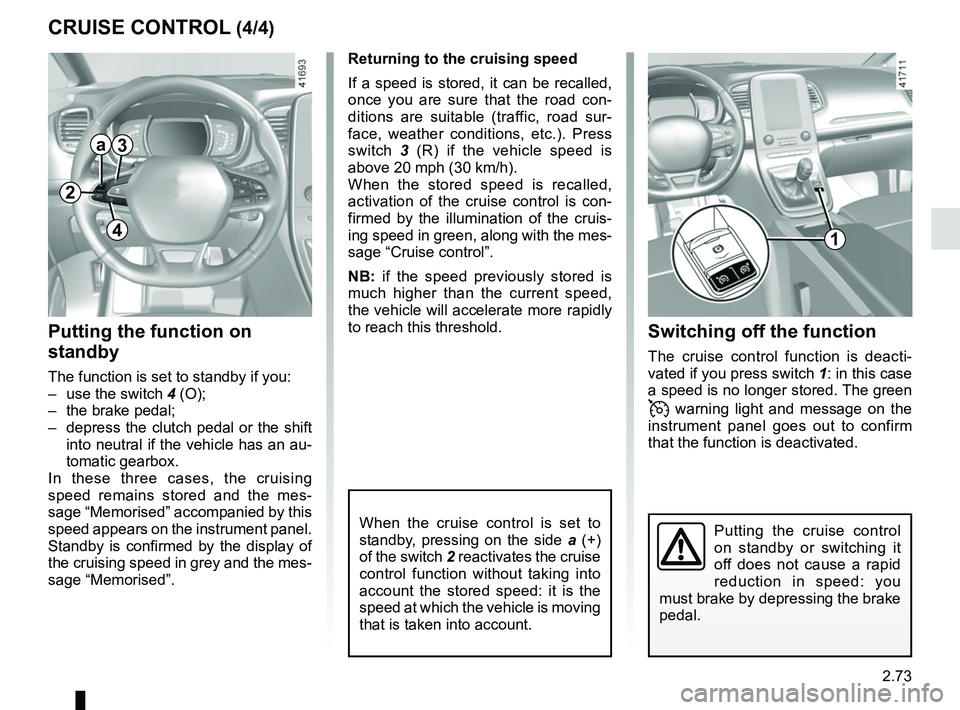
vated if you press switch 1: in this case
a speed is no longer stored. The green
warning light and message on the
instrument panel goes out to confirm
that the function is deactivated.
Returning to the cruising speed
If a speed is stored, it can be recalled,
once you are sure that the road con-
ditions are suitable (traffic, road sur-
face, weather conditions, etc.). Press
switch
3 (R) if the vehicle speed is
above 20 mph (30 km/h).
When the stored speed is recalled,
activation of the cruise control is con-
firmed by the illumination of the cruis-
ing speed in green, along with the mes-
sage “Cruise control”.
NB: if the speed previously stored is
much higher than the current speed,
the vehicle will accelerate more rapidly
to reach this threshold.
When the cruise control is set to
standby, pressing on the side a (+)
of the switch 2 reactivates the cruise
control function without taking into
account the stored speed: it is the
speed at which the vehicle is moving
that is taken into account.
Putting the function on
standby
The function is set to standby if you:
– use the switch 4 (O);
– the brake pedal;
– depress the clutch pedal or the shift into neutral if the vehicle has an au-
tomatic gearbox.
In these three cases, the cruising
speed remains stored and the mes-
sage “Memorised” accompanied by this
speed appears on the instrument panel.
Standby is confirmed by the display of
the cruising speed in grey and the mes-
sage “Memorised”.
Putting the cruise control
on standby or switching it
off does not cause a rapid
reduction in speed: you
must brake by depressing the brake
pedal.
2
a3
41
Page 206 of 364
2.86
Automatic deactivation of the
parking distance control
The system deactivates:
– when the vehicle speed is above ap-proximately 6 mph (10 km/h);
– depending on the model, when the vehicle is stationary for more than
approximately 5 seconds and an ob-
stacle is detected (such as when in a
traffic jam, etc.);
– when the vehicle is in neutral for manual gearboxes, or in position N
or P for automatic gearboxes.
PARKING DISTANCE CONTROL (5/5)
Operating faults
When the system detects an operating
fault, a beep sounds for approximately
3 seconds each time reverse gear is
selected and is accompanied by the
message “Check parking sensor” on
the instrument panel. Consult an ap-
proved dealer
Page 213 of 364

2.93
AUTOMATIC GEARBOX (1/3)
2
Operation
With gear lever 1 in position P, start the
engine.
To move out of position P, you must de-
press the brake pedal before pressing
the unlocking button 2.
With your foot on the brake pedal
(warning light
c on the display goes
out), move the lever out of position P.
Only engage D or R when the vehi-
cle is stopped, with your foot on the
brake, the accelerator pedal released
and the engine running.
1B
Selector lever 1
P: park
R: reverse
N: Neutral
D: automatic mode
M: manual mode
+: upper gear
–: lower gear
The gear engaged is displayed on the
instrument panel B and on the dis-
play A.
Note: press button 2 to go from position
D or N to R or P.
Driving in automatic mode
Put lever 1 into position D.
In most road conditions you will en-
counter, you will not need to touch your
lever again: the gears will change au-
tomatically at the right time and at the
most suitable engine speed because
the automatic system takes into ac-
count the vehicle load and road contour
and adjusts itself to the particular driv-
ing style you have chosen.
Economical driving
When driving, always leave the lever
in position D, keeping the accelerator
pedal lightly depressed to ensure auto-
matic gear changes at a lower engine
speed.
Accelerating and overtaking
Depress the accelerator pedal firmly
and fully (so that it goes beyond the
kickdown point).
This will enable you to change down
to the optimum gear within the
engine range.
A
Page 214 of 364

2.94
Special circumstances
– If the bends and road surface do
not allow you to stay in automatic
mode (e.g. in the mountains), we
recommend that you change to
manual mode. This will prevent the
automatic gearbox from changing
gear repeatedly when climbing, and
permit engine braking on long de-
scents.
– In cold weather , start the engine
and wait a few seconds before
moving the selector lever from posi-
tion P or N and engaging it in D or R
to prevent the engine stalling.
The gear selected is displayed on the
instrument panel.
Special casesIn certain driving conditions (result-
ing in, for example, engine protection,
operation of the Electronic Stability
Control programme: ESC etc.) the au-
tomated system may change the gear
automatically.
Likewise, to prevent incorrect manoeu-
vres, a gear change may be refused by
the automatic system: in this case the
gear display flashes for a few seconds
as a warning.
AUTOMATIC GEARBOX (2/3)
Driving in manual mode
Move the selector lever 1 to position D,
then move the lever to the right into po-
sition M.
Shifting the lever repeatedly allows you
to change gears manually:
– to move down through the gears, push the lever forwards;
– to move up through the gears, push the lever backwards.
1
When facing uphill, to remain
stopped, do not keep your foot on
the accelerator.
Risk of overheating the automatic
gearbox.
Check that the indicator
light P on the instrument
panel is activated before
leaving the vehicle.
Risk of loss of immobilisation of
the vehicle
Page 215 of 364
2.95
AUTOMATIC GEARBOX (3/3)
Maintenance period
The automatic gearbox does not re-
quire any maintenance. There is no
need to add oil.
Frequency of coolant level check:
please refer to the maintenance docu-
ment for your vehicle, or contact an
Authorised Dealer.
Operating faults
– when driving , if the message
“Check auto gearbox” appears on
the instrument panel, it indicates a
failure.
Contact your approved Dealer as
soon as possible;
– when driving, if the message
“Gearbox overheating” appears on
the instrument panel, stop as soon
as possible to let the gearbox cool
down and wait for the message to
disappear;
– If a vehicle with an automatic
gearbox breaks down, refer to the
information on “Towing” in Section 5.
Parking the vehicle
When the vehicle is stopped, move
the lever to position P while keeping
your foot on the brake pedal: the drive
wheels are mechanically locked by the
driveshaft.
Ensure that the electronic parking
brake is engaged.
An impact to the under-
side of the vehicle while
manoeuvring (e.g. strik-
ing a post, raised kerb or
other street furniture) may result in
damage to the vehicle (e.g. defor-
mation of an axle).
To avoid any risk of accident, have
your vehicle checked by an ap-
proved Dealer.
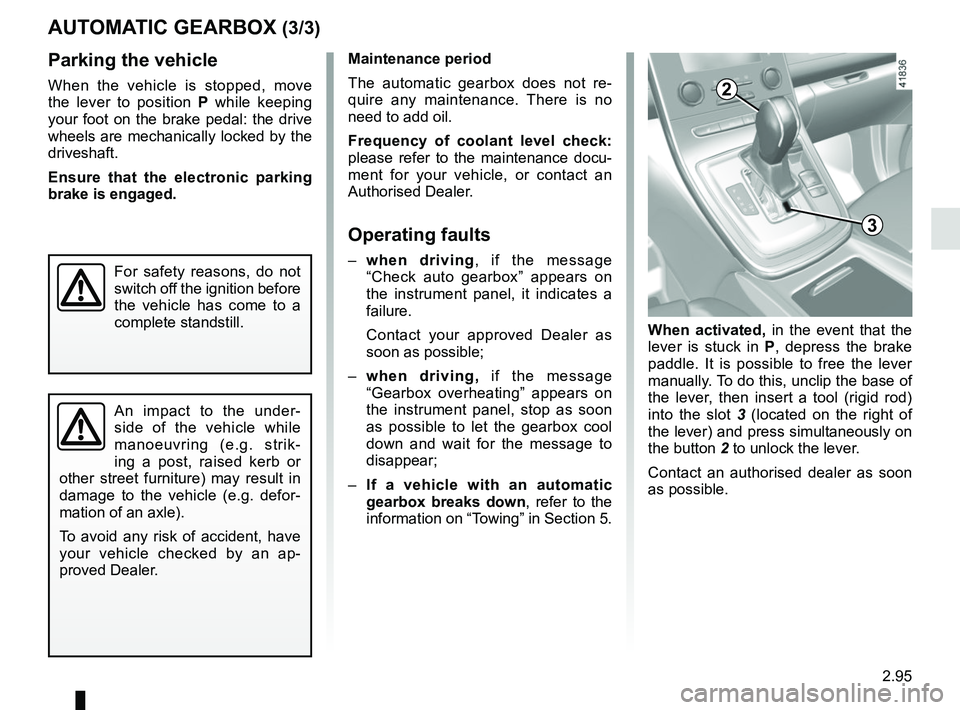
When activated, in the event that the
lever is stuck in P , depress the brake
paddle. It is possible to free the lever
manually. To do this, unclip the base of
the lever, then insert a tool (rigid rod)
into the slot 3 (located on the right of
the lever) and press simultaneously on
the button 2 to unlock the lever.
Contact an authorised dealer as soon
as possible.
3
2
For safety reasons, do not
switch off the ignition before
the vehicle has come to a
complete standstill.
Page 218 of 364
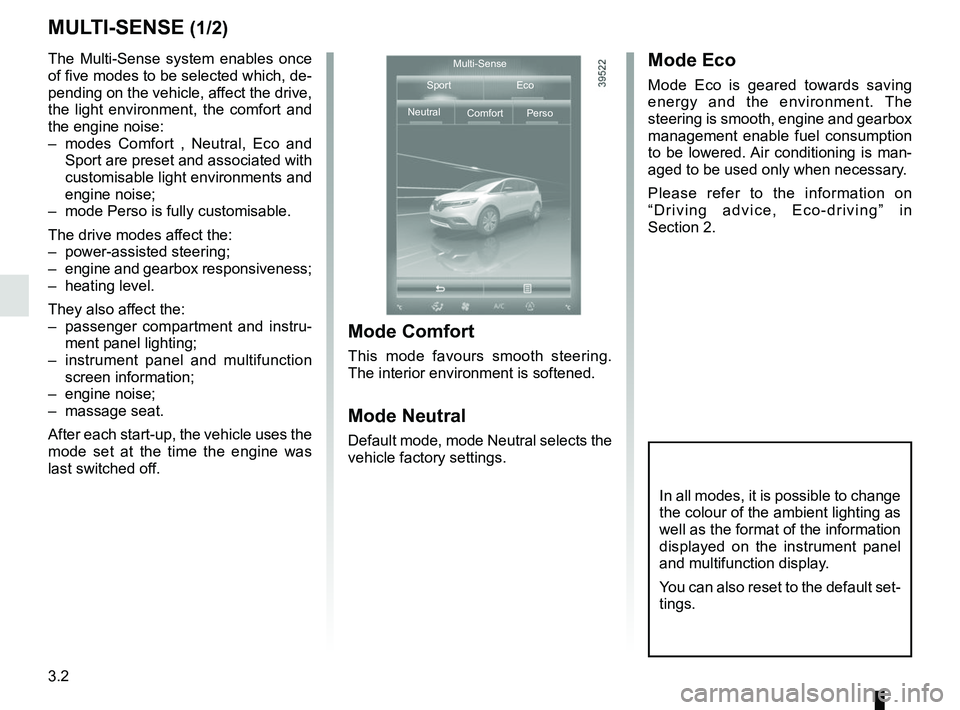
3.2
MULTI-SENSE (1/2)
The Multi-Sense system enables once
of five modes to be selected which, de-
pending on the vehicle, affect the drive,
the light environment, the comfort and
the engine noise:
– modes Comfort , Neutral, Eco and Sport are preset and associated with
customisable light environments and
engine noise;
– mode Perso is fully customisable.
The drive modes affect the:
– power-assisted steering;
– engine and gearbox responsiveness;
– heating level.
They also affect the:
– passenger compartment and instru- ment panel lighting;
– instrument panel and multifunction screen information;
– engine noise;
– massage seat.
After each start-up, the vehicle uses the
mode set at the time the engine was
last switched off.
Mode Comfort
This mode favours smooth steering.
The interior environment is softened.
Mode Neutral
Default mode, mode Neutral selects the
vehicle factory settings.
Mode Eco
Mode Eco is geared towards saving
energy and the environment. The
steering is smooth, engine and gearbox
management enable fuel consumption
to be lowered. Air conditioning is man-
aged to be used only when necessary.
Please refer to the information on
“Driving advice, Eco-driving” in
Section 2.
Multi-Sense
Sport Eco
Neutral Comfort Perso
In all modes, it is possible to change
the colour of the ambient lighting as
well as the format of the information
displayed on the instrument panel
and multifunction display.
You can also reset to the default set-
tings.