2018 RENAULT MEGANE seats
[x] Cancel search: seatsPage 7 of 348

1.1
Section 1: Getting to know your vehicle
Key, radio frequency remote control: general information, use, deadlocking . . . . . . . . . . . . . . . . . . 1.2
The RENAULT card: general information and use . . . . . . . . . . . . . . . . . . . . . . . . . . . . . . . . . . . .\
. . 1.6
Locking/unlocking the doors . . . . . . . . . . . . . . . . . . . . . . . . . . . . . . . . . . . .\
. . . . . . . . . . . . . . . . . . . 1.14
Opening and closing the doors . . . . . . . . . . . . . . . . . . . . . . . . . . . . . . . . . . . .\
. . . . . . . . . . . . . . . . . 1.17
Automatic locking when driving . . . . . . . . . . . . . . . . . . . . . . . . . . . . . . . . . . . . \
. . . . . . . . . . . . . . . . . 1.20
Headrests - Seats . . . . . . . . . . . . . . . . . . . . . . . . . . . . . . . . . . . .\
. . . . . . . . . . . . . . . . . . . . . . . . . . . 1.21
Steering wheel . . . . . . . . . . . . . . . . . . . . . . . . . . . . . . . . . . . . \
. . . . . . . . . . . . . . . . . . . . . . . . . . . . . . 1.25
Seat belts. . . . . . . . . . . . . . . . . . . . . . . . . . . . . . . . . . . . \
. . . . . . . . . . . . . . . . . . . . . . . . . . . . . . . . . . 1.26
Additional methods of restraint: . . . . . . . . . . . . . . . . . . . . . . . . . . . . . . . . . . . . \
. . . . . . . . . . . . . . . . . 1.30in addition to the front seat belts . . . . . . . . . . . . . . . . . . . . . . . . . . . . . . . . . . . .\
. . . . . . . . . . 1.30
to the rear seat belts . . . . . . . . . . . . . . . . . . . . . . . . . . . . . . . . . . . .\
. . . . . . . . . . . . . . . . . . . 1.34
side protection . . . . . . . . . . . . . . . . . . . . . . . . . . . . . . . . . . . .\
. . . . . . . . . . . . . . . . . . . . . . . . 1.35
Child safety: General information . . . . . . . . . . . . . . . . . . . . . . . . . . . . . . . . . . . .\
. . . . . . . . . . . . . . . 1.37 choosing a child seat mounting . . . . . . . . . . . . . . . . . . . . . . . . . . . . . . . . . . . .\
. . . . . . . . . . . 1.40
Fitting a child seat, general information . . . . . . . . . . . . . . . . . . . . . . . . . . . . . . . . . . . . \
. . . . . 1.44
Child seats: attachment by seat belt or by Isofix system . . . . . . . . . . . . . . . . . . . . . . . . . . . . . . . . . . 1.46 deactivating/activating the front passenger airbag . . . . . . . . . . . . . . . . . . . . . . . . . . . . . . . . . 1.52
Audible and visual signals . . . . . . . . . . . . . . . . . . . . . . . . . . . . . . . . . . . . \
. . . . . . . . . . . . . . . . . . . . . 1.55
Driving position . . . . . . . . . . . . . . . . . . . . . . . . . . . . . . . . . . . .\
. . . . . . . . . . . . . . . . . . . . . . . . . . . . . 1.56
Instrument panel . . . . . . . . . . . . . . . . . . . . . . . . . . . . . . . . . . . .\
. . . . . . . . . . . . . . . . . . . . . . . . . . . . 1.60 trip computer and warning system . . . . . . . . . . . . . . . . . . . . . . . . . . . . . . . . . . . . \
. . . . . . . . . 1.72
vehicle settings customisation menu . . . . . . . . . . . . . . . . . . . . . . . . . . . . . . . . . . . .\
. . . . . . . 1.82
Power-assisted steering . . . . . . . . . . . . . . . . . . . . . . . . . . . . . . . . . . . .\
. . . . . . . . . . . . . . . . . . . . . . 1.84
Clock and outdoor temperature . . . . . . . . . . . . . . . . . . . . . . . . . . . . . . . . . . . . \
. . . . . . . . . . . . . . . . . 1.85
Rear view mirrors . . . . . . . . . . . . . . . . . . . . . . . . . . . . . . . . . . . .\
. . . . . . . . . . . . . . . . . . . . . . . . . . . 1.86
Headlight beam adjustment . . . . . . . . . . . . . . . . . . . . . . . . . . . . . . . . . . . . \
. . . . . . . . . . . . . . . . . . . . 1.88
Exterior lighting and signals. . . . . . . . . . . . . . . . . . . . . . . . . . . . . . . . . . . . \
. . . . . . . . . . . . . . . . . . . . 1.90
Washers, wipers . . . . . . . . . . . . . . . . . . . . . . . . . . . . . . . . . . . .\
. . . . . . . . . . . . . . . . . . . . . . . . . . . . 1.96
Fuel tank (filling with fuel) . . . . . . . . . . . . . . . . . . . . . . . . . . . . . . . . . . . .\
. . . . . . . . . . . . . . . . . . . . . 1.104
Page 28 of 348
1.22
FRONT SEATS (1/3)
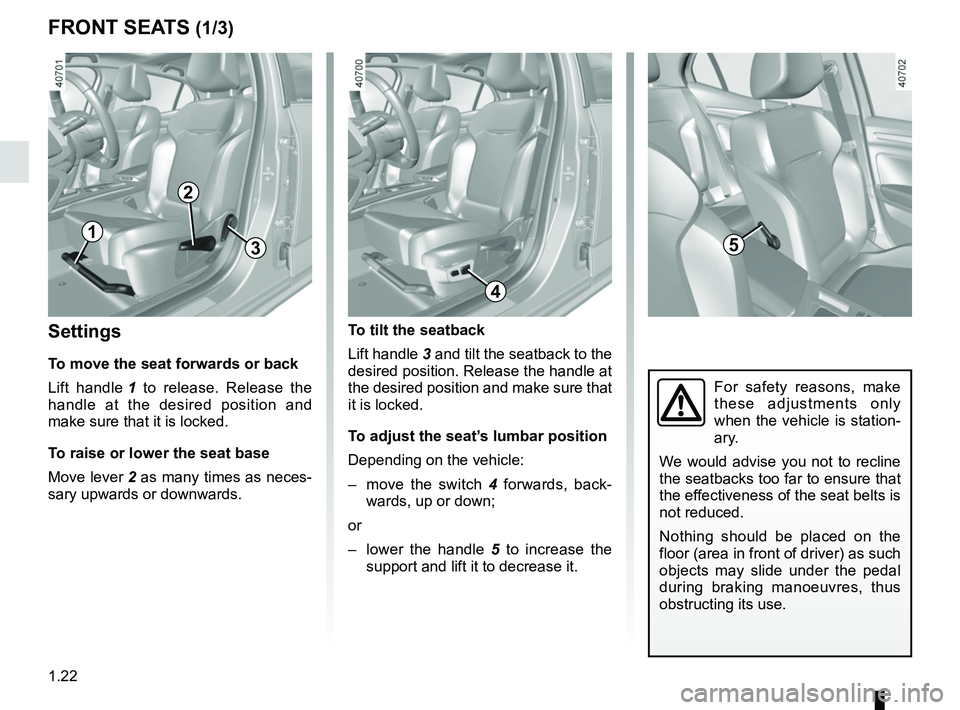
Settings
To move the seat forwards or back
Lift handle 1 to release. Release the
handle at the desired position and
make sure that it is locked.
To raise or lower the seat base
Move lever 2 as many times as neces-
sary upwards or downwards.
1
2
35
To tilt the seatback
Lift handle 3 and tilt the seatback to the
desired position. Release the handle at
the desired position and make sure that
it is locked.
To adjust the seat’s lumbar position
Depending on the vehicle:
– move the switch 4 forwards, back-
wards, up or down;
or
– lower the handle 5 to increase the
support and lift it to decrease it.
For safety reasons, make
these adjustments only
when the vehicle is station-
ary.
We would advise you not to recline
the seatbacks too far to ensure that
the effectiveness of the seat belts is
not reduced.
Nothing should be placed on the
floor (area in front of driver) as such
objects may slide under the pedal
during braking manoeuvres, thus
obstructing its use.
4
Page 29 of 348

1.23
Table function
Depending on the vehicle, the passen-
ger seatback may be folded down onto
the seat base to create a table.
– Lower the headrest;
– move the seat back;
– lift the lever 3 and tilt the seatback
forwards as far as possible;
– pull the handle 7 and fully lower the
seatback.
FRONT SEATS (2/3)
When the front seat is in
table position, the front pas-
senger airbag airbag must
be deactivated (see the in-
formation on "Child safety: activat-
ing/deactivating the front passenger
airbag" in Section 1).
Risk of serious injury caused by
items resting on the seatback table
which may be dislodged when the
airbagairbag is deployed.
The label (on the dashboard) and
the markings (on the windscreen)
remind you of these instructions.
7
For your safety, attach any
transported objects when
the seat is in the table po-
sition.
When using the passenger seat in table
position, you must not use the two rear
seats immediately behind it.Repositioning the seat
Make sure that nothing prevents the
seat from moving.
– Pull the handle 7 and raise the seat-
back, ensuring that it locks firmly in
place.
– Reposition the seat base.
Be sure to hold the seat-
back when placing it in the
flat position. Risk of injury.
For safety reasons, carry
out any adjustments when
the vehicle is not being
driven.
3
Page 30 of 348
1.24
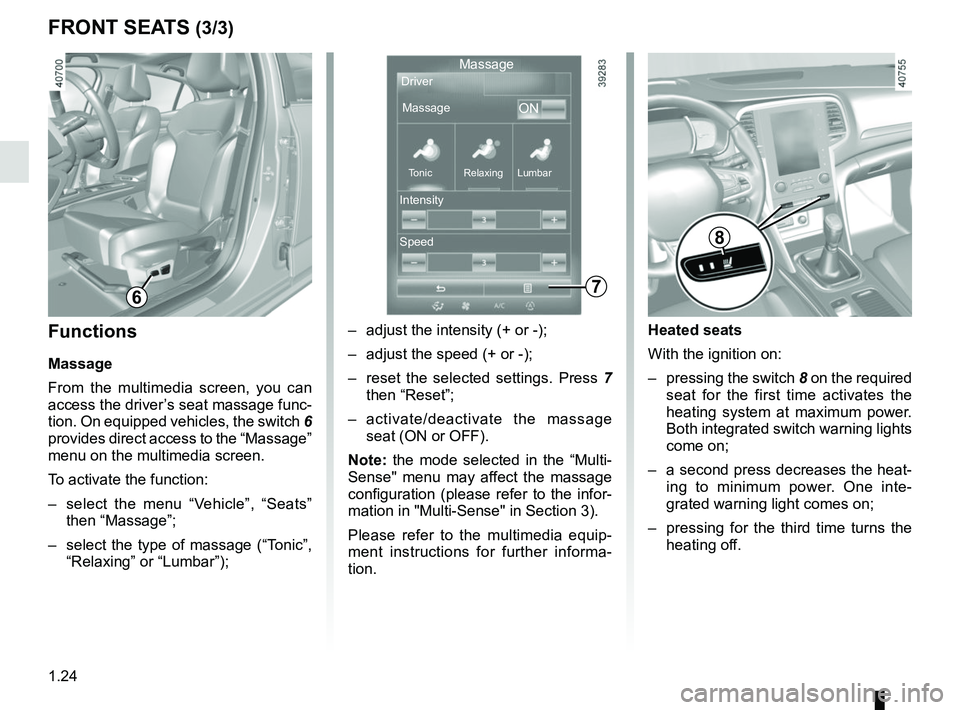
Heated seats
With the ignition on:
– pressing the switch 8 on the required
seat for the first time activates the
heating system at maximum power.
Both integrated switch warning lights
come on;
– a second press decreases the heat- ing to minimum power. One inte-
grated warning light comes on;
– pressing for the third time turns the heating off.
FRONT SEATS (3/3)
7
MassageDriver
Massage
ON
Tonic Relaxing Lumbar
Intensity
Speed
– adjust the intensity (+ or -);
– adjust the speed (+ or -);
– reset the selected settings. Press 7
then “Reset”;
– activate/deactivate the massage seat (ON or OFF).
Note: the mode selected in the “Multi-
Sense" menu may affect the massage
configuration (please refer to the infor-
mation in "Multi-Sense" in Section 3).
Please refer to the multimedia equip-
ment instructions for further informa-
tion.
8
Functions
Massage
From the multimedia screen, you can
access the driver’s seat massage func-
tion. On equipped vehicles, the switch 6
provides direct access to the “Massage”
menu on the multimedia screen.
To activate the function:
– select the menu “Vehicle”, “Seats” then “Massage”;
– select the type of massage (“Tonic”, “Relaxing” or “Lumbar”);
6
Page 35 of 348
1.29
The following information applies to the vehicle’s front and rear seat belts.
– No modification may be made to the component parts of the originally fit\
ted restraint system: seat belts, seats and
their mountings. For special operations (e.g. fitting child seats), co\
ntact an authorised dealer.
– Do not use devices which allow any slack in the belts (e.g. clothes peg\
s, clips, etc.): a seat belt which is worn too
loosely may cause injury in the event of an accident.
– Never wear the shoulder strap under your arm or behind your back.
– Never use the same belt for more than one person and never hold a baby o\
r child on your lap with your seat belt around them.
– The belt should never be twisted.
– Following an accident, have the seat belts checked and replaced if neces\
sary. Always replace your seat belts as soon as they show any signs of wear.
– When positioning the rear bench seat, make sure that the seat belts and \
buckles are correctly positioned so that they can be used properly.
– Make sure that the buckle is inserted into the appropriate catch.
– Ensure that no objects are placed in the area around the seat belt catch\
as they could prevent it from being properly se- cured.
– Make sure the seat belt catch is properly positioned (it should not be \
hidden away, crushed or flattened by people or ob- jects).
SEAT BELTS (4/4)
Page 36 of 348

1.30
METHODS OF RESTRAINT IN ADDITION TO THE FRONT SEAT BELTS (1/4)
Depending on the vehicle, they are
composed of:
– seat belt inertia reel pretension-ers;
– central seat belt pretensioners;
– chest-level load limiter;
– airbags driver and passenger
front.
These systems are designed to act in-
dependently or together when the vehi-
cle is subjected to a frontal impact.
Depending on the severity of the
impact, the system can trigger:
– seat belt locking;
– the seat belt inertia reel pretensioner (which engages to correct seat belt
slack);
– the lap belt pretensioners to hold the occupant in his seat;
– the front airbag.
Pretensioners
The pretensioners hold the seat belt
against the body, holding the occupant
more securely against the seat, thus in-
creasing the seat belt’s efficiency.
In the event of a severe frontal impact
and if the ignition is switched on, the
system may engage the following de-
pending on the force of the impact:
– the seat belt inertia reel preten- sioner 1 which instantly retracts the
seat belt;
– the lap seat belt pretensioner 2 on
the front seats.
– Have the entire restraint
system checked following
an accident.
– No operation whatso-
ever is permitted on any part
of the system (pretensioners,
airbags, computers, wiring) and
the system components must not
be reused on any other vehicle,
even if identical.
– Only qualified personnel from our Network may work on the airbags;
otherwise the system may trigger
accidentally and cause injury.
– The electric trigger system may only be tested by a specially
trained technician using special
equipment.
– When the vehicle is scrapped, contact an approved dealer for
disposal of the pretensioner and
airbags gas generators.
12
Page 41 of 348
1.35
SIDE PROTECTION DEVICES
Warning concerning the side air bag
– Fitting seat covers: seats equipped with an air bag require covers
specifically designed for your vehicle. Contact an approved Dealer to fi\
nd
out if these covers are available. The use of any covers other than those
designed for your vehicle (including those designed for another vehicle\
) may
affect the operation of the air bags and reduce your protection.
– Do not place any accessories, objects or even pets between the seatback,\
the door and the internal fittings. Do not cover the seatback with any items\
such as
clothes or accessories. This may prevent the air bag from operating correctly
or cause injury when the air bag is deployed.
– No work or modification whatsoever may be carried out on the seat or int\
ernal fittings, except by qualified personnel from an approved dealer.
Side air bags
These air bags are fitted to the front
seats and are activated at the sides of
the seats (door side) to protect the oc-
cupants in the event of a severe side
impact.
Curtain air bags
These are airbags fitted along the sides
of the vehicle in the ceiling which trigger
along the front and rear door side win-
dows to protect the passengers in case
of a severe side impact.
Depending on the vehicle, a mark-
ing on the windscreen informs you
of the presence of additional means
of restraint (airbags, pretensioners,
etc.) in the passenger compartment.
Page 44 of 348
1.38
CHILD SAFETY: General information (2/2)
Using a child seat
The level of protection offered by the
child seat depends on its ability to re-
strain your child and on its installation.
Incorrect installation compromises the
protection it offers the child in the event
of harsh braking or an impact.
Before purchasing a child seat, check
that it complies with the regulations for
the country you are in and that it can
be fitted in your vehicle. Consult an ap-
proved dealer to find out which seats
are recommended for your vehicle.
Before fitting a child seat, read the
manual and respect its instructions. If
you experience any difficulties during
installation, contact the manufacturer
of the equipment. Keep the instructions
with the seat.Set a good example by always fas-
tening your seat belt and teaching
your child:
– to strap themselves in correctly;
– to always get in and out of the car at the kerb, away from busy traf-
fic.
Do not use a second-hand child
seat or one without an instruction
manual.
Check that there are no objects in
the vicinity of the child seat which
could impede its operation.
Never leave a child unat-
tended in the vehicle.
Check that your child is
always strapped in and that
the belt or safety harness used is
correctly set and adjusted. Avoid
wearing bulky clothing which could
cause the belts to slacken.
Never let your child put their head or
arms out of the window.
Check that the child is in the correct
position for the entire journey, espe-
cially if asleep.