2018 RENAULT MEGANE change time
[x] Cancel search: change timePage 183 of 348

2.71
System sound
Enables the system sound to be
chosen.
Deactivating the system sound
Activate or deactivate the parking dis-
tance control sound.
Note: if you deactivate the sound, you
will no longer be notified with beeps
when approaching an obstacle.
Deactivating the system
Activate or deactivate parking distance
control.
Vehicles not fitted with a multimedia
system
Vehicle stationary:
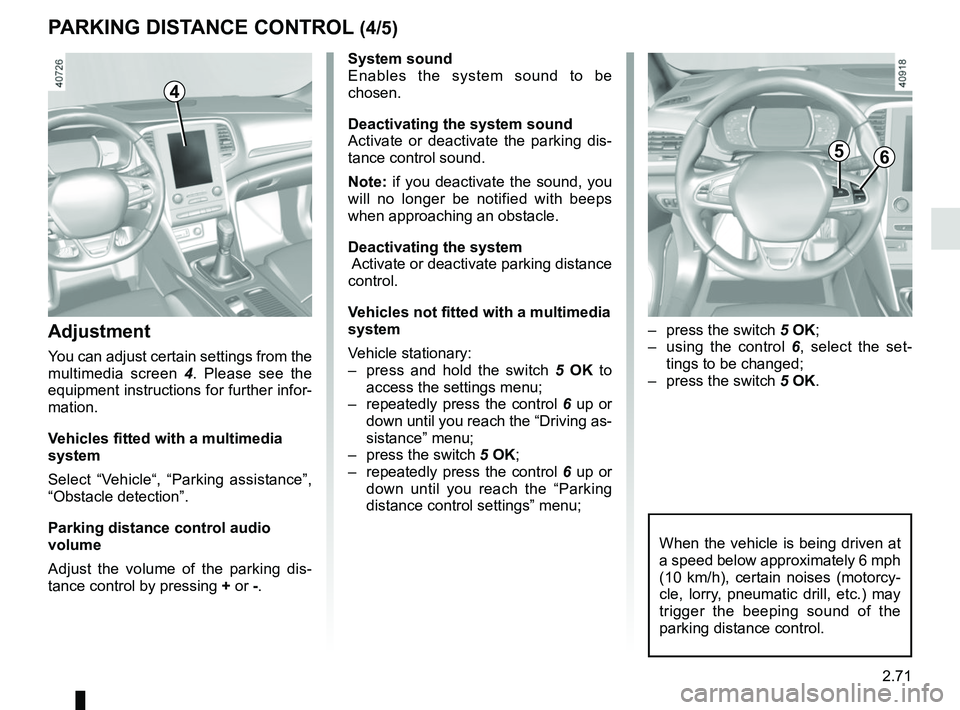
– press and hold the switch 5 OK to
access the settings menu;
– repeatedly press the control 6 up or
down until you reach the “Driving as-
sistance” menu;
– press the switch 5 OK;
– repeatedly press the control 6 up or
down until you reach the “Parking
distance control settings” menu;
PARKING DISTANCE CONTROL (4/5)
When the vehicle is being driven at
a speed below approximately 6 mph
(10 km/h), certain noises (motorcy-
cle, lorry, pneumatic drill, etc.) may
trigger the beeping sound of the
parking distance control.
4
Adjustment
You can adjust certain settings from the
multimedia screen 4. Please see the
equipment instructions for further infor-
mation.
Vehicles fitted with a multimedia
system
Select “Vehicle“, “Parking assistance”,
“Obstacle detection”.
Parking distance control audio
volume
Adjust the volume of the parking dis-
tance control by pressing + or -.
– press the switch 5 OK;
– using the control 6, select the set-
tings to be changed;
– press the switch 5 OK.
56
Page 192 of 348

2.80
AUTOMATIC TRANSMISSION (2/3)
Driving in manual modeWith the selector lever in position D,
move the lever to the left into the M po-
sition. Shifting the lever or the paddles
repeatedly allows you to change gears
manually:
– to move down through the gears, push the lever forwards or press the
left-hand paddle;
– to move up through the gears, push the lever backwards or press the
right-hand paddle.
The gear selected is displayed on the
instrument panel.
Special casesIn certain driving conditions (for exam-
ple, engine protection, operation of the
Electronic Stability Programme: the au-
tomatic system may change gear auto-
matically. Likewise, to prevent incorrect
manoeuvres, a gear change may be re-
fused by the automatic system: in this
case the gear display flashes for a few
seconds as a warning.
Special circumstances
– If the bends and road surface do
not allow you to stay in automatic
mode (e.g. in the mountains), we
recommend that you change to
manual mode. This will prevent the
automatic gearbox from changing
gear repeatedly when climbing, and
permit engine braking on long de-
scents.
Driving in automatic mode
Put lever 1 into position D.
In most road conditions you will en-
counter, you will not need to touch your
lever again: the gears will change au-
tomatically at the right time and at the
most suitable engine speed because
the automatic system takes into ac-
count the vehicle load and road contour
and adjusts itself to the particular driv-
ing style you have chosen.
Economical driving
When driving, always leave the lever
in position D, keeping the accelerator
pedal lightly depressed to ensure auto-
matic gear changes at a lower engine
speed.
Accelerating and overtaking
Depress the accelerator pedal firmly
and fully (so that it goes beyond the
kickdown point).
This will enable you to change down
to the optimum gear within the
engine range.
When facing uphill, to remain
stopped, do not keep your foot on
the accelerator.
Risk of overheating the automatic
gearbox.
Page 196 of 348

3.2
MULTI-SENSE (1/2)
Depending on the mode selected and
depending on the vehicle, the Multi-
Sense system controls the driving,
the ambient lighting, and the tone and
smoothness of the engine:
– modes Sport, Eco, Neutral and Comfort are preset and associated
with customisable light environments
and engine noise;
– mode Perso is fully customisable.
The drive modes affect the:
– power-assisted steering;
– the rear wheel steering;
– engine and gearbox responsiveness;
– heating level.
They also affect the:
– the light environment and the instru- ment panel lighting;
– the information on the instrument panel and multimedia screen;
– engine noise;
– massage seat.
After each start-up, the vehicle uses the
mode set at the time the engine was
last switched off.Mode Eco
Mode Eco is geared towards saving
energy and the environment. The
steering is smooth, engine and gearbox
management enable fuel consumption
to be lowered. Air conditioning is man-
aged to be used only when necessary.
Please refer to the information on
“Driving advice, Eco-driving” in
Section 2.
Note: for vehicles without ECOmode,
the Comfort mode becomes the most
suitable mode in terms of energy econ-
omy and respect for the environment.
Mode Neutral
Default mode, mode Neutral selects the
vehicle factory settings.
Multi-Sense
Sport Eco
Neutral Comfort Perso
Sport mode
This mode permits an increased re-
sponsiveness from the engine and the
gearbox. The steering is firmer.
Note: depending on the vehicle, this
mode can inhibit the Stop and Start
(refer to the information on the "Stop
and Start Function" in section 2).
In any mode, you can change the colour of the ambient lighting as well a\
s the
format of the information displayed on the instrument panel and multimed\
ia
screen. You can also reset to the default settings.
Please refer to the multimedia equipment instructions.
Page 256 of 348

4.4
ENGINE OIL LEVEL: general information
It is normal for an engine to use oil for
lubrication and cooling of moving parts
and it is normal to top up the level be-
tween oil changes.
However, contact your approved
Dealer if more than 0.5 litres is being
consumed every 600 miles (1,000 km)
after the running in period.
Oil change frequency: check the oil
level from time to time and certainly
before any long journey to avoid the
risk of damaging your engine.
Reading the oil level
The oil level should be read with the ve-
hicle on level ground, after the engine
has been switched off for some time.
The dipstick must be used to read
the exact oil level and make sure
that the maximum level has not been
exceeded (risk of engine damage).
Refer to the following pages.
The instrument panel display only
alerts the driver when the oil level is at
its minimum. – remove the dipstick and wipe with a
clean, lint-free cloth;
– push the dipstick in as far as it will go (for vehicles equipped with a cap-
type dipstick C, screw the cap in as
far as it will go);
– take out the dipstick again;
– read the level: it should never fall below minimum mark A or exceed
maximum mark B.
Once the operation has been com-
pleted, ensure that the dipstick is
pushed in as far as it will go or that
the “cap-type dipstick” is completely
screwed in.
C
A
B
A
B
In order to prevent splashback, it is
recommended that a funnel be used
when topping up/filling with oil
Before performing any
action in the engine com-
partment, the ignition must
be switched off (please see
the information on “Starting, stop-
ping the engine” in Section 2).
Exceeding the maximum
engine oil level
Under no circumstances
must the maximum fill
level B be exceeded: risk of damage
to the engine and catalytic con-
verter.
If the oil level exceeds the maximum
level, do not start your vehicle and
contact an approved Dealer.
Page 287 of 348

5.15
To comply with local legislation, or
as a precaution, you can obtain an
emergency kit containing a set of
spare bulbs and fuses from an ap-
proved dealer.
Daytime running lights and
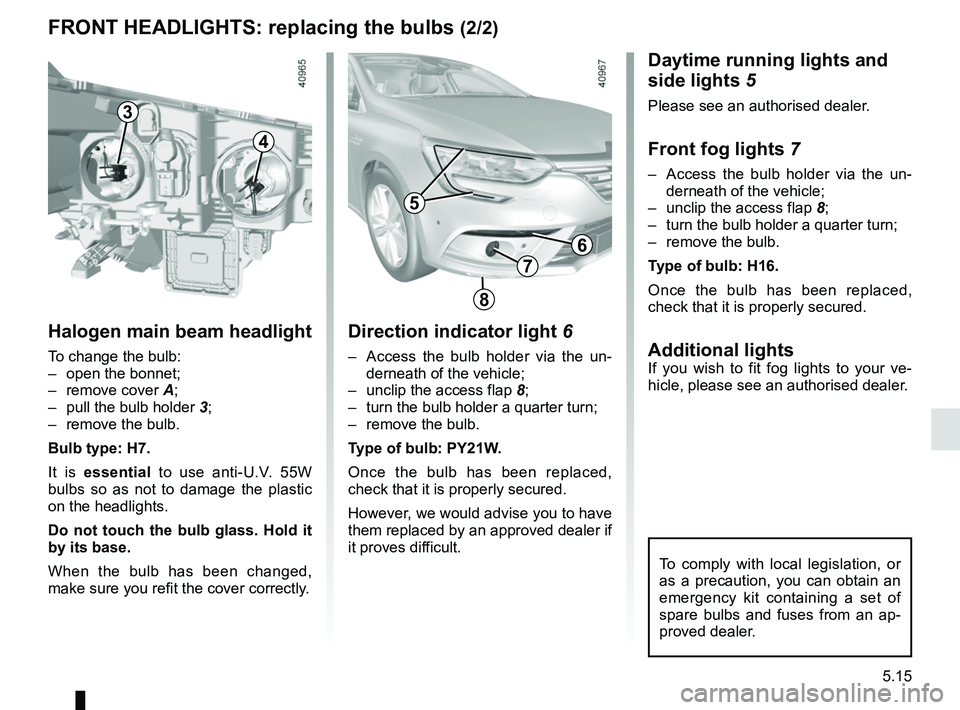
side lights 5
Please see an authorised dealer.
Front fog lights 7
– Access the bulb holder via the un-
derneath of the vehicle;
– unclip the access flap 8;
– turn the bulb holder a quarter turn;
– remove the bulb.
Type of bulb: H16.
Once the bulb has been replaced,
check that it is properly secured.
Additional lightsIf you wish to fit fog lights to your ve-
hicle, please see an authorised dealer.
FRONT HEADLIGHTS: replacing the bulbs (2/2)
Direction indicator light 6
– Access the bulb holder via the un-
derneath of the vehicle;
– unclip the access flap 8;
– turn the bulb holder a quarter turn;
– remove the bulb.
Type of bulb: PY21W.
Once the bulb has been replaced,
check that it is properly secured.
However, we would advise you to have
them replaced by an approved dealer if
it proves difficult.
7
5
6
8
3
4
Halogen main beam headlight
To change the bulb:
– open the bonnet;
– remove cover A;
– pull the bulb holder 3;
– remove the bulb.
Bulb type: H7.
It is essential to use anti-U.V. 55W
bulbs so as not to damage the plastic
on the headlights.
Do not touch the bulb glass. Hold it
by its base.
When the bulb has been changed,
make sure you refit the cover correctly.
6
7
8
Page 344 of 348

7.4
ALPHABETICAL INDEX (4/6)
reversing lights ............................................................. 5.18
side lights ................................................1.90, 5.14 → 5.16
lights-on warning buzzer.................................................... 1.93
locking the doors ........................ 1.4, 1.6 → 1.13, 1.17 → 1.20
luggage compartment cover .............................................. 3.45
luggage retaining net .............................................. 3.46 – 3.47
M
maintenance ............................................................\
.......... 2.25
maintenance: bodywork .........................................................4.15 → 4.17
interior trim ........................................................ 4.18 – 4.19
mechanical ..................... 4.2 – 4.3, 4.5 → 4.7, 6.11 → 6.16
map reading lights ......................................... 3.27 – 3.28, 3.28
menu for customising the vehicle settings .............. 1.82 – 1.83
methods of restraint in addition to the seat belts ...1.34 → 1.36
multimedia (equipment) .......................................... 3.57 – 3.58
multimedia equipment ............................................ 3.57 – 3.58
Multi-Sense................................................................. 3.2 – 3.3
N
navigation ............................................................... 3.57 – 3.58
navigation system ................................................... 3.57 – 3.58
O
oil change ..................................................................... 4.4, 4.7
opening the doors ..................................................1.14 → 1.19
operating faults ......................................................5.39 → 5.45
overspeed warning ..............................1.66, 1.68, 2.54 → 2.56
P
paintwork maintenance ....................................................4.15 → 4.17
parking assistance: assisted parking 2.68 → 2.72, 2.75 → 2.78
parking distance control................... 2.68 → 2.72, 2.75 → 2.78
power-assisted steering..................................................... 1.84 puncture...................................................5.2
→ 5.7, 5.9 – 5.10
R
radio........................................................................\
3.57 – 3.58
radio frequency remote control/key use ....................................................................\
...1.2 → 1.4
rear bench seat....................................................... 3.38 – 3.39
rear drive wheels ..........................................2.30 → 2.39, 2.39
rear parcel shelf ...................................................... 3.44 – 3.45
rear screen de-icing/demisting ................................. 3.11, 3.16
rear seats........................................................................\
... 1.28 functions ........................................................... 3.38 – 3.39
rear view camera .................................................... 2.73 – 2.74
rear view mirrors ..................................................... 1.86 – 1.87
R
remote control card: battery............................................... 5.32
R
remote control door locking batteries ..............................................................\
......... 5.33
remote control door locking unit ................................1.2 → 1.4
RENAULT ANTI-INTRUDER DEVICE (RAID) ................... 1.20
RENAULT card battery ................................................................\
.......... 5.32
use ....................................................................\
.1.6 → 1.13
RENAULT card battery ...................................................... 5.32
replacement parts .............................................................. 6.10
reverse gear selecting ..................................................2.16, 2.79 → 2.81
reversing sensor ....................................................2.68 → 2.72
roof bars ................................................................. 3.55 – 3.56
roof rack roof bars ............................................................ 3.55 – 3.56
running in .................................................................... 2.2 – 2.3