2018 RENAULT MASTER parking brake
[x] Cancel search: parking brakePage 117 of 290

2.1
Section 2: Driving
(advice on use relating to fuel economy and the environment)
Running in, ignition switch . . . . . . . . . . . . . . . . . . . . . . . . . . . . . . . . . . . . \
. . . . . . . . . . . . . . . . . . . . . 2.2
Starting, stopping the engine . . . . . . . . . . . . . . . . . . . . . . . . . . . . . . . . . . . . \
. . . . . . . . . . . . . . . . . . . 2.3
Stop and Start Function . . . . . . . . . . . . . . . . . . . . . . . . . . . . . . . . . . . . \
. . . . . . . . . . . . . . . . . . . . . . . 2.4
Special features of diesel versions . . . . . . . . . . . . . . . . . . . . . . . . . . . . . . . . . . . .\
. . . . . . . . . . . . . . 2.7
Driving advice, Eco-driving . . . . . . . . . . . . . . . . . . . . . . . . . . . . . . . . . . . .\
. . . . . . . . . . . . . . . . . . . . 2.8
Maintenance and antipollution advice . . . . . . . . . . . . . . . . . . . . . . . . . . . . . . . . . . . . \
. . . . . . . . . . . . 2.12
Environment . . . . . . . . . . . . . . . . . . . . . . . . . . . . . . . . . . . .\
. . . . . . . . . . . . . . . . . . . . . . . . . . . . . . . 2.13
Gear lever . . . . . . . . . . . . . . . . . . . . . . . . . . . . . . . . . . . .\
. . . . . . . . . . . . . . . . . . . . . . . . . . . . . . . . . 2.14
Handbrake . . . . . . . . . . . . . . . . . . . . . . . . . . . . . . . . . . . . \
. . . . . . . . . . . . . . . . . . . . . . . . . . . . . . . . . 2.15
Driver correction devices/aids . . . . . . . . . . . . . . . . . . . . . . . . . . . . . . . . . . . . \
. . . . . . . . . . . . . . . . . . 2.16
Tyre pressure loss warning . . . . . . . . . . . . . . . . . . . . . . . . . . . . . . . . . . . .\
. . . . . . . . . . . . . . . . . . . . 2.24
Lane departure warning. . . . . . . . . . . . . . . . . . . . . . . . . . . . . . . . . . . . \
. . . . . . . . . . . . . . . . . . . . . . . 2.27
Speed limiter . . . . . . . . . . . . . . . . . . . . . . . . . . . . . . . . . . . .\
. . . . . . . . . . . . . . . . . . . . . . . . . . . . . . . 2.30
Cruise control . . . . . . . . . . . . . . . . . . . . . . . . . . . . . . . . . . . .\
. . . . . . . . . . . . . . . . . . . . . . . . . . . . . . 2.33
Overspeed function . . . . . . . . . . . . . . . . . . . . . . . . . . . . . . . . . . . . \
. . . . . . . . . . . . . . . . . . . . . . . . . . 2.37
Parking distance control . . . . . . . . . . . . . . . . . . . . . . . . . . . . . . . . . . . .\
. . . . . . . . . . . . . . . . . . . . . . 2.38
Reversing camera . . . . . . . . . . . . . . . . . . . . . . . . . . . . . . . . . . . . \
. . . . . . . . . . . . . . . . . . . . . . . . . . . 2.40
Power take-off . . . . . . . . . . . . . . . . . . . . . . . . . . . . . . . . . . . . \
. . . . . . . . . . . . . . . . . . . . . . . . . . . . . . 2.42
Fast idle speed . . . . . . . . . . . . . . . . . . . . . . . . . . . . . . . . . . . .\
. . . . . . . . . . . . . . . . . . . . . . . . . . . . . 2.43
Self-locking differential . . . . . . . . . . . . . . . . . . . . . . . . . . . . . . . . . . . .\
. . . . . . . . . . . . . . . . . . . . . . . 2.44
Sequential gearbox . . . . . . . . . . . . . . . . . . . . . . . . . . . . . . . . . . . .\
. . . . . . . . . . . . . . . . . . . . . . . . . . 2.45
Page 119 of 290

2.3
STARTING, STOPPING THE ENGINE
Starting the engine
Turn the ignition key to the “Ignition on”
position M and hold this position until
the engine preheating warning light
É goes out.
Stopping the engine
With the engine idling, turn the key to
the “Stop” position St.
Starting the vehicle
For rear-wheel drive versions on
level ground, with the vehicle un-
laden, we recommend that you start
in second gear.
Never switch off the igni-
tion before the vehicle has
stopped completely. Once
the engine has stopped, the
brake servo, power-assisted steer-
ing, etc. and the passive safety de-
vices such as air bags and preten-
sioners will no longer operate.
Driver’s responsibility
when parking or stopping
the vehicle
Never leave an animal,
child or adult who is not self-suffi-
cient alone in your vehicle, even for
a short time.
They may pose a risk to themselves
or to others by starting the engine,
activating equipment such as the
electric windows or locking the
doors, for example.
Also, in hot and/or sunny weather,
please remember that the tempera-
ture inside the passenger compart-
ment increases very quickly.
RISK OF DEATH OR SERIOUS
INJURY.
Never start your vehicle
while freewheeling on a
gradient. Risk of non-acti-
vation of power-assisted
steering.
There is a risk of accidents.
Depending on the vehicle, if a gear is
engaged, the message “Depress clutch
+ start” is displayed on the instrument
panel. Press the clutch pedal.
Turn the key to starter position D with-
out depressing the accelerator
pedal.
Release the key as soon as the engine
starts.
Page 121 of 290

2.5
Preventing the engine from
standing by
In certain situations, such as negotiat-
ing a crossroads for instance, it is pos-
sible (with the system activated) to keep
the engine running so as to be ready to
move off quickly.
SEQUENTIAL gearbox
Keep the vehicle stationary without
pressing too hard on the brake pedal.
Manual gearbox
Keep the clutch pedal pressed right
down.
STOP AND START FUNCTION (2/3)Conditions for coming out of
engine standby
For sequential gearbox:
– the brake pedal is released, position A or M engaged, or;
– the brake pedal is released, position N engaged and the handbrake off,
or;
– or the brake pedal is pressed again, with position P engaged or position
N engaged with the parking brake
applied or;
– position R is engaged or;
– the accelerator pedal is pressed.
For manual gearboxes:
– the gearbox is in neutral and the clutch pedal is slightly depressed, or
– the engine is in gear and the clutch pedal is pressed right down.
Conditions preventing the
standby of the engine
Certain conditions prevent the system
from using the engine standby function,
including when:
– reverse gear is engaged;
– the bonnet is not locked; – the outdoor temperature is too low or
too high (less than around 0 °C or
higher than around 35 °C);
– the battery is not sufficiently charged;
– the difference between the vehicle interior temperature and the auto-
matic climate control instruction is
too high;
– the “Clear View” function is activated (please see “Automatic Climate
Control” in Section 3);
– the engine coolant temperature is too low;
– automatic particle filter cleaning is underway;
– the “Fast Idle Speed” function is acti- vated (please refer to the information
on “Fast Idle Speed” in section 2);
– ...
Warning light
is displayed on the
instrument panel. This notifies you that
the engine is on standby.
To fill up with fuel, the engine must
be stopped (and not on standby):
stop the engine (Please See
“Starting, stopping the engine” in
Section 2).
Page 135 of 290

2.19
DRIVER CORRECTION DEVICES AND AIDS (4/8)
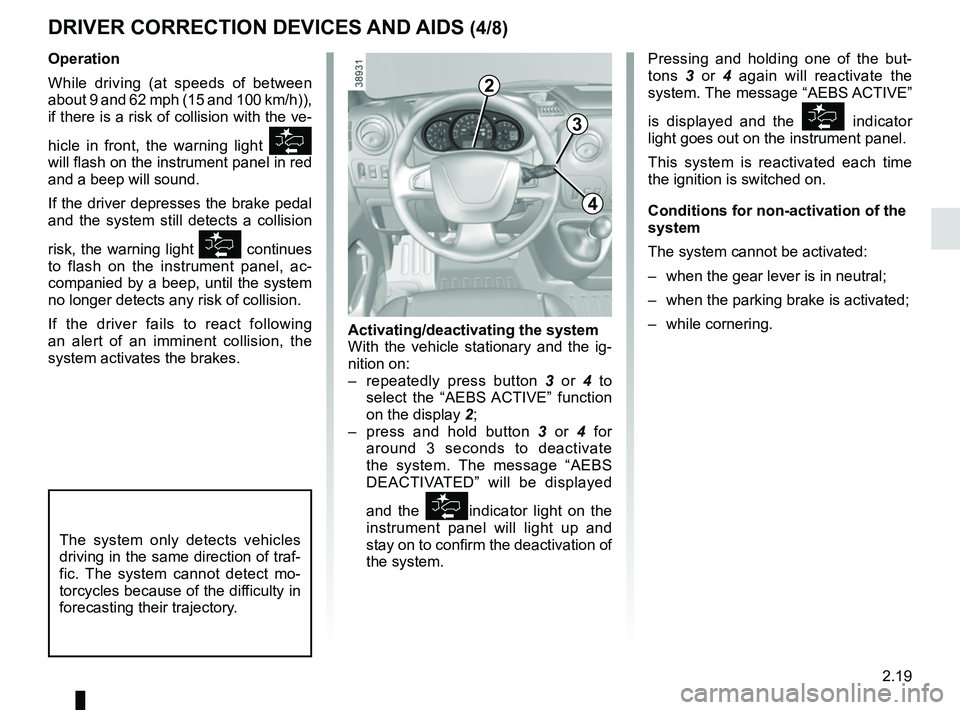
Pressing and holding one of the but-
tons 3 or 4 again will reactivate the
system. The message “AEBS ACTIVE”
is displayed and the
indicator
light goes out on the instrument panel.
This system is reactivated each time
the ignition is switched on.
Conditions for non-activation of the
system
The system cannot be activated:
– when the gear lever is in neutral;
– when the parking brake is activated;
– while cornering.
Operation
While driving (at speeds of between
about 9 and 62 mph (15 and 100 km/h)),
if there is a risk of collision with the ve-
hicle in front, the warning light
will flash on the instrument panel in red
and a beep will sound.
If the driver depresses the brake pedal
and the system still detects a collision
risk, the warning light
continues
to flash on the instrument panel, ac-
companied by a beep, until the system
no longer detects any risk of collision.
If the driver fails to react following
an alert of an imminent collision, the
system activates the brakes.
The system only detects vehicles
driving in the same direction of traf-
fic. The system cannot detect mo-
torcycles because of the difficulty in
forecasting their trajectory.
Activating/deactivating the system
With the vehicle stationary and the ig-
nition on:
– repeatedly press button 3 or 4 to
select the “AEBS ACTIVE” function
on the display 2;
– press and hold button 3 or 4 for
around 3 seconds to deactivate
the system. The message “AEBS
DEACTIVATED” will be displayed
and the
indicator light on the
instrument panel will light up and
stay on to confirm the deactivation of
the system.
3
4
2
Page 162 of 290

2.46
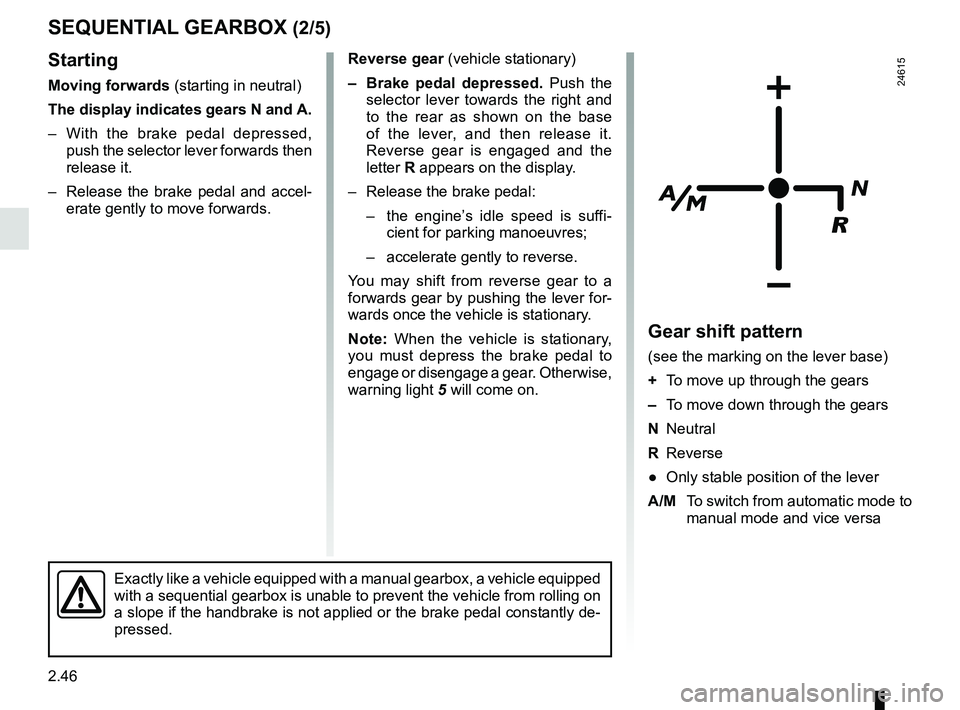
Reverse gear (vehicle stationary)
– Brake pedal depressed. Push the
selector lever towards the right and
to the rear as shown on the base
of the lever, and then release it.
Reverse gear is engaged and the
letter R appears on the display.
– Release the brake pedal: – the engine’s idle speed is suffi-
cient for parking manoeuvres;
– accelerate gently to reverse.
You may shift from reverse gear to a
forwards gear by pushing the lever for-
wards once the vehicle is stationary.
Note: When the vehicle is stationary,
you must depress the brake pedal to
engage or disengage a gear. Otherwise,
warning light 5 will come on.
SEQUENTIAL GEARBOX (2/5)
Gear shift pattern
(see the marking on the lever base)
+ To move up through the gears
– To move down through the gears
N Neutral
R Reverse
● Only stable position of the lever
A/M To switch from automatic mode to
manual mode and vice versa
24615
Exactly like a vehicle equipped with a manual gearbox, a vehicle equippe\
d
with a sequential gearbox is unable to prevent the vehicle from rolling \
on
a slope if the handbrake is not applied or the brake pedal constantly de\
-
pressed.
Starting
Moving forwards (starting in neutral)
The display indicates gears N and A.
– With the brake pedal depressed, push the selector lever forwards then
release it.
– Release the brake pedal and accel- erate gently to move forwards.
Page 164 of 290

2.48
SEQUENTIAL GEARBOX (4/5)
Operation in automatic mode
Automatic mode is selected by default
every time the ignition is switched on.
The letter A appears on the display.
The vehicle is controlled using the ac-
celerator and the brake. Gears will
change automatically at the correct
moment and at a suitable engine speed
because the automatic mode takes the
road surface and the chosen driving
style into consideration.
Gears may be shifted manually in this
mode. Pushing the lever forwards
or backwards shifts a gear upwards
(except if there is a risk of underrev-
ving) or downwards (except if there is a
risk of overrevving).
Note: automatic mode takes account
of:
– the position and speed of depression of the accelerator pedal to assess
driving style and select the optimum
gear;
– action on the brake pedal, to com- mence engine braking in preparation
for a downshift.
You can stop the vehicle at red lights,
with the gear engaged, by depressing
the brake pedal; there is no need to
change to neutral (N).
The vehicle will move off again:
– either slowly, if you release the brake without accelerating (e.g. when in a
traffic jam);
– or quickly, if you release the brake and accelerate.
Accelerating and overtaking
– Slowly depress the accelerator pedal to accelerate gradually;
The oil level in the automatic gear-
box system reservoir varies depend-
ing on use. Adding oil is strictly
forbidden (except by qualified ap-
proved network personnel).
– to obtain maximum vehicle per-
formance regardless of the mode
selected (automatic or manual),
quickly depress the accelerator
pedal beyond the kickdown point.
The speed with which you depress the
pedal will allow you to downshift ac-
cording to the vehicle’s capabilities.
Parking the vehicle
It is possible to park in gear (for exam-
ple, on a slope):
– with the ignition on, select a gear with your foot on the brake ;
– check that a gear other than N is dis- played on the instrument panel, then
remove the ignition key;
– apply the handbrake.
To disengage the gear, switch on the
ignition without starting the engine and
shift the selector lever to neutral with
the brake pedal depressed . Check
that N is displayed on the instrument
panel.
Page 223 of 290

5.9
TYRE INFLATION KIT (5/6)
Inflation kit E
Depending on the vehicle, in the event
of a puncture, use the inflation kit lo-
cated underneath the driver’s seat.
Before using this kit, park
the vehicle at a sufficient
distance from traffic, switch
on the hazard warning
lights, apply the handbrake, ask all
passengers to leave the vehicle and
keep them away from traffic.
If the vehicle is parked on
the hard shoulder, you must
warn other road users of
your vehicle’s presence
with a warning triangle or with other
devices as per the legislation apply-
ing to the country you are in.
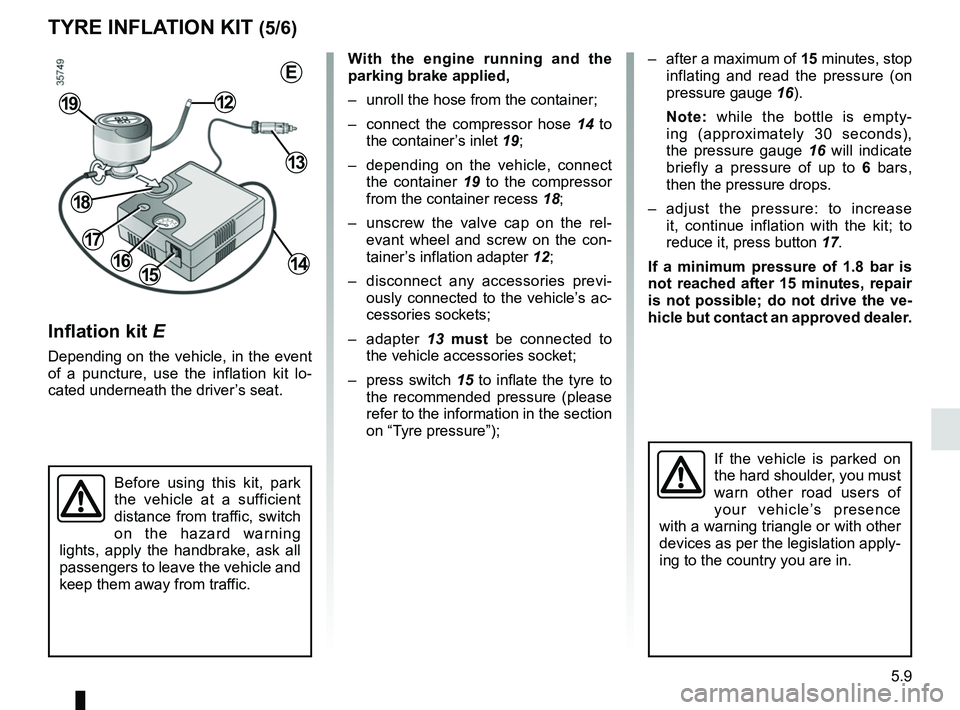
With the engine running and the
parking brake applied,
– unroll the hose from the container;
– connect the compressor hose 14 to the container’s inlet 19;
– depending on the vehicle, connect the container 19 to the compressor
from the container recess 18;
– unscrew the valve cap on the rel- evant wheel and screw on the con-
tainer’s inflation adapter 12;
– disconnect any accessories previ- ously connected to the vehicle’s ac-
cessories sockets;
– adapter 13 must be connected to
the vehicle accessories socket;
– press switch 15 to inflate the tyre to
the recommended pressure (please
refer to the information in the section
on “Tyre pressure”);
1516
1219
– after a maximum of 15 minutes, stop inflating and read the pressure (on
pressure gauge 16).
Note: while the bottle is empty-
ing (approximately 30 seconds),
the pressure gauge 16 will indicate
briefly a pressure of up to 6 bars,
then the pressure drops.
– adjust the pressure: to increase it, continue inflation with the kit; to
reduce it, press button 17.
If a minimum pressure of 1.8 bar is
not reached after 15 minutes, repair
is not possible; do not drive the ve-
hicle but contact an approved dealer.
13
14
18
17
E
Page 227 of 290

5.13
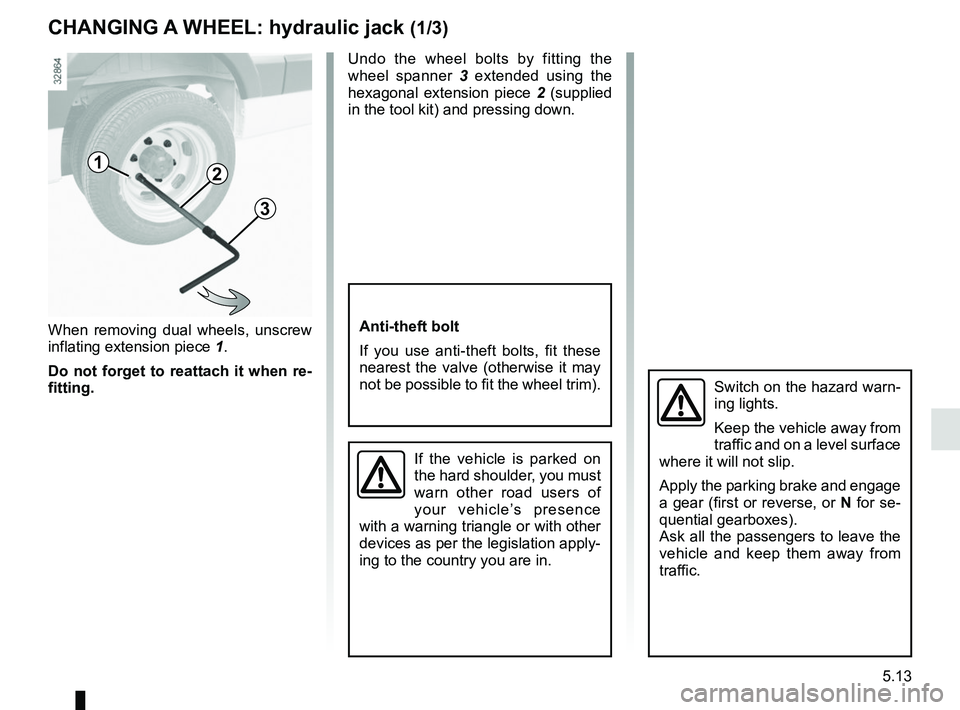
When removing dual wheels, unscrew
inflating extension piece 1.
Do not forget to reattach it when re-
fitting. Undo the wheel bolts by fitting the
wheel spanner
3 extended using the
hexagonal extension piece 2 (supplied
in the tool kit) and pressing down.
1
CHANGING A WHEEL: hydraulic jack (1/3)
Switch on the hazard warn-
ing lights.
Keep the vehicle away from
traffic and on a level surface
where it will not slip.
Apply the parking brake and engage
a gear (first or reverse, or N for se-
quential gearboxes).
Ask all the passengers to leave the
vehicle and keep them away from
traffic.
If the vehicle is parked on
the hard shoulder, you must
warn other road users of
your vehicle’s presence
with a warning triangle or with other
devices as per the legislation apply-
ing to the country you are in.
Anti-theft bolt
If you use anti-theft bolts, fit these
nearest the valve (otherwise it may
not be possible to fit the wheel trim).
2
3