2018 RENAULT MASTER tow
[x] Cancel search: towPage 176 of 290
3.10
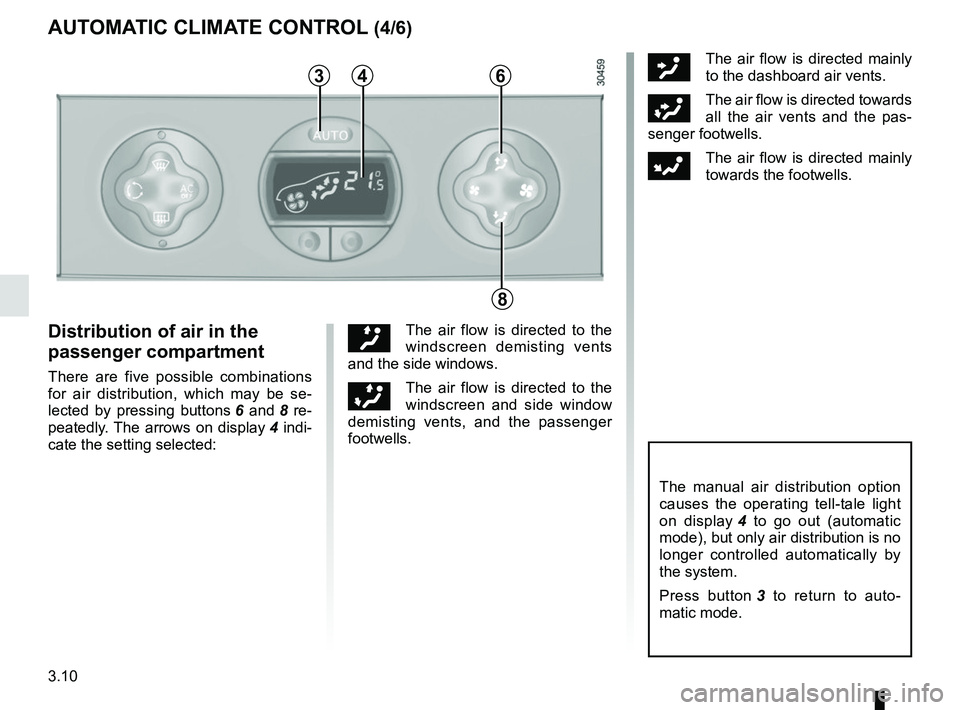
ôThe air flow is directed mainly
to the dashboard air vents.
öThe air flow is directed towards
all the air vents and the pas-
senger footwells.
FThe air flow is directed mainly
towards the footwells.
The manual air distribution option
causes the operating tell-tale light
on display 4 to go out (automatic
mode), but only air distribution is no
longer controlled automatically by
the system.
Press button 3 to return to auto-
matic mode.
Distribution of air in the
passenger compartment
There are five possible combinations
for air distribution, which may be se-
lected by pressing buttons 6 and 8 re-
peatedly. The arrows on display 4 indi-
cate the setting selected:
õThe air flow is directed to the
windscreen demisting vents
and the side windows.
÷The air flow is directed to the
windscreen and side window
demisting vents, and the passenger
footwells.
AUTOMATIC CLIMATE CONTROL (4/6)
346
8
Page 179 of 290

3.13
Operating faults
As a general rule, contact your ap-
proved dealer in the event of an oper-
ating fault.
– Reduction in de-icing, demisting or air conditioning performance.
This may be caused by the passen-
ger compartment filter cartridge be-
coming clogged.
– No cold air is being produced .
Check that the controls are set cor-
rectly and that the fuses are sound.
Otherwise, switch off the system.
Presence of water under the
vehicle
After prolonged use of the air condi-
tioning system, it is normal for water
to be present under the vehicle. This is
caused by condensation.
AIR CONDITIONING: information and operating instructions (1/2)
Do not open the refriger-
ant fluid circuit. The fluid
may damage eyes or skin.
Fuel consumption
You will normally notice an increase in
fuel consumption (especially in town)
when the air conditioning is operating.
For vehicles fitted with air conditioning
with no automatic mode, switch off the
system when it is not required.
Advice for reducing consumption
and helping to preserve the environ-
ment
Drive with the air vents open and the
windows closed.
If the vehicle has been parked in the
sun, open the doors for a few moments
to let the hot air escape before starting
the engine.
Maintenance
Refer to the Maintenance Document
for your vehicle for the inspection fre-
quency.
Advice on use
In some situations (air conditioning off,
air recirculation activated, ventilation
speed at zero or low etc.), you may
notice that condensation starts to form
on the windows and windscreen.
If there is condensation, use the “Clear
View” function to remove it, then use
the air conditioning in automatic mode
to stop it forming again.
Do not add anything to the
vehicle’s ventilation circuit
(for example, to remove
bad odours).
There is a risk of damage or of
fire.
Use the air conditioning system reg-
ularly, even in cold weather, running
it at least once a month for approxi-
mately 5 minutes.
Vehicles equipped with
modeECO
Once activated, ECO mode may
reduce air conditioning perform-
ance. Please refer to the informa-
tion on “Driving advice, Eco-driving”
in Section 2.
Page 189 of 290
3.23
24
25
PASSENGER COMPARTMENT STORAGE, FITTINGS (4/6)
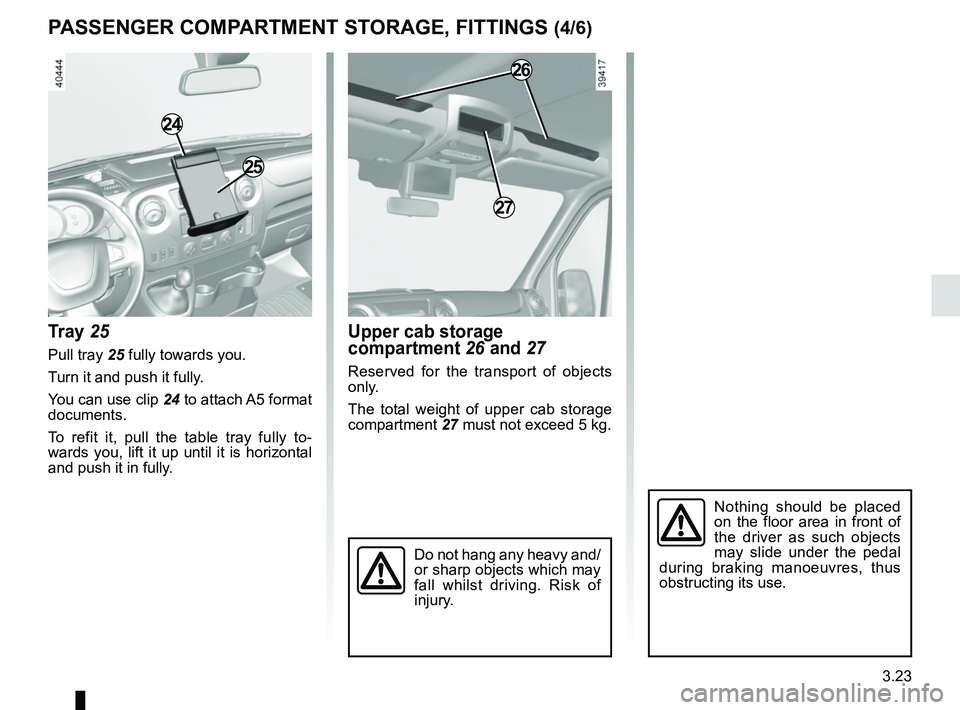
Tray 25
Pull tray 25 fully towards you.
Turn it and push it fully.
You can use clip 24 to attach A5 format
documents.
To refit it, pull the table tray fully to-
wards you, lift it up until it is horizontal
and push it in fully.
Upper cab storage
compartment 26 and 27
Reserved for the transport of objects
only.
The total weight of upper cab storage
compartment 27 must not exceed 5 kg.
Do not hang any heavy and/
or sharp objects which may
fall whilst driving. Risk of
injury.
Nothing should be placed
on the floor area in front of
the driver as such objects
may slide under the pedal
during braking manoeuvres, thus
obstructing its use.
26
27
Page 196 of 290
3.30
TRANSPORTING OBJECTS (2/2)
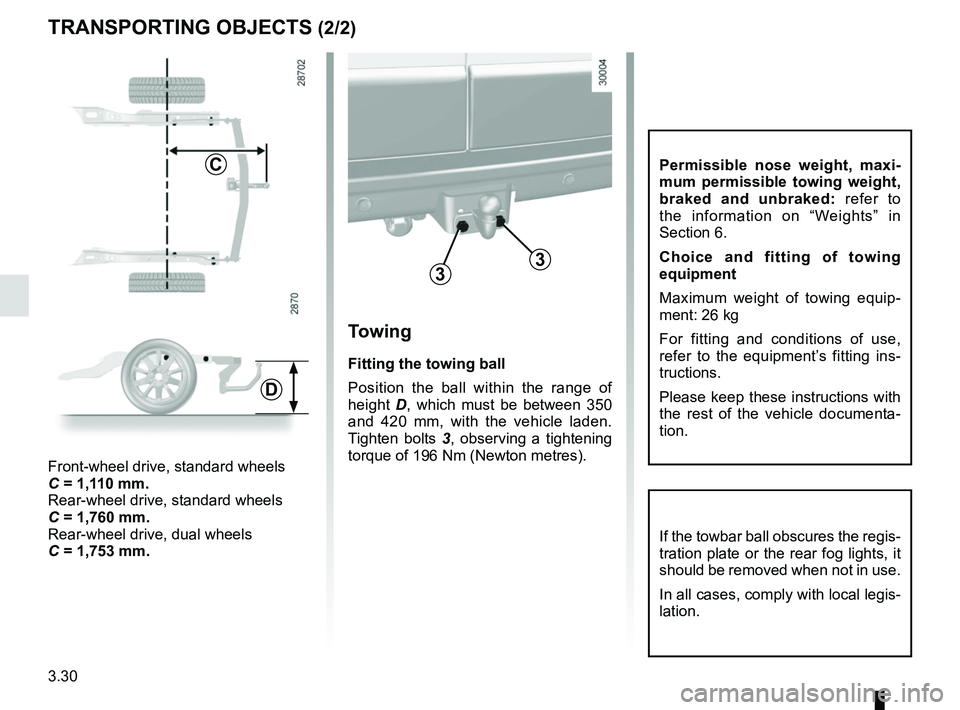
Towing
Fitting the towing ball
Position the ball within the range of
height D, which must be between 350
and 420 mm, with the vehicle laden.
Tighten bolts 3, observing a tightening
torque of 196 Nm (Newton metres).
33
C
Front-wheel drive, standard wheels
C = 1,110 mm.
Rear-wheel drive, standard wheels
C = 1,760 mm.
Rear-wheel drive, dual wheels
C = 1,753 mm.
D
If the towbar ball obscures the regis-
tration plate or the rear fog lights, it
should be removed when not in use.
In all cases, comply with local legis-
lation.
Permissible nose weight, maxi-
mum permissible towing weight,
braked and unbraked: refer to
the information on “Weights” in
Section 6.
Choice and fitting of towing
equipment
Maximum weight of towing equip-
ment: 26 kg
For fitting and conditions of use,
refer to the equipment’s fitting ins-
tructions.
Please keep these instructions with
the rest of the vehicle documenta-
tion.
Page 208 of 290
4.12
BC
ED
F
A
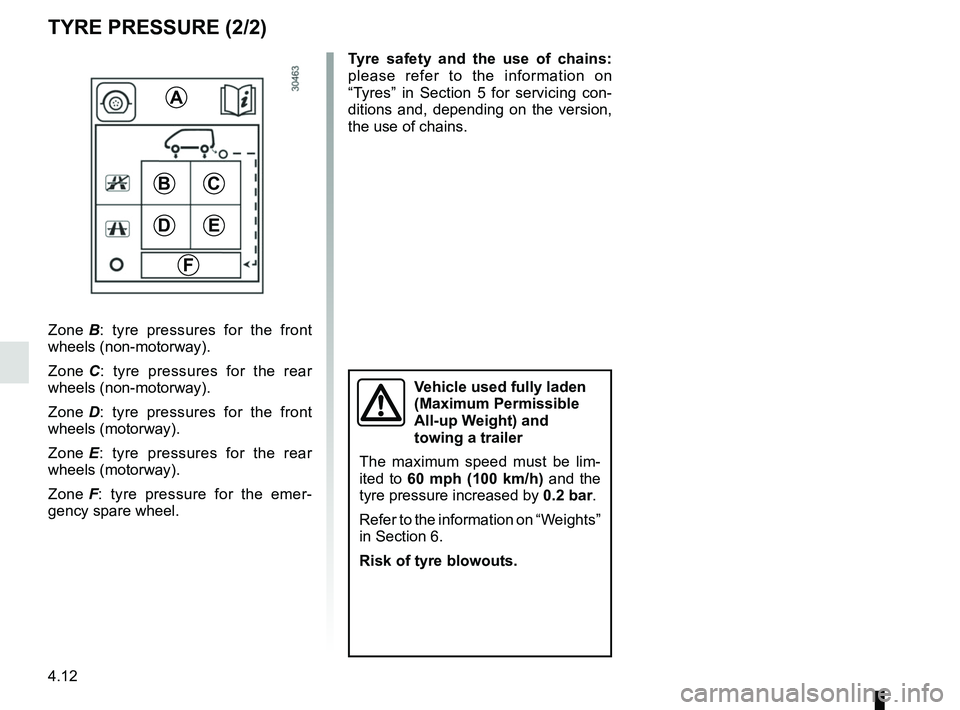
Zone B: tyre pressures for the front
wheels (non-motorway).
Zone C : tyre pressures for the rear
wheels (non-motorway).
Zone D : tyre pressures for the front
wheels (motorway).
Zone E : tyre pressures for the rear
wheels (motorway).
Zone F : tyre pressure for the emer-
gency spare wheel.
TYRE PRESSURE (2/2)
Tyre safety and the use of chains:
please refer to the information on
“Tyres” in Section 5 for servicing con-
ditions and, depending on the version,
the use of chains.
Vehicle used fully laden
(Maximum Permissible
All-up Weight) and
towing a trailer
The maximum speed must be lim-
ited to 60 mph (100 km/h) and the
tyre pressure increased by 0.2 bar.
Refer to the information on “Weights”
in Section 6.
Risk of tyre blowouts.
Page 209 of 290

4.13
When the ignition is off, some consu-
mers may also be switched off (dipped
beam headlights, radio, ventilation,
etc.). On the instrument panel, the mes-
sage “BATTERY MODE: ECONOMY”
appears when switched off. When the
level is extremely low, the message
“BATTERY LOW START ENGINE” is
displayed.
The charge status of the battery can
decrease, especially if you use your
vehicle:
– for short journeys;
– for driving in town;
– when the temperature drops;
– with the vehicle stopped and the engine off.
Replacing the battery
As this operation is complex, we advise
you to contact an approved Dealer.
BATTERY
123
456
This is located behind step A and does
not require maintenance. You should
not open it or add any fluid .
Depending on the vehicle, a system
continuously checks the battery charge
status.
Handle the battery with care as it contains sulphuric acid, which must n\
ot
come into contact with eyes or skin. If it does, wash the affected area with
plenty of cold water. If necessary, consult a doctor.
Ensure that naked flames, red hot objects and sparks do not come into
contact with the battery as there is a risk of explosion.
Label B
Observe the indications on the battery:
– 1 naked flames and smoking are for-
bidden;
– 2 eye protection required;
– 3 keep away from children;
– 4 explosive materials;
– 5 refer to the handbook;
– 6 corrosive materials.
The battery is a speci-
fic type, please ensure it
is replaced with the same
type. Consult an approved
dealer.
B
A
Page 215 of 290
5.1
Section 5: Practical advice
Puncture . . . . . . . . . . . . . . . . . . . . . . . . . . . . . . . . . . . .\
. . . . . . . . . . . . . . . . . . . . . . . . . . . . . . . . . . 5.2
Emergency spare wheel . . . . . . . . . . . . . . . . . . . . . . . . . . . . . . . . . . . .\
. . . . . . . . . . . . . . . . . . . . . . 5.2
Tool kit . . . . . . . . . . . . . . . . . . . . . . . . . . . . . . . . . . . . \
. . . . . . . . . . . . . . . . . . . . . . . . . . . . . . . . . . . . 5.4
Tyre inflation kit . . . . . . . . . . . . . . . . . . . . . . . . . . . . . . . . . . . .\
. . . . . . . . . . . . . . . . . . . . . . . . . . . . . 5.5
Wheel trims . . . . . . . . . . . . . . . . . . . . . . . . . . . . . . \
. . . . . . . . . . . . . . . . . . . . . . . . . . . . . . . . . . . . . . 5.11
Changing a wheel: hydraulic jack . . . . . . . . . . . . . . . . . . . . . . . . . . . . . . . . . . . .\
. . . . . . . . . . . . . . . 5.13
Changing a wheel: jack . . . . . . . . . . . . . . . . . . . . . . . . . . . . . . . . . . . . \
. . . . . . . . . . . . . . . . . . . . . . . 5.16
Tyres . . . . . . . . . . . . . . . . . . . . . . . . . . . . . . . . . . . .\
. . . . . . . . . . . . . . . . . . . . . . . . . . . . . . . . . . . . . 5.18
Headlights (changing bulbs) . . . . . . . . . . . . . . . . . . . . . . . . . . . . . . . . . . . .\
. . . . . . . . . . . . . . . . . . . 5.21front fog lights . . . . . . . . . . . . . . . . . . . . . . . . . . . . . . . . . . . . \
. . . . . . . . . . . . . . . . . . . . . . . . . 5.23
side lights . . . . . . . . . . . . . . . . . . . . . . . . . . . . . . . . . . . . \
. . . . . . . . . . . . . . . . . . . . . . . . . . . . 5.24
rear lights . . . . . . . . . . . . . . . . . . . . . . . . . . . . . . . . . . . . \
. . . . . . . . . . . . . . . . . . . . . . . . . . . . 5.25
interior lighting . . . . . . . . . . . . . . . . . . . . . . . . . . . . . . . . . . . .\
. . . . . . . . . . . . . . . . . . . . . . . . 5.27
Fuses . . . . . . . . . . . . . . . . . . . . . . . . . . . . . . . . . . . . \
. . . . . . . . . . . . . . . . . . . . . . . . . . . . . . . . . . . . . 5.28
Battery: troubleshooting. . . . . . . . . . . . . . . . . . . . . . . . . . . . . . . . . . . . \
. . . . . . . . . . . . . . . . . . . . . . . 5.33
Key, radio frequency remote control: battery . . . . . . . . . . . . . . . . . . . . . . . . . . . . . . . . . . . . \
. . . . . . . 5.35
Hands-free access transmitter/receiver: battery . . . . . . . . . . . . . . . . . . . . . . . . . . . . . . . . . . . .\
. . . . 5.36
Replacing wiper blades . . . . . . . . . . . . . . . . . . . . . . . . . . . . . . . . . . . . \
. . . . . . . . . . . . . . . . . . . . . . . 5.37
Towing . . . . . . . . . . . . . . . . . . . . . . . . . . . . . . . . . . . . \
. . . . . . . . . . . . . . . . . . . . . . . . . . . . . . . . . . . . 5.38
Fitting a radio . . . . . . . . . . . . . . . . . . . . . . . . . . . . . . . . . . . . \
. . . . . . . . . . . . . . . . . . . . . . . . . . . . . . . 5.40
Accessories . . . . . . . . . . . . . . . . . . . . . . . . . . . . . . . . . . . . \
. . . . . . . . . . . . . . . . . . . . . . . . . . . . . . . . 5.41
Operating faults . . . . . . . . . . . . . . . . . . . . . . . . . . . . . . . . . . . . \
. . . . . . . . . . . . . . . . . . . . . . . . . . . . . 5.42
Page 216 of 290
5.2
PUNCTURE, EMERGENCY SPARE WHEEL (1/2)
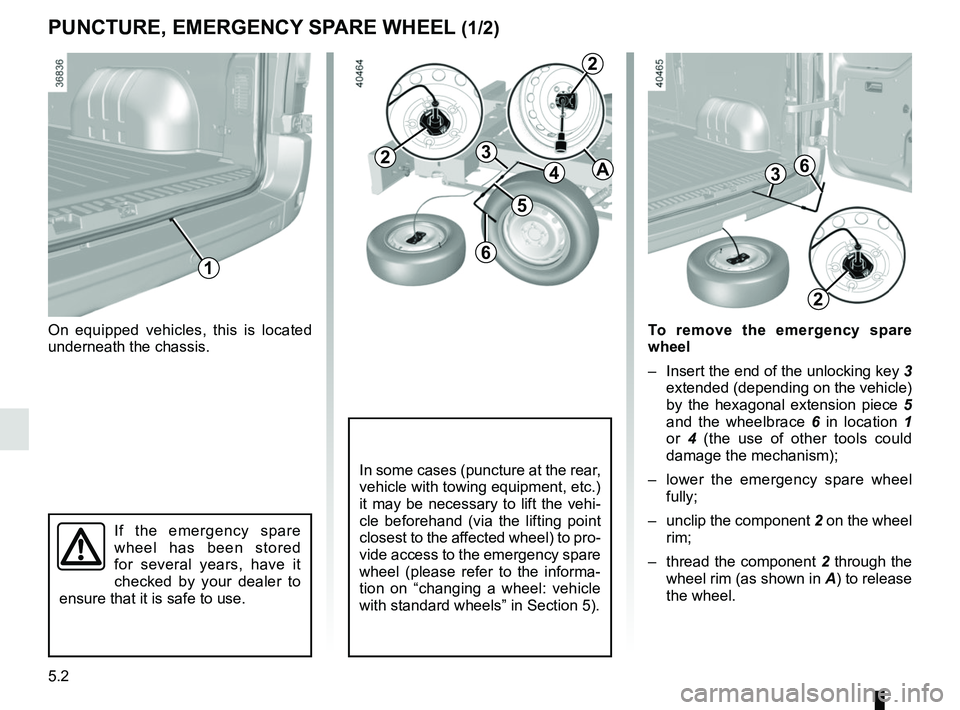
On equipped vehicles, this is located
underneath the chassis.
If the emergency spare
wheel has been stored
for several years, have it
checked by your dealer to
ensure that it is safe to use.
In some cases (puncture at the rear,
vehicle with towing equipment, etc.)
it may be necessary to lift the vehi-
cle beforehand (via the lifting point
closest to the affected wheel) to pro-
vide access to the emergency spare
wheel (please refer to the informa-
tion on “changing a wheel: vehicle
with standard wheels” in Section 5).
1
4
3
5
6
2
2
A
2
36
To remove the emergency spare
wheel
– Insert the end of the unlocking key 3
extended (depending on the vehicle)
by the hexagonal extension piece 5
and the wheelbrace 6 in location 1
or 4 (the use of other tools could
damage the mechanism);
– lower the emergency spare wheel fully;
– unclip the component 2 on the wheel
rim;
– thread the component 2 through the
wheel rim (as shown in A) to release
the wheel.