2018 RENAULT KANGOO Z.E. wheel
[x] Cancel search: wheelPage 89 of 230

1.83
éHazard warning lights
Pressing switch 3 illuminates
all four direction indicators and the
side-mounted indicator lights simul-
taneously. It must only be used in an
emergency to warn other drivers that
you have had to stop in an area where
stopping is prohibited or unexpected, or
that you are obliged to drive under spe-
cial conditions.
Depending on the vehicle, the hazard
warning lights may come on automati-
cally under heavy deceleration. You can
switch them off by pressing switch 3.
Horn
Press one of points 2.
Direction indicators
Move stalk 1 parallel to the steering
wheel and in the direction you are going
to turn.
When driving on the motorway, the
steering wheel is not often turned
enough to return the stalk automatically
to 0. There is an intermediate position in
which the switch may be held when
changing lanes.
You can also briefly place stalk
1 in the
intermediate position, causing the indi-
cator light to flash three times.
When the stalk is released, it automati-
cally returns to 0.
Headlight flasher
Pull stalk 1 towards you to flash the
headlights.
AUDIBLE AND VISUAL SIGNALS
2
3
1
0
1
Page 96 of 230

1.90
Windscreen wiper
With the ignition on, move stalk 1 paral-
lel to the steering wheel:
A Park
B Intermittent wiping
The wipers will pause for several
seconds between sweeps. It is
possible to change the time be-
tween sweeps by turning ring 2.
C Normal wiping speed
D Fast wiping speed
FRONT WINDSCREEN WASHER, WIPER (1/2)
Special note
When the vehicle is being driven, the
wiping speed slows down whenever
the vehicle stops. For example, fast
wiping speed will slow to normal wiping
speed. As soon as the vehicle moves
off, wiping will return to the speed origi-
nally selected.
If stalk 1 is operated, it overrides and
cancels the automatic function.
If for any reason the wipers are
jammed (e.g. frozen to windscreen
by ice etc.), the system will auto-
matically cut the power supply to
the wipers.
A
B
C
D
1
2
Automatic wiper function
(depending on vehicle)
With the engine running, move stalk 1.
A Park
B Automatic wiper function
When this position is selected, the
system detects the presence of
water on the windscreen and trig-
gers wiping at a suitable wiping
speed. The triggering threshold
and the time between sweeps can
be adjusted by turning ring 2.
NB: in foggy weather or during
snowfalls, the wiping is not automati-
cally triggered and remains under
the driver’s control.
C Normal wiping speed
D Fast wiping speed
Page 102 of 230

2.2
STARTING, STOPPING THE ENGINE (1/2)
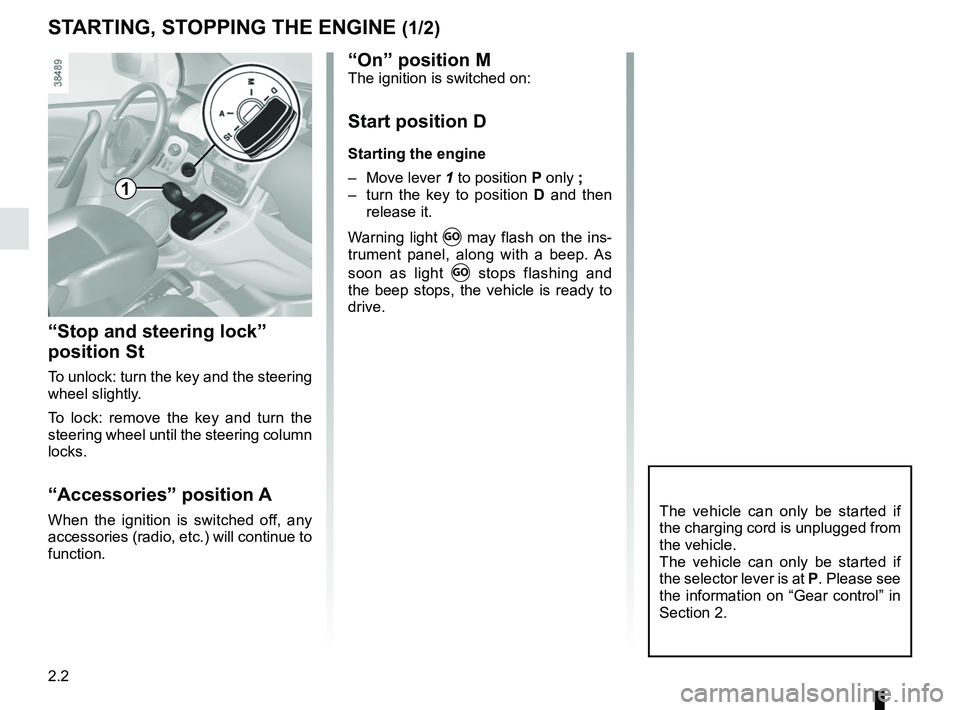
“Stop and steering lock”
position St
To unlock: turn the key and the steering
wheel slightly.
To lock: remove the key and turn the
steering wheel until the steering column
locks.
“Accessories” position A
When the ignition is switched off, any
accessories (radio, etc.) will continue to
function.The vehicle can only be started if
the charging cord is unplugged from
the vehicle.
The vehicle can only be started if
the selector lever is at P. Please see
the information on “Gear control” in
Section 2.
1
“On” position MThe ignition is switched on:
Start position D
Starting the engine
– Move lever 1 to position P only ;
– turn the key to position D and then
release it.
Warning light
Ṑ may flash on the ins-
trument panel, along with a beep. As
soon as light
Ṑ stops flashing and
the beep stops, the vehicle is ready to
drive.
Page 105 of 230

2.5
Handbrake
To release:
Pull the lever 5 up slightly, press
button 6 and then lower the lever to the
floor.
To apply:
Pull upwards, check that the vehicle is
properly immobilised.
GEAR CONTROL (2/2)/HANDBRAKE
Parking the vehicle
When the vehicle is stopped, move the
lever to position P while keeping your
foot on the brake pedal: the gearbox is
in neutral and the drive wheels are me-
chanically locked by the driveshaft.
Apply the handbrake.
In the event an impact to
the underside of the vehicle
(e.g.: striking a post, raised
kerb or other street furni-
ture), this may result in damage to
the vehicle (e.g.: twisted axle), the
electrical circuit or the traction bat-
tery.
Do not touch the circuit elements or
any fluids or liquids.
To prevent any risk of accident,
have your vehicle checked by an
authorised dealer.
Risk of serious injury or electric
shock and risk to life.
When setting off , if the lever is locked
in position P even though you are
pressing the brake pedal, the lever
can be released manually. To do this,
unclip the base of the lever and simulta-
neously press at location 4 and the un-
locking button 6 on the lever.
When stationary and de-
pending on the slope and/or
vehicle load, it may be nec-
essary to pull up the hand-
brake at least two extra notches and
engage position P.
Make sure that the hand-
brake is properly released
when driving (red indicator
light off), otherwise over-
heating, or even damage, may
occur.
6
4
5
Page 111 of 230

2.11
TYRE PRESSURE LOSS WARNING (1/4)
When fitted to the vehicle, this system
notifies the driver if one or more tyres
lose pressure.
Operating principle
Each wheel (except for the emergency
spare wheel) has a sensor in the infla-
tion valve which periodically measures
the tyre pressure while driving.
Warning light
1 comes on to
alert the driver in the event of insuffi-
cient pressure (deflated wheel, punctu-
red tyre, etc.).
Resetting the standard level
for the tyre pressures
This should be done:
– when the standard tyre pressure needs to be changed to adapt to
usage conditions (empty, carrying a
load, motorway driving, etc.);
– after swapping a wheel (however this practice is not recommended);
– after changing a wheel.
It should always be done after checking
the tyre pressure of all four tyres when
cold.
Tyre pressures must correspond to the
current usage of the vehicle (empty,
carrying a load, motorway driving, etc.).
This function is an addi-
tional driving aid.
However, the function does
not take the place of the
driver. It cannot, therefore, under
any circumstances replace the vig-
ilance or the responsibility of the
driver.
Check the tyre pressures, including
the emergency spare wheel, once a
month.
1
Page 113 of 230

2.13
TYRE PRESSURE LOSS WARNING (3/4)
TYRE PUNCTURE
The warning light
stays on to-
gether with a beep and, depending
on the vehicle, the message “TYRE
PUNCTURE”.
This message is accompanied by the
warning light
®.
They indicate that at least one wheel
is punctured or severely underinfla-
ted. Replace it or contact an authorised
dealer if it is punctured. Top up the tyre
pressure if the wheel is deflated.
Warning light ® re-
quires you to stop immedi-
ately, for your own safety,
as soon as traffic conditions
allow.
The sudden loss of pressure in a
tyre (burst tyre, etc.) cannot be de-
tected by the system.
CHECK TYRE SENSORS
The warning light
flashes for
several seconds, then stays on and,
depending on the vehicle, together
with the message “CHECK TYRE
SENSORS ”.
This message is accompanied by the
warning light
©.
They indicate that at least one tyre is
not fitted with sensors (e.g. emergency
spare wheel). In other cases, contact
an authorised dealer.
Display
The display 2 on the instrument panel
informs you of any tyre pressure faults
(flat tyre, punctured tyre, etc.).
CHECK TYRE PRESSURES
The warning light
stays on
and, depending on the vehicle, along
with the message “CHECK TYRE
PRESSURES”.
These indicate that at least one tyre is
flat.
Check and, if necessary, readjust the
pressures of the four wheels when cold.
The warning light
goes off after a
few minutes’ driving.
Page 114 of 230

2.14
Replacing wheels/tyres
This system requires specific equip-
ment (wheels, tyres, hubcaps, etc.).
Please see the information on “Tyres”
in Section 5.
Contact an approved Dealer to fit new
tyres and to find out about available ac-
cessories compatible with the system
and available from your dealer net-
work: the use of any other accessory
could affect the correct operation of the
system or damage a sensor.
Emergency spare wheel
If the vehicle is equipped with an emer-
gency spare wheel, it will not have a
sensor. When it is fitted on the vehi-
cle, the warning light
flashes
for several seconds, then stays on, to-
gether with the warning light
©.
Depending on the vehicle, the message
“CHECK TYRE SENSORS” appears
on the instrument panel.
Readjustment of tyre
pressures
The tyre pressures must be adjusted
when cold (please refer to the label lo-
cated on the edge of the driver’s door).
If tyre pressures cannot be checked
when the tyres are cold, the recom-
mended pressures must be increased
by 0.2 to 0.3 bar (3 PSI).
Never deflate a hot tyre.
TYRE PRESSURE LOSS WARNING (4/4)
Tyre repair product and
inflation kit
Because the valves are specially desi-
gned, only use equipment approved by
the approved network. Please refer to
“Tyre inflation kit” in Section 5.
Page 115 of 230

2.15
DRIVER CORRECTION DEVICES AND AIDS (1/3)
Depending on the vehicle, this is com-
posed of:
– of the ABS (anti-lock braking
system);
– electronic stability program (ESC) with understeer control and trac-
tion control;
– emergency brake assist;
– hill start assistance.
In an emergency, apply firm and
continuous pressure to the brake
pedal. There is no need to pump
it repeatedly. The ABS will modu-
late the force applied in the braking
system.
These functions are an ad-
ditional aid in the event of
critical driving conditions,
enabling the vehicle behav-
iour to be adapted to suit the driving
conditions.
However, the functions do not take
the place of the driver. They do
not increase the vehicle’s limits
and should not encourage you
to drive more quickly. Therefore,
they can under no circumstances
replace the vigilance or responsibil-
ity of the driver when manoeuvring
the vehicle (the driver must always
be ready for sudden incidents which
may occur when driving).
Your braking systems
are partially operational.
However, it is dangerous
to brake suddenly and
it is essential to stop immediately,
as soon as traffic conditions allow.
Contact an approved dealer.
ABS (anti-lock braking
system)
Under heavy braking, the ABS prevents
the wheels from locking, allowing the
stopping distance to be managed and
keeping control of the vehicle.
Under these circumstances, the vehi-
cle can be steered to avoid an obstacle
whilst braking. In addition, this system
can increase stopping distances, par-
ticularly on roads with low surface grip
(wet ground etc.).
You will feel a pulsation through the
brake pedal each time the system is
activated. The ABS does not in any way
improve the vehicle’s physical perform-
ance relating to the road surface and
roadholding. It is still essential to follow
the rules of good driving practice (such
as driving at a safe distance from the
vehicle in front, etc.). Operating faults:
– if the x warning light on the in-
strument panel comes on while driv-
ing, braking is still operational ;
– if the
x and D warning
lights on the instrument panel come
on while driving, this indicates a
fault in the braking system.
In such cases, ABS, ESC and emer-
gency brake assist are also deactivated
and, depending on the vehicle, the
messages “CHECK ABS”, “BRAKES
TO BE CHECKED” and “CHECK ESC”
appear on the instrument panel.
Consult an approved dealer.