2018 Ram ProMaster AUX
[x] Cancel search: AUXPage 45 of 204

SAFETY
AUXILIARY DRIVING SYSTEMS......44
Tire Pressure Monitoring System
(TPMS).....................44
OCCUPANT RESTRAINT SYSTEMS ....47
Occupant Restraint Systems Features . .47
Important Safety Precautions.......47Seat Belt Systems
...............48
Supplemental Restraint Systems (SRS) . .55
Child Restraints ................64
Transporting Pets ...............69SAFETY TIPS.................69
Transporting Passengers ...........69Exhaust Gas
..................69
Safety Checks You Should Make
Inside The Vehicle ..............70
Periodic Safety Checks You Should
Make Outside The Vehicle ..........72
SAFETY
43
Page 46 of 204

AUXILIARY DRIVING SYSTEMS
Tire Pressure Monitoring System
(TPMS)
The Tire Pressure Monitor System (TPMS)
will warn the driver of a low tire pressure
based on the vehicle recommended cold
placard pressure.
The tire pressure will vary with temperature
by about 1 psi (7 kPa) for every 12°F (6.5°C).
This means that when the outside tempera-
ture decreases, the tire pressure will de-
crease. Tire pressure should always be set
based on cold inflation tire pressure. This is
defined as the tire pressure after the vehicle
has not been driven for at least three hours, or
driven less than 1 mile (1.6 km) after a three
hour period. The cold tire inflation pressure
must not exceed the maximum inflation pres-
sure molded into the tire sidewall. Refer to
“Tires” in “Servicing And Maintenance” for
information on how to properly inflate the
vehicle’s tires. The tire pressure will also
increase as the vehicle is driven - this is
normal and there should be no adjustment for
this increased pressure.The TPMS will warn the driver of a low tire
pressure if the tire pressure falls below the
low-pressure warning limit for any reason,
including low temperature effects and natu-
ral pressure loss through the tire.
The TPMS will continue to warn the driver of
low tire pressure as long as the condition
exists, and will not turn off until the tire
pressure is at or above the recommended
cold placard pressure. Once the low tire pres-
sure warning (Tire Pressure Monitoring [TPM]
Telltale Light) illuminates, you must increase
the tire pressure to the recommended cold
placard pressure in order for the TPM Telltale
Light to turn off. The system will automati-
cally update and the TPM Telltale Light will
turn off once the system receives the updated
tire pressures. The vehicle may need to be
driven for up to 20 minutes above 15 mph
(24 km/h) in order for the TPMS to receive
this information.
NOTE:
When filling warm tires, the tire pressure may
need to be increased up to an additional 4 psi
(30 kPa) above the recommended cold plac-
ard pressure in order to turn the Tire Pressure
Monitoring Telltale Light off.
For example, your vehicle may have a recom-
mended cold (parked for more than three
hours) placard pressure of 30 psi (207 kPa).
If the ambient temperature is 68°F (20°C)
and the measured tire pressure is 27 psi
(186 kPa), a temperature drop to 20°F (-7°C)
will decrease the tire pressure to approxi-
mately 23 psi (158 kPa). This tire pressure is
sufficiently low enough to turn on the TPM
Telltale Light. Driving the vehicle may cause
the tire pressure to rise to approximately
27 psi (186 kPa), but the TPM Telltale Light
will still be on. In this situation, the TPM
Telltale Light will turn off only after the tires
are inflated to the vehicle’s recommended
cold placard pressure value.
SAFETY
44
Page 108 of 204

Interior Fuses
The interior fuse panel is part of the Body
Control Module (BCM) and is located on the
driver's side under the instrument panel.
CavityMini Fuse Description
F31 5 Amp BeigeINT/A
F34 7.5 Amp Brown Clearance Lights
F36 15 Amp Blue+30 (ACM – TPCU – RRM – DLC)
F37 5 Amp BeigeINT (BRAKE NO – IPC)
F38 15 Amp BlueCentral Locking
F42 5 Amp BeigeINT (BSM – SAS – BRAKE NC)
F43 20 Amp YellowBi-Directional Washer Pump
F47 20 Amp YellowDriver Power Window
F48 20 Amp YellowPassenger Power Window
F49 5 Amp BeigeINT (PAM – CCS – RRM – ECM)
F50 7.5 Amp Brown INT (ORC)
F51 5 Amp BeigeINT (REAR CAMERA-AUX)
F53 5 Amp Beige+30 (IPC)
F90 7.5 Amp Brown Left High Beam
F93 7.5 Amp Brown Right Fog Lamp
IN CASE OF EMERGENCY
106
Page 109 of 204

Right Central Pillar Fuses
The right central pillar fuse panel is located
on the interior side at the base of the passen-
ger side B pillar.
CavityMini Fuse Description
F81 7.5 Amp Brown Seat Heater
F83 20 Amp YellowRear Left Windows Heater
F84 20 Amp YellowRear Right Windows Heater
F86 20 Amp YellowAuxiliary Switch (From Battery) — If Equipped
F87 20 Amp YellowAuxiliary Switch (From Ignition) — If Equipped
107
Page 163 of 204

MULTIMEDIA
CYBERSECURITY..............162
UCONNECT 3/3 NAV WITH
5-INCH DISPLAY ..............163
Clock Setting.................164
Equalizer, Balance And Fade .......164
Radio Operation ...............166
USB/Audio Jack (AUX)/Bluetooth
Operation ...................167
Navigation ..................168
UCONNECT SETTINGS ...........169
STEERING WHEEL AUDIO CONTROLS . .170
Left Switch ..................170
Right Switch .................170
UCONNECT PHONE ............171
Uconnect Phone (Bluetooth Hands
Free Calling).................171
Pairing (Wirelessly Connecting)
Your Mobile Phone To The Uconnect
System ....................172
Common Phone Commands
(Examples) ..................175
Mute (Or Unmute) Microphone
During Call ..................175
Transfer Ongoing Call Between
Handset And Vehicle ............175
Phonebook ..................175
Voice Command Tips ............176
Changing The Volume ............176
Using Do Not Disturb ...........176
Incoming Text Messages ..........176Helpful Tips And Common Questions To
Improve Bluetooth Performance With Your
Uconnect System
..............178
Regulatory And Safety Information
USA/CANADA ................178
UCONNECT VOICE RECOGNITION QUICK
TIPS..................... .179
Introducing Uconnect............179
Get Started ..................180
Basic Voice Commands ...........182
Radio .....................182
Media .....................182
Phone .....................183
Voice Text Reply ...............183
Additional Information ...........184
MULTIMEDIA
161
Page 166 of 204

Clock Setting
1. To start the clock setting procedure, pushthe SETTINGS
button on the right
side of the display, then “Clock” button
on the touchscreen, and then “Set Time &
Format” button on the touchscreen. Se-
lect the up or down arrows as appropriate.
2. Press the up or down arrows to adjust the hours or minutes, next select the AM or
PM button on the touchscreen. You can
also select 12hr or 24hr format by press-
ing the desired button on the
touchscreen.
3. Once the time is set, press the “Done” or “back arrow” button on the touchscreen
to exit the time screen.
NOTE:
Once the time has been set on the radio, the
time will also appear in the instrument clus-
ter display.
Equalizer, Balance And Fade
1. Push the SETTINGSbutton on the
right side of the display.
2. Scroll down and press the “Audio” button on the touchscreen to open the Audio
menu.
3. The Audio Menu shows the following op- tions for you to customize your audio
settings.
Equalizer — If Equipped
• Press the “Equalizer” button on the touch- screen to adjust the Bass, Mid and Treble.
Use the “+” or “-” buttons on the touch-
screen to adjust the equalizer to your de-
sired settings.
Balance/Fade — If Equipped
• Press the “Balance/Fade” button on the touchscreen to adjust the sound from the
speakers. Use the “arrow” buttons on the
touchscreen to adjust the sound level from
the front and rear or right and left side
speakers. Press the Center “C” button on
the touchscreen to reset the balance and
fade to the factory setting. Speed Adjusted Volume — If Equipped
• Press the “Speed Adjusted Volume” button
on the touchscreen to select between OFF,
1, 2 or 3. This decreases the radio volume
relative to a decrease in vehicle speed.
AUX Volume Offset
• Press the “AUX Volume Offset” button on the touchscreen to activate the AUX Vol-
ume Offset screen.
• The AUX Volume Offset is adjusted by pressing of the “+” and “–” buttons. This
alters the AUX input audio volume. The
level value, which spans between plus or
minus three, is displayed above the adjust-
ment bar.
Auto Play
• Press the “Auto Play” button on the touch- screen to activate the Auto Play screen.
• The Auto Play feature begins playing music as soon as a USB Media device is con-
nected to one of the vehicle’s Media USB
ports, when it is turned on. Press “Off” to
turn the setting off.
MULTIMEDIA
164
Page 169 of 204

Seek Up/Down Buttons
• Push the up or down button to seek throughradio stations in AM, FM or SXM bands.
• Hold either button to bypass stations with- out stopping.
Store Radio Presets Manually
The Radio stores up to 12 presets in each of
the Radio modes. There are four visible pre-
sets at the top of the radio screen. Pressing
the “All” button on the touchscreen will dis-
play all of the preset stations for that mode.
To store a radio preset manually, follow the
steps below:
1. Tune to the desired station.
2. Press and hold the desired numbered but- ton on the touchscreen for more than two
seconds, or until you hear a confirmation
beep.USB/Audio Jack (AUX)/Bluetooth
Operation
USB/iPod
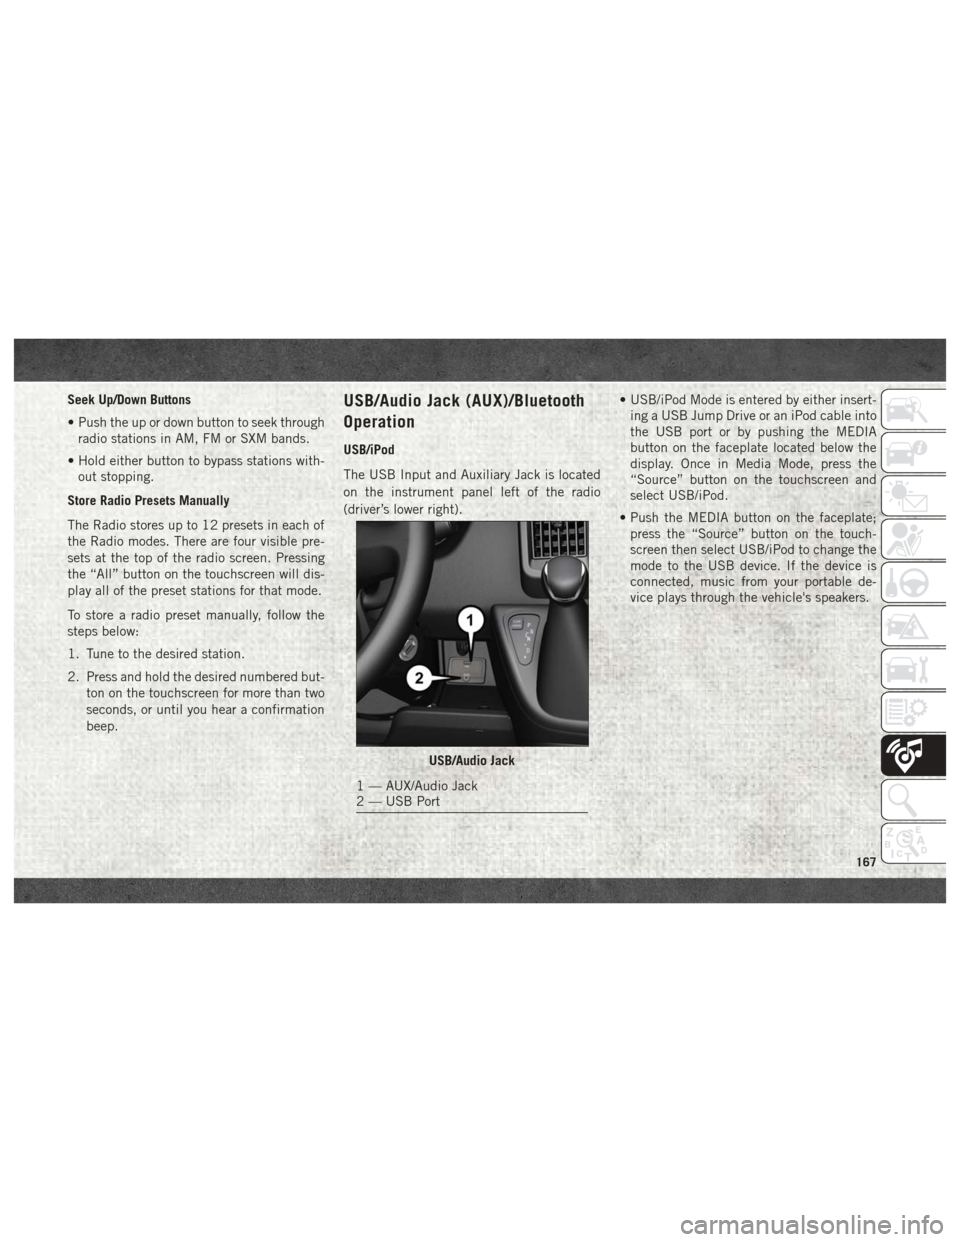
The USB Input and Auxiliary Jack is located
on the instrument panel left of the radio
(driver’s lower right). • USB/iPod Mode is entered by either insert-
ing a USB Jump Drive or an iPod cable into
the USB port or by pushing the MEDIA
button on the faceplate located below the
display. Once in Media Mode, press the
“Source” button on the touchscreen and
select USB/iPod.
• Push the MEDIA button on the faceplate; press the “Source” button on the touch-
screen then select USB/iPod to change the
mode to the USB device. If the device is
connected, music from your portable de-
vice plays through the vehicle's speakers.
USB/Audio Jack
1 — AUX/Audio Jack
2 — USB Port
167
Page 170 of 204

Audio Jack (AUX)
The AUX jack allows a portable device, such
as an MP3 player or an iPod, to be plugged
into the radio and utilize the vehicle’s audio
system. Using a 3.5 mm audio jack plugged
into the AUX jack will amplify the source and
play the music through the vehicle speakers.
• Push the MEDIA button on the faceplate;press the “Source” button on the touch-
screen then select AUX to change the mode
to the AUX device. If the device is con-
nected in play mode, music from your por-
table device will play through the vehicle's
speakers.
• The functions of the portable device are controlled using the device. However, the
volume may be controlled using the radio or
portable device. Bluetooth
If using a Bluetooth - equipped device, you
may also be able to stream music through
your vehicle's sound system.
• Push the MEDIA button on the faceplate,
press the “Source” button on the touch-
screen then select Bluetooth to change the
mode to Bluetooth. If the device is paired,
music from your portable device plays
through the vehicle's speakers.
Uconnect 3/3 NAV Available Media Hubs
Uconnect 3/3 NAV Media Hub (USB,
AUX Ports)
S
S = Standard Equipment
Navigation
If your vehicle is equipped with Navigation,
there will be a NAV button on the faceplate in
place of the COMPASS button on the face-
plate. See your Uconnect Owner’s Manual
Supplement manual or www.mopar.com/en-us/
care/owners-manual.html for U.S. residents or
www.owners.mopar.ca for Canadian residents
for additional information.
MULTIMEDIA
168