2018 Ram ProMaster City bluetooth
[x] Cancel search: bluetoothPage 143 of 180

MULTIMEDIA
CYBERSECURITY..............142
UCONNECT 3/3 NAV WITH 5-INCH
DISPLAY .................. .143
Clock Setting.................144
Equalizer, Balance And Fade .......144
Radio Operation ...............146
USB/Audio Jack (AUX)/Bluetooth
Operation ...................147
Navigation ..................148
UCONNECT SETTINGS ...........148
STEERING WHEEL AUDIO CONTROLS . .149
Left Switch ..................149
Right Switch .................149
UCONNECT PHONE ............150
Uconnect Phone (Bluetooth Hands Free
Calling)....................150 Pairing (Wirelessly Connecting) Your
Mobile Phone To The Uconnect
System
....................151
Common Phone Commands
(Examples) ..................154
Mute (Or Unmute) Microphone
During Call ..................154
Transfer Ongoing Call Between Handset
And Vehicle .................154
Phonebook ..................154
Voice Command Tips ............154
Changing The Volume ............155
Using Do Not Disturb ...........155
Incoming Text Messages ..........156
Helpful Tips And Common Questions To
Improve Bluetooth Performance With
Your Uconnect System ...........157 Regulatory And Safety Information
USA/CANADA
................157
UCONNECT VOICE RECOGNITION
QUICK TIPS................ .158
Introducing Uconnect............158
Get Started ..................159
Basic Voice Commands ...........159
Radio .....................160
Media .....................160
Phone .....................160
Voice Text Reply ...............161
General Information .............162
Additional Information ...........162
MULTIMEDIA
141
Page 149 of 180

Seek Up/Down Buttons
• Push the up or down button to seek throughradio stations in AM, FM or SXM bands.
• Hold either button to bypass stations with- out stopping.
Store Radio Presets Manually
The Radio stores up to 12 presets in each of
the Radio modes. There are four visible pre-
sets at the top of the radio screen. Pressing
the “All” button on the touchscreen will dis-
play all of the preset stations for that mode.
To store a radio preset manually, follow the
steps below:
1. Tune to the desired station.
2. Press and hold the desired numbered but- ton on the touchscreen for more than two
seconds, or until you hear a confirmation
beep.USB/Audio Jack (AUX)/Bluetooth
Operation
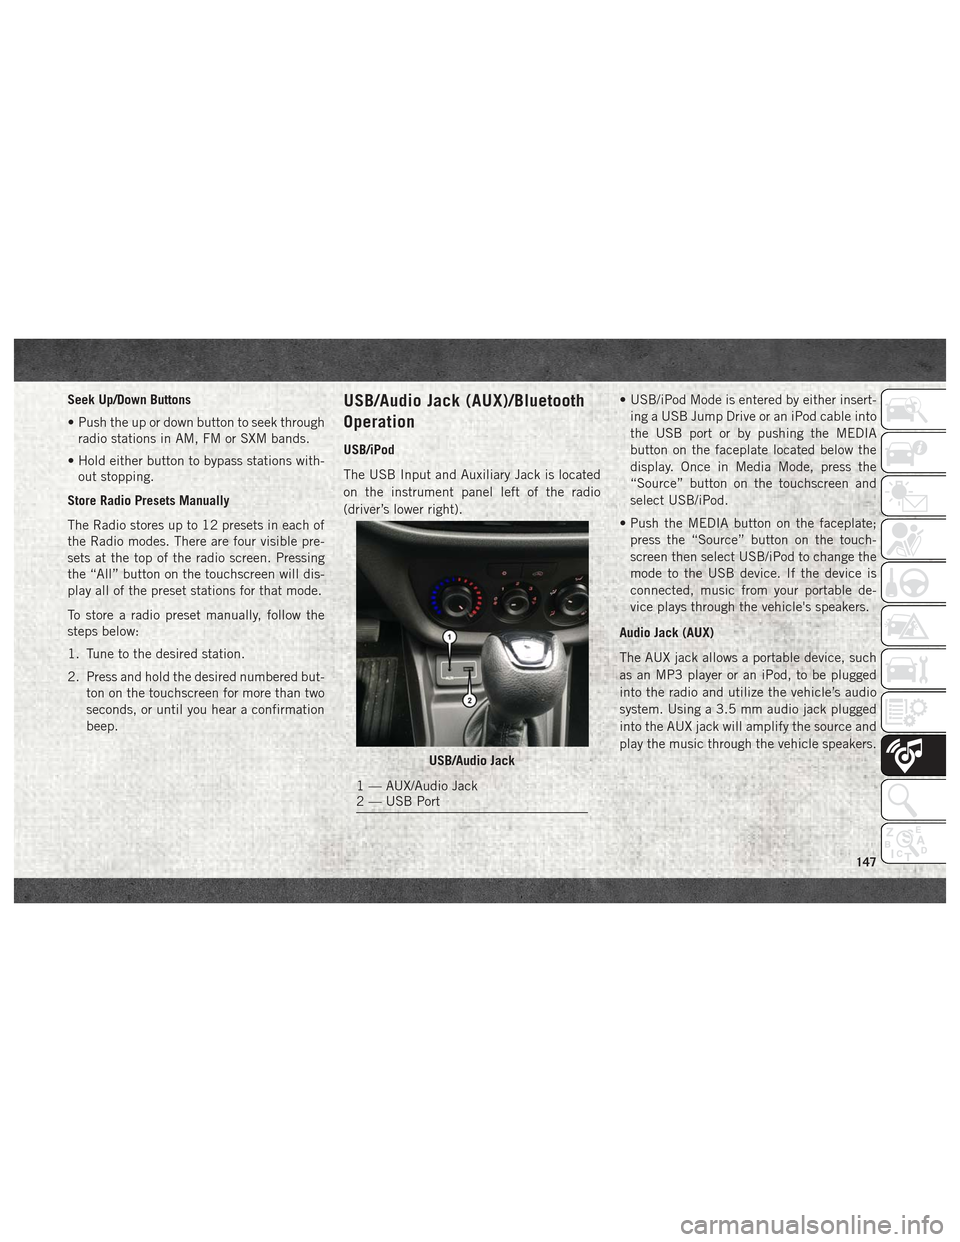
USB/iPod
The USB Input and Auxiliary Jack is located
on the instrument panel left of the radio
(driver’s lower right). • USB/iPod Mode is entered by either insert-
ing a USB Jump Drive or an iPod cable into
the USB port or by pushing the MEDIA
button on the faceplate located below the
display. Once in Media Mode, press the
“Source” button on the touchscreen and
select USB/iPod.
• Push the MEDIA button on the faceplate; press the “Source” button on the touch-
screen then select USB/iPod to change the
mode to the USB device. If the device is
connected, music from your portable de-
vice plays through the vehicle's speakers.
Audio Jack (AUX)
The AUX jack allows a portable device, such
as an MP3 player or an iPod, to be plugged
into the radio and utilize the vehicle’s audio
system. Using a 3.5 mm audio jack plugged
into the AUX jack will amplify the source and
play the music through the vehicle speakers.
USB/Audio Jack
1 — AUX/Audio Jack
2 — USB Port
147
Page 150 of 180

• Push the MEDIA button on the faceplate;press the “Source” button on the touch-
screen then select AUX to change the mode
to the AUX device. If the device is con-
nected in play mode, music from your por-
table device will play through the vehicle's
speakers.
• The functions of the portable device are controlled using the device. However, the
volume may be controlled using the radio or
portable device.
Bluetooth
If using a Bluetooth - equipped device, you
may also be able to stream music through
your vehicle's sound system.
• Push the MEDIA button on the faceplate, press the “Source” button on the touch-
screen then select Bluetooth to change the
mode to Bluetooth. If the device is paired,
music from your portable device plays
through the vehicle's speakers. Uconnect 3/3 NAV Available Media Hubs
Uconnect 3/3 NAV
Media Hub (USB,
AUX Ports)
S
S = Standard Equipment
Navigation
If your vehicle is equipped with Navigation,
there will be a NAV button on the faceplate in
place of the COMPASS button on the face-
plate. See your Uconnect Owner’s Manual
Supplement manual or
www.mopar.com/en-us/
care/owners-manual.html for U.S. residents or
www.owners.mopar.ca for Canadian residents for
additional information.
UCONNECT SETTINGS
The Uconnect system allows you to access
Customer Programmable feature settings
such as Display, Clock & Date, Safety/
Assistance, Lights, Doors & Locks, Audio,
Phone/Bluetooth, SiriusXM Setup, Restore
Default Settings and Clear Personal Data
through buttons on the touchscreen.
To change a setting:
1. Push the SETTINGS
button located
on the right side of the display.
2. Select a programmable feature you would like to adjust.
3. Make your selection highlighting the button.
MULTIMEDIA
148
Page 152 of 180

UCONNECT PHONE
Uconnect Phone (Bluetooth Hands Free Calling)
Uconnect 3/3 NAV With 5–inch Display Phone Menu
1 — Call/Redial/Hold
2 — Mobile Phone Signal Strength
3 — Currently Paired Mobile Phone
4 — Mobile Phone Battery Life5 — Mute Microphone
6 — Transfer To/From Uconnect System
7 — Uconnect Phone Settings Menu
8 — Text Messaging9 — Direct Dial Pad
10 — Recent Call Log
11 — Browse Phone Book (Contains 911)
12 — End Call
MULTIMEDIA
150
Page 153 of 180

The Uconnect Phone feature enables you to
place and receive hands-free mobile phone
calls. Drivers can also place mobile phone
calls using their voice or by using the buttons
on the touchscreen (see Voice Command sec-
tion).
The hands-free calling feature is made pos-
sible through Bluetooth technology — the
global standard that enables different elec-
tronic devices to connect to each other wire-
lessly.
If the Uconnect Phone Button
exists on
your steering wheel, you then have the
Uconnect Phone features.
Refer to the “Uconnect 3/3 NAV Voice Rec-
ognition Quick Tips” in “Multimedia” in the
Owner's Manual at
www.mopar.com/en-us/
care/owners-manual.html
(U.S. Residents) or
www.owners.mopar.ca (Canadian Residents)
for further information.
NOTE:
• The Uconnect Phone requires a mobile phone equipped with the Bluetooth Hands-
Free Profile, Version 1.0 or higher. • Most mobile phones/devices are compat-
ible with the Uconnect system, however
some mobile phones/devices may not be
equipped with all of the required features to
utilize all of the Uconnect system features.
• For Uconnect Customer Care:
• U.S. residents visit UconnectPhone.com or call 1-877-855-8400.
•
Canadian Residents visitUconnectPhone.com
or call, 1-800-465-2001 (English) or
1-800-387-9983 (French).
Pairing (Wirelessly Connecting)
Your Mobile Phone To The
Uconnect System
Mobile phone pairing is the process of estab-
lishing a wireless connection between a cel-
lular phone and the Uconnect system.
NOTE:
• To use the Uconnect Phone feature, you first must determine if your mobile phone
and software are compatible with the
Uconnect system. Please visit
UconnectPhone.com for complete mobile
phone compatibility information. • Mobile phone pairing is not available while
the vehicle is in motion.
• A maximum of ten mobile phones can be paired to the Uconnect system.
Start Pairing Procedure On The Radio
Uconnect 3/3 NAV:
1. Place the ignition in the ACC or ON position.
2. Press the “Phone” button.
3. Select “Settings.”
Uconnect 3/3 NAV
151
Page 154 of 180

4. Select “Paired Phones.”
5. Select “Add device.”NOTE:
Uconnect Phone will display an “In prog-
ress” screen while the system is connect-
ing.
Pair Your iPhone: To search for available devices on your
Bluetooth enabled iPhone:
1. Press the Settings button.
2. Select Bluetooth.
• Ensure the Bluetooth feature is en-abled. Once enabled, the mobile
phone will begin to search for
Bluetooth connections.
3. When your mobile phone finds the Uconnect system, select “Uconnect.”
Complete The iPhone Pairing Procedure: When prompted on the mobile phone, accept
the connection request from Uconnect
Phone.
NOTE:
Some mobile phones will require you to enter
the PIN number.
Select The iPhone's Priority Level
When the pairing process has successfully
completed, the system will prompt you to
choose whether or not this is your favorite
mobile phone. Selecting “Yes” will make this
mobile phone the highest priority. This mo-
bile phone will take precedence over other
paired mobile phones within range and will
connect to the Uconnect system automati-
cally when entering the vehicle. Only one
mobile phone and/or one Bluetooth audio
device can be connected to the Uconnect
system at a time. If “No” is selected, simply
select “Uconnect” from the mobile phone/
audio device Bluetooth screen, and the
Uconnect system will reconnect to the
Bluetooth device.
Bluetooth On/Uconnect Device
Pairing Request
MULTIMEDIA
152
Page 155 of 180

Pair Your Android Device:
To search for available devices on your
Bluetooth enabled Android Device:
1. Push the Menu button.
2. Select Settings.
3. Select Connections.
4. Turn Bluetooth setting to “On.”• Ensure the Bluetooth feature is en-abled. Once enabled, the mobile phone
will begin to search for Bluetooth
connections. 5. Once your mobile phone finds the
Uconnect system, select “Uconnect.”
• You may be prompted by your mobile phone to download the phonebook,
check “Do Not Ask Again” to automati-
cally download the phonebook. This is
so you can make calls by saying the
name of your contact.
Complete The Android Pairing Procedure: Confirm the passkey shown on the mobile
phone matches the passkey shown on the
Uconnect system then accept the Bluetooth
pairing request.
NOTE:
Some mobile phones require the PIN to be
entered manually, enter the PIN number
shown on the Uconnect screen.
Select The Android Mobile Phone's Priority
Level
When the pairing process has successfully
completed, the system will prompt you to
choose whether or not this is your favorite
mobile phone. Selecting “Yes” will make this
mobile phone the highest priority. This mo-
bile phone will take precedence over other
paired mobile phones within range and will
connect to the Uconnect system automati-
cally when entering the vehicle. Only one
mobile phone and/or one Bluetooth audio
device can be connected to the Uconnect
system at a time. If “No” is selected, simply
select “Uconnect” from the mobile phone/
audio device Bluetooth screen, and the
Uconnect system will reconnect to the
Bluetooth device.
Bluetooth On/Uconnect Device
Pairing Request
153
Page 157 of 180

Changing The Volume
• Start a dialogue by pushing the VR button
, then say a command. For example,
"Help".
• Use the radio VOLUME/MUTE rotary knob to adjust the volume to a comfortable level
while the Uconnect system is speaking.
NOTE:
The volume setting for Uconnect is different
than the audio system.
NOTE:
To access help, push the Uconnect VR button
(if active) on the steering wheel and say
"help." Push the Uconnect VR Pickup button
(if active) or the VR button(if
active) and say "cancel" to cancel the help
session.
Using Do Not Disturb
With Do Not Disturb, you can disable notifi-
cations from incoming calls and texts, allow-
ing you to keep your eyes on the road and
hands on the wheel. For your convenience,
there is a counter display to keep track of your
missed calls and text messages while you
were using Do Not Disturb.
Do Not Disturb can automatically reply with a
text message, a call or both, when declining
an incoming call and send it to voicemail.
Automatic reply messages can be:
• “I am driving right now, I will get back to you shortly.”
• Create a custom auto reply message up to 160 characters. While in Do Not Disturb, Conference Call can
be selected so you can still place a second
call without being interrupted by incoming
calls.
NOTE:
• Only the beginning of your custom message
will be seen on the touchscreen.
• Reply with text message is not compatible with iPhones.
• Auto reply with text message is only avail- able on phones that supporting Bluetooth
MAP.
155