2018 Ram 3500 android auto
[x] Cancel search: android autoPage 291 of 372

MULTIMEDIA
CYBERSECURITY..............291
RADIO 3.0 ................. .292
Clock Setting.................293
Audio Setting .................293
Radio Operation ...............293
Disc Operation — If Equipped ......293
USB/Audio Jack (AUX) Manual
Operation ...................294
UCONNECT 3.0 ...............295
Clock Setting.................296
Audio Setting .................296
Radio Operation ...............296
Disc Operation — If Equipped ......296
USB/Audio Jack (AUX) Manual
Operation ...................297
UCONNECT 3 WITH 5-INCH DISPLAY . .298
Controls On The Front Panel .......298
Clock Setting .................299
Equalizer, Balance And Fade .......299
Radio Mode ..................300
Media Mode .................301 Bluetooth Source
..............304
UCONNECT 4C/4C NAV WITH 8.4-INCH
DISPLAY.................. .306
Uconnect 4C/4C NAV At A Glance . . . .306
Personalized Menu Bar...........309
Radio .....................310
Android Auto .................310
Apple CarPlay Integration .........314
SIRIUSXM GUARDIAN — IF EQUIPPED.316
SiriusXM Guardian — If Equipped
(Available on Uconnect 4C NAV) .....316
SiriusXM Guardian Activation ......317
Download The Uconnect App .......318
Renewing Subscriptions (Uconnect 4C
NAV)......................318
Maintaining Your SiriusXM Guardian
Account ...................318
Built-In Features ..............318
SiriusXM Guardian Remote Features . .321
UCONNECT SETTINGS ...........324
TIPS CONTROLS AND GENERAL
INFORMATION ............... .325
Steering Wheel Audio Controls ......325
Reception Conditions ............325
Care And Maintenance ...........325
Anti-Theft Protection ............325
IPOD/USB/MEDIA PLAYER CONTROL . .325
Audio Jack (AUX)..............326
USB Port ...................326
Bluetooth Streaming Audio ........326
NAVIGATION................ .327
Changing The Navigation Voice Prompt
Volume....................327
Finding Points Of Interest .........329
Finding A Place By Spelling The Name .329
One-Step Voice Destination Entry . . . .329
Setting Your Home Location ........329
Home .....................330
Adding A Stop ................330
Taking A Detour ...............330
SiriusXM Traffic Plus (4C NAV) .....330
SiriusXM Travel Link (4C NAV) ......331
UCONNECT PHONE............332
MULTIMEDIA
289
Page 292 of 372

Uconnect Phone (Bluetooth Hands Free
Calling)....................332
Pairing (Wirelessly Connecting) Your Mobile
Phone To The Uconnect System .....334
Common Phone Commands
(Examples) ..................337
Mute (Or Unmute) Microphone During
Call ......................337
Transfer Ongoing Call Between Handset
And Vehicle .................337
Phonebook ..................337
Voice Command Tips ............338
Changing The Volume ............338
Using Do Not Disturb ...........338 Incoming Text Messages
..........338
Helpful Tips And Common Questions To
Improve Bluetooth Performance With Your
Uconnect System ..............340
UCONNECT VOICE RECOGNITION QUICK
TIPS..................... .340
Introducing Uconnect...........340
Get Started .................340
Basic Voice Commands ...........341
Radio .....................342
Media .....................343
Phone .....................343 Climate (4C/4C NAV)
............344
Navigation (4C NAV) ............344
SiriusXM Guardian (4C NAV) — If
Equipped ...................345
Register (4C NAV) ..............346
Vehicle Health Report/Alert (4C NAV) . .346
Mobile App (4C NAV) ............346
SiriusXM Travel Link (4C NAV) ......346
Apple CarPlay — If Equipped .......347
Android Auto — If Equipped .......348
General Information .............348
Additional Information ...........349MULTIMEDIA
290
Page 312 of 372

1. Press the “Apps” button to open the
App screen.
2. Press and hold, then drag the selected App to replace an existing shortcut in the
main menu bar.
The new app shortcut, that was dragged
down onto the main menu bar, will now
be an active App/shortcut.
NOTE:
This feature is only available if the vehicle is
in PARK.
Radio
WARNING!
ALWAYS drive safely with your hands on
the wheel. You have full responsibility and
assume all risks related to the use of the
Uconnect features, SiriusXM Guardian
services, and applications in this vehicle.
Only use Uconnect features and SiriusXM
Guardian services when it is safe to do so.
Failure to do so may result in an accident
involving serious injury or death. • To access the Radio mode, press the “Ra-
dio” button on the touchscreen.
Selecting Radio Stations
• Press the desired radio band (AM, FM or SXM) button on the touchscreen.
Seek Up/Seek Down
• Press the Seek up or down arrow buttons on the touchscreen for less than two seconds
to seek through radio stations.
• Press and hold either arrow button on the touchscreen for more than two seconds to
bypass stations without stopping. The radio
will stop at the next listenable station once
the arrow button on the touchscreen is
released.
Direct Tune
• Tune directly to a radio station by pressing the “Tune” button on the screen, and en-
tering the desired station number.
Store Radio Presets Manually
Your radio can store 36 total preset stations,
12 presets per band (AM, FM and SXM). They
are shown at the top of your radio screen. To see the 12 preset stations per band, press the
arrow button on the touchscreen at the top
right of the screen to toggle between the two
sets of six presets.
To store a radio preset manually, follow the
steps below:
1. Tune to the desired station.
2. Press and hold the desired numbered but-
ton on the touchscreen for more than two
seconds or until you hear a confirmation
beep.
HD Radio — If Equipped
• HD Radio (available on Uconnect 4C/4C NAV) operates similar to conventional radio
except it allows broadcasters to transmit a
high-quality digital signal.
• With an HD radio receiver, the listener is provided with a clear sound that enhances
the listening experience. HD radio can also
transmit data such as song title or artist.
Android Auto
Android Auto is a feature of your Uconnect
system, and your Android 5.0 Lollipop, or
higher, powered smartphone with a data
MULTIMEDIA
310
Page 313 of 372

plan, that allows you to project your smart-
phone and a number of its apps onto the
touchscreen radio display. Android Auto au-
tomatically brings you useful information,
and organizes it into simple cards that appear
just when they are needed. Android Auto can
be used with Google's best-in-class speech
technology, the steering wheel controls, the
knobs and buttons on your radio faceplate,
and the radio display’s touchscreen to control
many of your apps. To use Android Auto
follow the following procedure:
1. Download the Android Auto app from theGoogle Play store on your Android-
powered smartphone.
2. Connect your Android powered smart- phone to one of the media USB ports in
your vehicle. If the Android Auto app was
not downloaded, the first time you plug
your device in, the app will begin to
download. NOTE:
Be sure to use the factory-provided USB
cable that came with your phone, as after-
market cables may not work.
3. Once the device is connected, the system will display the Android Auto home
screen. Android Auto should automati-
cally launch, but if it does not launch
automatically, refer to the Uconnect Own-
er’s Manual Supplement for the procedure
to enable the feature “AutoShow.” You can also launch it by pressing Android
Auto located in the “Apps” menu. If you
use Android Auto frequently you can move
the app to the menu bar at the bottom of
the touchscreen. Press the “Apps” button
and locate the Android Auto app; then
press and drag the selected App to replace
an existing shortcut in the main menu bar.
Once Android Auto is up and running on your
Uconnect radio, the following features can be
utilized using your smartphone’s data plan:
• Google Maps for navigation
• Google Play Music, Spotify, iHeart Radio, etc. for music
• Handsfree Calling, and Texting for commu- nication
• Hundred of compatible apps
Android Auto
311
Page 314 of 372

NOTE:
To use Android Auto, make sure you are in an
area with cellular coverage. Android Auto
may use cellular data and your cellular cov-
erage is shown in the upper right corner of the
radio screen.
Maps
Push and hold the VR button on the steering
wheel or tap the microphone icon to ask
Google to take you to a desired destination by
voice. You can also touch the Navigation icon
in Android Auto to access Google Maps.NOTE:
If the VR button is not held, and is only
pushed, the native Uconnect VR will prompt
you and any navigation command said will
launch the native Uconnect navigation sys-
tem.
While using Android Auto, Google Maps pro-
vides voice-guided:
• Navigation
• Live traffic information
• Lane guidance
NOTE:
If you are using the native Uconnect naviga-
tion system, and you try and start a new route
using the Android Auto, via voice or any other
method, a pop-up will appear asking if you
would like to switch from Uconnect naviga-
tion to smartphone navigation. A pop-up will
also appear, asking if you’d like to switch, if
Android Auto is currently in use and you
attempt to launch a native Uconnect route.
Selecting “Yes” will switch the navigation
type to the newly used method of navigation
and a route will be planned for the new
destination. If “No” is selected the naviga-
tion type will remain unchanged.
For further information, refer to
www.android.com/auto/.
For further information on the navigation
function, please refer to
https://support.google.com/android or
https://support.google.com/androidauto/.
Google Maps Data And Cellular Coverage
Google Maps
MULTIMEDIA
312
Page 315 of 372

Music
Android Auto allows you to access and stream
your favorite music with apps like Google Play
Music, iHeartRadio, and Spotify. Using your
smartphone’s data plan, you can stream end-
less music on the road.
NOTE:
Music apps, playlists, and stations must be
set up on your smartphone prior to using
Android Auto, for them to work with Android
Auto.NOTE:
To see the metadata for the music playing
through Android Auto, select the Uconnect
System’s media screen.
For further information refer to
https://support.google.com/androidauto.
Communication
With Android Auto connected, press and hold
the VR button on the steering wheel to acti-
vate voice recognition specific to the Android
Auto. This will allow you to send and reply to
text messages, have incoming text messages
read out loud, and place and receive hands-
free calls.
Apps
The Android Auto App will display all the
compatible apps that are available to use
with Android Auto, every time it is launched.
You must have the compatible app down-
loaded, and you must be signed in to the app
for it to work with Android Auto. Refer to
g.co/androidauto to see the latest list of avail-
able apps for Android Auto.
Android Auto Music
Android Auto Contact
Android Auto Phone
313
Page 338 of 372

Select The iPhone's Priority Level
When the pairing process has successfully
completed, the system will prompt you to
choose whether or not this is your favorite
mobile phone. Selecting “Yes” will make this
mobile phone the highest priority. This mo-
bile phone will take precedence over other
paired mobile phones within range and will
connect to the Uconnect system automati-
cally when entering the vehicle. Only one
mobile phone and/or one Bluetooth audio
device can be connected to the Uconnect
system at a time. If “No” is selected, simply
select “Uconnect” from the mobile phone/
audio device Bluetooth screen, and the
Uconnect system will reconnect to the
Bluetooth device.Pair Your Android Device:
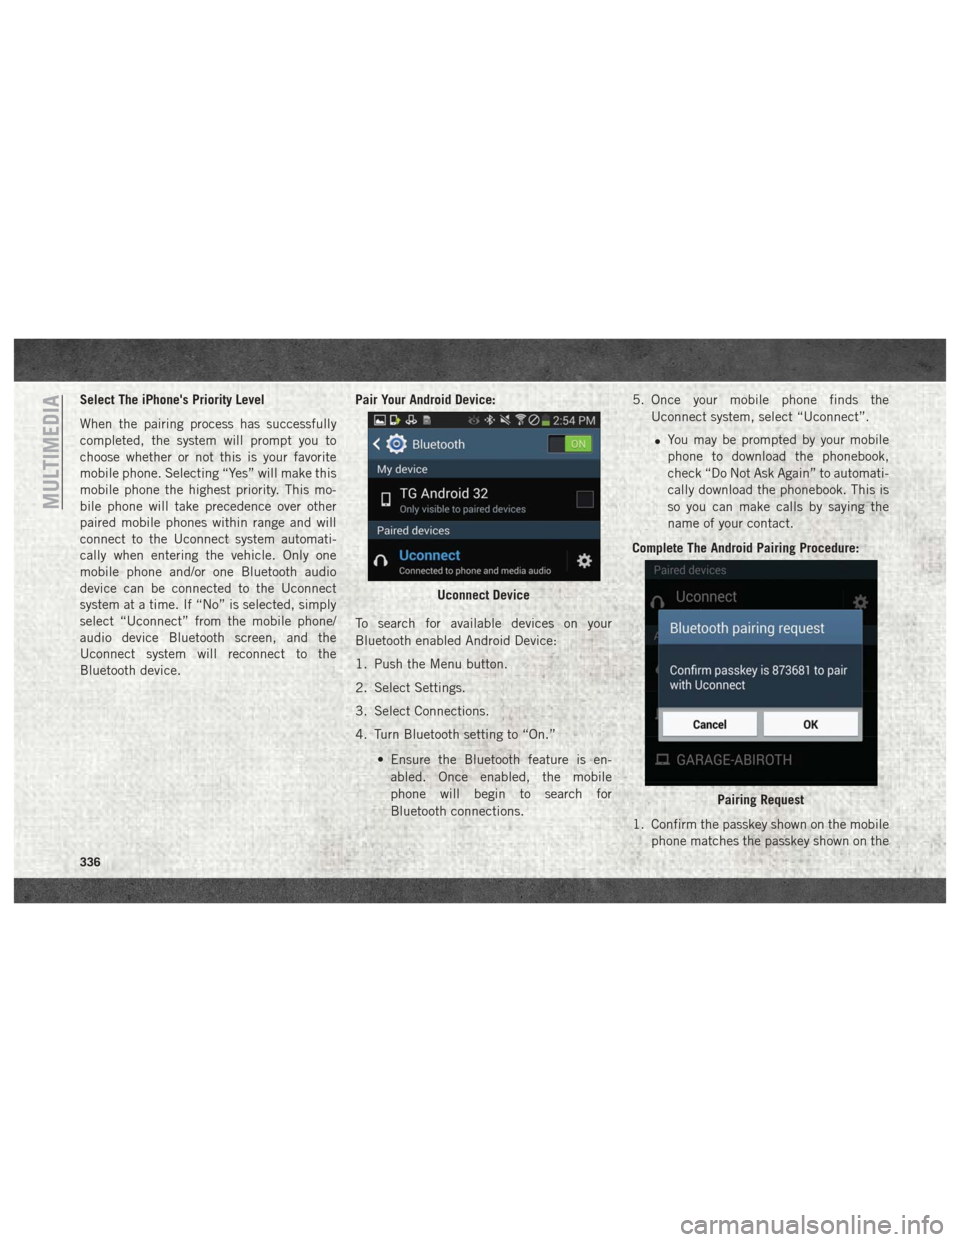
To search for available devices on your
Bluetooth enabled Android Device:
1. Push the Menu button.
2. Select Settings.
3. Select Connections.
4. Turn Bluetooth setting to “On.”
• Ensure the Bluetooth feature is en-abled. Once enabled, the mobile
phone will begin to search for
Bluetooth connections. 5. Once your mobile phone finds the
Uconnect system, select “Uconnect”.
• You may be prompted by your mobile
phone to download the phonebook,
check “Do Not Ask Again” to automati-
cally download the phonebook. This is
so you can make calls by saying the
name of your contact.
Complete The Android Pairing Procedure:
1. Confirm the passkey shown on the mobile phone matches the passkey shown on the
Uconnect Device
Pairing Request
MULTIMEDIA
336
Page 339 of 372

Uconnect system then accept the
Bluetooth pairing request.
NOTE:
Some mobile phones require the PIN to be
entered manually, enter the PIN number
shown on the Uconnect screen.
Select The Android Mobile Phone's Priority
Level
When the pairing process has successfully
completed, the system will prompt you to
choose whether or not this is your favorite
mobile phone. Selecting “Yes” will make this
mobile phone the highest priority. This mo-
bile phone will take precedence over other
paired mobile phones within range and will
connect to the Uconnect system automati-
cally when entering the vehicle. Only one
mobile phone and/or one Bluetooth audio
device can be connected to the Uconnect
system at a time. If “No” is selected, simply
select “Uconnect” from the mobile phone/
audio device Bluetooth screen, and the
Uconnect system will reconnect to the
Bluetooth device. You are now ready to make hands-free calls.
Press the Uconnect “Phone” button
on
your steering wheel to begin.
NOTE:
Refer to UconnectPhone.com website for ad-
ditional information on mobile phone pairing
and for a list of compatible phones.
Common Phone Commands
(Examples)
• “Call John Smith”
• “Call John Smith mobile”
• “Dial 1 248 555 1212”
• “Redial”
Mute (Or Unmute) Microphone
During Call
• During a call, press the “Mute” button on the Phone main screen to mute and unmute
the call.
Transfer Ongoing Call Between
Handset And Vehicle
• During an on-going call, press the “Trans-fer” button on the Phone main screen to
transfer an on-going call between handset
and vehicle.
Phonebook
The Uconnect system will automatically sync
your phonebook from your paired phone, if
this feature is supported by your phone.
Phonebook contacts are updated each time
that the phone is connected. If your phone
book entries do not appear, check the set-
tings on your phone. Some phones require
you to enable this feature manually.
• Your phonebook can be browsed on theUconnect system touchscreen, but editing
can only be done on your phone. To browse,
press the “Phone” button on the touch-
screen, then the “Phonebook” button on
the touchscreen.
337