2018 Ram 3500 ignition
[x] Cancel search: ignitionPage 255 of 372

If the vehicle experiences a sudden loss of
engine power while being driven in heavy
snow or rain, or when plowing snow, and/or
the “SERVICE AIR FILTER” message is dis-
played on the instrument cluster along with a
chime that repeats every 60 seconds, visually
inspect the air filter for snow/ice build up or
extreme water saturation. If the air filter is
not damaged, remove all snow/ice and rein-
stall air filter. If the air filter is damaged,
replace filter element.
NOTE:
The air filter housing contains a Mass Air
Flow sensor. This sensor is critical to proper
engine operation and component longevity.
Any damage or modification to this sensor
could result in major engine and/or exhaust
aftertreatment damage. We recommend you
use Mopar brand parts.
Even though your vehicle is equipped with an
Air Filter Monitor, a visual inspection of the
air cleaner filter element is recommended
every 15,000 miles (24,000km) or
12 months – whichever occurs first.Under nocircumstances should the air cleaner filter ele-
ment exceed 30,000 miles (48,000 km) or
24 months, whichever comes first.
CAUTION!
Many aftermarket performance air filter
elements do not adequately filter the air
entering the engine. Use of such filters can
severely damage your engine.
Draining Fuel/Water Separator
Filter
There are two fuel filter assemblies. One is
located on the driver's side of the engine. The
best access to this water drain valve is from
under the hood. The second one is on the
under body, located in front of the rear axle
above the drive shaft on pick-up models. The
Chassis Cab models second filter location is
on the frame behind the front axle. The best
access to this water drain valve is from under
the vehicle.
CAUTION!
• Do not drain the fuel/water separator
filter when the engine is running.
• Diesel fuel will damage blacktop paving
surfaces. Drain the filter into an appro-
priate container.
If water is detected in the water separator
while the engine is running, or while the
ignition switch is in the ON position, the
“Water In Fuel Indicator Light” will illumi-
nate and an audible chime will be heard five
times. At this point you should stop the
engine and drain the water from both of the
filters.
CAUTION!
If the “Water In Fuel Indicator Light” re-
mains on, DO NOT START the engine be-
fore you drain water from the fuel filters to
avoid engine damage.
If the “Water In Fuel Indicator Light” comes
on and a single chime is heard while you are
driving, or with the ignition switch in the ON
253
Page 256 of 372

position, there may be a problem with your
water separator wiring or sensor. See your
authorized dealer for service.
Upon proper draining of the water from both
fuel filters, the “Water In Fuel Indicator
Light” will remain illuminated for approxi-
mately 10 seconds. If the water was drained
while the engine was running, the “Water In
Fuel Indicator Light” may remain on for ap-
proximately three minutes.
NOTE:
Care should be taken in disposing of used
fluids from your vehicle. Used fluids, indis-
criminately discarded, can present a problem
to the environment. Contact an authorized
dealer, service station, or government agency
for advice on recycling programs and for
where used fluids and filters can be properly
disposed of in your area.
Drain the fuel/water separator filters when
the “Water In Fuel Indicator Light” is ON.
Within 10 minutes of vehicle shutdown, turn
the engine mounted filter drain valve (located
on the side of the filter assembly) counter-
clockwise 1/4 turn, and turn the under body
mounted filter drain valve (located on thebottom of the filter assembly) counterclock
wise 1 full turn. Then turn the ignition switch
to the ON position, and allow any accumu-
lated water to drain. Leave the drain valve
open until all water and contaminants have
been removed. When clean fuel is visible,
close the drain valves by turning them fully
clockwise, and turn the ignition switch to
OFF.
If more than a couple ounces/milliliters of
fuel have been drained, follow the directions
for “Priming If The Engine Has Run Out Of
Fuel.”
Engine Mounted Fuel Filter
Replacement
NOTE:
• Using a fuel filter that does not meet the
manufacturer's filtration and water separat-
ing requirements can severely impact fuel
system life and reliability.
• The engine mounted filter housing is equipped with a No-Filter-No-Run (NFNR)
feature. Engine will not run if:
1. No filter is installed. 2. Inferior/Non-approved filter is used.
Use of OEM filter is required to ensure
vehicle will run.
CAUTION!
• Diesel fuel will damage blacktop pavingsurfaces. Drain the filter into an appro-
priate container.
• Do not prefill the fuel filter when install-
ing a new fuel filter. There is a possibility
debris could be introduced into the fuel
filter during this action. It is best to
install the filter dry and allow the in-tank
lift pump to prime the fuel system.
1. Ensure engine is turned off.
2. Place drain pan under the fuel filter drain hose.
3. Open the water drain valve 1/4 turn coun- terclockwise and completely drain fuel
and water into the approved container.
4. Close the water drain valve.
5. Remove lid using a socket or strap wrench. Rotate counterclockwise for re-
moval. Remove used o-ring and discard it.
SERVICING AND MAINTENANCE
254
Page 258 of 372

Priming If The Engine Has Run
Out Of Fuel
WARNING!
Do not open the high pressure fuel system
with the engine running. Engine operation
causes high fuel pressure. High pressure
fuel spray can cause serious injury or
death.
1. Add a substantial amount of fuel to the tank, approximately 2 to 5 gal (8L to
19L).
2. Turn ignition switch to the start position to engage starter for one second, return ig-
nition switch to run position. This will
activate in tank fuel pump for approxi-
mately 15 seconds. Repeat this process
twice.
3. Start the engine using the “Normal Start- ing” procedure. Refer to “Starting Proce-
dures” in “Starting and Operating” for
further information.
CAUTION!
Do not engage the starter motor for more
than 15 seconds at a time. Allow two
minutes between the cranking intervals.
NOTE:
The engine may run rough until the air is
forced from all the fuel lines.
WARNING!
Do not use alcohol or gasoline as a fuel
blending agent. They can be unstable un-
der certain conditions and be hazardous or
explosive when mixed with diesel fuel.
CAUTION!
Due to lack of lubricants in alcohol or
gasoline, the use of these fuels can cause
damage to the fuel system. NOTE:
• A maximum blend of 5% biodiesel, meet-
ing ASTM specification D-975 may be used
with your Cummins diesel engine. (Chassis
Cab models not configured with B20 capa-
bility.)
• A maximum blend of 20% biodiesel, meet- ing ASTM specification D-7467 may be
used with your Cummins diesel engine.
(Pickup models and Chassis Cab models
configured with B20 capability.)
• Use of biodiesel mixture in excess of 20% can negatively impact the fuel filter's abil-
ity to separate water from the fuel, resulting
in high pressure fuel system corrosion or
damage.
• Ethanol blends are not recommended or approved for use with your Cummins diesel
engine.
• In addition, commercially available fuel ad- ditives are not necessary for the proper
operation of your Cummins diesel engine.
SERVICING AND MAINTENANCE
256
Page 304 of 372

Media Mode is entered by pushing the ME-
DIA button located on the faceplate. Once in
Media Mode, press the “Source” button on
the touchscreen and the desired mode button
on the touchscreen. Disc (if equipped), USB,
AUX, and Bluetooth (if equipped), are theMedia sources available. When available, you
can select the “Browse” button on the touch-
screen to be given these options:
• Now Playing
• Artists
• Albums
• Genres
• Songs
• Playlists
• Folders
Source
Press the “Source” button on the touch-
screen to select the desired audio source:
Disc (if equipped), USB, AUX and Bluetooth
(if equipped). This screen will time out after a
few seconds and return to the main radio
screen if no selection is made.
You can press the “Source,” “Pause/Play” or
the “Info” button on the touchscreen for
artist information on the current song play-
ing. Disc Mode — If Equipped
Your vehicle may have a remote Disc player
located in the center console storage bin.
Disc Mode is entered by either inserting a
CD/Disc or by pushing the MEDIA button on
the faceplate. Once in Media Mode, press the
“Source” button on the touchscreen and se-
lect “Disc.”
Inserting Compact Disc
Gently insert one disc into the disc player
with the disc label following the illustration
indicated on the player. The disc will auto-
matically be pulled into the disc player and
the disc icon will illuminate on the radio
display. If a disc does not go into the slot
more than 1.0 inch (2.5 cm), a disc may
already be loaded and must be ejected before
a new disc can be loaded.
If you insert a disc with the ignition ON and
the radio ON, the unit will switch to disc
mode and begin to play when you insert the
disc. The display will show the track number
and index time in minutes and seconds. Play
will begin at the start of track one.
Uconnect Media Mode
1 — SEEK Down
2 — SEEK Up
3 — Additional Functions
4 — Info
5 — Pause/Play
6 — Source
7 — Browse
MULTIMEDIA
302
Page 305 of 372

Browse
Press the “Browse” button on the touch-
screen to scroll through and select a desired
track on the Disc. Press the “Exit” button on
the touchscreen if you wish to cancel the
browse function.
Eject Button — Ejecting a Disc
Push the eject button to eject the disc. If you
have ejected a disc and have not removed it
within ten seconds, it will be reloaded. If the
Disc is not removed, the radio will reinsert the
disc but will not play it.
A disc can be ejected with the radio and
ignition OFF.
USB/iPod Mode
USB/iPod Mode is entered by either inserting
a USB Jump Drive or iPod cable into the USB
port, or by pushing the MEDIA button located
on the faceplate. Once in Media Mode, press
the “Source” button on the touchscreen and
select “USB/iPod.”Inserting USB/iPod Device
Gently insert the USB/iPod device into the
USB Port. If you insert a USB/iPod device
with the ignition ON, the unit will switch to
USB/iPod mode and begin to play when you
insert the device. The display will show the
track number and index time in minutes and
seconds. Play will begin at the start of track
one.
Browse
Press the “Browse” button on the touch-
screen to select Artist, Albums, Genres,
Songs, Playlists or Folders from the USB/
iPod device. Once the desired selection is
made you can chose from the available media
by pressing the button on the touchscreen.
Press the “Exit” button on the touchscreen if
you wish to cancel the browse function.
AUX Mode
AUX Mode is entered by inserting a AUX
device using a stereo cable with a 3.5 mm
audio jack into the AUX port, or by pushing
the MEDIA button located on the faceplate.
Once in Media Mode, press the “Source”
button on the touchscreen and select “AUX.”Inserting Auxiliary Device
Gently insert the Auxiliary device cable into
the AUX Port. If you insert a Auxiliary device
with the ignition ON, the unit will switch to
AUX mode and begin to play when you insert
the device cable.
Controlling The Auxiliary Device
The control of the Auxiliary device (e.g., se-
lecting playlists, play, fast forward, etc.) can-
not be provided by the radio; use the device
controls instead. Adjust the volume with the
VOLUME/MUTE rotary knob, or with the vol-
ume of the attached device.
The vehicle radio unit is acting as the ampli-
fier for audio output from the Auxiliary de-
vice. Therefore if the volume control on the
Auxiliary device is set too low, there will be
insufficient audio signal for the radio unit to
play the music on the device.
Track Selection
Seek Up/Seek Down
Press and release the “Right Arrow”but-
ton on the touchscreen for the next selection.
Press and release the “Left Arrow”
button
303
Page 306 of 372

on the touchscreen to return to the beginning
of the current selection, or return to the
beginning of the previous selection if the
Disc is within the first second of the current
selection.
Fast Seek Up
Press and hold the “Right Arrow”button
on the touchscreen and the desired mode will
begin to fast forward through the current
track until the button on the touchscreen is
released.
Fast Seek Down
Press and hold the “Left Arrow”button
on the touchscreen and the desired mode will
begin to rewind through the current track
until the button on the touchscreen is re-
leased.
Info
Press the “Info” button on the touchscreen to
display the current track information. Press
the “X” button on the touchscreen to cancel
this feature. Shuffle
Press the “Shuffle” button on the touch-
screen to play the selections on the USB/iPod
device in random order to provide an interest-
ing change of pace. Press the “Shuffle” but-
ton on the touchscreen a second time to turn
this feature off.
Repeat
Press the “Repeat” button on the touch-
screen to repeat the song selection. To cancel
repeat, press the “Repeat” button on the
touchscreen a second time.Bluetooth Source
Bluetooth Streaming Audio (BTSA) or
Bluetooth Mode is entered by pairing a
Bluetooth device containing music to the
Uconnect system.
Before proceeding, the Bluetooth device
must be paired with the Uconnect Phone to
communicate with the Uconnect system.
See the “Pairing Procedure” in this manual
for further details. Once the Bluetooth device is paired to the
Uconnect system, push the MEDIA button
located on the faceplate. Once in Media
Mode, press the “Source” button on the
touchscreen and select “Bluetooth.”
NOTE:
For mobile phone compatibility and pairing
instructions, please visit
UconnectPhone.com.
Pairing A Bluetooth Audio Device
To begin using your audio device, you must
pair your compatible Bluetooth enabled au-
dio device. Pairing is the process of estab-
lishing a wireless connection between a de-
vice and the Uconnect system.
NOTE:
• You must have Bluetooth enabled on your
device to complete this procedure.
• The vehicle must be in PARK.
1. Place the ignition in the ACC or ON position.
MULTIMEDIA
304
Page 336 of 372

The Uconnect Phone feature enables you to
place and receive hands-free mobile phone
calls. Drivers can also place mobile phone
calls using their voice or by using the buttons
on the touchscreen (see Voice Command sec-
tion).
The hands-free calling feature is made pos-
sible through Bluetooth technology — the
global standard that enables different elec-
tronic devices to connect to each other wire-
lessly.
If the Uconnect Phone Button
exists on
your steering wheel, you then have the
Uconnect Phone features.
NOTE:
• The Uconnect Phone requires a mobile phone equipped with the Bluetooth Hands-
Free Profile, Version 1.0 or higher.
• Most mobile phones/devices are compat- ible with the Uconnect system, however
some mobile phones/devices may not be
equipped with all of the required features
to utilize all of the Uconnect system
features. For Uconnect Customer Care:
• U.S. residents visit UconnectPhone.com or
call 1-877-855-8400
• Canadian residents visit UconnectPhone.com or call
1-800-465-2001 (English) or
1-800-387-9983 (French).
Pairing (Wirelessly Connecting)
Your Mobile Phone To The
Uconnect System
Mobile phone pairing is the process of estab-
lishing a wireless connection between a cel-
lular phone and the Uconnect system.
NOTE:
• To use the Uconnect Phone feature, youfirst must determine if your mobile phone
and software are compatible with the
Uconnect system. Please visit
UconnectPhone.com for complete mobile
phone compatibility information.
• Mobile phone pairing is not available while the vehicle is in motion. • A maximum of ten mobile phones can be
paired to the Uconnect system.
Start Pairing Procedure On The Radio
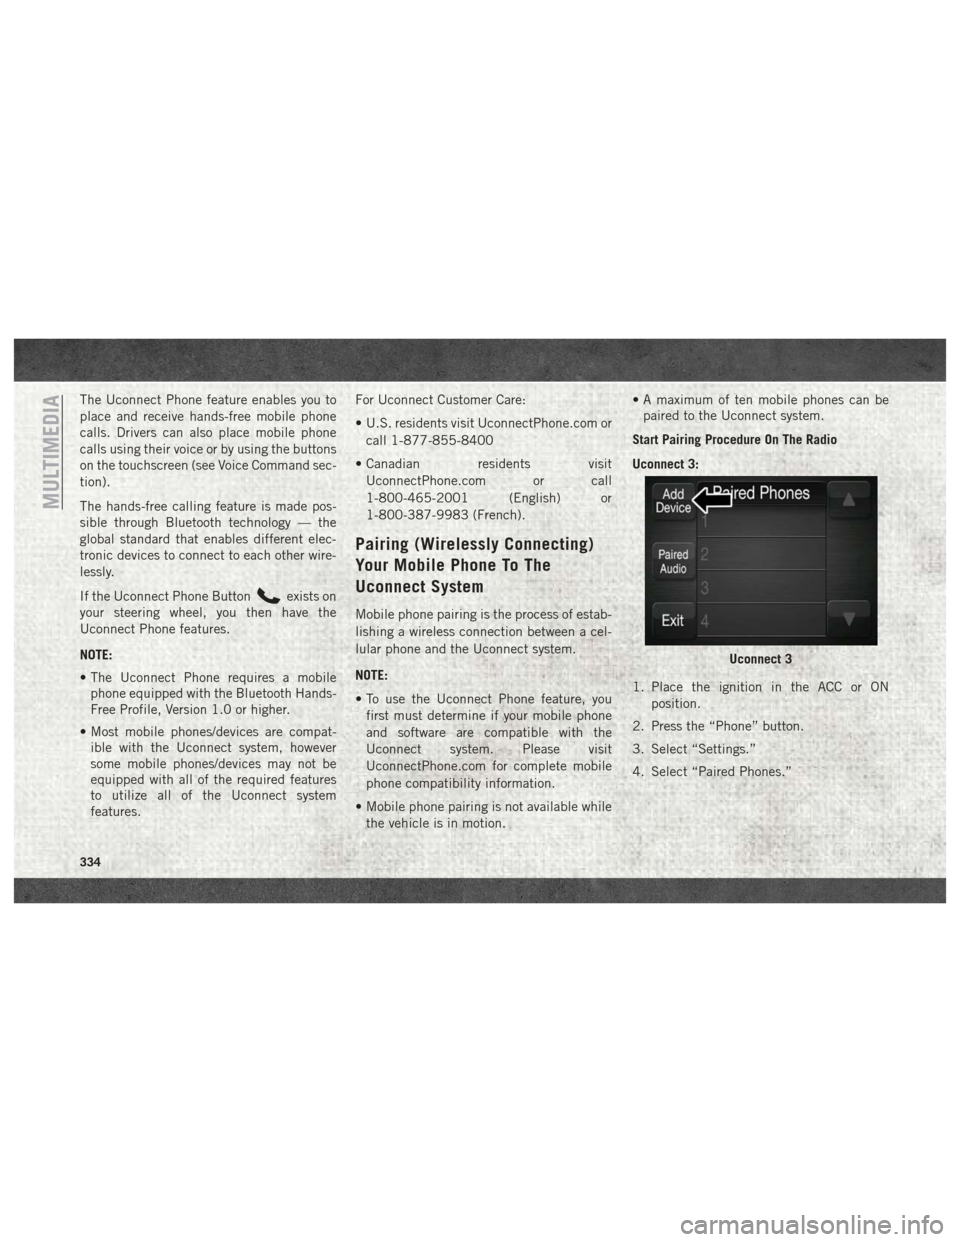
Uconnect 3:
1. Place the ignition in the ACC or ON position.
2. Press the “Phone” button.
3. Select “Settings.”
4. Select “Paired Phones.”
Uconnect 3
MULTIMEDIA
334
Page 337 of 372

5. Select “Add device.”• Uconnect Phone will display an “Inprogress” screen while the system is
connecting.
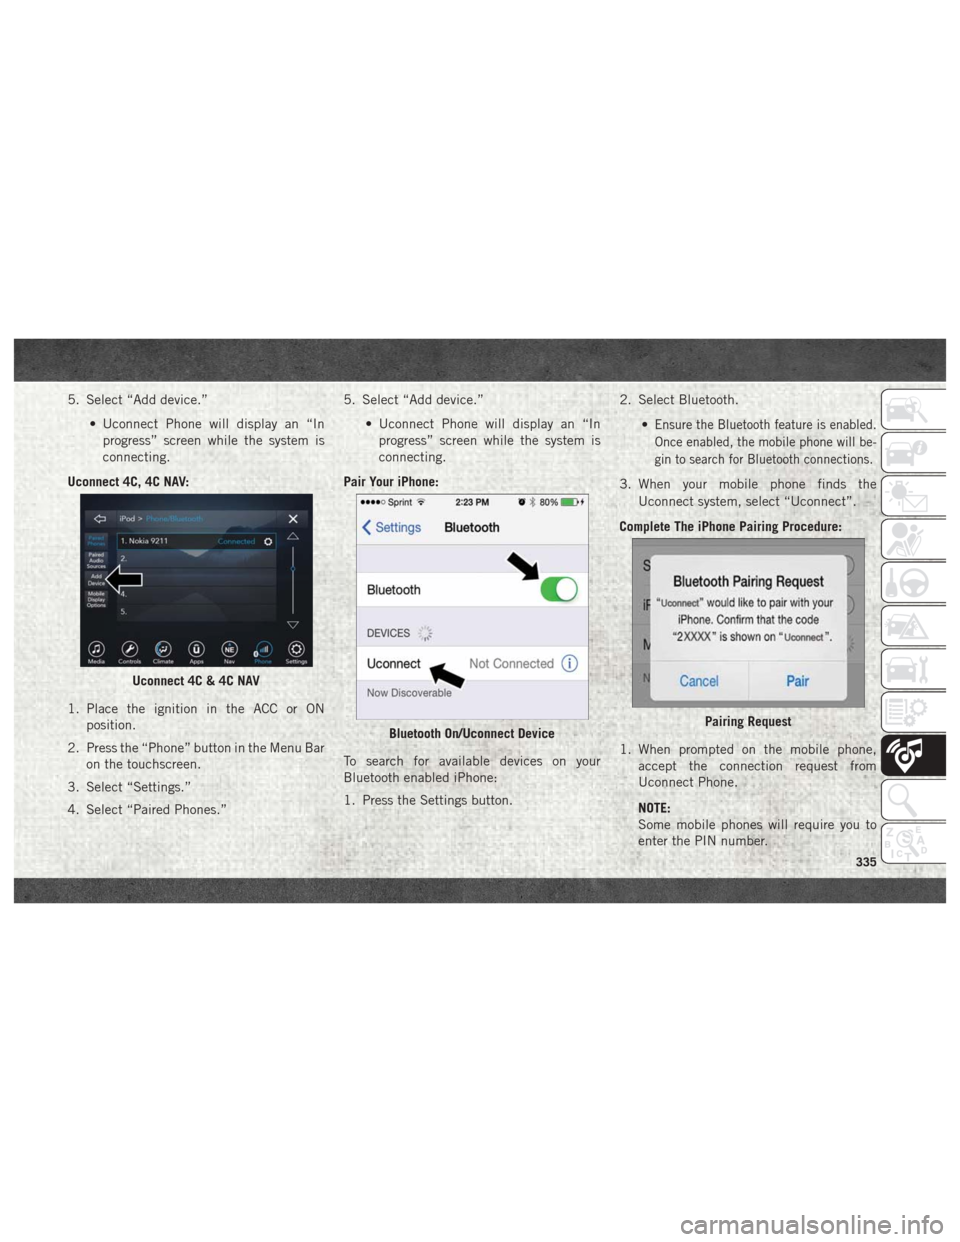
Uconnect 4C, 4C NAV:
1. Place the ignition in the ACC or ON position.
2. Press the “Phone” button in the Menu Bar on the touchscreen.
3. Select “Settings.”
4. Select “Paired Phones.” 5. Select “Add device.”
• Uconnect Phone will display an “Inprogress” screen while the system is
connecting.
Pair Your iPhone:
To search for available devices on your
Bluetooth enabled iPhone:
1. Press the Settings button. 2. Select Bluetooth.
•
Ensure the Bluetooth feature is enabled.
Once enabled, the mobile phone will be-
gin to search for Bluetooth connections.
3. When your mobile phone finds theUconnect system, select “Uconnect”.
Complete The iPhone Pairing Procedure:
1. When prompted on the mobile phone, accept the connection request from
Uconnect Phone.
NOTE:
Some mobile phones will require you to
enter the PIN number.
Uconnect 4C & 4C NAV
Bluetooth On/Uconnect DevicePairing Request
335