2018 Ram 3500 audio
[x] Cancel search: audioPage 310 of 372

• Pressing the “Front,” “Rear,” “Left,” or“Right” buttons on the touchscreen or
press and drag the Speaker Icon to adjust
the Balance/Fade.
Equalizer
• Press the “Equalizer” button on the touch- screen to activate the Equalizer screen.
• Press the “+” or “–” buttons on the touch- screen, or press and drag over the level bar
for each of the equalizer bands. The level
value, which spans between plus or minus
nine, is displayed at the bottom of each of
the Bands.
Speed Adjusted Volume
• Press the “Speed Adjusted Volume” button on the touchscreen to activate the Speed
Adjusted Volume screen. The Speed Ad-
justed Volume is adjusted by pressing the
volume level indicator. This alters the auto-
matic adjustment of the audio volume with
variation to vehicle speed.
MULTIMEDIA
308
Page 317 of 372

NOTE:
Only temporarily pushing the VR button on
the steering wheel will launch a native VR
session, not a Siri session, and it will not
function with CarPlay.
Music
CarPlay allows you to access all your artists,
playlists, and music from iTunes. Using your
iPhone’s data plan, you can also use select
third party audio apps including music, news,
sports, podcasts and more.
Messages
Just like Phone, CarPlay allows you to use Siri
to send or reply to text messages. Siri can also
read incoming text messages, but driver’s will
not be able to read messages, as everything is
done via voice.
Maps
To use your Apple Maps for navigation on your
Uconnect system, launch CarPlay, and push
and hold the VR button on the steering wheel
to use Siri to set your desired destination.
Alternatively, choose a Nearby destination by
pressing Destinations and selecting a cat-
egory, by launching Siri from the destinations
page, or even by typing in a destination.NOTE:
• If the VR button is not held, and is only
pushed, the native Uconnect VR will
prompt you and any navigation command
said will launch the native Uconnect navi-
gation system.
Apple Music
Maps
315
Page 326 of 372

UCONNECT SETTINGS
The Uconnect system allows you to access
Customer Programmable feature settings
such as Display, Voice, Clock, Safety & Driv-
ing Assistance, Lights, Doors & Locks,
Auto-On Comfort, Engine Off Options, Com-
pass Settings (Uconnect 3 with 5–inch dis-
play), Trailer Brake, Suspension, Audio,
Phone/Bluetooth, SiriusXM Setup, Restore
Settings, Clear Personal Data, and System
Information through buttons on the touch-
screen.
• Push the SETTINGS button (Uconnect3 With 5–inch Display), or press the “Apps”
button (Uconnect 4/4C NAV With 8.4–inch
Display) located near the bottom of the
touchscreen, then press the “Settings”
button on the touchscreen to access the
Settings screen. When making a selection,
scroll up or down until the preferred setting is highlighted, then press the preferred
setting until a check-mark appears next to
the setting, showing that setting has been
selected. The following feature settings are
available:
• Display
• Suspension
• Voice • Audio
• Clock • Phone/Bluetooth
• Safety & Driving Assistance • SiriusXM Setup
• Lights • Restore Settings
• Doors & Locks • Clear Personal Data
• Auto-On Comfort • System Informa- tion
• Engine Off Options •
Compass Settings
(Uconnect 3)
• Trailer Brake
NOTE:
Depending on the vehicles options, feature
settings may vary.
Refer to “Uconnect Settings” found within
“Multimedia” located in your Owner's Manual at
www.mopar.com/en-us/care/owners-manual.html
(U.S. Residents) or www.owners.mopar.ca
(Canadian Residents) for further information.MULTIMEDIA
324
Page 327 of 372

TIPS CONTROLS AND GENERAL
INFORMATION
Steering Wheel Audio Controls
The steering wheel audio controls are located
on the rear surface of the steering wheel.
Reception Conditions
Reception conditions change constantly
while driving. Reception may be interfered
with by the presence of mountains, buildings
or bridges, especially when you are far away
from the broadcaster.The volume may be increased when receiving
traffic alerts and news.
Care And Maintenance
Observe the following precautions to ensure
the system is fully operational:
• The display lens should not come into con-
tact with pointed or rigid objects which
could damage its surface; use a soft, dry
anti-static cloth to clean and do not press.
• Never use alcohol, gas and derivatives to clean the display lens.
• Prevent any liquid from entering the sys- tem: this could damage it beyond repair.
Anti-Theft Protection
The system is equipped with an anti-theft
protection system based on the exchange of
information with the electronic control unit
(Body Computer) on the vehicle.
This guarantees maximum safety and pre-
vents the secret code from being entered
after the power supply has been discon-
nected. If the check has a positive outcome, the
system will start to operate, whereas if the
comparison codes are not the same or if the
electronic control unit (Body Computer) is
replaced, the system will ask the user to enter
the secret code. See an authorized dealer for
further information.
IPOD/USB/MEDIA PLAYER CONTROL
Steering Wheel Audio Controls
Uconnect Media Hub
1 — USB Port
2 — AUX Jack
3 — USB Port
325
Page 328 of 372

There are many ways to play music from
MP3 players, or USB devices through your
vehicle's sound system. Press your Media
button on the touchscreen to begin.
Audio Jack (AUX)
• The AUX allows a device to be plugged intothe radio and utilize the vehicle’s sound
system, using a 3.5 mm audio cable, to
amplify the source and play through the
vehicle speakers.
• Pressing the “AUX” button on the touch- screen will change the mode to auxiliary
device if the audio jack is connected, allow-
ing the music from your device to be heard
through the vehicle's speakers. To activate
the AUX, plug in the audio jack.
• The functions of the device are controlled using the device buttons. The volume may
be controlled using the radio or device.
USB Port
• Connect your compatible device using aUSB cable into the USB Port. USB Memory
sticks with audio files can also be used.
Audio from the device can be played on the
vehicles sound system while providing
metadata (artist, track title, album, etc.)
information on the radio display.
• When connected, the compatible USB de- vice can be controlled using the radio or
Steering Wheel Audio Controls to play, skip
to the next or previous track, browse, and
list the contents.
• The battery charges when plugged into the USB port (if supported by the specific de-
vice).
• To route the USB cable out of the center console, use the access cut out. NOTE:
When connecting your device for the first
time, the system may take several minutes to
read your music, depending on the number of
files. For example, the system will take ap-
proximately five minutes for every
1,000 songs loaded on the device. Also dur-
ing the reading process, the Shuffle and
Browse functions will be disabled. This pro-
cess is needed to ensure the full use of your
features and only happens the first time it is
connected. After the first time, the reading
process of your device will take considerably
less time unless changes are made or new
songs are added to the playlist.
Bluetooth Streaming Audio
If using a Bluetooth equipped device you may
also be able to stream music to your vehicle's
sound system. Your connected device must
be Bluetooth compatible and paired with
your system (see Uconnect Phone for pairing
instructions). You can access the music from
your connected Bluetooth device by pressing
the Bluetooth button on the touchscreen
while in Media mode.
MULTIMEDIA
326
Page 338 of 372

Select The iPhone's Priority Level
When the pairing process has successfully
completed, the system will prompt you to
choose whether or not this is your favorite
mobile phone. Selecting “Yes” will make this
mobile phone the highest priority. This mo-
bile phone will take precedence over other
paired mobile phones within range and will
connect to the Uconnect system automati-
cally when entering the vehicle. Only one
mobile phone and/or one Bluetooth audio
device can be connected to the Uconnect
system at a time. If “No” is selected, simply
select “Uconnect” from the mobile phone/
audio device Bluetooth screen, and the
Uconnect system will reconnect to the
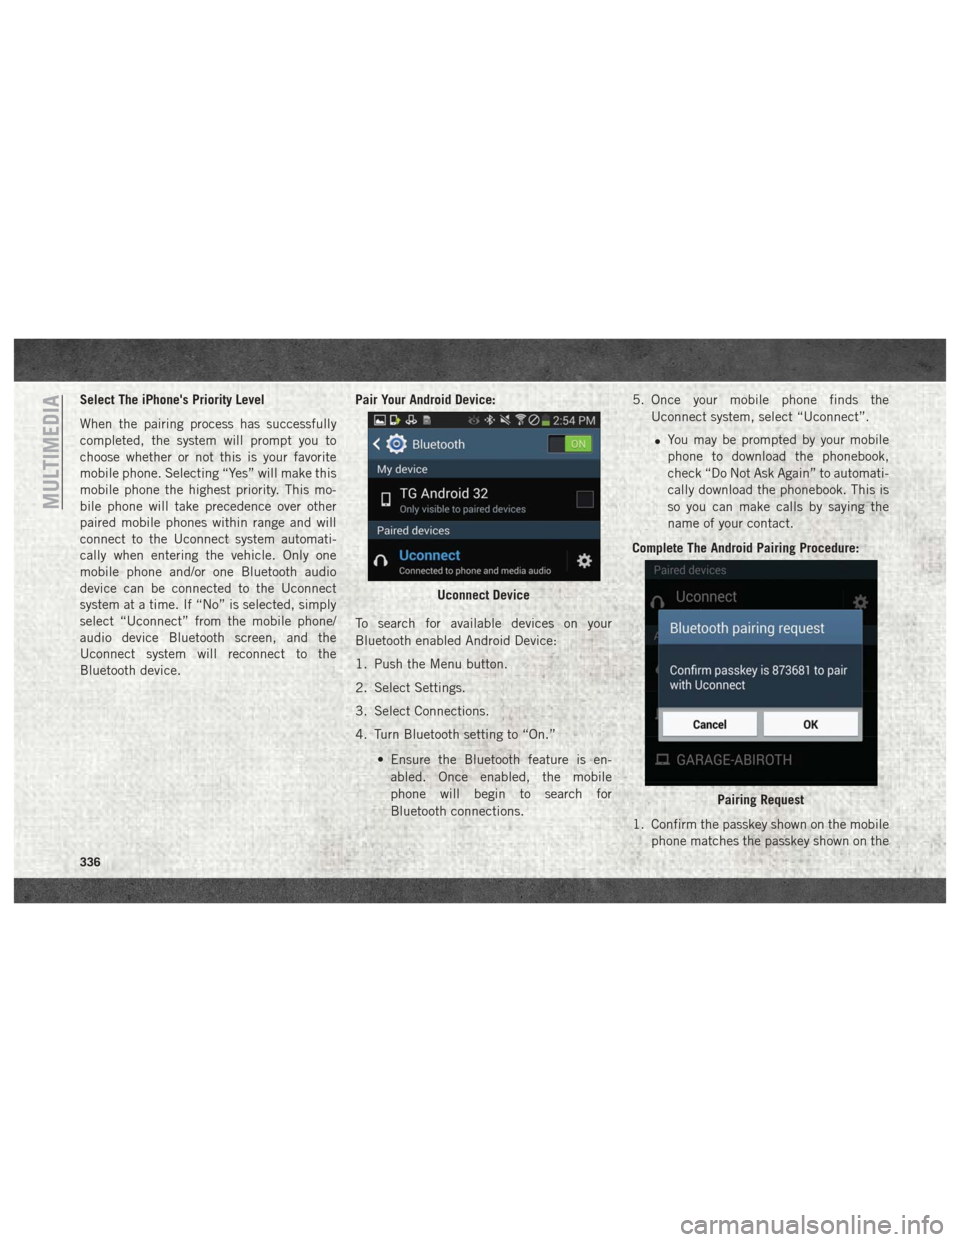
Bluetooth device.Pair Your Android Device:
To search for available devices on your
Bluetooth enabled Android Device:
1. Push the Menu button.
2. Select Settings.
3. Select Connections.
4. Turn Bluetooth setting to “On.”
• Ensure the Bluetooth feature is en-abled. Once enabled, the mobile
phone will begin to search for
Bluetooth connections. 5. Once your mobile phone finds the
Uconnect system, select “Uconnect”.
• You may be prompted by your mobile
phone to download the phonebook,
check “Do Not Ask Again” to automati-
cally download the phonebook. This is
so you can make calls by saying the
name of your contact.
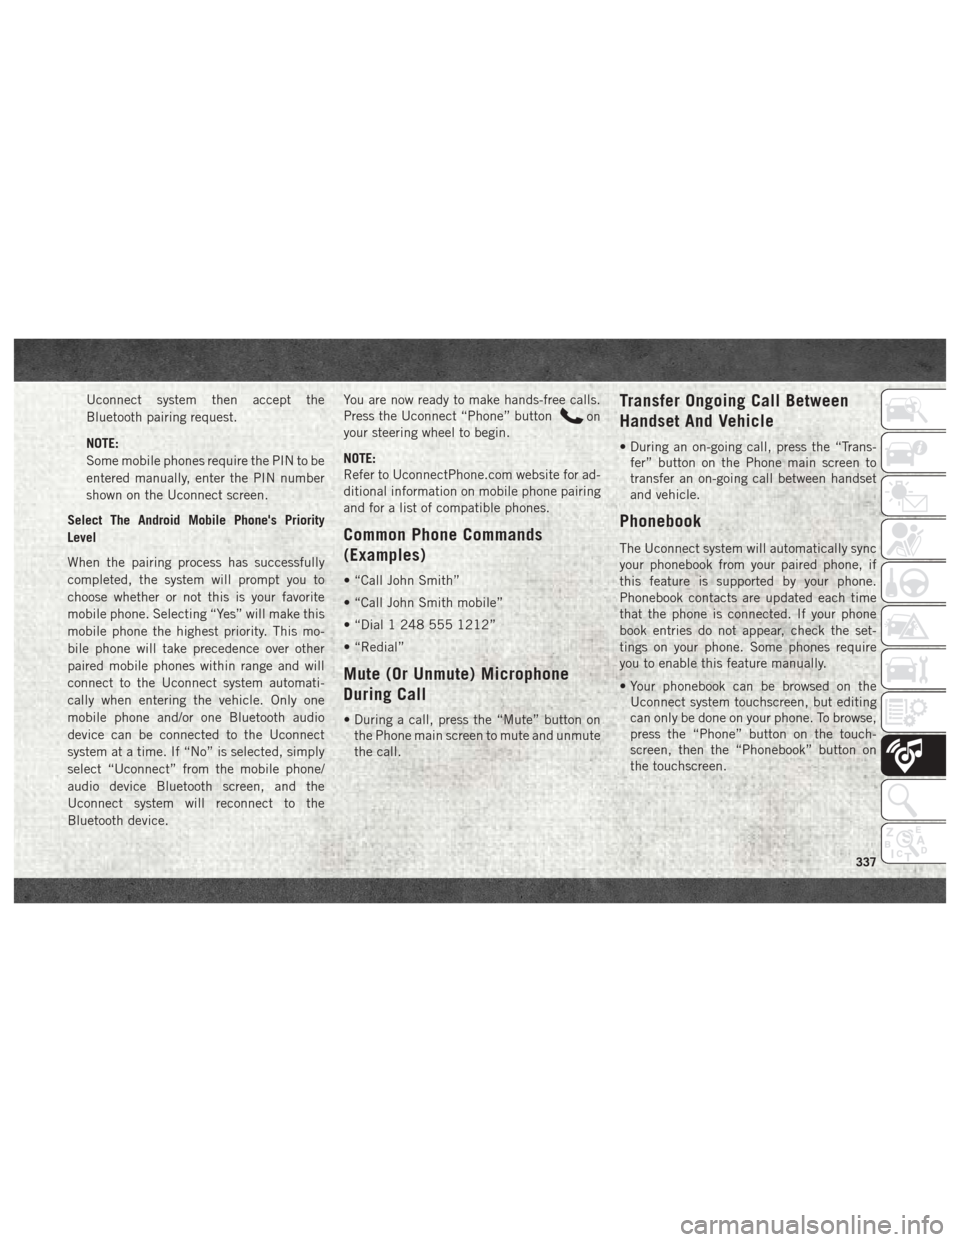
Complete The Android Pairing Procedure:
1. Confirm the passkey shown on the mobile phone matches the passkey shown on the
Uconnect Device
Pairing Request
MULTIMEDIA
336
Page 339 of 372

Uconnect system then accept the
Bluetooth pairing request.
NOTE:
Some mobile phones require the PIN to be
entered manually, enter the PIN number
shown on the Uconnect screen.
Select The Android Mobile Phone's Priority
Level
When the pairing process has successfully
completed, the system will prompt you to
choose whether or not this is your favorite
mobile phone. Selecting “Yes” will make this
mobile phone the highest priority. This mo-
bile phone will take precedence over other
paired mobile phones within range and will
connect to the Uconnect system automati-
cally when entering the vehicle. Only one
mobile phone and/or one Bluetooth audio
device can be connected to the Uconnect
system at a time. If “No” is selected, simply
select “Uconnect” from the mobile phone/
audio device Bluetooth screen, and the
Uconnect system will reconnect to the
Bluetooth device. You are now ready to make hands-free calls.
Press the Uconnect “Phone” button
on
your steering wheel to begin.
NOTE:
Refer to UconnectPhone.com website for ad-
ditional information on mobile phone pairing
and for a list of compatible phones.
Common Phone Commands
(Examples)
• “Call John Smith”
• “Call John Smith mobile”
• “Dial 1 248 555 1212”
• “Redial”
Mute (Or Unmute) Microphone
During Call
• During a call, press the “Mute” button on the Phone main screen to mute and unmute
the call.
Transfer Ongoing Call Between
Handset And Vehicle
• During an on-going call, press the “Trans-fer” button on the Phone main screen to
transfer an on-going call between handset
and vehicle.
Phonebook
The Uconnect system will automatically sync
your phonebook from your paired phone, if
this feature is supported by your phone.
Phonebook contacts are updated each time
that the phone is connected. If your phone
book entries do not appear, check the set-
tings on your phone. Some phones require
you to enable this feature manually.
• Your phonebook can be browsed on theUconnect system touchscreen, but editing
can only be done on your phone. To browse,
press the “Phone” button on the touch-
screen, then the “Phonebook” button on
the touchscreen.
337
Page 340 of 372

Favorite phonebook entries can be saved as
Favorites for quicker access. Favorites are
shown at the top of the main phone screen.
Voice Command Tips
• Speaking complete names (i.e; Call JohnDoe vs. Call John) will result in greater
system accuracy.
• You can “link” commands together for faster results. Say “Call John Doe, mobile,”
for example.
• If you are listening to available voice com- mand options, you do not have to listen to
the entire list. When you hear the command
that you need, push the
button on the
steering wheel, wait for the beep and say
your command.
Changing The Volume
• Start a dialogue by pushing the VR button
, then say a command. For example,
"Help".
• Use the radio VOLUME/MUTE rotary knob to adjust the volume to a comfortable level
while the Uconnect system is speaking. NOTE:
The volume setting for Uconnect is different
than the audio system.
NOTE:
To access help, push the Uconnect VR button
(if active) on the steering wheel and say
"help." Push the Uconnect VR Pickup button
(if active) or the VR button(if
active) and say "cancel" to cancel the help
session.
Using Do Not Disturb
With Do Not Disturb, you can disable notifi-
cations from incoming calls and texts, allow-
ing you to keep your eyes on the road and
hands on the wheel. For your convenience,
there is a counter display to keep track of
your missed calls and text messages while
you were using Do Not Disturb.
Do Not Disturb can automatically reply with a
text message, a call or both, when declining
an incoming call and send it to voicemail.
Automatic reply messages can be:
• “I am driving right now, I will get back to you shortly.” • Create a custom auto reply message up to
160 characters.
While in Do Not Disturb, Conference Call can
be selected so you can still place a second
call without being interrupted by incoming
calls.
NOTE:
• Only the beginning of your custom message will be seen on the touchscreen.
• Reply with text message is not compatible with iPhones.
• Auto reply with text message is only avail- able on phones that supporting Bluetooth
MAP.
Incoming Text Messages
After pairing your Uconnect system with a
Bluetooth enabled mobile device with the
Message Access Profile (MAP), the Uconnect
system can announce a new incoming text
message and read it to you over the vehicle’s
audio system.
NOTE:
Only incoming text messages received during
the current ignition cycle can be viewed/read.
MULTIMEDIA
338