Page 441 of 527
UCONNECT RADIOS
For detailed information about your Uconnect radio, refer
to your Uconnect Owner ’s Manual Supplement.
NOTE:Uconnect screen images are for illustration pur-
poses only and may not reflect exact software for your
vehicle.
PERSONALIZED MENU BAR
The Uconnect features and services in the main menu bar
are easily changed for your convenience. Simply follow
these steps:
1. Press the “Apps
” button to open the App screen.
2. Press and hold, then drag the selected App to replace anexisting shortcut in the main menu bar.
The new shortcut will now be an active App/shortcut on
the main menu bar.
Uconnect 4/4C/4C NAV Main Menu10
MULTIMEDIA 439
Page 448 of 527

Setting NameSelectable Options
ParkView Backup Camera Active Guidelines
NOTE:
Your vehicle may be equipped with the ParkView Rear Back Up Camera Active Guidelines that allows you to see ac-
tive guidelines over the ParkView Back up camera display whenever the gear selector is put into REVERSE. The im-
age will be displayed on the radio touchscreen display along with a caution note to “check entire surroundings”
across the top of the screen. After five seconds, this note will disappear.
ParkView Backup Camera Delay
NOTE:
When the vehicle is shifted out of REVERSE (with camera delay turned OFF), the rear camera mode is exited and the
navigation or audio screen appears again. When the vehicle is shifted out of REVERSE (with camera delay turned
ON), the rear view image with dynamic grid lines will be displayed for up to ten seconds after shifting out of RE-
VERSE unless the forward vehicle speed exceeds 8 mph (12 km/h), the transmission is shifted into PARK or the igni-
tion is switched to the OFF position.
Rain Sensing Auto Wipers — If Equipped
NOTE:
When the “Rain Sensing Auto Wipers” feature is selected, the system will automatically activate the windshield wip-
ers if it senses moisture on the windshield.
446 MULTIMEDIA
Page 461 of 527

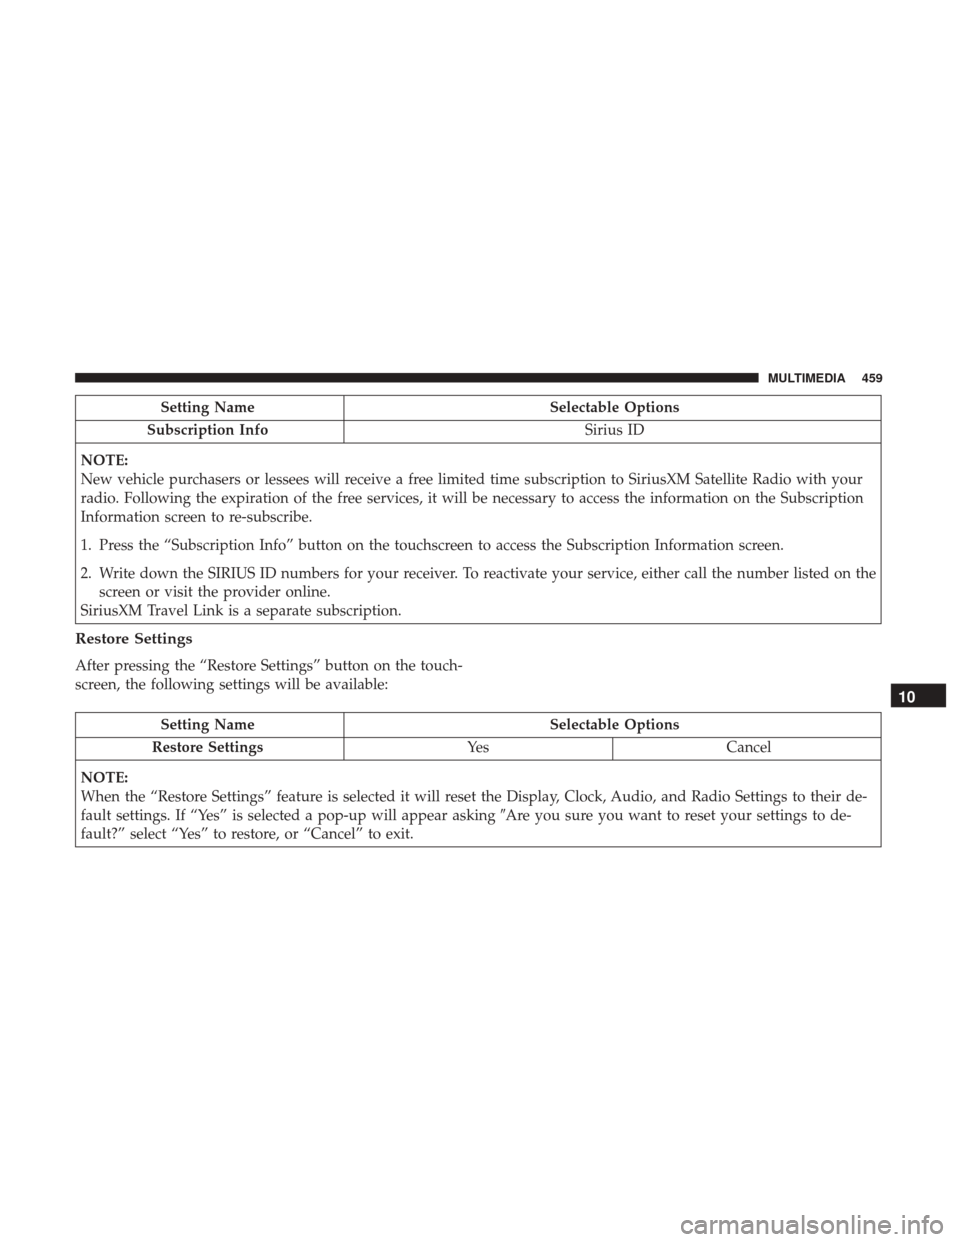
Setting NameSelectable Options
Subscription Info Sirius ID
NOTE:
New vehicle purchasers or lessees will receive a free limited time subscription to SiriusXM Satellite Radio with your
radio. Following the expiration of the free services, it will be necessary to access the information on the Subscription
Information screen to re-subscribe.
1. Press the “Subscription Info” button on the touchscreen to access the Subscription Information screen.
2. Write down the SIRIUS ID numbers for your receiver. To reactivate your service, either call the number listed on the screen or visit the provider online.
SiriusXM Travel Link is a separate subscription.
Restore Settings
After pressing the “Restore Settings” button on the touch-
screen, the following settings will be available:
Setting Name Selectable Options
Restore Settings YesCancel
NOTE:
When the “Restore Settings” feature is selected it will reset the Display, Clock, Audio, and Radio Settings to their de-
fault settings. If “Yes” is selected a pop-up will appear asking �Are you sure you want to reset your settings to de-
fault?” select “Yes” to restore, or “Cancel” to exit.
10
MULTIMEDIA 459
Page 464 of 527
Display
After pressing the “Display” button on the touchscreen, the
following settings will be available:
Setting NameSelectable Options
Display Mode DayNight Auto
NOTE:
When Day or Night is selected for the Display Mode, the usage of the Parade Mode feature will cause the radio to
activate the Display Brightness Day control even though the headlights are on. Display Brightness With Headlights ON +–
NOTE:
To make changes to the �Display Brightness with Headlights ON� setting, the headlights must be on and the interior
dimmer switch must not be in the �party�or�parade� positions.
Display Brightness With Headlights OFF +–
NOTE:
To make changes to the �Display Brightness with Headlights OFF� setting, the headlights must be off and the interior
dimmer switch must not be in the �party�or�parade� positions.
462 MULTIMEDIA
Page 469 of 527

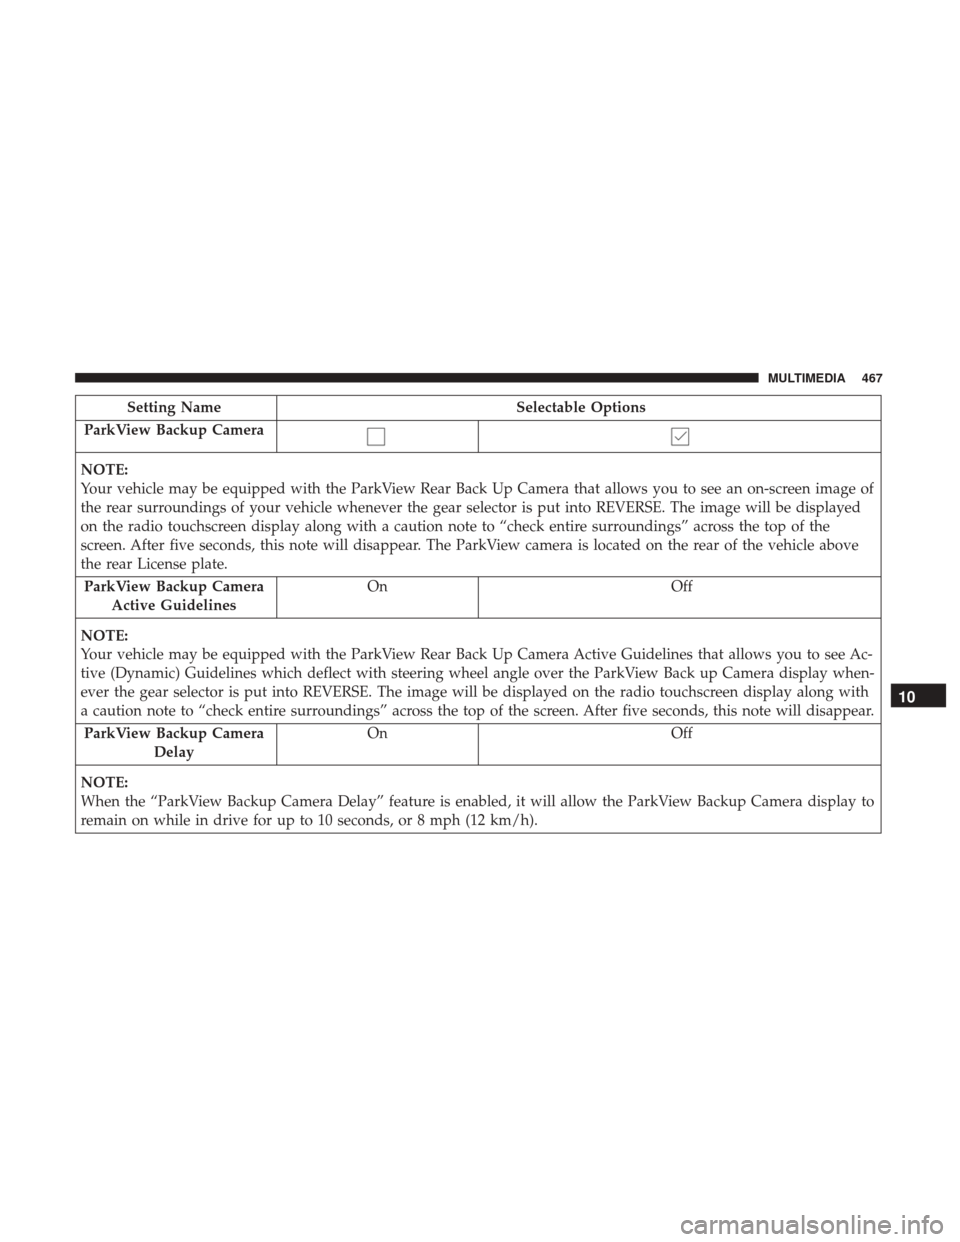
Setting NameSelectable Options
ParkView Backup Camera
NOTE:
Your vehicle may be equipped with the ParkView Rear Back Up Camera that allows you to see an on-screen image of
the rear surroundings of your vehicle whenever the gear selector is put into REVERSE. The image will be displayed
on the radio touchscreen display along with a caution note to “check entire surroundings” across the top of the
screen. After five seconds, this note will disappear. The ParkView camera is located on the rear of the vehicle above
the rear License plate. ParkView Backup Camera Active Guidelines On
Off
NOTE:
Your vehicle may be equipped with the ParkView Rear Back Up Camera Active Guidelines that allows you to see Ac-
tive (Dynamic) Guidelines which deflect with steering wheel angle over the ParkView Back up Camera display when-
ever the gear selector is put into REVERSE. The image will be displayed on the radio touchscreen display along with
a caution note to “check entire surroundings” across the top of the screen. After five seconds, this note will disappear. ParkView Backup Camera Delay On
Off
NOTE:
When the “ParkView Backup Camera Delay” feature is enabled, it will allow the ParkView Backup Camera display to
remain on while in drive for up to 10 seconds, or 8 mph (12 km/h).
10
MULTIMEDIA 467
Page 475 of 527
Engine Off Options
After pressing the “Engine Off Options” button on the
touchscreen, the following settings will be available:
Setting NameSelectable Options
Engine Off Power Delay +–
NOTE:
When the “Engine Off Power Delay” feature is selected, the power window switches, radio, Uconnect phone system
(if equipped), power sunroof (if equipped), and power outlets will remain active for up to ten minutes after the igni-
tion is cycled to OFF. Opening either front door will cancel this feature. Headlight Off Delay +–
NOTE:
When the “Headlight Off Delay” feature is selected, the driver can choose to have the headlights remain on for 0, 30,
60, or 90 seconds when exiting the vehicle.
10
MULTIMEDIA 473
Page 481 of 527

SiriusXM Setup — If Equipped
After pressing the “SiriusXM Setup” button on the touchscreen, the following settings will be available:
Setting NameSelectable Options
Tune Start OnOff
NOTE:
The “Tune Start” feature begins playing the current song from the beginning when you tune to a music channel using
one of the twelve presets, so you can enjoy the complete song. This feature occurs the first time the preset is selected
during that current song. Tune Start works in the background, so you will not even realize it’s on, except that you
will miss the experience of joining your favorite song with only a few seconds left to play. Channel Skip List of Channels
NOTE:
SiriusXM can be programmed to designate a group of channels that are the most desirable to listen to or to exclude
undesirable channels while scanning. This feature allows you to select the channels you would like to skip. Subscription Info Sirius ID
NOTE:
New vehicle purchasers or lessees will receive a free limited time subscription to SiriusXM Satellite Radio with your
radio. Following the expiration of the free services, it will be necessary to access the information on the Subscription
Information screen to re-subscribe.
1. Press the “Subscription Info” button on the touchscreen to access the Subscription Information screen.
2. Write down the Sirius ID numbers for your receiver. To reactivate your service, either call the number listed on the screen or visit the provider online.
SiriusXM Travel Link is a separate subscription.
10
MULTIMEDIA 479
Page 483 of 527

STEERING WHEEL AUDIO CONTROLS — IF
EQUIPPED
The remote sound system controls are located on the back
surface of the steering wheel. Reach behind the wheel to
access the switches.
The right hand control is a rocker type switch with a
push-button in the center. Pushing the top of the switch
will increase the volume, and pushing the bottom of the
switch will decrease the volume.The button located in the center of the right hand control
will switch modes to Radio, CD or other valid audio
sources.
The left hand control is a rocker type switch with a
push-button in the center. The function of the left hand
control is different depending on which mode you are in.
The following describes the left hand control operation in
each mode.
Radio Operation
Pushing the top of the switch will SEEK up for the next
listenable station and pushing the bottom of the switch will
SEEK down for the next listenable station.
The button located in the center of the left hand control will
tune to the next pre-set station that you have programmed
in the radio pre-set buttons.
Remote Sound System Controls (Rearview Of Steering
Wheel)
10
MULTIMEDIA 481