Page 234 of 527

Whenever a change is noticed in the sound of the exhaust
system, when exhaust fumes can be detected inside the
vehicle, or when the underside or rear of the vehicle is
damaged, have a competent mechanic inspect the complete
exhaust system and adjacent body areas for broken, dam-
aged, deteriorated, or mispositioned parts. Open seams or
loose connections could permit exhaust fumes to seep into
the passenger compartment. In addition, inspect the ex-
haust system each time the vehicle is raised for lubrication
or oil change. Replace as required.
Safety Checks You Should Make Inside The Vehicle
Seat Belts
Inspect the seat belt system periodically, checking for cuts,
frays, and loose parts. Damaged parts must be replaced
immediately. Do not disassemble or modify the system.
Front seat belt assemblies must be replaced after a collision.
Rear seat belt assemblies must be replaced after a collision
if they have been damaged (i.e., bent retractor, torn web-
bing, etc.). If there is any question regarding seat belt or
retractor condition, replace the seat belt.
Air Bag Warning Light
The Air Bag warning lightwill turn on for four to
eight seconds as a bulb check when the ignition switch is first turned to ON/RUN. If the light is either not on
during starting, stays on, or turns on while driving,
have the system inspected at your authorized dealer as
soon as possible. After the bulb check, this light will
illuminate with a single chime when a fault with the Air
Bag System has been detected. It will stay on until the
fault is cleared. If the light comes on intermittently or
remains on while driving, have your authorized dealer
service the vehicle immediately. Refer to “Occupant
Restraint Systems” in “Safety” for further information.
Defroster
Check operation by selecting the defrost mode and place the
blower control on high speed. You should be able to feel the
air directed against the windshield. See your authorized
dealer for service if your defroster is inoperable.
Floor Mat Safety Information
Always use floor mats designed to fit your vehicle. Only
use a floor mat that does not interfere with the operation of
the accelerator, brake or clutch pedals. Only use a floor mat
that is securely attached using the floor mat fasteners so it
cannot slip out of position and interfere with the accelera-
tor, brake or clutch pedals or impair safe operation of your
vehicle in other ways.
232 SAFETY
Page 319 of 527

IN CASE OF EMERGENCY
CONTENTS
�HAZARD WARNING FLASHERS ............318
� ASSIST AND SOS MIRROR — IF EQUIPPED . . . .318
� BULB REPLACEMENT ....................323
▫ Replacement Bulbs .....................323
▫ Replacing Exterior Bulbs ..................324
� FUSES ............................... .329
▫ Power Distribution Center ................330
� JACKING AND TIRE CHANGING ...........337
▫ 4500/5500 Models ..................... .337
▫ Preparations For Jacking ..................338
▫ Jacking Instructions 4500 And 5500 Series ......338
▫ To Stow The Flat Or Spare — If Equipped .....342
▫ Hub Caps/Wheel Covers — If Equipped ......342�
JUMP STARTING ....................... .343
▫ Preparations For Jump Start ...............344
▫ Jump Starting Procedure ..................345
� IF YOUR ENGINE OVERHEATS .............346
� GEAR SELECTOR OVERRIDE ..............347
� FREEING A STUCK VEHICLE ..............348
� TOWING A DISABLED VEHICLE ............350
▫ Two-Wheel Drive Models .................351
▫ Four-Wheel Drive Models .................352
▫ Emergency Tow Hooks — If Equipped ........352
� ENHANCED ACCIDENT RESPONSE SYSTEM
(EARS) .............................. .353
� EVENT DATA RECORDER (EDR) ............353
7
Page 325 of 527

NOTE:
•Your vehicle may be transmitting data as authorized by
the subscriber.
• Never place anything on or near the vehicle’s LTE
(voice/data) or 4G (data) and GPS antennas. You could
prevent LTE (voice/data) or 4G (data) and GPS signal
reception, which can prevent your vehicle from placing
an emergency call. An operable LTE (voice/data) or 4G
(data) network connection and a GPS signal is required
for the SOS Call system to function properly.
General Information
This device complies with Part 15 of the FCC Rules.
Operation is subject to the following two conditions: (1)
This device may not cause harmful interference, and (2)
this device must accept any interference received, includ-
ing interference that may cause undesired operation.
NOTE: Changes or modifications not expressly approved
by the party responsible for compliance could void the
user’s authority to operate the equipment.CAUTION!
To avoid damage to the mirror during cleaning, never
spray any cleaning solution directly onto the mirror.
Apply the solution onto a clean cloth and wipe the
mirror clean.
BULB REPLACEMENT
Replacement Bulbs
LIGHT BULBS — Interior
Bulb Number
Overhead Console Lamps TS 212-2
Dome Lamp 7679
For lighted switches, see your authorized dealer for replacement instructions.
7
IN CASE OF EMERGENCY 323
Page 326 of 527

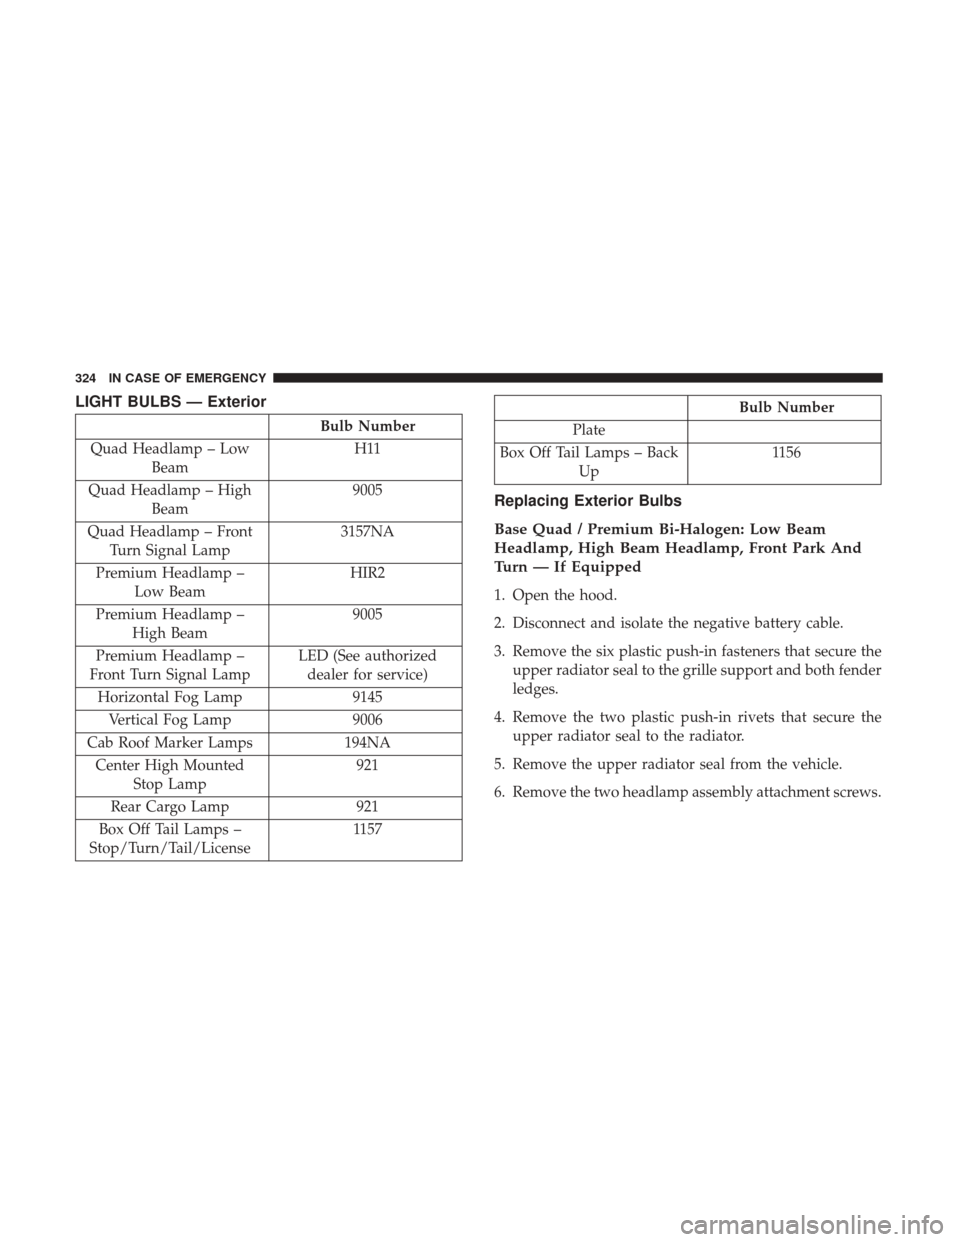
LIGHT BULBS — Exterior
Bulb Number
Quad Headlamp – Low Beam H11
Quad Headlamp – High Beam 9005
Quad Headlamp – Front Turn Signal Lamp 3157NA
Premium Headlamp – Low Beam HIR2
Premium Headlamp – High Beam 9005
Premium Headlamp –
Front Turn Signal Lamp LED (See authorized
dealer for service)
Horizontal Fog Lamp 9145
Vertical Fog Lamp 9006
Cab Roof Marker Lamps 194NA
Center High Mounted Stop Lamp 921
Rear Cargo Lamp 921
Box Off Tail Lamps –
Stop/Turn/Tail/License 1157
Bulb Number
Plate
Box Off Tail Lamps – Back Up 1156
Replacing Exterior Bulbs
Base Quad / Premium Bi-Halogen: Low Beam
Headlamp, High Beam Headlamp, Front Park And
Turn — If Equipped
1. Open the hood.
2. Disconnect and isolate the negative battery cable.
3. Remove the six plastic push-in fasteners that secure the
upper radiator seal to the grille support and both fender
ledges.
4. Remove the two plastic push-in rivets that secure the upper radiator seal to the radiator.
5. Remove the upper radiator seal from the vehicle.
6. Remove the two headlamp assembly attachment screws.
324 IN CASE OF EMERGENCY
Page 327 of 527
7. Reach into the front wheel house ahead of the frontwheel, remove the fastener, and lift the cover over the
access hole in the front of the wheel house splash shield.
Access to the rear of the lamp can be gained through this
access hole.
8. Reach through the access hole of the wheel house splash shield and lift the slide lock upward far enough to
disengage it from the lock post on the back of the front
lamp unit housing. 9. Remove the headlamp assembly. Grasp the outboard
edge of the lamp and pull it straight forward to disen-
gage the ball stud from the plastic grommet.
10. Disconnect the wiring harness connectors from the bulb socket.
11. Replace bulb(s) as necessary.
Headlamp Assembly Attachment Screw LocationsSlide Lock
7
IN CASE OF EMERGENCY 325
Page 328 of 527

CAUTION!
•Do not contaminate the bulb glass by touching it
with your fingers or by allowing it to contact other
oily surfaces. Shortened bulb life will result.
• Always use the correct bulb size and type for replace-
ment. An incorrect bulb size or type may overheat
and cause damage to the lamp, the bulb socket, or the
lamp wiring.
NOTE: There are access covers over both headlamp bulb
access holes in the quad front lamp unit housing (if
equipped). These covers MUST be reinstalled after the bulb
has been replaced.
Fog Lamps — If Equipped
1. Reach under and behind the front bumper to access the back of the front fog lamp housing.
2. Disconnect the fog lamp wiring harness connector from the fog lamp bulb.
3. Rotate the bulb counterclockwise ¼ turn to unlock the bulb from the housing.
4. Pull the bulb straight out from the housing.
CAUTION!
Do not contaminate the bulb glass by touching it with
your fingers or by allowing it to contact other oily
surfaces. Shortened bulb life will result.
Center High-Mounted Stoplamp (CHMSL) With
Cargo Lamp
1. Remove the two screws holding the housing/lens to the body as shown.
CHMSL Mounting Screw Locations
326 IN CASE OF EMERGENCY
Page 329 of 527
2. Separate the connector holding the housing and wiringharness to the body.
3. Turn the desired bulb socket ¼ turn and remove the socket and bulb from housing.
4. Pull the desired bulb straight from the socket.
CAUTION!
Do not contaminate the bulb glass by touching it with
your fingers or by allowing it to contact other oily
surfaces. Shortened bulb life will result. • Outside Bulbs: Cargo Lamps
• Inside Bulb: Center High-Mounted Stop Lamp
5. Reverse the procedure for installation of bulbs and housing.
CHMSL Connector Location
CHMSL Bulb And Socket
7
IN CASE OF EMERGENCY 327
Page 330 of 527
Cab Top Clearance Lamps — If Equipped
1. Remove the two screws from the top of the lamp.2. Rotate the bulb socket ¼ turn and pull it from the lamp
assembly.
Removing Rear Screw From Clearance LampRemoving Bulb Socket From Clearance Lamp
328 IN CASE OF EMERGENCY