2018 PEUGEOT EXPERT steering
[x] Cancel search: steeringPage 198 of 416
196
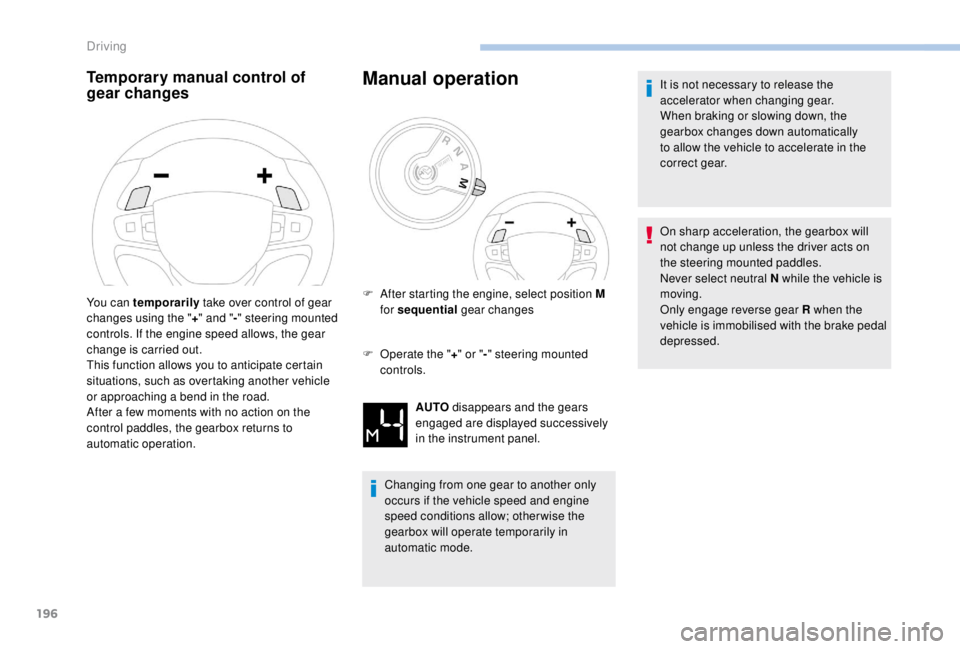
Manual operation
F Operate the "+" or " -" steering mounted
controls.
Changing from one gear to another only
occurs if the vehicle speed and engine
speed conditions allow; other wise the
gearbox will operate temporarily in
automatic mode. It is not necessary to release the
accelerator when changing gear.
When braking or slowing down, the
gearbox changes down automatically
to allow the vehicle to accelerate in the
correct gear.
On sharp acceleration, the gearbox will
not change up unless the driver acts on
the steering mounted paddles.
Never select neutral N while the vehicle is
moving.
Only engage reverse gear R when the
vehicle is immobilised with the brake pedal
depressed.
Temporary manual control of
gear changes
You can temporarily
take over control of gear
changes using the " +" and " -" steering mounted
controls. If the engine speed allows, the gear
change is carried out.
This function allows you to anticipate certain
situations, such as overtaking another vehicle
or approaching a bend in the road.
After a few moments with no action on the
control paddles, the gearbox returns to
automatic operation. F
A fter starting the engine, select position M
for sequential gear changes
AUTO disappears and the gears
engaged are displayed successively
in the instrument panel.
Driving
Page 200 of 416
198
Stop & Start
The Stop & Start system puts the engine
temporarily into standby – STOP mode – during
stops in traffic (red lights, traffic jams, etc.). The
engine restarts automatically – START mode –
as soon as you want to move off.
The restart takes place instantly, quickly and
silently.
Per fect for urban use, the Stop & Start system
reduces fuel consumption and exhaust
emissions as well as the noise level when
stationary.
Going into engine
STOP mode
For your convenience during parking
manoeuvres, STOP mode is not available
for a few seconds after coming out of
reverse gear.
The Stop & Start does not affect the
functionality of the vehicle, such as for
example, braking, power steering, etc.
A slight delay between the vehicle
stopping and the engine cutting out may
be noticed.Never refuel with the engine in STOP
mode; you must switch off the ignition.
With a manual gearbox , when vehicle speed
is below 12 mph (20 km/h) or the vehicle is
stationary (depending on engine), the Stop &
Start warning lamp comes on in the instrument
panel and the engine goes into standby
automatically when you place the gear lever in
neutral and you release the clutch pedal.
With an automatic gearbox , vehicle
stationary, the Stop & Start warning lamp
on the instrument panel comes on and the
engine goes into standby automatically when
you press the brake pedal or place the gear
selector in position N .
With an electronic gearbox , vehicle speed
below 5 mph (8 km/h), the Stop & Start warning
lamp on the instrument panel comes on and the
engine goes into standby automatically when
you press the brake pedal or place the gear
selector in position N .
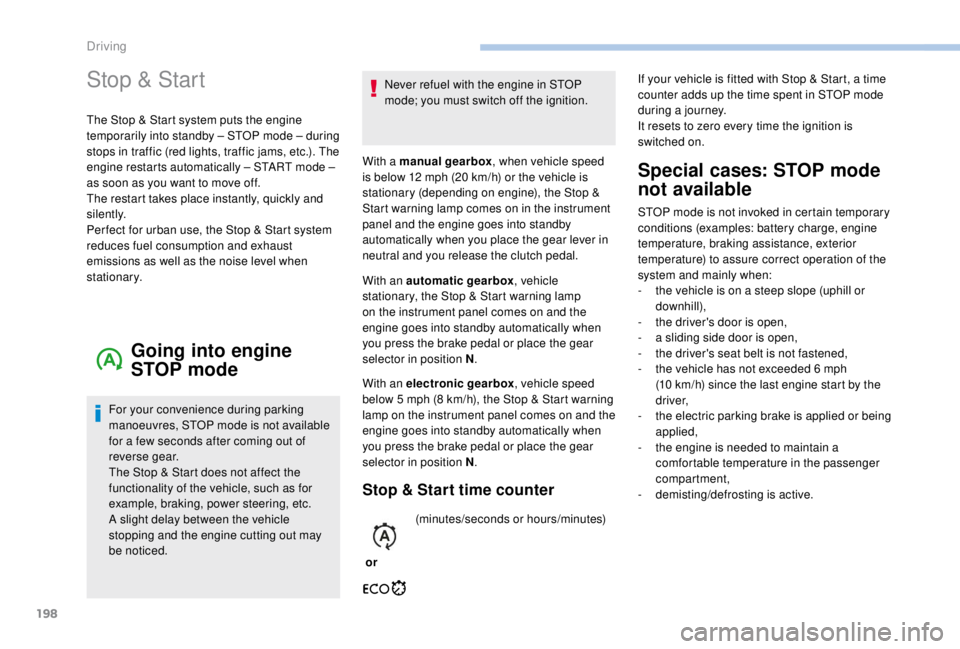
Stop & Start time counter
or(minutes/seconds or hours/minutes)
Special cases: STOP mode
not available
STOP mode is not invoked in certain temporary
conditions (examples: battery charge, engine
temperature, braking assistance, exterior
temperature) to assure correct operation of the
system and mainly when:
-
t
he vehicle is on a steep slope (uphill or
downhill),
-
t
he driver's door is open,
-
a s
liding side door is open,
-
t
he driver's seat belt is not fastened,
-
t
he vehicle has not exceeded 6 mph
(10
km/h) since the last engine start by the
driver,
-
t
he electric parking brake is applied or being
applied,
-
t
he engine is needed to maintain a
comfortable temperature in the passenger
compartment,
-
d
emisting/defrosting is active.
If your vehicle is fitted with Stop & Start, a time
counter adds up the time spent in STOP mode
during a journey.
It resets to zero every time the ignition is
switched on.
Driving
Page 207 of 416
205
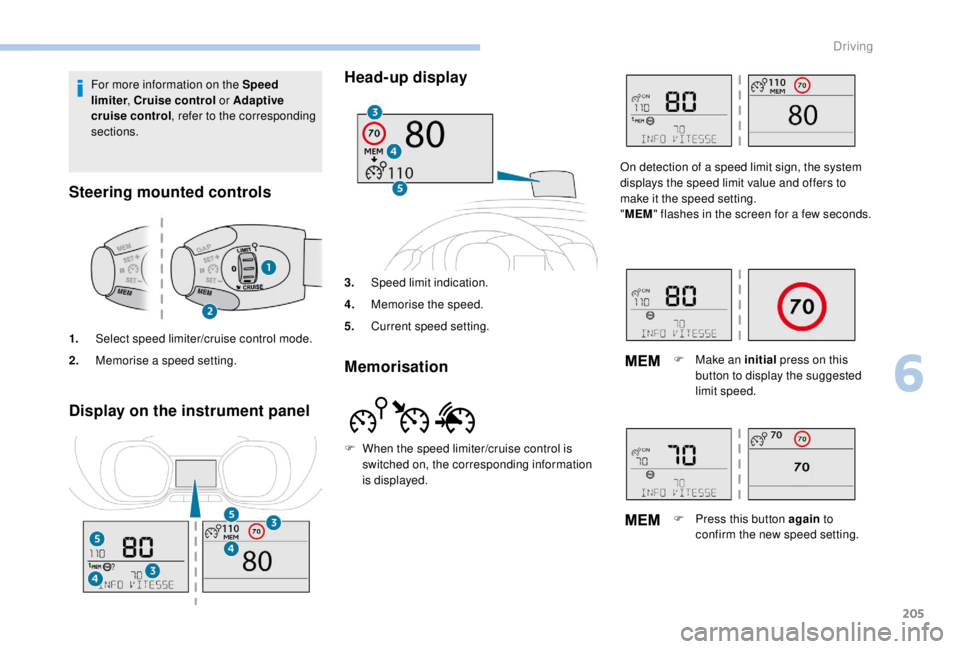
Display on the instrument panelHead-up display
3.
Speed limit indication.
4. Memorise the speed.
5. Current speed setting.
Memorisation
For more information on the Speed
limiter , Cruise control or Adaptive
cruise control , refer to the corresponding
sections.
Steering mounted controls
1. Select speed limiter/cruise control mode.
2. Memorise a speed setting.
F
W
hen the speed limiter/cruise control is
switched on, the corresponding information
is displayed. On detection of a speed limit sign, the system
displays the speed limit value and offers to
make it the speed setting.
"
MEM " flashes in the screen for a few seconds.
F
M
ake an initial press on this
button to display the suggested
limit speed.
F
P
ress this button again to
confirm the new speed setting.
6
Driving
Page 208 of 416
206
Speed limiter ("LIMIT")
System which prevents the
vehicle from exceeding the speed
programmed by the driver.
Once the programmed speed limit is reached,
additional pressure on the accelerator pedal
has no effect.
The speed setting value is stored when
the ignition is switched off.
For more information on this
button and the Dynamic
cruise control , refer to the
corresponding section.
For more information on
Memorising speeds , refer to the
corresponding section.
For more information on Speed limit
recognition and memorising them in
particular, refer to the corresponding
section.
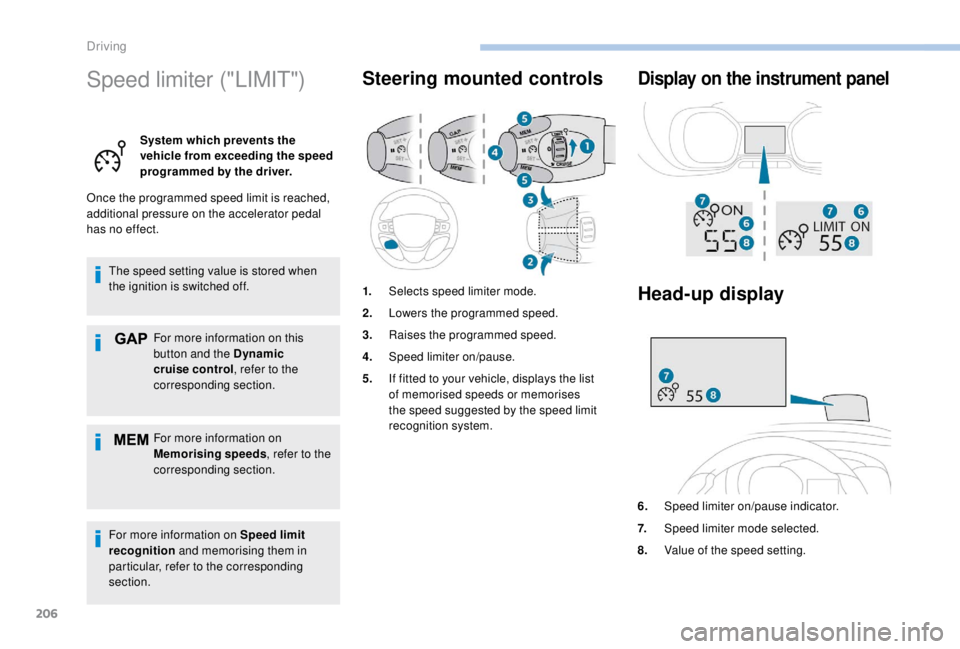
Steering mounted controls Display on the instrument panel
Head-up display
6. Speed limiter on/pause indicator.
7. Speed limiter mode selected.
8. Value of the speed setting.
1.
Selects speed limiter mode.
2. Lowers the programmed speed.
3. Raises the programmed speed.
4. Speed limiter on/pause.
5. If fitted to your vehicle, displays the list
of memorised speeds or memorises
the speed suggested by the speed limit
recognition system.
Driving
Page 211 of 416

209
Cruise control ("CRUISE")
System which automatically
maintains the speed of the
vehicle at the value programmed
by the driver, without any action
on the accelerator pedal.
Switching off the ignition cancels any
programmed speed setting.
For more information on
Memorising speeds , refer to the
corresponding section.
For more information on Speed
limit recognition , refer to the
corresponding section.
Steering mounted controls Display on the instrument
panel
Head-up display
1. Selects cruise control mode.
2. Programme a speed/Decrease the value.
3. Programme a speed/Increase the value.
4. Pause/resume cruise control.
5. If fitted to your vehicle, display the list
of memorised speeds or memorise the
speed suggested by the speed limit
recognition system.
6.Cruise control pause/resume indication.
7. Cruise control selection indication.
8. Value of the speed setting.
6
Driving
Page 214 of 416
212
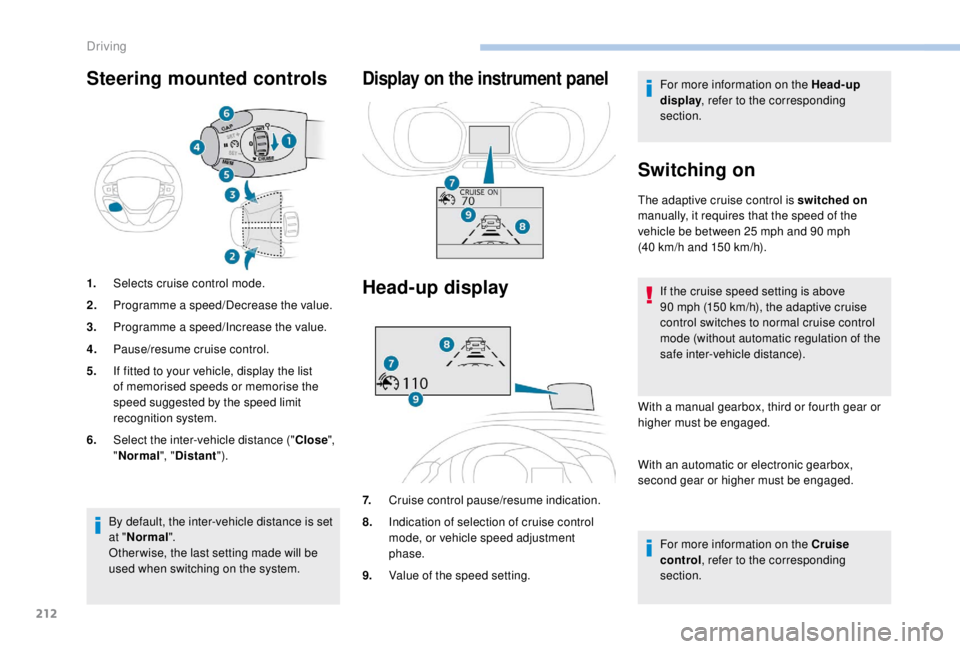
Steering mounted controls
1.Selects cruise control mode.
2. Programme a speed/Decrease the value.
3. Programme a speed/Increase the value.
4. Pause/resume cruise control.
5. If fitted to your vehicle, display the list
of memorised speeds or memorise the
speed suggested by the speed limit
recognition system.
6. Select the inter-vehicle distance (" Close",
" Normal ", "Distant ").
Display on the instrument panel
Head-up display
7.Cruise control pause/resume indication.
8. Indication of selection of cruise control
mode, or vehicle speed adjustment
phase.
9. Value of the speed setting. For more information on the Head-up
display
, refer to the corresponding
section.
Switching on
The adaptive cruise control is switched on
manually, it requires that the speed of the
vehicle be between 25
mph and 90 mph
(40
km/h and 150 km/h).
If the cruise speed setting is above
90
mph (150 km/h), the adaptive cruise
control switches to normal cruise control
mode (without automatic regulation of the
safe inter-vehicle distance).
With a manual gearbox, third or fourth gear or
higher must be engaged.
With an automatic or electronic gearbox,
second gear or higher must be engaged.
For more information on the Cruise
control , refer to the corresponding
section.
By default, the inter-vehicle distance is set
at "
Normal ".
Other wise, the last setting made will be
used when switching on the system.
Driving
Page 222 of 416
220
Where the speed of your vehicle is too
high approaching another vehicle, the first
level of alert may not be displayed: the
level 2 alert may be displayed directly.
Furthermore, the level 1
alert is never
displayed with the " Close" threshold.
Programming the alert
thresholds
The thresholds for triggering an alert determine
how you wish to be warned of the presence of a
vehicle moving or stationary ahead of you, or a
pedestrian in your traffic lane.
You can select one of three thresholds:
-
"Distant ", to be warned early (cautious
driving).
-
"Normal ".
-
"Close ", to be warned later.
With audio system
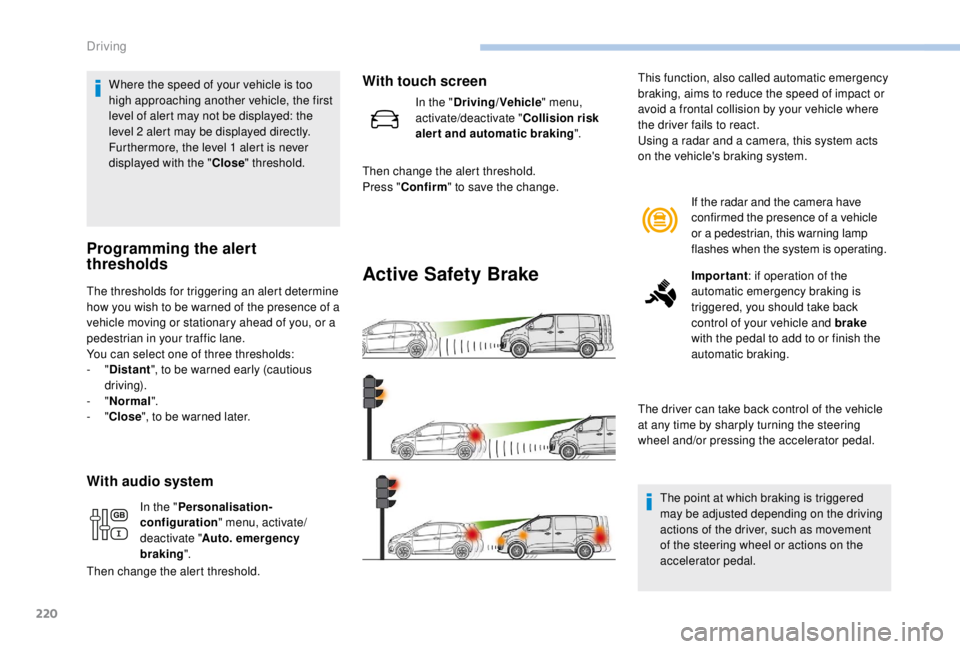
Active Safety Brake
If the radar and the camera have
confirmed the presence of a vehicle
or a pedestrian, this warning lamp
flashes when the system is operating.
Important : if operation of the
automatic emergency braking is
triggered, you should take back
control of your vehicle and brake
with the pedal to add to or finish the
automatic braking.
The driver can take back control of the vehicle
at any time by sharply turning the steering
wheel and/or pressing the accelerator pedal.
The point at which braking is triggered
may be adjusted depending on the driving
actions of the driver, such as movement
of the steering wheel or actions on the
accelerator pedal.
This function, also called automatic emergency
braking, aims to reduce the speed of impact or
avoid a frontal collision by your vehicle where
the driver fails to react.
Using a radar and a camera, this system acts
on the vehicle's braking system.
In the " Personalisation-
configuration " menu, activate/
deactivate " Auto. emergency
braking ".
Then change the alert threshold.
With touch screen
In the " Driving/Vehicle " menu,
activate/deactivate " Collision risk
alert and automatic braking ".
Then change the alert threshold.
Press " Confirm " to save the change.
Driving
Page 233 of 416
231
Principle of operation
The images provided by the cameras may
be distorted by the environment (external
conditions, driving mode, etc.).
The presence of areas in shadow, bright
sunlight, or poor lighting conditions may
make the image dark and reduce contrast.
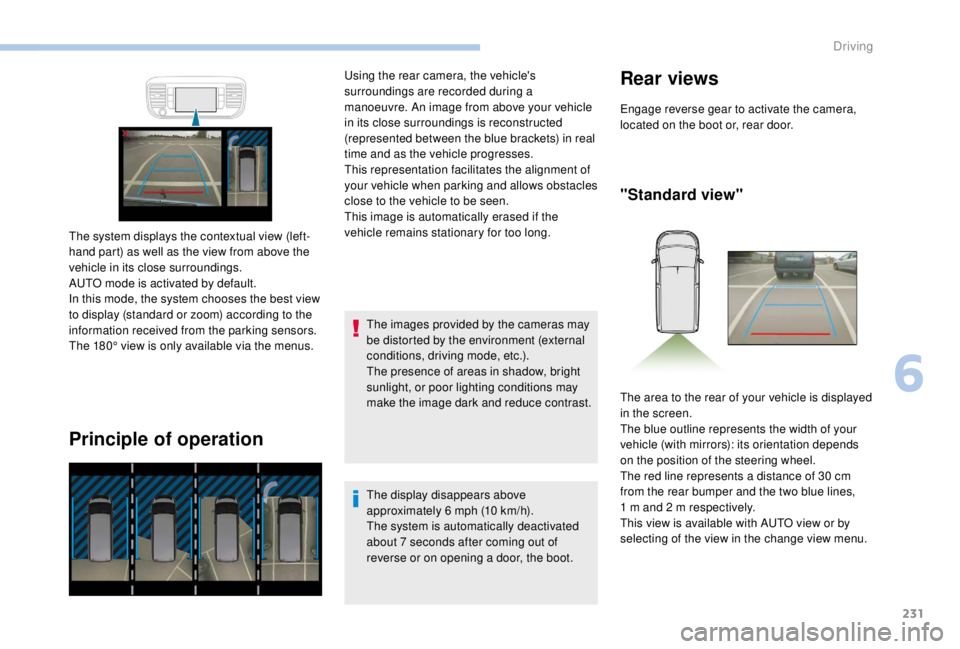
The system displays the contextual view (left-
hand part) as well as the view from above the
vehicle in its close surroundings.
AUTO mode is activated by default.
In this mode, the system chooses the best view
to display (standard or zoom) according to the
information received from the parking sensors.
The 180° view is only available via the menus. Using the rear camera, the vehicle's
surroundings are recorded during a
manoeuvre. An image from above your vehicle
in its close surroundings is reconstructed
(represented between the blue brackets) in real
time and as the vehicle progresses.
This representation facilitates the alignment of
your vehicle when parking and allows obstacles
close to the vehicle to be seen.
This image is automatically erased if the
vehicle remains stationary for too long.
The display disappears above
approximately 6 mph (10 km/h).
The system is automatically deactivated
about 7
seconds after coming out of
reverse or on opening a door, the boot.
Rear views
Engage reverse gear to activate the camera,
located on the boot or, rear door.
"Standard view"
The area to the rear of your vehicle is displayed
in the screen.
The blue outline represents the width of your
vehicle (with mirrors): its orientation depends
on the position of the steering wheel.
The red line represents a distance of 30
cm
from the rear bumper and the two blue lines,
1
m and 2 m respectively.
This view is available with AUTO view or by
selecting of the view in the change view menu.
6
Driving