2018 PEUGEOT EXPERT window
[x] Cancel search: windowPage 84 of 416
82
Deactivation
F Press this unlocking button on the remote control.
Or
F
U
nlock the vehicle using the
K
eyless Entry
and Starting system.
The monitoring system is deactivated: the
indicator lamp in the button goes off and the
direction indicators flash for about 2
seconds.
If the vehicle locks itself automatically
(this occurs after 30
seconds if none of
the doors or the tailgate are opened),
the monitoring system is reactivated
automatically.
Protection – exterior
perimeter monitoring alone
Deactivate the interior volumetric monitoring
to avoid unwanted triggering of the alarm in
certain cases such as:
-
p
assengers on board the vehicle,
-
l
eaving a window partially open,
-
w
ashing your vehicle,
-
c
hanging a wheel,
-
h
aving your vehicle towed,
-
t
ransport on a ship or ferry.
Volumetric monitoring
Deactivation F
S
witch off the ignition and within
ten seconds, press the button
until the indicator lamp is lit
continuously.
F
G
et out of the vehicle.F
I
mmediately lock the vehicle
using the remote control or the
K
eyless Entry and Starting
system.
The exterior perimeter monitoring alone is
activated: the indicator lamp flashes once per
second.
To take effect, this deactivation must be carried
out each time the ignition is switched off.
Reactivation
F
D
eactivate the exterior perimeter
monitoring by unlocking the
vehicle using the remote control
or the
K
eyless Entry and Starting
system.
The indicator lamp in the button goes off. F
R
eactivate the full alarm system
by locking the vehicle using the
remote control or the K eyless
Entry and Starting system.
The indicator lamp in the button flashes once
per second again.
Triggering of the alarm
This results in sounding the siren and flashing
the direction indicators for thirty seconds.
The monitoring functions remain active until
the alarm has been triggered eleven times in
succession.
When the vehicle is unlocked using
the remote control or the
K
eyless
Entry and Starting system, rapid
flashing of the indicator lamp informs
you that the alarm was triggered
during your absence.
When the ignition is switched on, this
flashing stops immediately.
Access
Page 85 of 416

83
Remote control failure
To deactivate the monitoring functions:
F U nlock the vehicle using the key (integrated
with the remote control if equipped with
Keyless Entry and Starting) in the driver's
door lock.
F
O
pen the door; the alarm is triggered.
F
S
witch on the ignition; the alarm stops; the
indicator lamp in the button goes off.
Locking the vehicle without
activating the alarm
F Lock or deadlock the vehicle using the key (integrated with the remote control if
equipped with
K
eyless Entry and Starting)
in the driver's door lock.
Malfunction
When the ignition is switched on,
fixed illumination of the button’s
indicator lamp indicates a fault in the
system.
Have it checked by a PEUGEOT
dealer or a qualified workshop.
Automatic activation
This function is either not available, an option
or is standard.
2
minutes after the last opening element (door
or tailgate) is closed, the system is activated
automatically.
F
T
o avoid triggering the alarm on entering
the vehicle, first press the unlocking button
on the remote control or unlock the vehicle
using the Keyless Entry and Starting
system.
Electric windows
1 Left electric window control.
2 R ight electric window control.
Manual mode
Press or pull the control gently, without
exceeding the resistance point. The window
stops as soon as the control is released.
Automatic mode
Press or pull the control fully, beyond the
resistance point. The window opens or closes
completely when the switch is released.
Pressing the switch again stops the movement
of the window.
The electrical functions of the electric windows
are deactivated:
-
a
pproximately 45 seconds after the ignition
is switched off,
-
a
fter one of the front doors is opened, if the
ignition is off.
2
Access
Page 86 of 416
84
Safety anti-pinch
If your vehicle is fitted with the safety anti-pinch
function, when the window rises and meets an
obstacle, it stops and partially lowers.
In the event of unwanted opening of the window
on closing, press the control until the window
opens completely. Within 4 seconds, pull the
control until the window closes.
The safety anti-pinch does not operate while
doing this.
Reinitialisation
Following reconnection of the battery, the anti-
pinch safety function must be reinitialised.
F
L
ower the window fully, then raise it, it will
rise in steps of a few centimetres each time
the control is pressed.
F
R
epeat the operation until the window is
fully closed.
F
C
ontinue to pull the switch upwards for at
least one second after reaching the window
closed position. The safety anti-pinch does not operate
while doing this.
Always remove the key when leaving the
vehicle, even for a short time.
In the event of contact during operation
of the windows, you must reverse the
movement of the window. To do this, press
the switch concerned.
When operating the passenger electric
window switches, the driver must ensure
that no-one is preventing correct closing
of the windows.
The driver must ensure that the
passengers use the electric windows
c o r r e c t l y.
Be aware of children when operating the
windows.
Access
Page 88 of 416

86
Heated mirrors
If your vehicle is so equipped:or
F
P
ress the heated mirror button.
As a safety measure, the mirrors should
be adjusted to reduce the blind spots.
The objects obser ved are, in reality, closer
than they appear.
Take this into account in order to
correctly judge the distance of vehicles
approaching from behind.
F
P
ress the heated rear window
button.
Electric unfolding
Door mirrors are unfolded electrically with
the remote control or key when the vehicle is
unlocked. Unless folding was selected with
control A , pull the control backwards in the
centre position.
Folding/unfolding during locking/unlocking
can be disabled. Contact a PEUGEOT
dealer or a qualified workshop.
If necessary, the mirrors can be folded in
manually. For more information on Rear
screen demist - defrost, refer to the
corresponding section.
Rear view mirror
Equipped with an anti-dazzle system, which
darkens the mirror glass and reduces the
nuisance to the driver caused by the sun,
headlamps from other vehicles, etc.
Manual model
Adjustment
F
A djust the mirror so that the glass is
directed correctly in the "day" position.
Day/night position
F
P
ull the lever to change to the "night"
anti-dazzle position.
F
P
ush the lever to change to the normal
"day" position.
Ease of use and comfort
Page 108 of 416
106
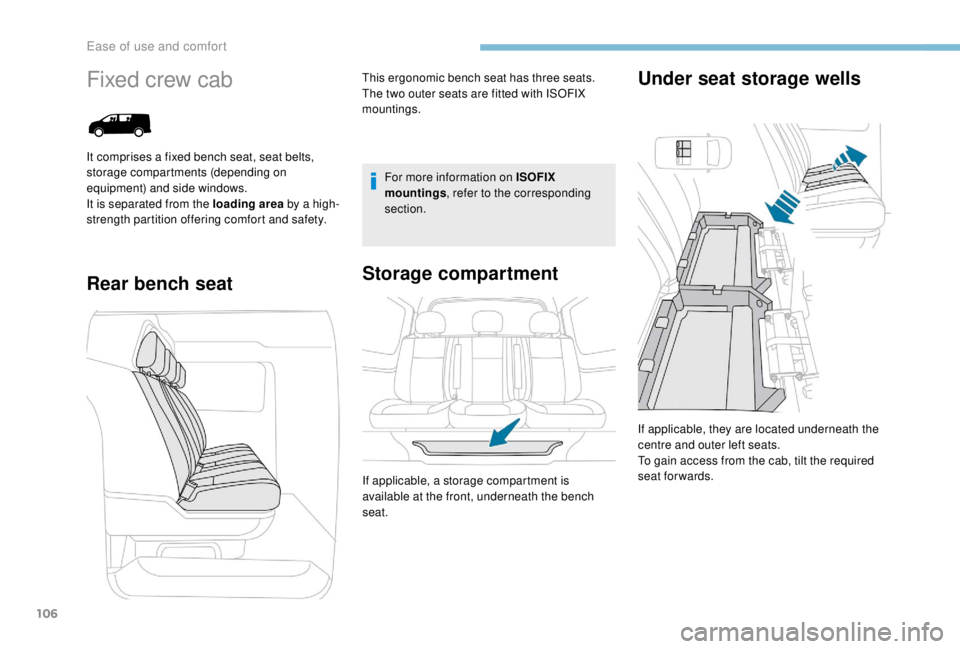
Fixed crew cab
Rear bench seatStorage compartment Under seat storage wells
For more information on ISOFIX
mountings
, refer to the corresponding
section.
If applicable, they are located underneath the
centre and outer left seats.
To gain access from the cab, tilt the required
seat forwards.
This ergonomic bench seat has three seats.
The two outer seats are fitted with ISOFIX
mountings.
If applicable, a storage compartment is
available at the front, underneath the bench
seat.
It comprises a fixed bench seat, seat belts,
storage compartments (depending on
equipment) and side windows.
It is separated from the loading area
by a high-
strength partition offering comfort and safety.
Ease of use and comfort
Page 109 of 416
107
Do not attach anything to the cabin fixing
structure.
Do not exceed the number of passengers
indicated on the registration certificate.
In the rear, the loading area is intended
for carrying goods only.
You are advised to place the heavy goods
or objects as far for wards as possible in
the loading area (towards the cab) and
secure them by means of straps using the
stowing rings on the floor.
The rear seat belt fittings are not designed
to secure the load.
The wells can be disassembled* and removed*
from the back to stow bulky objects underneath
the bench seat.
*
D
epending on the country of sale.
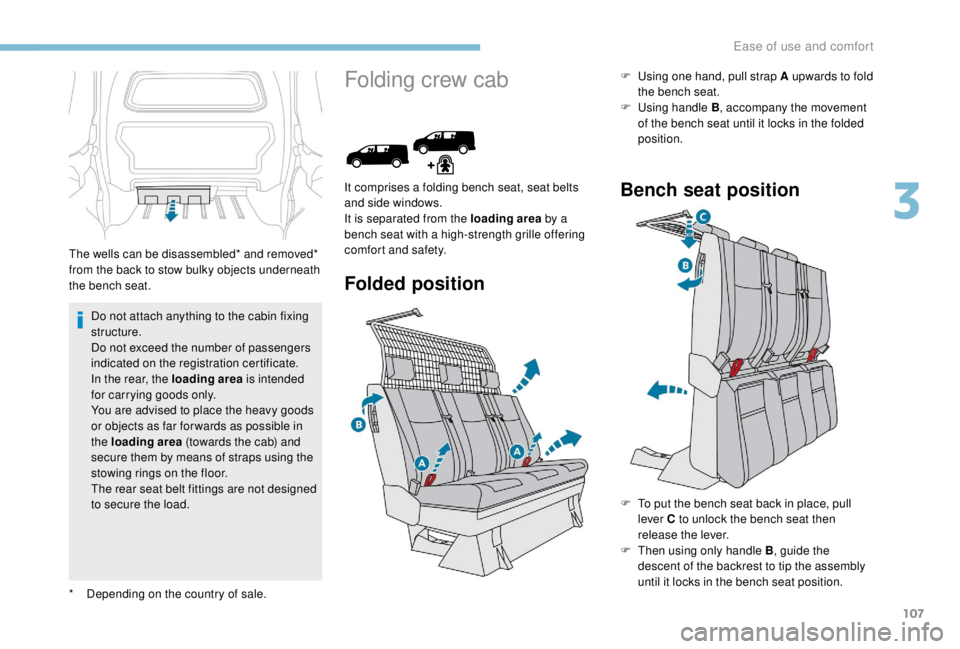
Folding crew cab
Folded position
It comprises a folding bench seat, seat belts
and side windows.
It is separated from the loading area by a
bench seat with a high-strength grille offering
comfort and safety. F
Us
ing one hand, pull strap A upwards to fold
the bench seat.
F
Us
ing handle B
, accompany the movement
of the bench seat until it locks in the folded
position.Bench seat position
F To put the bench seat back in place, pull lever C to unlock the bench seat then
release the lever.
F
T
hen using only handle B , guide the
descent of the backrest to tip the assembly
until it locks in the bench seat position.
3
Ease of use and comfort
Page 116 of 416
114
Fitting the net
Unclip the upper fixing covers and secure the
lower fixings (as previously described).
F
F
old (table position) or remove the seats
and bench seats in rows 2
and 3 (depending
on equipment).
F
C
lose the rear heating and air conditioning
vents (depending on equipment).
F
U
nroll the high load retaining net.
F
P
osition the upper net fixings in the
corresponding anchorages in the roof (first
one side, then the other).
F
F
ully extend the straps.
F
O
n each side, attach the bottom fixings of
the net to the lower anchorages (behind
row 1) or in the stowing rings (behind row 2).
F
T
ension the straps to extend the net.
F
C
heck that the net is attached securely and
properly extended.
Never use the ISOFIX ring for the strap
fixing point of a child seat with Top Tether.
Windows in row 2
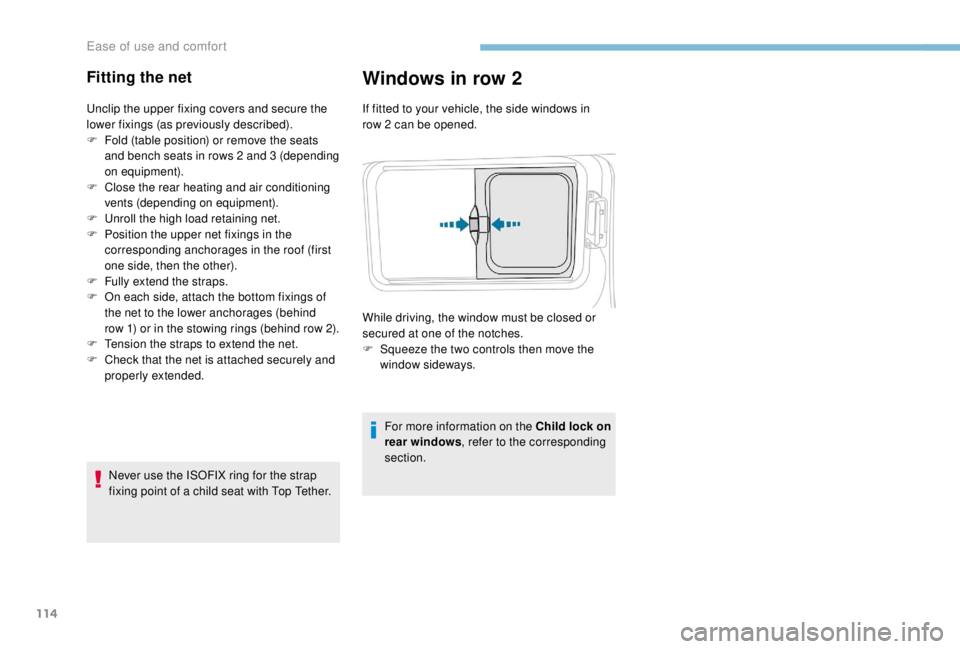
If fitted to your vehicle, the side windows in
row 2 can be opened.
For more information on the Child lock on
rear windows , refer to the corresponding
section.
While driving, the window must be closed or
secured at one of the notches.
F
S
queeze the two controls then move the
window sideways.
Ease of use and comfort
Page 117 of 416
115
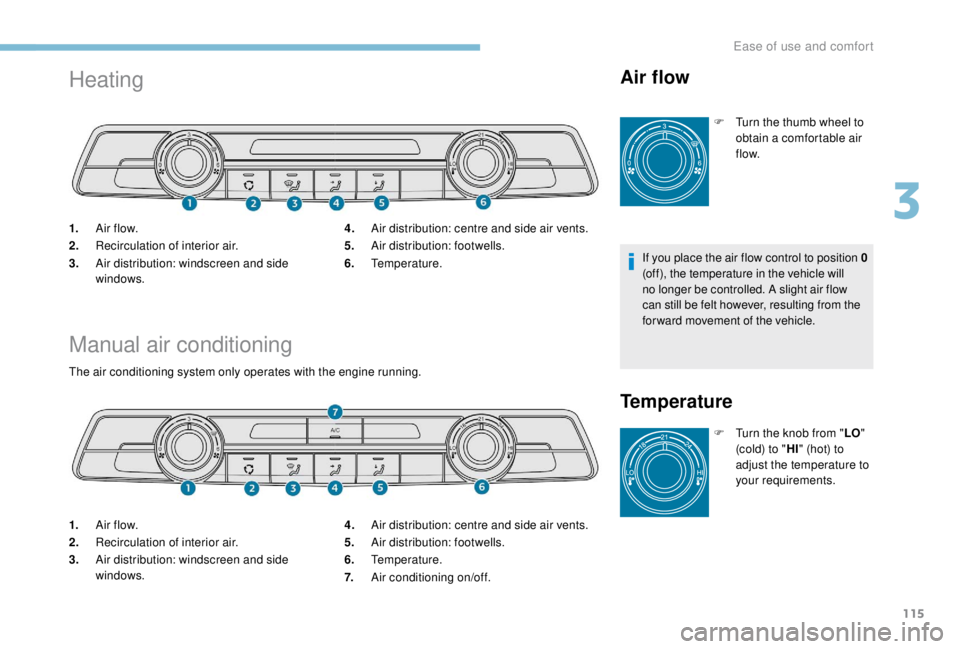
Heating
Manual air conditioning
The air conditioning system only operates with the engine running.
1.A ir f low.
2. Recirculation of interior air.
3. Air distribution: windscreen and side
windows. 4.
Air distribution: centre and side air vents.
5. Air distribution: footwells.
6. Temperature.
7. Air conditioning on/off.
Air flow
F Turn the thumb wheel to
obtain a comfortable air
f low.
If you place the air flow control to position 0
(off), the temperature in the vehicle will
no longer be controlled. A slight air flow
can still be felt however, resulting from the
for ward movement of the vehicle.
Temperature
F Turn the knob from " LO"
(cold) to " HI" (hot) to
adjust the temperature to
your requirements.
1.
A ir f low.
2. Recirculation of interior air.
3. Air distribution: windscreen and side
windows. 4.
Air distribution: centre and side air vents.
5. Air distribution: footwells.
6. Temperature.
3
Ease of use and comfort