2018 PEUGEOT EXPERT change time
[x] Cancel search: change timePage 196 of 416
194
Electronic gearbox
Electronically controlled gearbox which offers
a choice between the comfort of fully automatic
operation and manual gear changing.
Two driving modes are available:
-
a
utomatic operation for automatic control
of the gears by the gearbox, without any
action on the part of the driver,
-
man
ual operation for sequential gear
changing by the driver using the steering
mounted paddles.
With automatic operation, you can temporarily
take over control of gear changing at any time.
Gear selector
To safely switch the gear selector, it is
recommended that you keep your foot on
the brake.
Steering mounted controls
The steering mounted paddles cannot be
used to select neutral or to select or come
out of reverse gear.
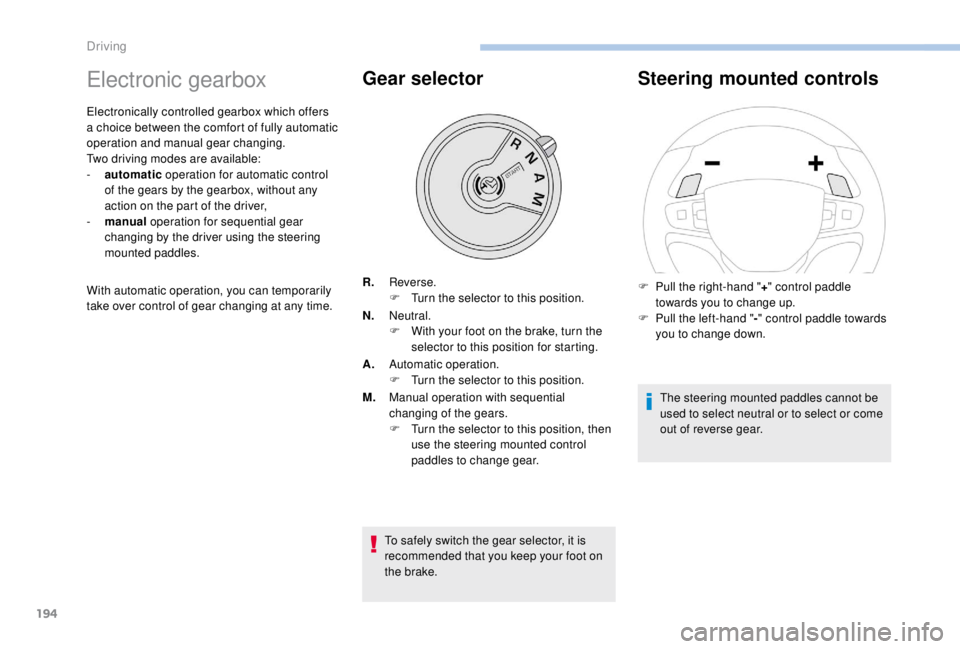
F
P
ull the right-hand "
+" control paddle
towards you to change up.
F
P
ull the left-hand "
-" control paddle towards
you to change down.
R.
Reverse.
F
T
urn the selector to this position.
N. Neutral.
F
W
ith your foot on the brake, turn the
selector to this position for starting.
A. Automatic operation.
F
T
urn the selector to this position.
M. Manual operation with sequential
changing of the gears.
F
T
urn the selector to this position, then
use the steering mounted control
paddles to change gear.
Driving
Page 202 of 416
200
The system reactivates automatically
every time the engine is started by the
driver.
Opening the bonnet
Driving on flooded roadsOperating fault
Depending on your vehicle's equipment:In the event of a fault with the
system, this warning lamp flashes in
the instrument panel.
The indicator lamp in this button
flashes and a message appears,
accompanied by an audible signal.
Have it checked by a PEUGEOT dealer or a
qualified workshop.
If a fault occurs in STOP mode, the vehicle may
stall.
All of the instrument panel warning lamps come
on.
Depending on version, an alert message may
also be displayed, asking you to place the gear
lever in position N and put your foot on the
brake pedal.
With the vehicle stationary, you must switch off
the ignition and then start the engine again.
Head-up display
System which projects various information onto
a blade in the driver's field of vision so that they
do not have to take their eyes off the road.
Displays during operation
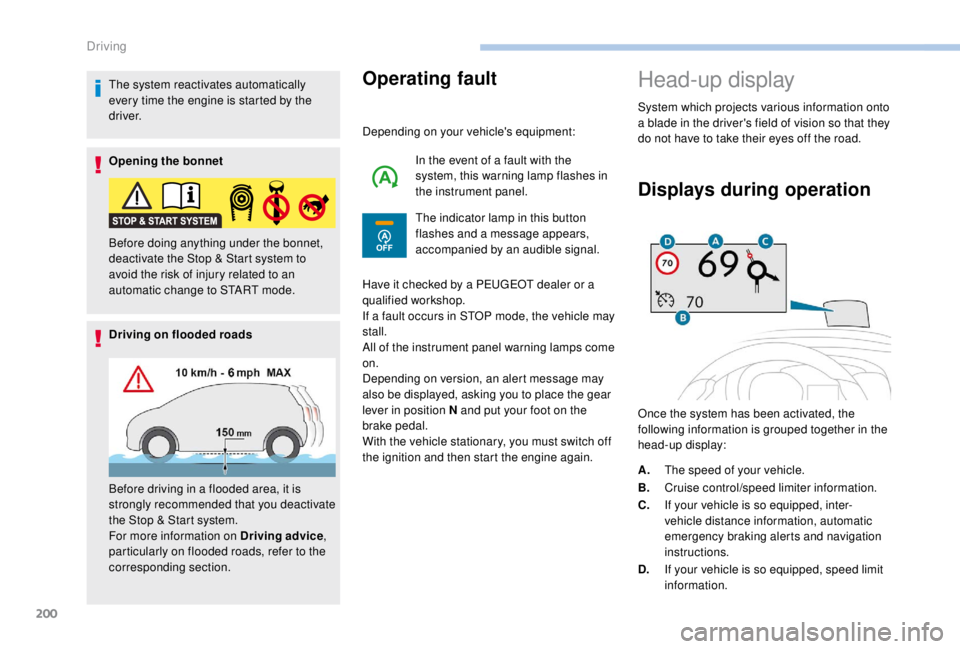
Once the system has been activated, the
following information is grouped together in the
head-up display:
Before doing anything under the bonnet,
deactivate the Stop & Start system to
avoid the risk of injury related to an
automatic change to START mode.
Before driving in a flooded area, it is
strongly recommended that you deactivate
the Stop & Start system.
For more information on Driving advice
,
particularly on flooded roads, refer to the
corresponding section. A.
The speed of your vehicle.
B. Cruise control/speed limiter information.
C. If your vehicle is so equipped, inter-
vehicle distance information, automatic
emergency braking alerts and navigation
instructions.
D. If your vehicle is so equipped, speed limit
information.
Driving
Page 218 of 416
216
SymbolAssociated message Comment
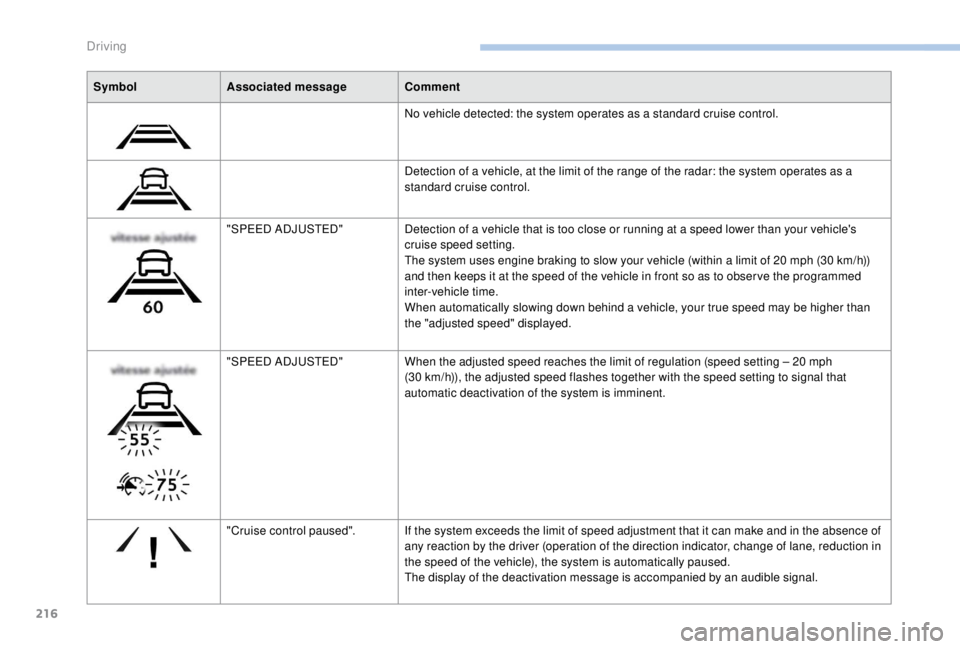
No vehicle detected: the system operates as a standard cruise control.
Detection of a vehicle, at the limit of the range of the radar: the system operates as a
standard cruise control.
"SPEED ADJUSTED" Detection of a vehicle that is too close or running at a speed lower than your vehicle's
cruise speed setting.
The system uses engine braking to slow your vehicle (within a limit of 20
mph (30 km/h))
and then keeps it at the speed of the vehicle in front so as to obser ve the programmed
inter-vehicle time.
When automatically slowing down behind a vehicle, your true speed may be higher than
the "adjusted speed" displayed.
"SPEED ADJUSTED" When the adjusted speed reaches the limit of regulation (speed setting – 20
mph
(30
km/h)), the adjusted speed flashes together with the speed setting to signal that
automatic deactivation of the system is imminent.
"Cruise control paused". If the system exceeds the limit of speed adjustment that it can make and in the absence of
any reaction by the driver (operation of the direction indicator, change of lane, reduction in
the speed of the vehicle), the system is automatically paused.
The display of the deactivation message is accompanied by an audible signal.
Driving
Page 222 of 416
220
Where the speed of your vehicle is too
high approaching another vehicle, the first
level of alert may not be displayed: the
level 2 alert may be displayed directly.
Furthermore, the level 1
alert is never
displayed with the " Close" threshold.
Programming the alert
thresholds
The thresholds for triggering an alert determine
how you wish to be warned of the presence of a
vehicle moving or stationary ahead of you, or a
pedestrian in your traffic lane.
You can select one of three thresholds:
-
"Distant ", to be warned early (cautious
driving).
-
"Normal ".
-
"Close ", to be warned later.
With audio system
Active Safety Brake
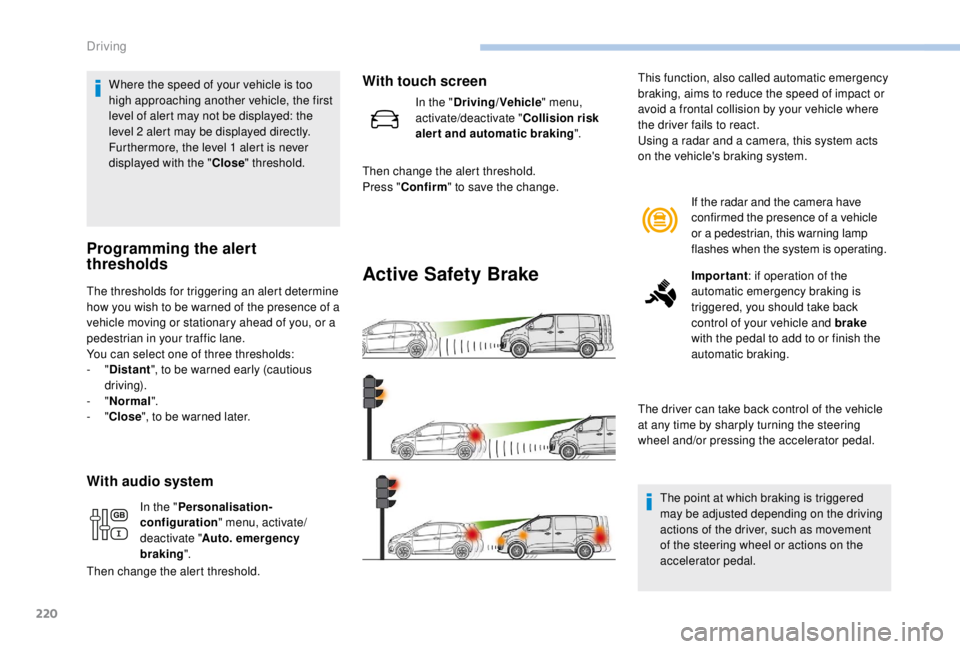
If the radar and the camera have
confirmed the presence of a vehicle
or a pedestrian, this warning lamp
flashes when the system is operating.
Important : if operation of the
automatic emergency braking is
triggered, you should take back
control of your vehicle and brake
with the pedal to add to or finish the
automatic braking.
The driver can take back control of the vehicle
at any time by sharply turning the steering
wheel and/or pressing the accelerator pedal.
The point at which braking is triggered
may be adjusted depending on the driving
actions of the driver, such as movement
of the steering wheel or actions on the
accelerator pedal.
This function, also called automatic emergency
braking, aims to reduce the speed of impact or
avoid a frontal collision by your vehicle where
the driver fails to react.
Using a radar and a camera, this system acts
on the vehicle's braking system.
In the " Personalisation-
configuration " menu, activate/
deactivate " Auto. emergency
braking ".
Then change the alert threshold.
With touch screen
In the " Driving/Vehicle " menu,
activate/deactivate " Collision risk
alert and automatic braking ".
Then change the alert threshold.
Press " Confirm " to save the change.
Driving
Page 233 of 416
231
Principle of operation
The images provided by the cameras may
be distorted by the environment (external
conditions, driving mode, etc.).
The presence of areas in shadow, bright
sunlight, or poor lighting conditions may
make the image dark and reduce contrast.
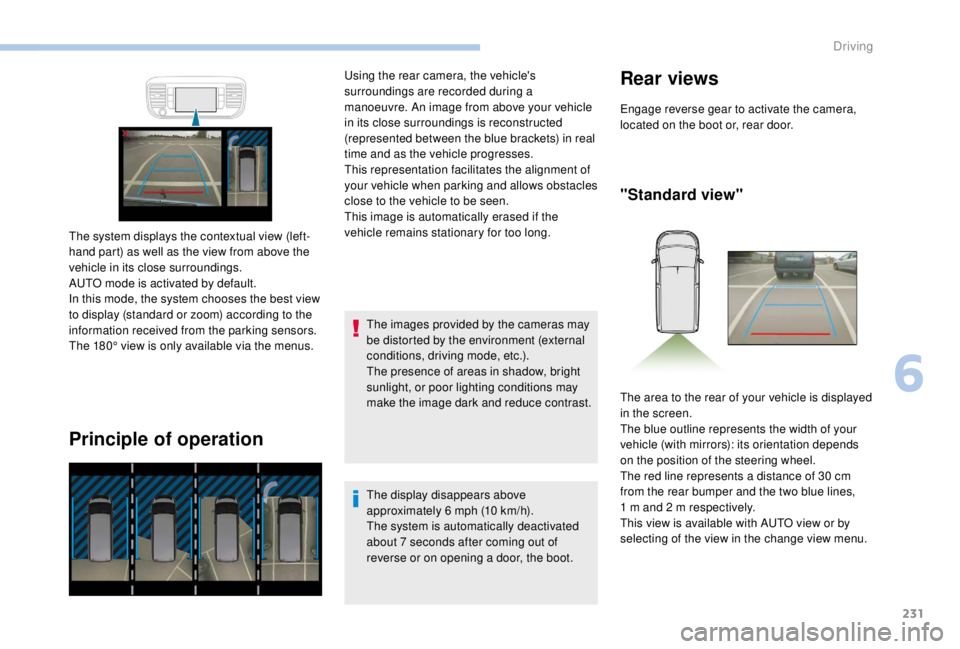
The system displays the contextual view (left-
hand part) as well as the view from above the
vehicle in its close surroundings.
AUTO mode is activated by default.
In this mode, the system chooses the best view
to display (standard or zoom) according to the
information received from the parking sensors.
The 180° view is only available via the menus. Using the rear camera, the vehicle's
surroundings are recorded during a
manoeuvre. An image from above your vehicle
in its close surroundings is reconstructed
(represented between the blue brackets) in real
time and as the vehicle progresses.
This representation facilitates the alignment of
your vehicle when parking and allows obstacles
close to the vehicle to be seen.
This image is automatically erased if the
vehicle remains stationary for too long.
The display disappears above
approximately 6 mph (10 km/h).
The system is automatically deactivated
about 7
seconds after coming out of
reverse or on opening a door, the boot.
Rear views
Engage reverse gear to activate the camera,
located on the boot or, rear door.
"Standard view"
The area to the rear of your vehicle is displayed
in the screen.
The blue outline represents the width of your
vehicle (with mirrors): its orientation depends
on the position of the steering wheel.
The red line represents a distance of 30
cm
from the rear bumper and the two blue lines,
1
m and 2 m respectively.
This view is available with AUTO view or by
selecting of the view in the change view menu.
6
Driving
Page 252 of 416
250
Diesel fuel additive level
(Diesel with particle filter)
A low additive level is indicated by
illumination of this warning lamp,
accompanied by an audible warning
and a message in the instrument
panel screen.
To p p i n g u p
The reser voir must be topped up without delay
by a PEUGEOT dealer or a qualified workshop.
Checks
Unless otherwise indicated, check these
components in accordance with the
manufacturer's service schedule and according
to your engine.
Other wise, have them checked by a PEUGEOT
dealer or a qualified workshop.
12 V battery
The battery does not require any
maintenance.
However, check regularly that the
terminals are correctly tightened
(versions without quick release terminals)
and that the connections are clean.
For more information on the precautions
to take before starting work on the 12 V
battery , refer to the corresponding
section.
Air filter
Refer to the manufacturer's
ser vice schedule for details of
the replacement inter val for this
component. Depending on the environment (e.g. dusty
atmosphere) and the use of the vehicle (e.g.
city driving), replace it twice as often if
necessary
.
Passenger compartment
filter
Refer to the manufacturer's
ser vice schedule for details of
the replacement inter val for this
component.
Depending on the environment (e.g. dusty
atmosphere) and the use of the vehicle (e.g.
city driving), replace it twice as often if
necessary .
Oil filter
Change the oil filter each time the
engine oil is changed.
Refer to the manufacturer’s
ser vice schedule for details of
the replacement inter val for this
component.
A clogged passenger compartment
filter may have an adverse effect on
the per formance of the air conditioning
system and generate undesirable odours.
Practical information
Page 275 of 416
273
Halogen bulbs must be replaced with
the headlamps having been off for a few
minutes (risk of severe burns). Do not
touch the bulb directly, use a lint-free
cloth.
Ty p e E
When each operation has been
completed, check the operation of the
lighting.
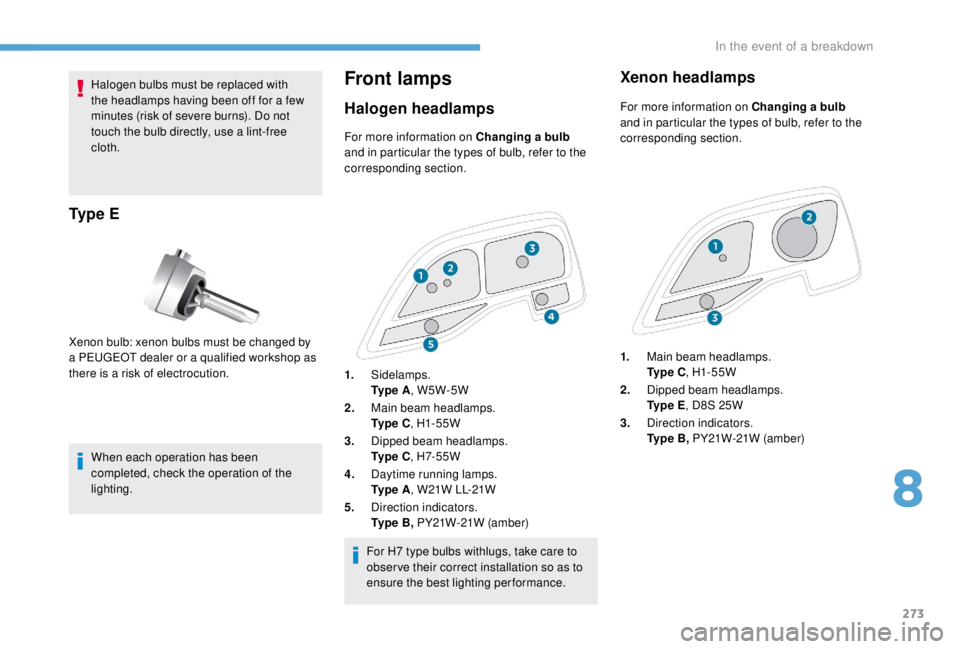
Front lamps
Halogen headlamps
Xenon bulb: xenon bulbs must be changed by
a PEUGEOT dealer or a qualified workshop as
there is a risk of electrocution.For more information on Changing a bulb
and in particular the types of bulb, refer to the
corresponding section.
For H7 type bulbs withlugs, take care to
obser ve their correct installation so as to
ensure the best lighting performance.
Xenon headlamps
For more information on Changing a bulb
and in particular the types of bulb, refer to the
corresponding section.
1. Main beam headlamps.
Ty p e C , H1- 55W
2. Dipped beam headlamps.
Ty p e E , D8S 25W
3. Direction indicators.
Ty p e B , PY21W-21W (amber)
1.
Sidelamps.
Ty p e A , W5W-5W
2. Main beam headlamps.
Ty p e C , H1- 55W
3. Dipped beam headlamps.
Ty p e C , H7- 5 5 W
4. Daytime running lamps.
Ty p e A , W21W LL-21W
5. Direction indicators.
Ty p e B , PY21W-21W (amber)
8
In the event of a breakdown
Page 276 of 416
274
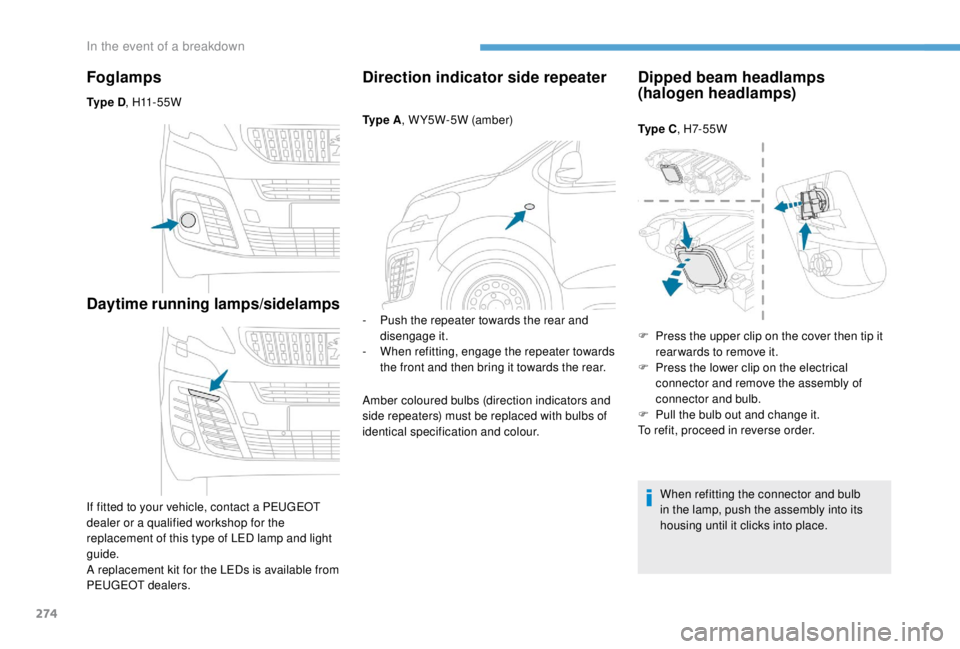
Foglamps
Ty p e D, H11 - 5 5 W
Daytime running lamps/sidelamps
If fitted to your vehicle, contact a PEUGEOT
dealer or a qualified workshop for the
replacement of this type of LED lamp and light
guide.
A replacement kit for the LEDs is available from
PEUGEOT dealers.
Direction indicator side repeater
Ty p e A , W Y5W-5W (amber)
-
P
ush the repeater towards the rear and
disengage it.
-
W
hen refitting, engage the repeater towards
the front and then bring it towards the rear.
Amber coloured bulbs (direction indicators and
side repeaters) must be replaced with bulbs of
identical specification and colour.
Dipped beam headlamps
(halogen headlamps)
Ty p e C , H7- 5 5 W
When refitting the connector and bulb
in the lamp, push the assembly into its
housing until it clicks into place.
F
P
ress the upper clip on the cover then tip it
rear wards to remove it.
F
P
ress the lower clip on the electrical
connector and remove the assembly of
connector and bulb.
F
P
ull the bulb out and change it.
To refit, proceed in reverse order.
In the event of a breakdown