2018 PEUGEOT EXPERT seat adjustment
[x] Cancel search: seat adjustmentPage 4 of 416

2
.
.
Instrument panel 10
Warning and indicator lamps 1 3
Indicators
2
7
Lighting dimmer
3
4
Trip computer
3
5
Date and time adjustment
3
7
Key
39
Key, remote control
3
9
Keyless Entry and Starting
4
6
Locking/unlocking from inside
6
1
Front doors
6
3
Manual sliding side door(s)
6
4
Electric sliding side door(s)
6
6
Hands-free sliding side door(s)
7
4
Side-hinged rear doors
7
7
Tailgate
80
Alarm
81
Electric windows
8
3Steering wheel adjustment
8
5
Mirrors 85
Front seats
87
A
dditional adjustments
9
1
2-seat front bench seat
9
2
Moduwork
9
4
Fixed one-piece bench seat
9
9
Fixed rear seat and bench seat 1 02
Precautions for the seats and
bench seats 1 05
Fixed crew cab
1
06
Folding crew cab
1
07
Interior fittings
1
08
Loading area fittings
1
12
Seating area fittings
1
13
Heating
115
Manual air conditioning
1
15
Dual-zone automatic air conditioning
1
17
Recirculation of the interior air
1
20
Front demist – defrost
1
20
Door mirrors demist – defrost
1
21
Rear screen demist – defrost
1
22
Rear Heating – Air conditioning
1
24
Programmable Heating/Ventilation
1
25
Courtesy lamp(s)
1
28Lighting control stalk
1
30
Daytime running lamps
1
32
Automatic illumination of headlamps
1
32
Cornering lighting
1
34
Automatic headlamp dipping
1
35
Headlamp beam height
adjustment
137
Wiper control stalk
1
37
General safety recommendations
1
42
Hazard warning lamps
1
43
Emergency or assistance call
1
43
Hor n
14
5
Electronic stability control (ESC)
1
45
Grip control
1
48
Seat belts
1
50
Airbags
154
Child seats
1
57
Deactivating the passenger front airbag
1
59
ISOFIX mountings and child seats
1
66
Manual child lock
1
74
Electric child lock
1
74
Child lock on rear windows
1
75
Over view
Instruments
Access Ease of use and comfort
Safety
Lighting and visibility
Eco-driving
Instruments and controls 4
L abels 7
Eco-driving
8
Contents
Page 89 of 416
87
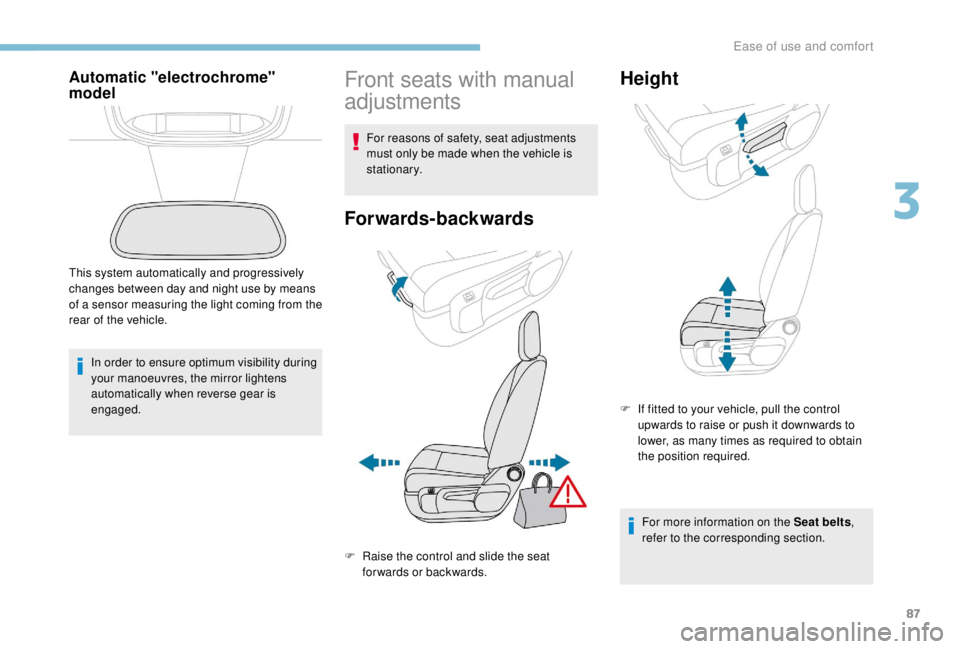
Automatic "electrochrome"
model
In order to ensure optimum visibility during
your manoeuvres, the mirror lightens
automatically when reverse gear is
engaged.
This system automatically and progressively
changes between day and night use by means
of a sensor measuring the light coming from the
rear of the vehicle.
Front seats with manual
adjustments
For reasons of safety, seat adjustments
must only be made when the vehicle is
stationary.
Forwards-backwards
F Raise the control and slide the seat
forwards or backwards.
Height
F If fitted to your vehicle, pull the control upwards to raise or push it downwards to
lower, as many times as required to obtain
the position required.
For more information on the Seat belts ,
refer to the corresponding section.
3
Ease of use and comfort
Page 91 of 416
89
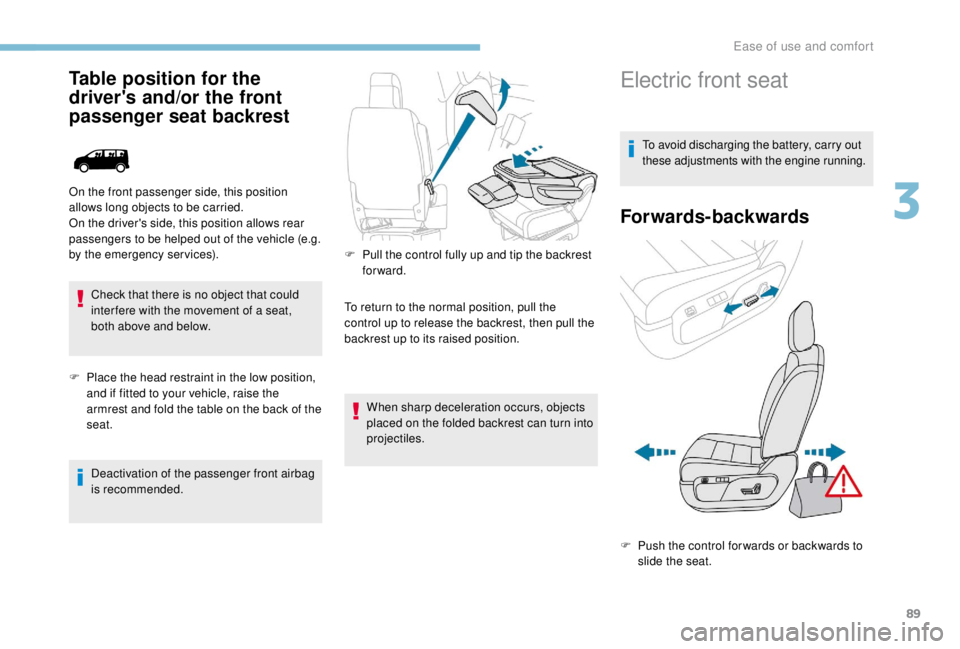
Table position for the
driver's and/or the front
passenger seat backrest
Check that there is no object that could
inter fere with the movement of a seat,
both above and below.
F
P
lace the head restraint in the low position,
and if fitted to your vehicle, raise the
armrest and fold the table on the back of the
seat.
Deactivation of the passenger front airbag
is recommended.
On the front passenger side, this position
allows long objects to be carried.
On the driver's side, this position allows rear
passengers to be helped out of the vehicle (e.g.
by the emergency services).
F
P
ull the control fully up and tip the backrest
forward.
To return to the normal position, pull the
control up to release the backrest, then pull the
backrest up to its raised position.
When sharp deceleration occurs, objects
placed on the folded backrest can turn into
projectiles.
Electric front seat
To avoid discharging the battery, carry out
these adjustments with the engine running.
Forwards-backwards
F Push the control for wards or backwards to slide the seat.
3
Ease of use and comfort
Page 93 of 416
91
Additional adjustments
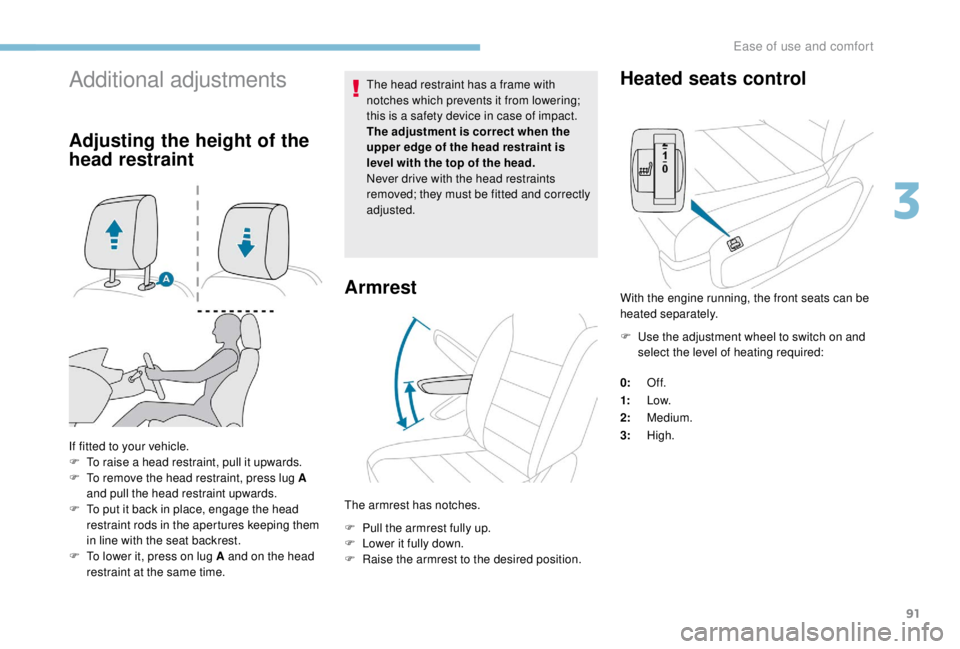
Adjusting the height of the
head restraint
If fitted to your vehicle.
F T o raise a head restraint, pull it upwards.
F
T
o remove the head restraint, press lug A
and pull the head restraint upwards.
F
T
o put it back in place, engage the head
restraint rods in the apertures keeping them
in line with the seat backrest.
F
T
o lower it, press on lug A and on the head
restraint at the same time. The head restraint has a frame with
notches which prevents it from lowering;
this is a safety device in case of impact.
The adjustment is correct when the
upper edge of the head restraint is
level with the top of the head.
Never drive with the head restraints
removed; they must be fitted and correctly
adjusted.
Armrest
The armrest has notches.
F
P
ull the armrest fully up.
F
L
ower it fully down.
F
R
aise the armrest to the desired position.
Heated seats control
With the engine running, the front seats can be
heated separately.
F
U
se the adjustment wheel to switch on and
select the level of heating required:
0: Of f.
1: Low.
2: Medium.
3: High.
3
Ease of use and comfort
Page 95 of 416
93
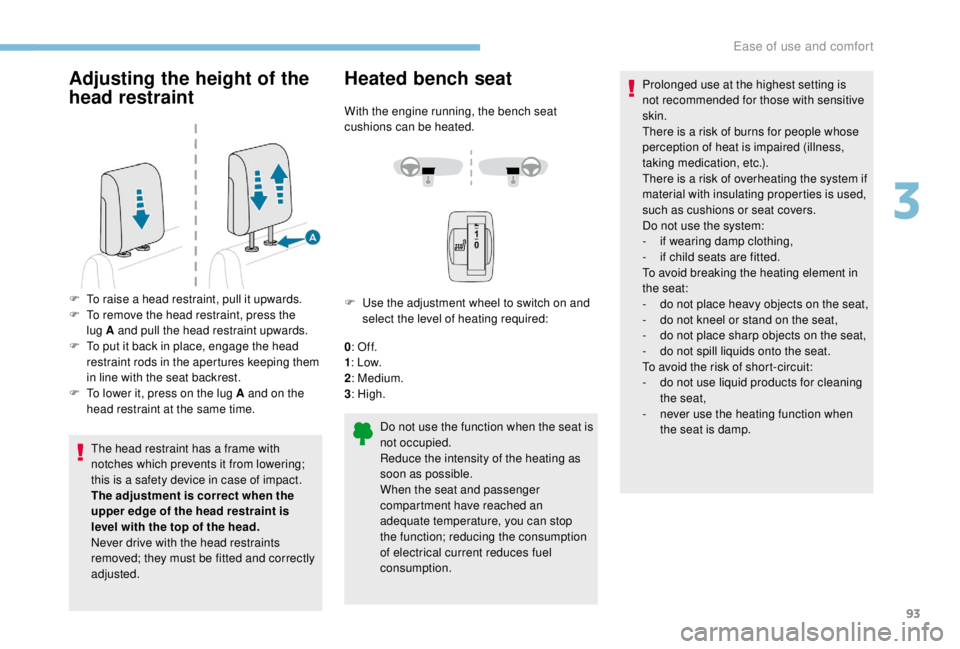
Adjusting the height of the
head restraint
The head restraint has a frame with
notches which prevents it from lowering;
this is a safety device in case of impact.
The adjustment is correct when the
upper edge of the head restraint is
level with the top of the head.
Never drive with the head restraints
removed; they must be fitted and correctly
adjusted.
Heated bench seat
With the engine running, the bench seat
cushions can be heated.
F
U
se the adjustment wheel to switch on and
select the level of heating required:
0 : Of f.
1 : Low.
2 : Medium.
3 : High.
F
T
o raise a head restraint, pull it upwards.
F
T
o remove the head restraint, press the
lug A and pull the head restraint upwards.
F
T
o put it back in place, engage the head
restraint rods in the apertures keeping them
in line with the seat backrest.
F
T
o lower it, press on the lug A and on the
head restraint at the same time.
Do not use the function when the seat is
not occupied.
Reduce the intensity of the heating as
soon as possible.
When the seat and passenger
compartment have reached an
adequate temperature, you can stop
the function; reducing the consumption
of electrical current reduces fuel
consumption.Prolonged use at the highest setting is
not recommended for those with sensitive
skin.
There is a risk of burns for people whose
perception of heat is impaired (illness,
taking medication, etc.).
There is a risk of overheating the system if
material with insulating properties is used,
such as cushions or seat covers.
Do not use the system:
-
i
f wearing damp clothing,
-
i
f child seats are fitted.
To avoid breaking the heating element in
the seat:
-
d
o not place heavy objects on the seat,
-
d
o not kneel or stand on the seat,
-
d
o not place sharp objects on the seat,
-
d
o not spill liquids onto the seat.
To avoid the risk of short-circuit:
-
d
o not use liquid products for cleaning
the seat,
-
n
ever use the heating function when
the seat is damp.
3
Ease of use and comfort
Page 101 of 416
99
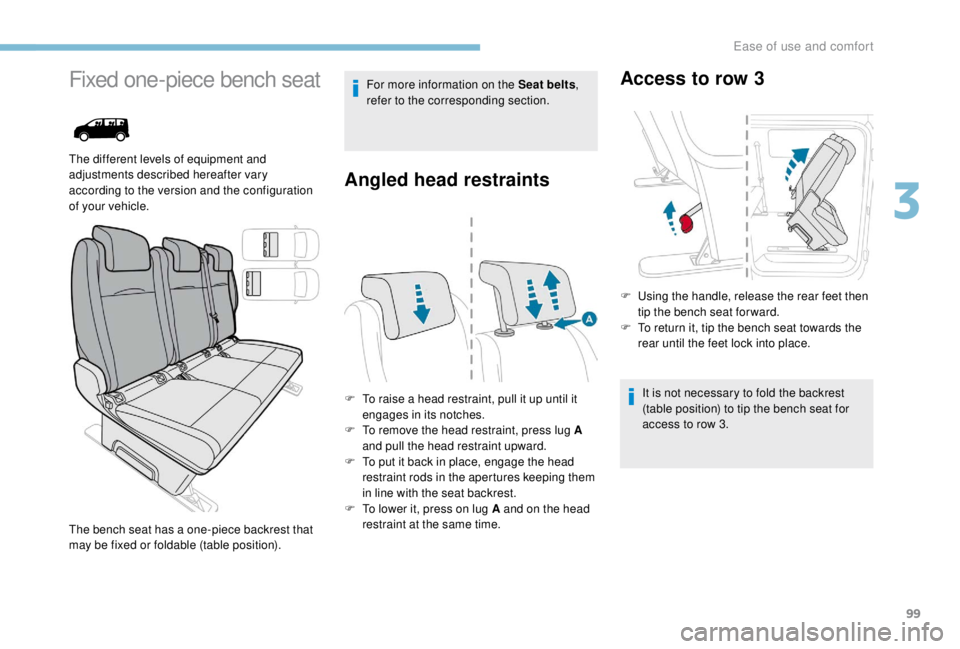
Fixed one-piece bench seat
The different levels of equipment and
adjustments described hereafter vary
according to the version and the configuration
of your vehicle.For more information on the Seat belts
,
refer to the corresponding section.
Angled head restraints
F To raise a head restraint, pull it up until it engages in its notches.
F
T
o remove the head restraint, press lug A
and pull the head restraint upward.
F
T
o put it back in place, engage the head
restraint rods in the apertures keeping them
in line with the seat backrest.
F
T
o lower it, press on lug A and on the head
restraint at the same time.
The bench seat has a one-piece backrest that
may be fixed or foldable (table position).
Access to row 3
F Using the handle, release the rear feet then
tip the bench seat for ward.
F
T
o return it, tip the bench seat towards the
rear until the feet lock into place.
It is not necessary to fold the backrest
(table position) to tip the bench seat for
access to row 3.
3
Ease of use and comfort
Page 104 of 416
102
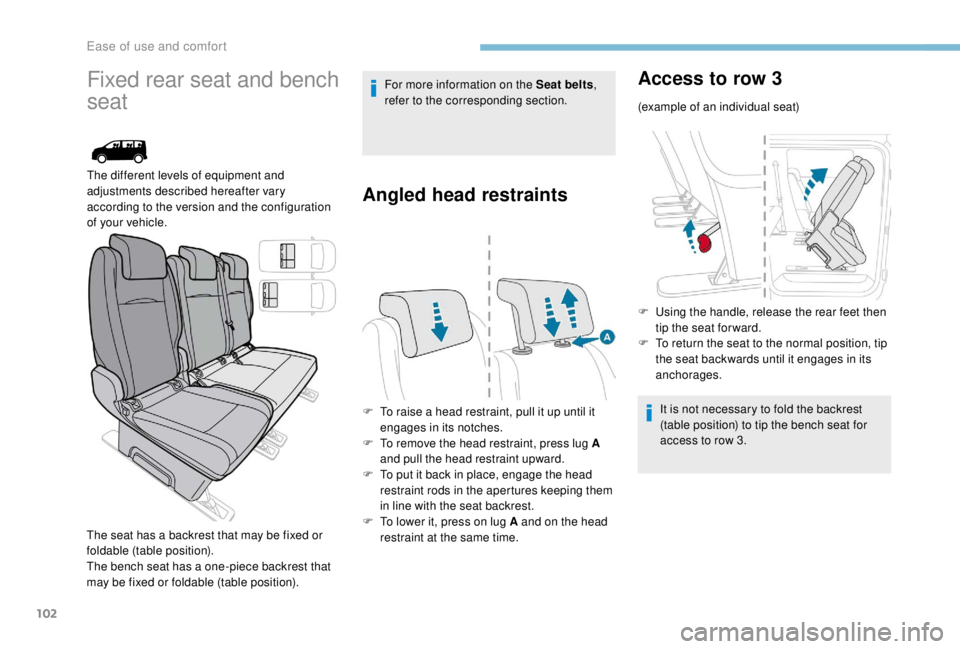
Fixed rear seat and bench
seat
The different levels of equipment and
adjustments described hereafter vary
according to the version and the configuration
of your vehicle.
The seat has a backrest that may be fixed or
foldable (table position).
The bench seat has a one-piece backrest that
may be fixed or foldable (table position). For more information on the Seat belts
,
refer to the corresponding section.
Angled head restraints
F To raise a head restraint, pull it up until it engages in its notches.
F
T
o remove the head restraint, press lug A
and pull the head restraint upward.
F
T
o put it back in place, engage the head
restraint rods in the apertures keeping them
in line with the seat backrest.
F
T
o lower it, press on lug A and on the head
restraint at the same time.
Access to row 3
(example of an individual seat)
F
U
sing the handle, release the rear feet then
tip the seat for ward.
F
T
o return the seat to the normal position, tip
the seat backwards until it engages in its
anchorages.
It is not necessary to fold the backrest
(table position) to tip the bench seat for
access to row 3.
Ease of use and comfort
Page 139 of 416
137
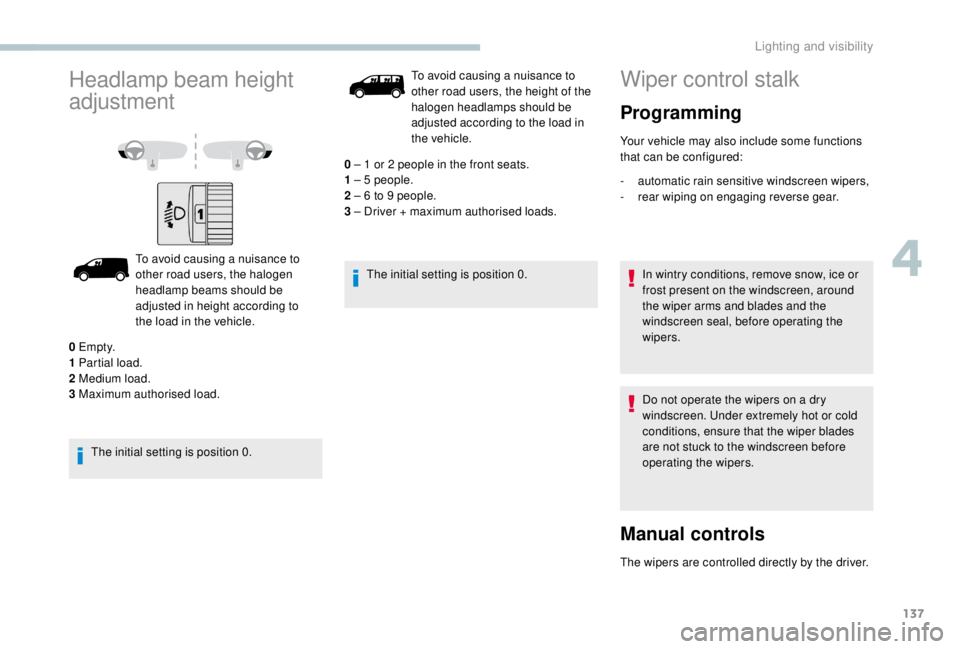
Headlamp beam height
adjustment
To avoid causing a nuisance to
other road users, the halogen
headlamp beams should be
adjusted in height according to
the load in the vehicle.
The initial setting is position 0. To avoid causing a nuisance to
other road users, the height of the
halogen headlamps should be
adjusted according to the load in
the vehicle.
0 – 1 or 2 people in the front seats.
1 – 5
people.
2 – 6 to 9 people.
3 – Driver + maximum authorised loads.
The initial setting is position 0.
0
Em pt y.
1
Partial load.
2
Medium load.
3
Maximum authorised load.
Wiper control stalk
Programming
Your vehicle may also include some functions
that can be configured:
-
a
utomatic rain sensitive windscreen wipers,
-
r
ear wiping on engaging reverse gear.
In wintry conditions, remove snow, ice or
frost present on the windscreen, around
the wiper arms and blades and the
windscreen seal, before operating the
wipers.
Do not operate the wipers on a dry
windscreen. Under extremely hot or cold
conditions, ensure that the wiper blades
are not stuck to the windscreen before
operating the wipers.
Manual controls
The wipers are controlled directly by the driver.
4
Lighting and visibility