2018 Peugeot Boxer seats
[x] Cancel search: seatsPage 4 of 232

2
.
.
Instrument panels 7
W arning and indicator lamps 8
I
ndic ators
18
Vehicle configuration
2
2
Setting the date and time
2
8
Trip computer
2
8
Tachograph
2
9
Instruments and controls
4
C
entre console
4
K
ey
30
Remote control
3
0
Anti-intrusion security
3
3
Front doors
3
3
Sliding side door
3
3
Rear doors
3
4
Alarm
35
Electric windows
3
6
Driver's seat
3
7
2-seat front bench seat
3
9
Rear seats
4
0
Rear bench seats
4
0
Steering wheel adjustment
4
1
Mirrors
42
H
eating/Manual air conditioning
4
3
Automatic air conditioning
4
4
Additional heating systems
4
6
Rear heating and/or air conditioning
4
6
Programmable additional heating
4
7
Recommendations for ventilation and air
conditioning
5
0
Front demist – defrost
5
1
Defrosting the rear screen and
door mirrors
5
1
Cab layout
5
2
Rear fittings
5
7
Exterior fittings
6
0Lighting controls
6
1
LED daytime running lamps
6
2
Automatic illumination of headlamps
6
2
Guide-me-home lighting
6
2
Adaptive lighting
6
3
Parking lamps
6
4
Headlamp beam height adjustment
6
5
Wiper control stalk
6
5
General safety recommendations
6
7
Hazard warning lamps
6
8
Horn
68
Electronic stability control (ESC)
6
8
Seat belts
7
2
Airbags
75
Child seats
7
7
Deactivating the passenger's front airbag
7
8
ISOFIX mountings and child seats
8
3
Child lock
8
6
Over view
Dashboard instruments Access
Ease of use and comfort Safety
Lighting and visibility
Eco-driving
Contents
Page 8 of 232

6
Limit the causes of excess
consumption
Spread loads throughout the vehicle; place
the heaviest items in the bottom of the boot,
as close as possible to the rear seats.
Limit the loads carried in the vehicle and
reduce wind resistance (roof bars, roof rack,
bicycle carrier, trailer, etc.). Preferably, use a
roof box.
Remove roof bars and roof racks after use.
At the end of winter, remove snow tyres and
refit your summer tyres.
Observe the recommendations
on maintenance
Check the tyre pressures regularly, when cold,
referring to the label in the door aperture,
driver's side.
Carry out this check in particular:
-
b
efore a long journey,
-
a
t each change of season,
-
a
fter a long period out of use.
Do not forget the spare wheel and the tyres on
any trailer or caravan. Have your vehicle ser viced regularly (engine
oil, oil filter, air filter, cabin filter, etc.) and
obser ve the schedule of operations in the
manufacturer's service schedule.
When filling the tank, do not continue after the
3
rd cut-off of the nozzle to avoid over flow.
At the wheel of your new vehicle, it is only
after the first 1,900
miles (3,000 kilometres)
that you will see the fuel consumption settle
down to a
consistent average.
With a
BlueHDi Diesel engine, if the SCR
system is faulty, your vehicle becomes
polluting. As soon as possible, visit
a
PEUGEOT dealer or a qualified workshop
to make your vehicle's level of nitrogen oxides
emissions compliant to the standard.
Eco-driving
Page 39 of 232

37
Driver's seat
Forwards-backwards
F Raise the control and slide the seat forwards or backwards.
Before moving the seat backwards,
ensure that there is no object or person in
the way, preventing full travel of the seat.
There is a
risk of trapping or pinching
passengers if present in the rear seats
or jamming the seat if large objects are
placed on the floor behind the seat.
Seat height
Seat backrest angle
F Turn the knob to adjust the backrest.
Lumbar support
Head restraints
F Lift the handle 1 to raise or lower the front of
the seat.
F
L
ift the handle 2 to raise or lower the rear of
the seat. F
T
urn the knob to obtain the desired level of
lumbar support.
As a
safety measure, seats should only be
adjusted when stationary.
F
P
ress the tab to adjust the height of the
head restraint.
3
Ease of use and comfort
Page 40 of 232

38
Adjustable armrestHeated seat
When the seat and passenger
compartment have reached an adequate
temperature, you can switch off the
function; reducing the consumption
of electrical current reduces fuel
consumption.
F
T
o remove the head restraint, press the tabs
and raise the head restraint.
F
Ra
ise or lower the armrest.
F
T
urn the wheel located under the end of the
armrest to lock it in the desired position. Use this control to switch the heating of the
seat on or off.
Do not use the function when the seat is
e m pt y.
Prolonged use is not recommended for
those with sensitive skin.
There is a
risk of burns for people whose
perception of heat is impaired (illness,
taking medication, etc.).
There is a risk of overheating the system if
material with insulating properties is used,
such as cushions or seat covers.
Do not use the system:
-
i
f wearing damp clothing,
-
i
f child seats are fitted.
To avoid breaking the heating element in
the seat:
- d o not place heavy objects on the seat,
-
d
o not kneel or stand on the seat,
-
d
o not place sharp objects on the seat,
-
d
o not spill liquids onto the seat.
To avoid the risk of short-circuit:
-
d
o not use liquid products for cleaning
the seat,
-
n
ever use the heating function when
the seat is damp.
Ease of use and comfort
Page 41 of 232

39
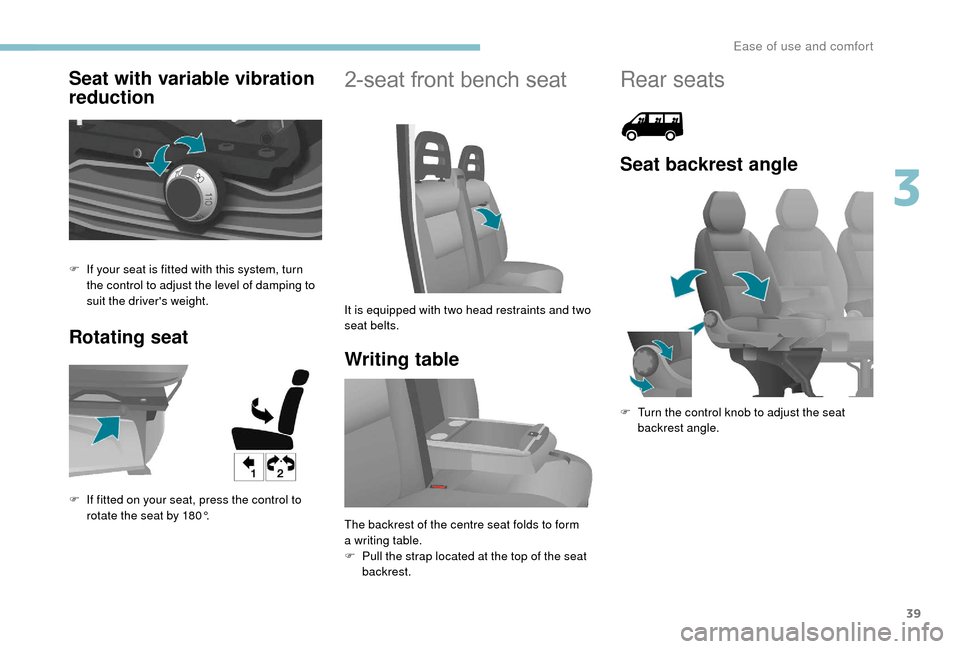
Seat with variable vibration
reduction
Rotating seat2-seat front bench seat
Writing table
F If your seat is fitted with this system, turn the control to adjust the level of damping to
suit the driver's weight.
F
I
f fitted on your seat, press the control to
rotate the seat by 180°. It is equipped with two head restraints and two
seat belts.
The backrest of the centre seat folds to form
a
writing table.
F
P
ull the strap located at the top of the seat
backrest.
Rear seats
Seat backrest angle
F Turn the control knob to adjust the seat backrest angle.
3
Ease of use and comfort
Page 42 of 232

40
Access to row 3Central seat backrest folded
position (rows 2
and 3)
The backrest of the central seat can be folded
down fully onto the seat cushion and used as
a
cup holder/table.
To understand the significance of the
precautions mentioned on the Labels ,
refer to the corresponding section.
F
T
o gain access to row 3, operate the control
on the outer seat of row 2
and tilt the
backrest forwards.
F
T
o return the backrest to its initial position,
bring it to the vertical position without
touching the control. F
L
ower the head restraint then raise the
control and fold the seat backrest for wards.
F
T
o return the seat backrest to its initial
position, raise the control again.
Rear bench seats
Access to the rear seats
F Lower the head restraints then raise the first lever and tilt the seat backrest for wards.
Seat backrest folded
position
F Remove the head restraints then tilt the seat backrest as described above.
F
W
ith your right hand, raise the second lever
then tilt the seat backrest 5° towards the
r e a r.
F
W
ith your left hand, tilt the seat backrest
fully forwards onto the cushion.
Ease of use and comfort
Page 48 of 232

46
Air outlet
Press this control to activate
extraction of air to the outside; the
LED comes on. Press again to
switch off.
Air intake
Pressing this control activates the
exterior air intake into the passenger
compartment; the LED comes on.
Press again to switch off.
Additional heating
systems
Additional heating
This is passenger compartment heating,
additional to the standard equipment.
It can operate independently of the engine.
Additional heater or
programmable additional
heating
This is an additional, programmable and
separate system which heats the Diesel engine
hot coolant loop to make starting easier.
It improves the demisting and defrosting
per formance and that of the heated seats, if
fitted to the vehicle.
Automatic additional
heating
This is an additional system which starts
automatically when the ignition is switched
on. Its activation depends on the exterior
temperature and the temperature inside the
vehicle.
It switches off automatically once the heating
system is started manually. The passenger compartment heating is brought
up to temperature more rapidly.
This system must be programmed to start up
before you enter the vehicle.
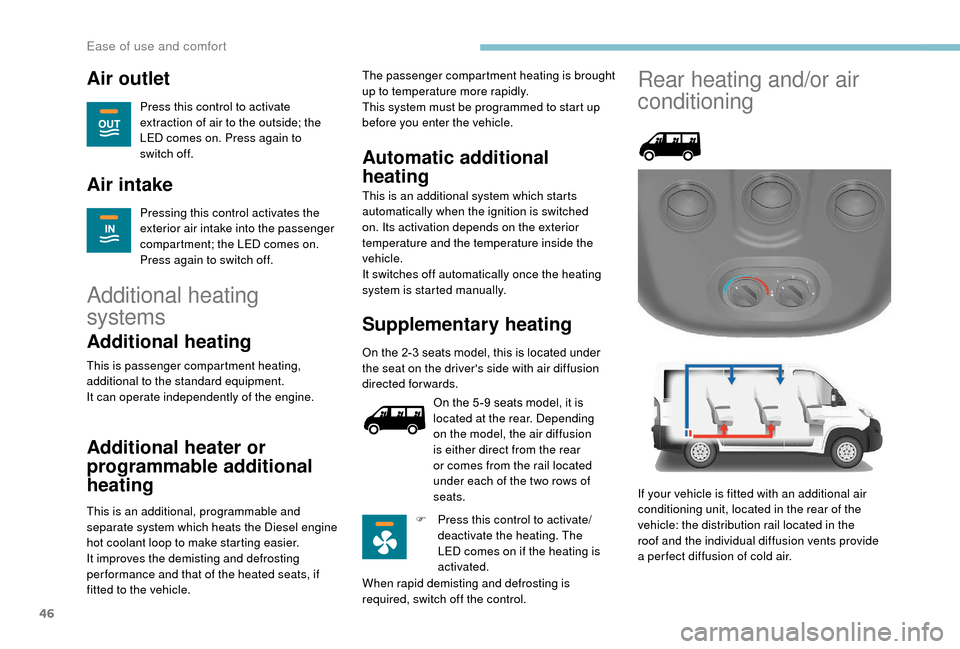
Supplementary heating
On the 2-3 seats model, this is located under
t he seat on the driver's side with air diffusion
directed forwards.
On the 5 -9
seats model, it is
located at the rear. Depending
on the model, the air diffusion
is either direct from the rear
or comes from the rail located
under each of the two rows of
seats.
F
P
ress this control to activate/
deactivate the heating. The
LED comes on if the heating is
activated.
When rapid demisting and defrosting is
required, switch off the control.
Rear heating and/or air
conditioning
If your vehicle is fitted with an additional air
conditioning unit, located in the rear of the
vehicle: the distribution rail located in the
roof and the individual diffusion vents provide
a
per fect diffusion of cold air.
Ease of use and comfort
Page 60 of 232

58
Cigarette lighter
F Press and wait a few moments until the
lighter pops out automatically.
Courtesy lamps Reading lamps
They are located above each row
of seats.
Interior roof rack
This is a storage compartment located in the
l oad space, above the cab. Its capacity varies
depending on the height of the van
(type H2
or H3).
As a
safety measure, do not place heavy
objects in the roof storage space.
Load retainerIf fitted on your vehicle, one or two courtesy
lamps are located above the rear and side
doors.
They can be activated by:
-
t
ilting the courtesy lamp (to the left or to the
right),
-
o
pening or closing the rear or side doors.
This lighting switches off automatically, after
a
few minutes, if the doors are left open. On the floor, behind the front seats, a
horizontal partition protects the driver and front
passengers against the risk of load movement.
Ladder type vertical
partition
Depending on the country of sale, behind the
driver's seat, a ladder type vertical partition
protects the driver against the risk of load
movement.
Ease of use and comfort