2018 Peugeot Boxer left hand indicator
[x] Cancel search: left hand indicatorPage 10 of 232

8
In the left-hand part:
- Time,
-
E
xterior temperature,
-
W
arning or indicator lamps,
-
C
ruise control or speed limiter.
In the right-hand part:
-
Date,
-
S
ervice indicator,
-
T
rip computer (range, fuel consumption,
e t c .),
-
A
lert messages,
-
S
ystem status messages,
-
V
ehicle configuration,
-
H
eadlamp beam height,
-
M
iles/kilometres travelled.
Warning and indicator
lamps
When the ignition is switched on
Certain warning lamps come on for a few
s econds when the vehicle's ignition is switched
on.
When the engine is started, these same
warning lamps should go off.
If they remain on, before moving off refer to the
information on the warning lamp concerned.
Level 2
display screen
Brightness of instruments
and controls
The instruments and controls can be adjusted
for brightness by pressing the MODE button,
with the sidelamps on.
For more information on Vehicle
configuration
, refer to the corresponding
section.Associated warnings
Certain warning lamps may come on in one of
two modes: fixed (continuous) or flashing.
Only by relating the type of lighting to the
operating status of the vehicle can it be
ascertained whether the situation is normal or
whether a
fault has occurred.
In the event of a
fault, the illumination of the
warning lamp may be accompanied by an
audible signal and/or a
message.
Visual indicators informing the driver
that a
system is in operation (operation
or deactivation indicator lamps) or of the
occurrence of a fault (warning lamps).
Dashboard instruments
Page 17 of 232

15
Low fuel levelFixed, with the needle
in the E zone. The fuel reserve is being used.
Refuel without delay.
The calculation of the remaining fuel depends on
the style of driving, the profile of the road, the time
elapsed and the distance travelled since the lamp first
came on.
Flashing. There is a
fault with the system. Contact a PEUGEOT dealer or a qualified workshop.
Warning/indicator lamp
StateCause Actions/Comments
Diesel pre-heater Fixed. Climate conditions cause pre-
heating to be necessary. Wait until the lamp goes off before starting the engine.
Rear foglamps Fixed. The button on the MODE control
panel is engaged. Manual selection.
The lamps only operate when the dipped beam
headlamps are on.
In normal visibility, please switch them off.
Green warning/indicator lamps Left-hand direction
indicator Flashing with audible
signal. A steering change using the
lighting control stalk. Move the stalk down.
Right-hand
direction indicator Flashing with audible
signal. A steering change using the
lighting control stalk. Move the stalk up.
Front foglamps Fixed. The button on the MODE control
panel is engaged. Manual selection.
The lamps only operate when the dipped beam
headlamps are on.
1
Dashboard instruments
Page 37 of 232

35
Opening to 180°
If your vehicle is fitted with this equipment,
a retractable check strap system permits
extending of the opening from 96° to 180°.
Closing
F To close, start with the left-hand door then close the right-hand door.
Alarm
System which protects and provides a deterrent
a gainst theft and break-ins. If your vehicle is
so equipped, it provides the following types of
monitoring:
- Perimeter monitoring
The system ensures exterior perimeter
protection by detectors on the openings (doors,
bonnet) and in the electrical power supply.
- Anti-tilt monitoring
The system checks for any change in the
attitude of the vehicle.
Activation
F Press this button on the remote control.
The protection provided by the alarm system
becomes active after a
few seconds.
Triggering of the alarm
The alarm then returns to monitoring
mode but the triggering event is
stored and is indicated by illumination
of the electronic immobiliser warning
lamp for about 10
seconds when the
ignition is switched on.
The alarm is also triggered after interruption
of the electrical supply and when it is
reconnected.
From inside
F Pull the handle on the door panel towards you, then push to open the right-hand door.
F
P
ush the lever to open the left-hand door.
Do not drive with a
rear door open. F
P
ress the button, located on the door trim
pad, to widen the angle of the door.
The check strap will engage again
automatically on closing. F
T
urn the ignition off and exit the vehicle.
This is signalled by the siren sounding and
flashing of the direction indicators for thirty
seconds.
2
Access
Page 44 of 232

42
Mirrors
Door mirrors
These are divided into two zones:
A -Upper mirror
B - Lower mirror
Electric adjustments
The key must be in the MAR position.
Left-hand mirror:
A1 - Upper mirror
B1 - Lower mirror
Right-hand mirror:
A2 - Upper mirror
B2 - Lower mirror
F
T
hen move the control in the direction of the
adjustment required.
The rear view mirror glass is spherical in
order to widen the lateral field of view. The
objects obser ved are, in reality, closer than
they appear. Therefore, this must be taken
into account in order to assess the distance
c o r r e c t l y.
The shell incorporates the direction indicator
side repeater and aerials, depending on the
equipment available on board (GPS, GSM,
Radio, etc.). F
T
urn the control to select the mirror zone.
Electric folding
F Press this control.
Defrosting the mirrors
F Press the heated rear window button.
Rear view mirror
The lever located on the lower edge moves the
mirror into two positions.
For the day position, the lever is pushed.
For the night position to prevent dazzle, pull the
lever towards you.
Ease of use and comfort
Page 108 of 232

106
If the windscreen is damaged, it is strongly
recommended that you go to a PEUGEOT
dealer or a
qualified workshop for any
replacement and calibration of the camera.
Operation
The system starts automatically when moving
of f.
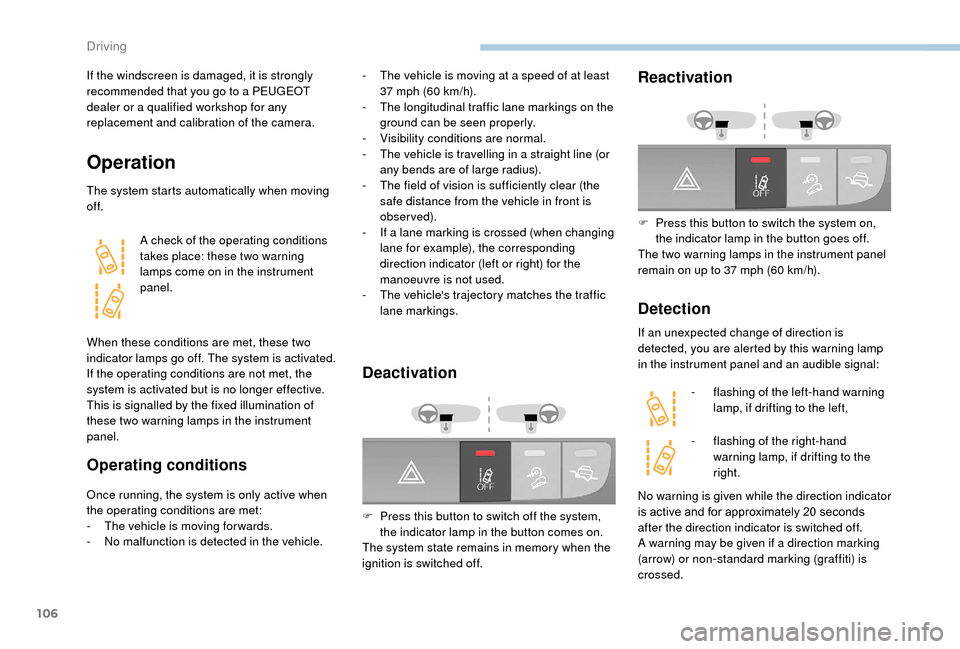
A check of the operating conditions
takes place: these two warning
lamps come on in the instrument
panel.
When these conditions are met, these two
indicator lamps go off. The system is activated.
If the operating conditions are not met, the
system is activated but is no longer effective.
This is signalled by the fixed illumination of
these two warning lamps in the instrument
panel.
Operating conditions
Once running, the system is only active when
the operating conditions are met:
-
T
he vehicle is moving for wards.
-
N
o malfunction is detected in the vehicle.
Deactivation
F Press this button to switch off the system, the indicator lamp in the button comes on.
The system state remains in memory when the
ignition is switched off.
Reactivation
F Press this button to switch the system on, the indicator lamp in the button goes off.
The two warning lamps in the instrument panel
remain on up to 37
mph (60 km/h).
Detection
If an unexpected change of direction is
detected, you are alerted by this warning lamp
in the instrument panel and an audible signal:-
f
lashing of the left-hand warning
lamp, if drifting to the left,
-
f
lashing of the right-hand
warning lamp, if drifting to the
right.
-
T
he vehicle is moving at a
speed of at least
37
mph (60
km/h).
-
T
he longitudinal traffic lane markings on the
ground can be seen properly.
-
V
isibility conditions are normal.
-
T
he vehicle is travelling in a
straight line (or
any bends are of large radius).
-
T
he field of vision is sufficiently clear (the
safe distance from the vehicle in front is
observed).
-
I
f a
lane marking is crossed (when changing
lane for example), the corresponding
direction indicator (left or right) for the
manoeuvre is not used.
-
T
he vehicle's trajectory matches the traffic
lane markings.
No warning is given while the direction indicator
is active and for approximately 20 seconds
after the direction indicator is switched off.
A warning may be given if a
direction marking
(arrow) or non-standard marking (graffiti) is
crossed.
Driving
Page 110 of 232

108
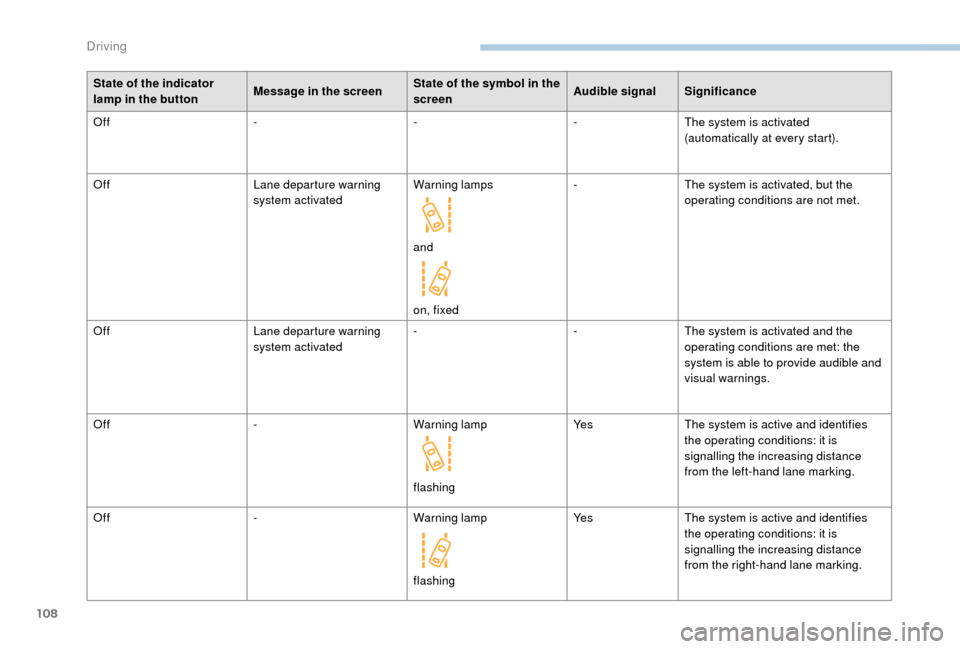
State of the indicator
lamp in the buttonMessage in the screenState of the symbol in the
screenAudible signal Significance
Off ---The system is activated
(automatically at every start).
Off Lane departure warning
system activatedWarning lamps
and
on, fixed-
The system is activated, but the
operating conditions are not met.
Off Lane departure warning
system activated-
-The system is activated and the
operating conditions are met: the
system is able to provide audible and
visual warnings.
Off -Warning lamp
flashingYe s
The system is active and identifies
the operating conditions: it is
signalling the increasing distance
from the left-hand lane marking.
Off -Warning lamp
flashingYe s
The system is active and identifies
the operating conditions: it is
signalling the increasing distance
from the right-hand lane marking.
Driving
Page 147 of 232

145
If necessary you can remove the headlamp
unit:
F
D
epending on country of sale, remove the
extreme cold protection foam by making it
slide sideways towards the outside.
F
D
isconnect the electrical connector by
removing its locking ring.
F
R
emove the two headlamp unit fixing
screws.
F
M
ove the headlamp towards the centre of
the vehicle to extract it from its sliders. On
the left-hand side, be careful of the bonnet
st ay.
Main beam headlamps
Ty p e D , H7 - 55W
F R emove the cover by pulling on the rubber
tongue.
F
D
isconnect the electrical connector.
F
R
elease the retaining spring by pressing on
the central clip.
F
C
hange the bulb taking care to align the
metal part with the groove on the lamp.
Dipped beam headlamps
Ty p e D , H7 - 55W
F R emove the cover by pulling on the rubber
tongue.
F
D
isconnect the electrical connector.
F
R
elease the retaining spring by pressing on
the central clip.
F
C
hange the bulb taking care to align the
metal part with the grooves on the lamp.
Direction indicators
Ty p e A , W Y21W – 21W
F R emove the cover by pulling on the rubber
tongue.
F
T
urn the bulb holder a quarter turn anti-
clockwise.
F
C
hange the bulb.
F
O
pen and secure the bonnet with the stay.
F
T
o access the lamps and bulbs, reach
behind the headlamp unit. Ty p e A
, W21/5W – 21W and 5W
F
R
emove the cover by pulling on the rubber
tongue.
F
T
urn the bulb holder a quarter turn anti-
clockwise.
F
C
hange the bulb.
Sidelamps/daytime running
lamps
LED daytime running lamps
These light-emitting diode (LED) lamps act as
both daytime running lamps and sidelamps.
If your vehicle is fitted with LED daytime
running lamps, contact a PEUGEOT dealer.
8
In the event of a breakdown