2018 PEUGEOT 5008 window
[x] Cancel search: windowPage 58 of 364
56
Anti-intrusion security
This system allows automatic simultaneous
locking of the doors and boot as soon as the
speed of the vehicle exceeds 6 mph (10 km/h).
Operation
If one of the doors or the boot is open, the
automatic central locking does not take place.
Carrying long or voluminous objects
If you want to drive with the boot open, you
should press the central locking button
to lock the doors. Other wise, every time
the speed of the vehicle exceeds 6
mph
(10
km/h), the locks will rebound and the
alerts mentioned above will appear.
Pressing the central locking button
unlocks the vehicle.
Above 6
mph (10 km/h), this unlocking is
te m p o r a r y.
Activation/Deactivation
Driving with the doors locked may render
access for the emergency services
difficult in an emergency.
This is signalled by the sound of
the locks rebounding, accompanied
by illumination of this symbol in the
instrument panel, an audible signal and
the display of an alert message.
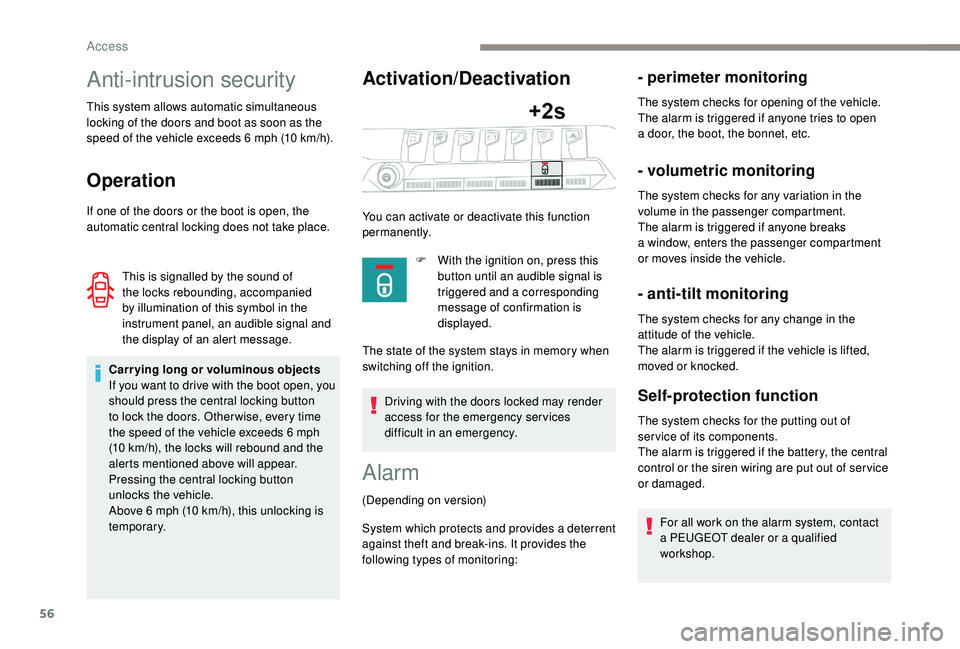
You can activate or deactivate this function
permanently.
F
W
ith the ignition on, press this
button until an audible signal is
triggered and a corresponding
message of confirmation is
displayed.
The state of the system stays in memory when
switching off the ignition.
Alarm
(Depending on version)
System which protects and provides a
deterrent
against theft and break-ins. It provides the
following types of monitoring:
- perimeter monitoring
The system checks for opening of the vehicle.
The alarm is triggered if anyone tries to open
a
door, the boot, the bonnet, etc.
- volumetric monitoring
The system checks for any variation in the
volume in the passenger compartment.
The alarm is triggered if anyone breaks
a
window, enters the passenger compartment
or moves inside the vehicle.
- anti-tilt monitoring
The system checks for any change in the
attitude of the vehicle.
The alarm is triggered if the vehicle is lifted,
moved or knocked.
Self-protection function
The system checks for the putting out of
ser vice of its components.
The alarm is triggered if the battery, the central
control or the siren wiring are put out of ser vice
or damaged.
For all work on the alarm system, contact
a
PEUGEOT dealer or a qualified
workshop.
Access
Page 59 of 364
57
Locking the vehicle with full
alarm system
Activation
Following a vehicle locking request, the
p erimeter monitoring is activated after
5
seconds and the interior volumetric and
anti-tilt monitoring after 45
seconds.If an opening (door, boot or bonnet) is not
fully closed, the vehicle is not locked but
the exterior perimeter monitoring will be
activated after a
delay of 45 seconds at
the same time as the interior volumetric
and anti-tilt monitoring.
Deactivation
F Press the unlocking button on the remote control.
or
F
U
nlock the vehicle with the Keyless Entry
and Starting system.
The monitoring system is deactivated: the
indicator lamp in the button goes off and the
direction indicators flash for about 2
seconds.
When the vehicle automatically locks itself
again (as happens if a
door or boot is not
opened within 30
seconds of unlocking),
the monitoring system is also reactivated
automatically.
Locking the vehicle
with exterior perimeter
monitoring only
Deactivate the interior volumetric and anti-tilt
monitoring to avoid unwanted triggering of the
alarm in certain cases such as:
-
l
eaving a pet in the vehicle,
Deactivating the interior
volumetric and anti-tilt
monitoring
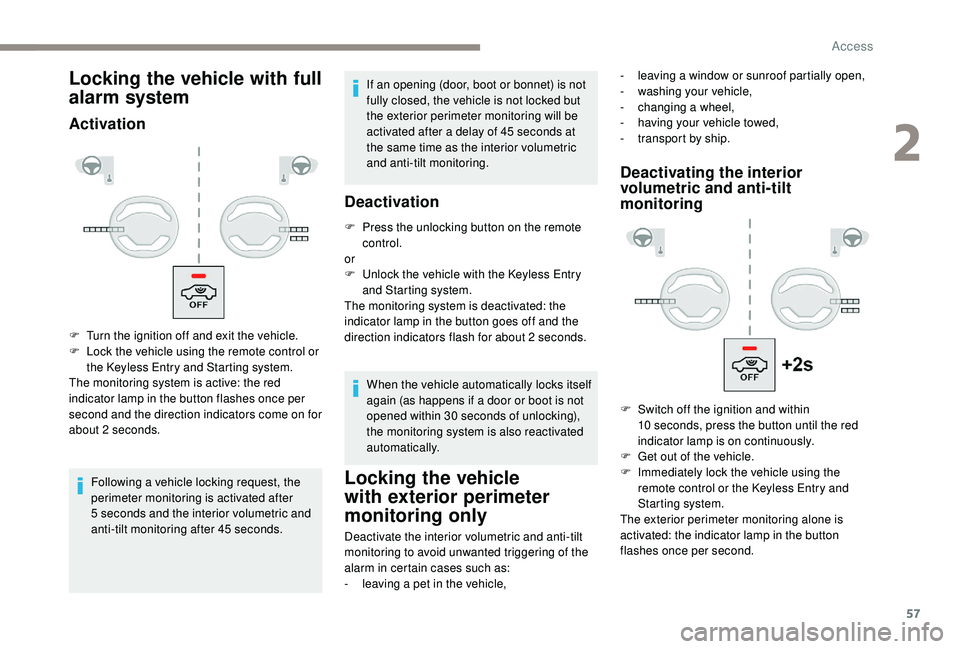
F Turn the ignition off and exit the vehicle.
F L ock the vehicle using the remote control or
the Keyless Entry and Starting system.
The monitoring system is active: the red
indicator lamp in the button flashes once per
second and the direction indicators come on for
about 2
seconds. -
l
eaving a window or sunroof partially open,
-
w
ashing your vehicle,
-
c
hanging a
wheel,
-
h
aving your vehicle towed,
-
t
ransport by ship.
F
S
witch off the ignition and within
10
seconds, press the button until the red
indicator lamp is on continuously.
F
G
et out of the vehicle.
F
I
mmediately lock the vehicle using the
remote control or the Keyless Entry and
Starting system.
The exterior perimeter monitoring alone is
activated: the indicator lamp in the button
flashes once per second.
2
Access
Page 65 of 364
63
The function automatically deactivates in heavy
rain or following a build-up of snow.
If it does not work, check that the electronic key
is not exposed to a
source of electromagnetic
pollution (smartphone, etc.).
The function may not work correctly with
a
prosthetic leg.
The function may not work correctly if your
vehicle is fitted with a
towbar. -
y
our vehicle is being serviced,
-
y
ou are accessing the spare wheel
(depending on version).
To avoid such operating problems, keep the
electronic key away from the recognition zone
or deactivate the "Hands-Free Tailgate Access"
function.
Recommendations related
to the " Hands-Free Tailgate
Access " function
If several kicking movements to operate the
tailgate have no effect, wait a
few seconds
before trying again.
In some circumstances, the tailgate may open
or close by itself, particularly if:
-
y
ou hitch or unhitch a trailer,
-
y
ou fit or remove a bicycle carrier,
-
y
ou load or unload bicycles from a bicycle
c a r r i e r,
-
y
ou place or lift something behind the
vehicle,
-
an
animal approaches the rear bumper,
-
y
ou are washing your vehicle,
Electric windows
Manual operation
To open or close the window, press or pull the
switch gently, without exceeding the resistance
point. The window stops as soon as the switch
is released.
Automatic operation
To open or close the window, press or pull the
switch fully, beyond the resistance point: the
window opens or closes completely when the
switch is released. Pressing the switch again
stops the movement of the window.The electric window switches remain
operational for approximately 45
seconds
after switching off the ignition.
Once this time has elapsed, the electric
windows will not operate. To reactivate
them, switch the ignition on again.
Safety anti-pinch
When the window rises and meets an obstacle,
it stops and immediately partially lowers again.
In the event of unwanted opening of the
window on closing, press the switch until the
window opens completely, then pull the switch
immediately until the window closes. Continue
to hold the switch for approximately one second
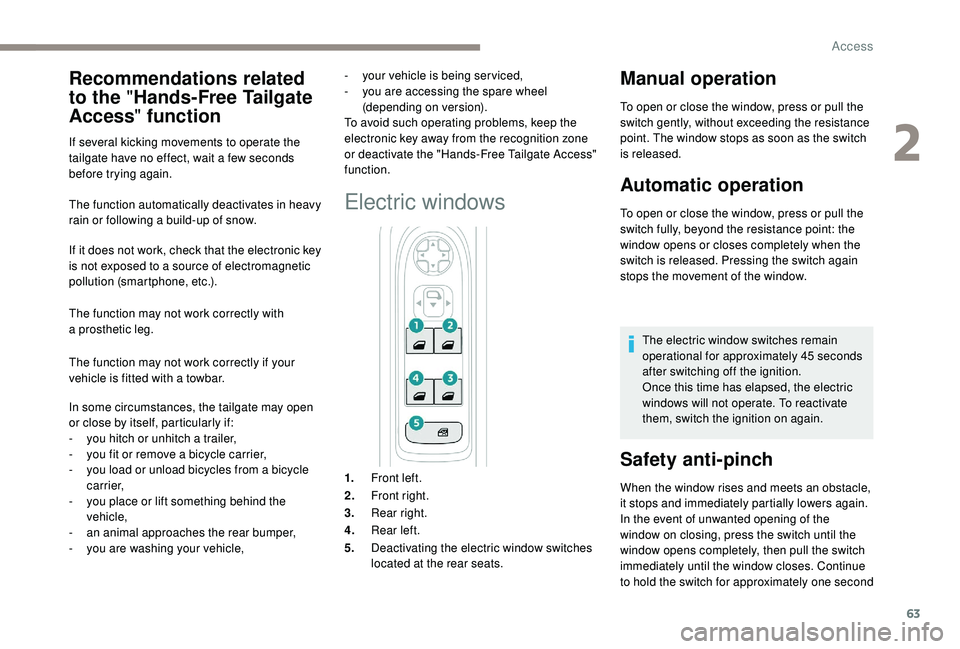
1.
Front left.
2. Front right.
3. Rear right.
4. Rear left.
5. Deactivating the electric window switches
located at the rear seats.
2
Access
Page 66 of 364
64
Deactivating the rear
controls for the rear
windows
after the window has closed.
The safety anti-pinch function is not active
during this operation.
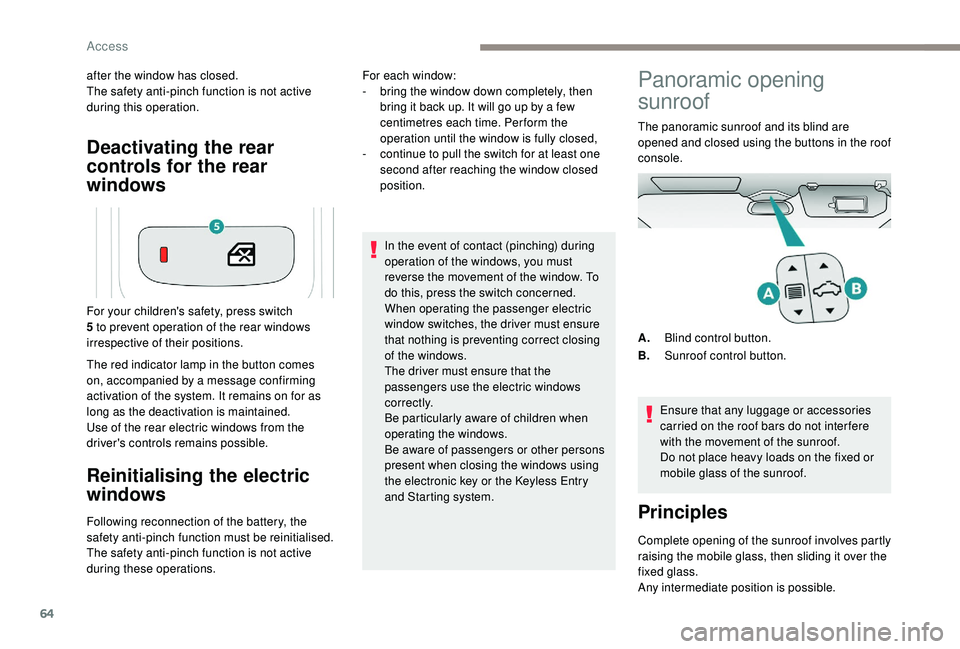
The red indicator lamp in the button comes
on, accompanied by a message confirming
activation of the system. It remains on for as
long as the deactivation is maintained.
Use of the rear electric windows from the
driver's controls remains possible.
Reinitialising the electric
windows
Following reconnection of the battery, the
safety anti-pinch function must be reinitialised.
The safety anti-pinch function is not active
during these operations. In the event of contact (pinching) during
operation of the windows, you must
reverse the movement of the window. To
do this, press the switch concerned.
When operating the passenger electric
window switches, the driver must ensure
that nothing is preventing correct closing
of the windows.
The driver must ensure that the
passengers use the electric windows
c o r r e c t l y.
Be particularly aware of children when
operating the windows.
Be aware of passengers or other persons
present when closing the windows using
the electronic key or the
K
eyless Entry
and Starting system.
For your children's safety, press switch
5 to prevent operation of the rear windows
irrespective of their positions. For each window:
-
b
ring the window down completely, then
bring it back up. It will go up by a few
centimetres each time. Per form the
operation until the window is fully closed,
-
c
ontinue to pull the switch for at least one
second after reaching the window closed
position.
Panoramic opening
sunroof
The panoramic sunroof and its blind are
opened and closed using the buttons in the roof
console.
Ensure that any luggage or accessories
carried on the roof bars do not inter fere
with the movement of the sunroof.
Do not place heavy loads on the fixed or
mobile glass of the sunroof.
Principles
Complete opening of the sunroof involves partly
raising the mobile glass, then sliding it over the
fixed glass.
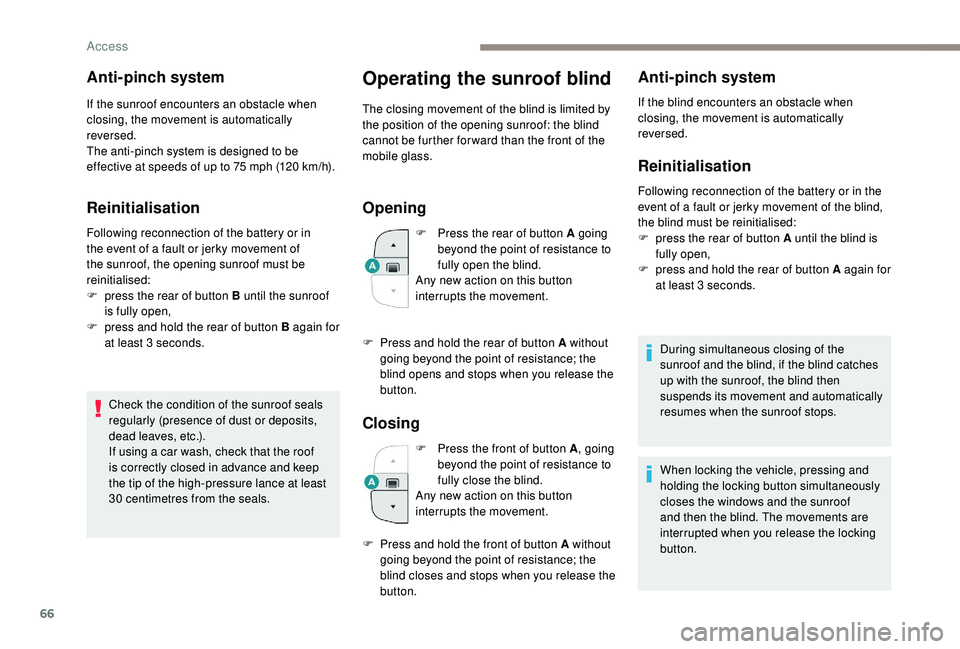
Any intermediate position is possible. A. Blind control button.
B. Sunroof control button.
Access
Page 68 of 364
66
Anti-pinch system
If the sunroof encounters an obstacle when
closing, the movement is automatically
reversed.
The anti-pinch system is designed to be
effective at speeds of up to 75 mph (120 km/h).
Reinitialisation
Following reconnection of the battery or in
the event of a fault or jerky movement of
the sunroof, the opening sunroof must be
reinitialised:
F
p
ress the rear of button B until the sunroof
is fully open,
F
p
ress and hold the rear of button B again for
at least 3
seconds.
Check the condition of the sunroof seals
regularly (presence of dust or deposits,
dead leaves, etc.).
If using a
car wash, check that the roof
is correctly closed in advance and keep
the tip of the high-pressure lance at least
30
centimetres from the seals.
Operating the sunroof blind
The closing movement of the blind is limited by
the position of the opening sunroof: the blind
cannot be further for ward than the front of the
mobile glass.
Opening
F Press the rear of button A going beyond the point of resistance to
fully open the blind.
Any new action on this button
interrupts the movement.
Closing
F Press the front of button A , going
beyond the point of resistance to
fully close the blind.
Any new action on this button
interrupts the movement.
Anti-pinch system
If the blind encounters an obstacle when
closing, the movement is automatically
reversed.
Reinitialisation
Following reconnection of the battery or in the
event of a fault or jerky movement of the blind,
the blind must be reinitialised:
F
p
ress the rear of button A until the blind is
fully open,
F
p
ress and hold the rear of button A again for
at least 3
seconds.
During simultaneous closing of the
sunroof and the blind, if the blind catches
up with the sunroof, the blind then
suspends its movement and automatically
resumes when the sunroof stops.
F
P
ress and hold the rear of button A without
going beyond the point of resistance; the
blind opens and stops when you release the
button.
F
P
ress and hold the front of button A without
going beyond the point of resistance; the
blind closes and stops when you release the
button. When locking the vehicle, pressing and
holding the locking button simultaneously
closes the windows and the sunroof
and then the blind. The movements are
interrupted when you release the locking
button.
Access
Page 86 of 364
84
Personalising an ambience
From the home page:
F S elect an ambience to activate it.
F
P
ress " Settings " to display the settings
page for the ambience.
F
S
elect a system for which you wish to
modify the settings.
F
A
fter making the modifications, press any
area of the screen outside the system
settings window to return to the ambience
settings page.
F
A
fter making all of the desired modifications
to settings, press " Save settings".
The modifications are taken into account
immediately.
It is possible to temporarily modify an
ambience at any time, by modifying the
settings for one or more of the systems
managed in the ambience, without going
via the i- Cockpit Amplify function.
For example, you can deactivate or modify
the intensity of the current massage by
pressing the massage activation button
on your seat or activate/deactivate
the ambient lighting in the passenger
compartment from the Vehicle/Driving
menu.
In this case, the new settings will not be
saved as part of the current ambience.Heating and Ventilation
Air intake
The air circulating in the passenger
compartment is filtered and originates either
from the outside via the grille located at the
base of the windscreen or from the inside in air
recirculation mode.
Controls
The incoming air follows various routes
depending on the controls selected by
the driver, the front passenger and rear
passengers, depending on the level of
equipment.
The temperature control enables you to obtain
the level of comfort required by mixing the air of
the various circuits.
The air distribution control enables you to
select the air vents used in the passenger
compartment by the combined use of the
associated buttons.
The air flow control enables you to increase or
reduce the speed of the ventilation fan.
Depending on your vehicle, the controls are
accessible in the Air conditioning menu of the
touch screen or are grouped together on the
control panel of the centre console.
Air distribution
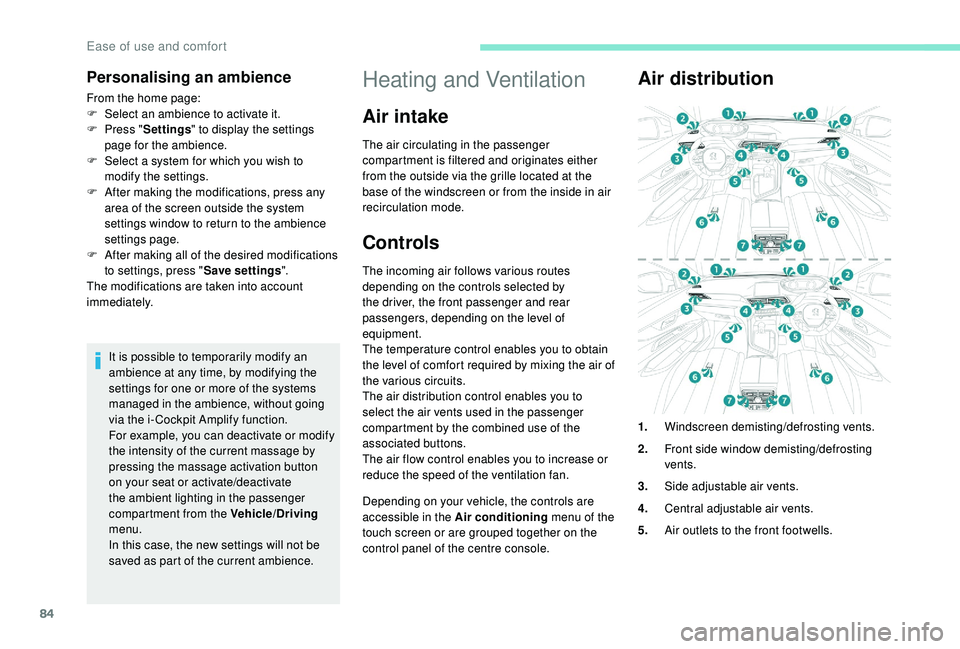
1. Windscreen demisting/defrosting vents.
2. Front side window demisting/defrosting
vents.
3. Side adjustable air vents.
4. Central adjustable air vents.
5. Air outlets to the front footwells.
Ease of use and comfort
Page 88 of 364
86
Manual air conditioning
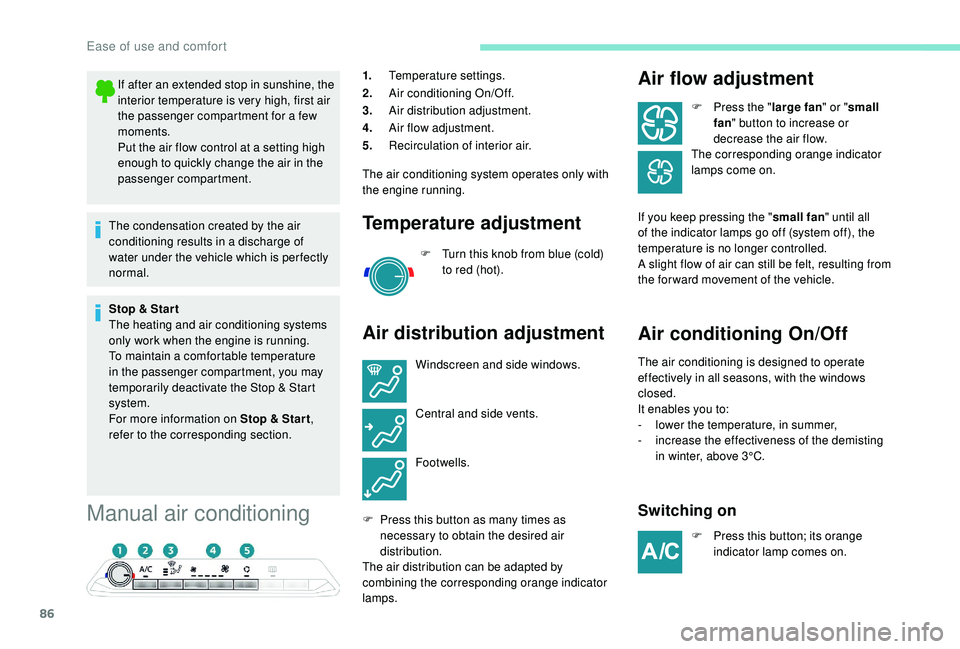
1.Temperature settings.
2. Air conditioning On/Off.
3. Air distribution adjustment.
4. Air flow adjustment.
5. Recirculation of interior air.
The air conditioning system operates only with
the engine running.
Temperature adjustment
F Turn this knob from blue (cold) to red (hot).
Air distribution adjustment Air flow adjustment
F Press the "
large fan" or "small
fan " button to increase or
decrease the air flow.
The corresponding orange indicator
lamps come on.
If you keep pressing the " small fan" until all
of the indicator lamps go off (system off), the
temperature is no longer controlled.
A slight flow of air can still be felt, resulting from
the for ward movement of the vehicle.
Air conditioning On/Off
The air conditioning is designed to operate
effectively in all seasons, with the windows
closed.
It enables you to:
-
l
ower the temperature, in summer,
-
i
ncrease the effectiveness of the demisting
in winter, above 3°C.
Switching on
F Press this button; its orange indicator lamp comes on.
If after an extended stop in sunshine, the
interior temperature is very high, first air
the passenger compartment for a
few
moments.
Put the air flow control at a
setting high
enough to quickly change the air in the
passenger compartment.
The condensation created by the air
conditioning results in a
discharge of
water under the vehicle which is per fectly
normal.
Stop & Star t
The heating and air conditioning systems
only work when the engine is running.
To maintain a
comfortable temperature
in the passenger compartment, you may
temporarily deactivate the Stop & Start
system.
For more information on Stop & Star t ,
refer to the corresponding section. Windscreen and side windows.
Central and side vents.
Footwells.
F
P
ress this button as many times as
necessary to obtain the desired air
distribution.
The air distribution can be adapted by
combining the corresponding orange indicator
lamps.
Ease of use and comfort
Page 89 of 364
87
The air conditioning does not operate
when the air flow adjustment is set to off.
To obtain cool air more quickly, you can
activate recirculation of the interior air for
a few moments.
Switching off
F Press this button again; its indicator lamp goes off.
Switching off the air conditioning may result in
some discomfort (humidity, condensation).
Semi-automatic mono-
zone air conditioning
Press the Air conditioning menu
button to display the system controls
page. The air conditioning system operates only with
the engine running.
The temperature at the nozzles and vents
is regulated by the system according to the
temperature in the passenger compartment
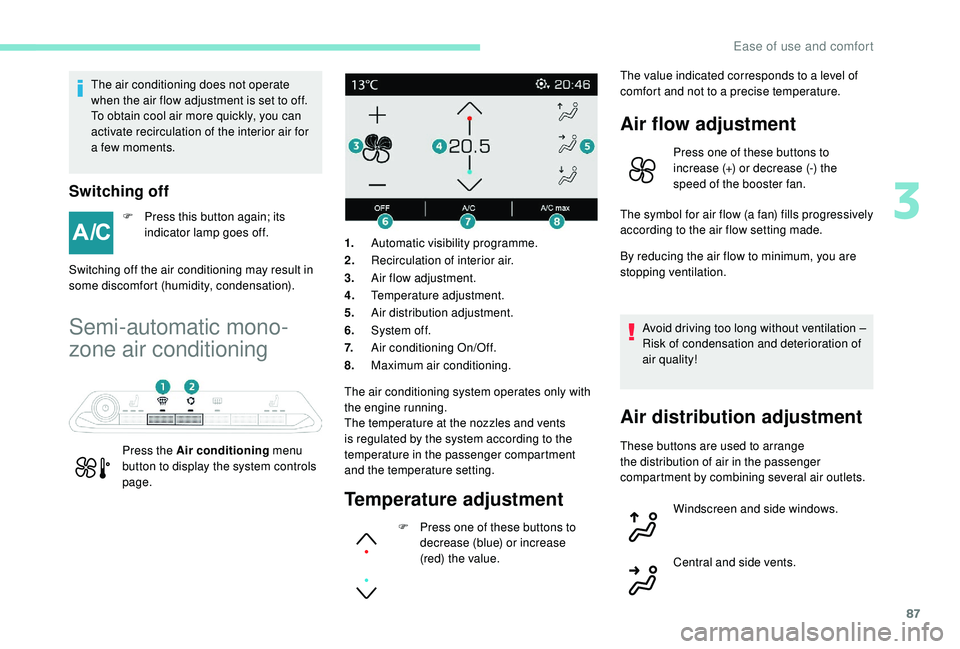
and the temperature setting.1.
Automatic visibility programme.
2. Recirculation of interior air.
3. Air flow adjustment.
4. Temperature adjustment.
5. Air distribution adjustment.
6. System of f.
7. Air conditioning On/Off.
8. Maximum air conditioning.
Temperature adjustment
F Press one of these buttons to
decrease (blue) or increase
(red) the value. The value indicated corresponds to a
level of
comfort and not to a precise temperature.
Air flow adjustment
Press one of these buttons to
increase (+) or decrease (-) the
speed of the booster fan.
The symbol for air flow (a fan) fills progressively
according to the air flow setting made.
By reducing the air flow to minimum, you are
stopping ventilation.
Avoid driving too long without ventilation –
Risk of condensation and deterioration of
air quality!
Air distribution adjustment
These buttons are used to arrange
the distribution of air in the passenger
compartment by combining several air outlets. Windscreen and side windows.
Central and side vents.
3
Ease of use and comfort