2018 PEUGEOT 5008 CD player
[x] Cancel search: CD playerPage 41 of 364

39
Controls
From the audio system control panel, press:
F t he "MENU " button to access the main
menu ,
F
t
he "5" or " 6" buttons to scroll through the
items in the screen,
F
t
he "7" or " 8" buttons to change a
setting
value,
F
t
he "OK" button to confirm,
or
F
t
he "Back " button to abandon the operation
in progress.
Main menu
F Press the MENU button:
- "Multimedia",
-
"Telephone",
-
"Connections",
-
"
Personalisation-configuration".
F
P
ress the " 7" or " 8" button to select the
menu required, then confirm by pressing the
" OK " button.
"Multimedia " menu
With the audio system switched on,
this menu allows you to activate or
deactivate the functions associated
with use of the radio (Frequency
search (RDS), DAB/FM auto
tracking, Radio Text (TXT) display)
or to choose the media play mode
(Normal, Random, Random all,
Repeat).
For more information on the "Multimedia"
application, refer to the "Audio equipment and
telematics" section.
" Telephone " menu
With the audio system switched on,
this menu allows you to make a
call,
view the calls log or the various
telephone directories.
For more information on the "Telephone"
application, refer to the "Audio equipment and
telematics" section.
" Connections " menu
With the audio system on, this
menu allows a
Bluetooth device
(telephone, media player) to be
paired and the connection mode
to be defined (hands-free, playing
audio files). For more information on the "Connections"
application, refer to the "Audio equipment and
telematics" section.
"
Personalisation-
configuration " menu
This menu gives access to the
following functions:
-
"
Define the vehicle parameters",
-
"
Choice of language",
-
"
Display configuration".
Define the vehicle parameters
This menu allows the activation or deactivation
of the following equipment, depending on
version:
- "Access to the vehicle ":
•
"
Remote control action".
For more information on the Remote control
and driver door selective unlocking in
particular, refer to the "Access" section.
-
"Comfort ":
•
"
Rear wipe in reverse gear".
For more information on the Wipers ,
refer to the "Lighting and visibility"
section.
•
"
Parking sensors".
For more information on the Parking
sensors , refer to the "Driving" section.
1
Instruments
Page 101 of 364

99
Reinitialising the remote control
If the battery is disconnected or when changing
the battery, the remote control must be
reinitialised.
F
A
fter turning on the power, within the next
5
seconds, press button 4 for 1 second.
If the operation is successful, the message
" OK " will be displayed on the remote
control's screen.
If there is a
fault, the message " FA I L" will
appear.
F
St
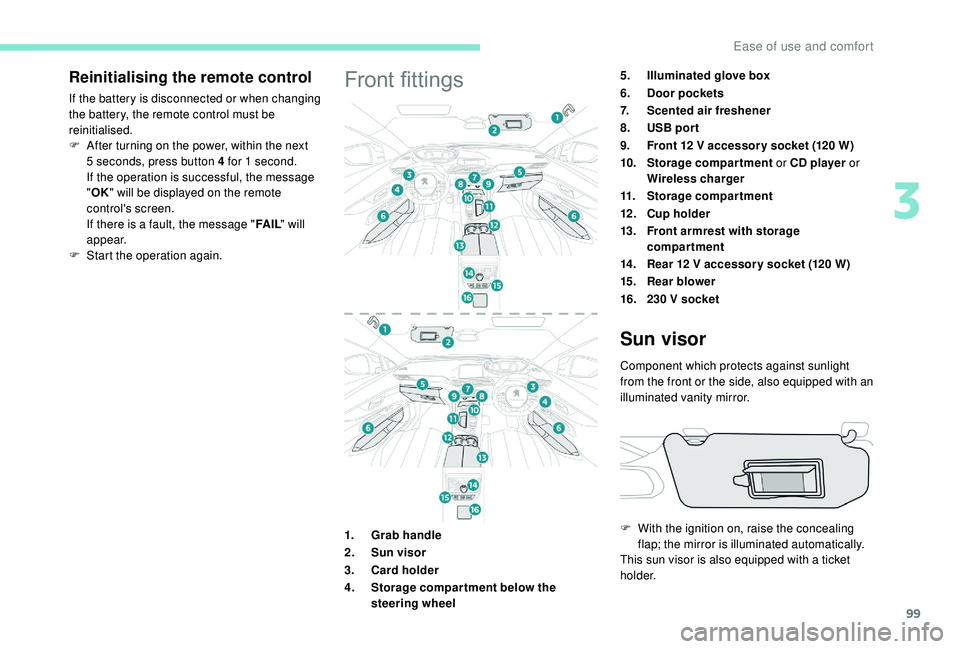
art the operation again.Front fittings5.Illuminated glove box
6. Door pockets
7. Scented air freshener
8. USB por t
9. Front 12
V accessor y socket (120 W)
10. Storage compartment or CD player or
Wireless charger
11. Storage compartment
12 . Cup holder
13. Front armrest with storage
compartment
14 . Rear 12
V accessor y socket (120 W)
15. Rear blower
16. 230
V socket
1. Grab handle
2. Sun visor
3. Card holder
4. Storage compar tment below the
steering wheel
Sun visor
Component which protects against sunlight
from the front or the side, also equipped with an
illuminated vanity mirror.
F
W
ith the ignition on, raise the concealing
flap; the mirror is illuminated automatically.
This sun visor is also equipped with a
ticket
h o l d e r.
3
Ease of use and comfort
Page 102 of 364

100
Glove box
F To open the glove box, raise the handle.
The glove box is lit when the lid is opened.
It houses the front passenger airbag
deactivation switch A .
It also gives access to the housing for scented
air freshener B cartridges.
Never drive with the glove box open when
a
passenger is at the front – it may cause
injury during sharp deceleration!
Cigarette lighter/12 V
a ccessory socket(s)
F To use the cigarette lighter, press it in
and wait a few seconds until it pops out
automatically.
F
T
o use a 12 V accessory (max power:
120
W), remove the cigarette lighter and
connect a
suitable adaptor.
You can use this socket to connect a
telephone
charger, a bottle warmer, etc.
After use, put the cigarette lighter back into
place straight away.
The connection of an electrical device
not approved by PEUGEOT, such as
a
USB charger, may adversely affect the
operation of vehicle electrical systems,
causing faults such as poor radio
reception or inter ference with displays in
the screens.
USB port
The USB port allows the connection of
a portable device, such as an iPod®-type digital
audio player, or a
USB memory stick.
The USB reader reads your audio files which
are then transferred to the audio system and
played via the vehicle's loudspeakers.
These files are managed via the steering wheel
controls or from the audio system.
When connected to the USB port,
the portable device can be charged
automatically.
While charging, a message is displayed
if the power consumption of the portable
device exceeds the amperage supplied by
the vehicle.
For more details on the Audio equipment and
telematics, and particularly the USB port,
consult the corresponding section.
Ease of use and comfort
Page 108 of 364

106
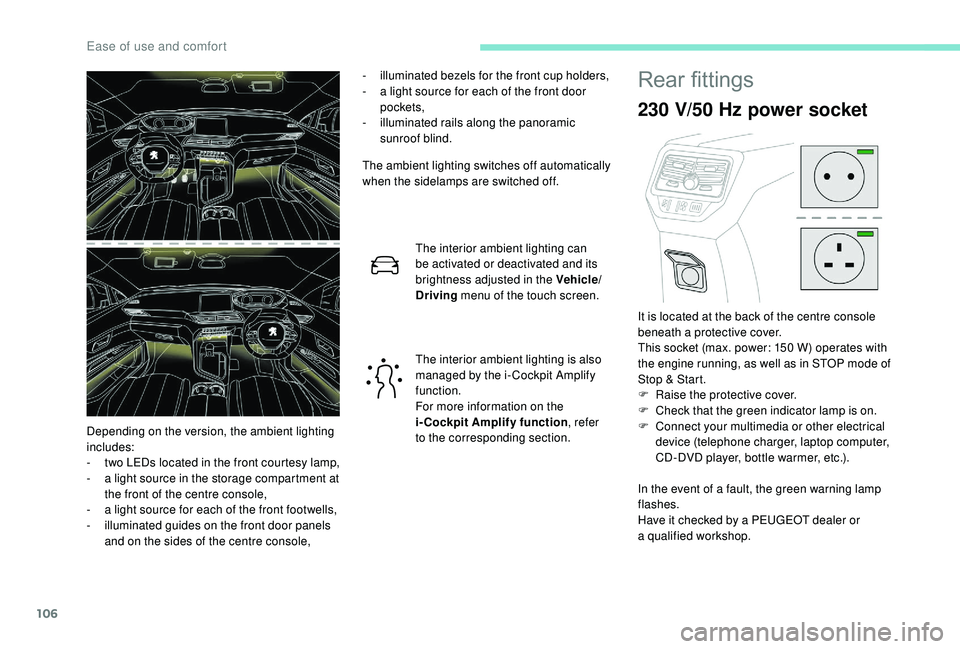
- illuminated bezels for the front cup holders,
- a l ight source for each of the front door
pockets,
-
i
lluminated rails along the panoramic
sunroof blind.
The ambient lighting switches off automatically
when the sidelamps are switched off.
The interior ambient lighting can
be activated or deactivated and its
brightness adjusted in the Vehicle/
Driving menu of the touch screen.
The interior ambient lighting is also
managed by the i- Cockpit Amplify
function.
For more information on the
i-Cockpit Amplify function , refer
to the corresponding section.
Depending on the version, the ambient lighting
includes:
-
t
wo LEDs located in the front courtesy lamp,
-
a l
ight source in the storage compartment at
the front of the centre console,
-
a l
ight source for each of the front footwells,
-
i
lluminated guides on the front door panels
and on the sides of the centre console,Rear fittings
230 V/50 Hz power socket
In the event of a fault, the green warning lamp
f lashes.
Have it checked by a
PEUGEOT dealer or
a
qualified workshop.
It is located at the back of the centre console
beneath a
protective cover.
This socket (max. power: 150 W) operates with
the engine running, as well as in STOP mode of
Stop & Start.
F
Ra
ise the protective cover.
F
C
heck that the green indicator lamp is on.
F
C
onnect your multimedia or other electrical
device (telephone charger, laptop computer,
CD-DVD player, bottle warmer, etc.).
Ease of use and comfort
Page 261 of 364

259
Fuse N°Rating (A) Functions
F1 3
A
K
eyless Entry and Starting.
F2 5
AMultifunction screen.
F5 5
AReversing camera, parking sensors.
F7 10
AHi-Fi amplifier.
F8 20
ARear wiper.
F10 30
ALocks.
F11 30
ALocks.
F17 10
ABoot 12
V accessory socket.
F18 5
AEmergency and assistance calls.
F22 3
AGlove box lighting.
F26 3
ASeat belts not fastened warning lamps display.
F27 3
ARain/sunshine sensor.
F31 5
AAirbags.
F33 15
AFront 12
V accessory socket
F35 5
AInstrument panel.
F36 20
AAudio system, touch screen, CD player, audio/
navigation system.
Fuse N° Rating (A) Functions
F17 10
AStoring driving positions.
Version 1 (Full)
Box 1
Box 2
8
In the event of a breakdown
Page 262 of 364

260
Version 2 (Eco)
Fuse N°Rating (A) Functions
F4 15
AHorn.
F5 20
AFront screenwash pump.
F6 20
ARear screenwash pump.
F7 10
A12
V accessory socket.
F8 20
ARear wiper.
F10 30
ALocks.
F11 30
ALocks.
F14 5
AAlarm siren.
F17 5
AInstrument panel.
F22 3
ARain/sunshine sensor.
F24 5
AReversing camera, parking sensors.
F25 5
AAirbags.
F27 5
AAlarm.
F28 5
AEmergency and assistance calls.
F29 20
AAudio system, touch screen, CD player, audio/
navigation system.
F32 15
ACigarette lighter.
F36 5
AGlove box lighting.
In the event of a breakdown
Page 278 of 364

2
12:13
18,5 21,5
23 °CFirst steps
With the engine running, a press
mutes the sound.
With the ignition off, a press turns
the system on.
Adjustment of the volume.
Use the buttons on either side of or below the
touch screen for access to the menus, then
press the virtual buttons in the touch screen.
Depending on the model, use the "Source" or
"Menu" buttons on the left-hand side of the
touch screen for access to the menus, then
press the virtual buttons in the touch screen.
You can display the menus at any time by
pressing the screen briefly with three fingers.
All of the touch areas of the screen are white.
Press the cross to go back a
level.
Press "OK" to confirm. The touch screen is of the "capacitive"
type.
To clean the screen, use a
soft, non-
abrasive cloth (e.g. spectacles cloth) with
no additional product.
Do not use sharp objects on the screen.
Do not touch the screen with wet hands.
*
D
epending on equipment.
Certain information is displayed permanently in
the upper band of the touch screen:
-
R
eminder of the air conditioning information
(depending on version), and direct access to
the corresponding menu.
-
G
o directly to the selection of the audio
source, to the list of radio stations (or list of
titles depending on the source).
-
G
o to the message notifications, emails,
map updates and, depending on the
services, the navigation notifications.
-
G
o to the settings for the touch screen and
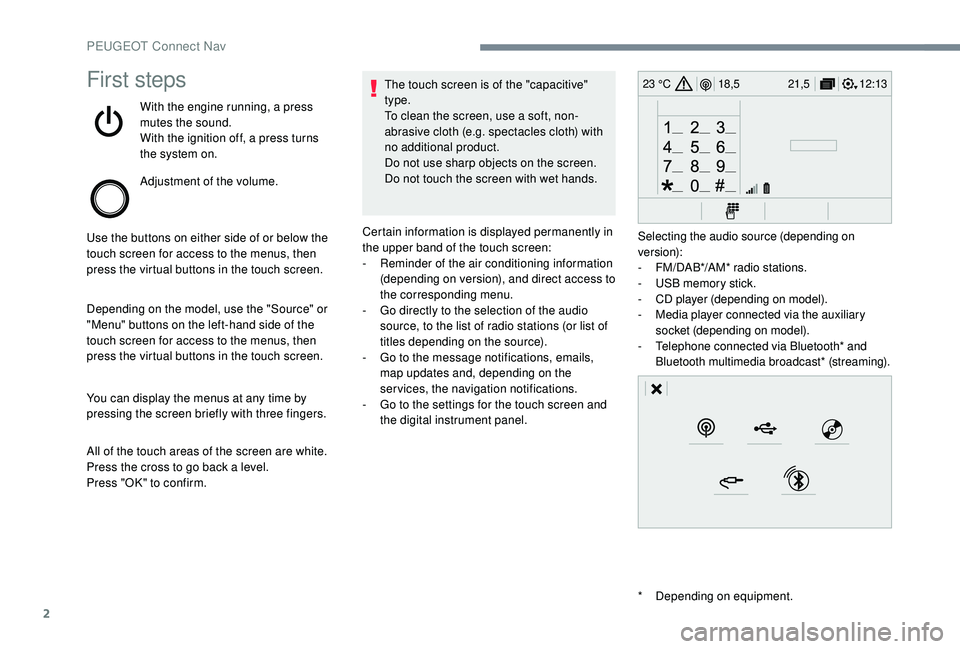
the digital instrument panel. Selecting the audio source (depending on
version):
-
F
M/DAB*/AM* radio stations.
-
U
SB memory stick.
-
C
D player (depending on model).
-
M
edia player connected via the auxiliary
socket (depending on model).
-
T
elephone connected via Bluetooth* and
Bluetooth multimedia broadcast* (streaming).
PEUGEOT Connect Nav
Page 299 of 364

23
Select "Radio settings ".
Select " General ".
Activate/Deactivate " Station
tracking ".
Press " OK".
If "DAB-FM tracking" is activated, there
is a
difference of a few seconds when the
system switches to FM analogue radio
with sometimes a
variation in volume.
Once the digital signal quality is restored,
the system automatically changes back
to " DA B ".
If the "DAB" station being listened to is
not available on FM (" DAB- FM" option
greyed out), or "DAB-FM tracking" is not
activated, the sound will cut out while the
digital signal is too weak.Media
USB
Insert the USB memory stick in the USB port or
connect the USB device to the USB port using
a
suitable cable (not supplied).
To protect the system, do not use a
USB
hub.
The system builds playlists (in temporary
memory), an operation which can take from
a
few seconds to several minutes at the first
connection.
Reduce the number of non-music files and the
number of folders to reduce the waiting time.
The playlists are updated every time the
ignition is switched off or a
USB memory stick
is connected. The lists are memorised: if they
are not modified, the subsequent loading time
will be shorter.
Auxiliary socket (AUX)
(depending on model/depending on equipment)
This source is only available if "Auxiliary input"
has been checked in the audio settings.
Connect the portable device (MP3
player, etc.)
to the auxiliary Jack socket using an audio
cable (not supplied).
First adjust the volume on your portable device
(to a
high level). Then adjust the volume of your
audio system.
Display and management of the controls are
via the portable device.
CD player
(depending on model/depending on equipment)
Insert the CD in the player.
.
PEUGEOT Connect Nav