2018 Peugeot 308 ECO mode
[x] Cancel search: ECO modePage 38 of 360

36
Distance recorders
The total and trip distances are displayed for
thirty seconds when the ignition is switched off,
when the driver's door is opened and when the
vehicle is locked or unlocked.When travelling abroad, you may have to
change the distance unit: the display of
road speed must be in the official units
(miles or km) for the country.
The change of units is done via the
screen configuration menu, with the
vehicle stationary.
Total distance recorder
It measures the total distance travelled by the
vehicle since its first registration.
Trip recorder
It measures the distance travelled since it was
reset by the driver.
Resetting the trip recorder
F
W
ith the ignition on, press the button until
zeroes appear.
Instrument panel lighting
dimmer
Version with monochrome screen
Only works when the vehicle lighting is on
("night" mode).
It allows the brightness of the instruments and
controls to be adjusted.
F
P
ress this button to adjust the
brightness.
F
W
hen the lighting reaches the
minimum setting, release the
button, then press it again to
increase brightness. or
F
W
hen the lighting reaches the maximum
setting, release the button, then press it
again to decrease brightness.
F
R
elease the button once the desired level of
brightness is reached.
Instrument panel ambient
lighting
Version with touch screen
It allows the instrument panel ambient lighting
to be switched on or off.
The brightness of the instrument panel ambient
lighting is adjusted in the touch screen. F
P
ress this button.
Instruments
Page 39 of 360

37
or F
Sel
ect the Settings
menu in the
upper bar of the touch screen.
F
P
ress the "Brightness " button.
F
A
djust the brightness by pressing the
arrows or moving the cursor.
F
C
onfirm to save and quit.
Trip computer
Information displayed about the current journey
(range, fuel consumption, average speed, etc.). Trip computer data is displayed permanently
when you select the display mode "TRIP
COMPUTER" or "PERSONAL", depending on
the version.
In all other display modes, pressing the end of
the wiper control stalk will cause this data to
appear temporarily in a specific window.
F
P
ress this button, located on the end of the
wiper control stalk , to display the different
tabs in turn.
Display of data on the
instrument panel- Instant information with: • range,
•
c
urrent fuel consumption,
•
t
ime counter of the Stop & Start.
-
J
ourney " 1" with:
•
a
verage speed,
•
a
verage fuel consumption,
•
d
istance travelled,
for the first journey.
-
J
ourney " 2" with:
•
a
verage speed,
•
a
verage fuel consumption,
•
d
istance travelled,
for the second journey.
Reset trip
F When the desired trip is displayed, press the button on the end of the wiper control
stalk for more than 2
seconds.
1
Instruments
Page 40 of 360
38
Monochrome screen C
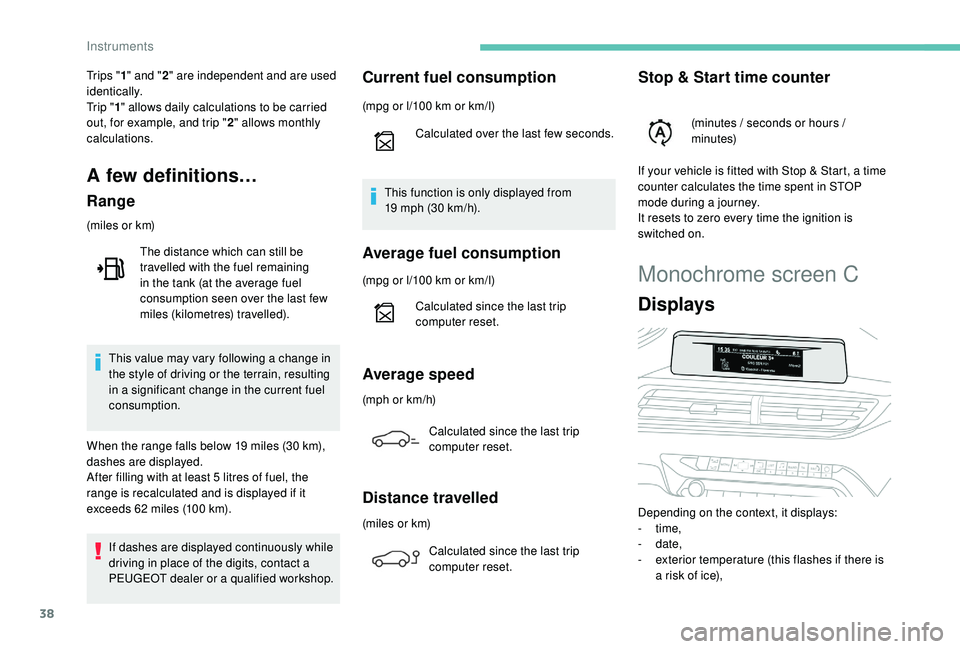
Displays
Depending on the context, it displays:
- time,
-
date,
-
e
xterior temperature (this flashes if there is
a risk of ice),
Tr i p s "
1" and " 2" are independent and are used
identically.
Tr i p " 1" allows daily calculations to be carried
out, for example, and trip " 2" allows monthly
calculations.
A few definitions…
Range
(miles or km)
If dashes are displayed continuously while
driving in place of the digits, contact a
PEUGEOT dealer or a qualified workshop. This value may vary following a change in
the style of driving or the terrain, resulting
in a significant change in the current fuel
consumption.
When the range falls below 19
miles (30 km),
dashes are displayed.
After filling with at least 5
litres of fuel, the
range is recalculated and is displayed if it
exceeds 62
miles (100 km).
The distance which can still be
travelled with the fuel remaining
in the tank (at the average fuel
consumption seen over the last few
miles (kilometres) travelled).
Current fuel consumption
(mpg or l/100 km or km/l)
C alculated over the last few seconds.
This function is only displayed from
19
mph (30 km/h).
Average fuel consumption
(mpg or l/100 km or km/l)
C alculated since the last trip
computer reset.
Average speed
(mph or km/h)
Calculated since the last trip
computer reset.
Distance travelled
(miles or km)Calculated since the last trip
computer reset.
Stop & Start time counter
(minutes / seconds or hours /
minutes)
If your vehicle is fitted with Stop & Start, a time
counter calculates the time spent in STOP
mode during a journey.
It resets to zero every time the ignition is
switched on.
Instruments
Page 59 of 360
57
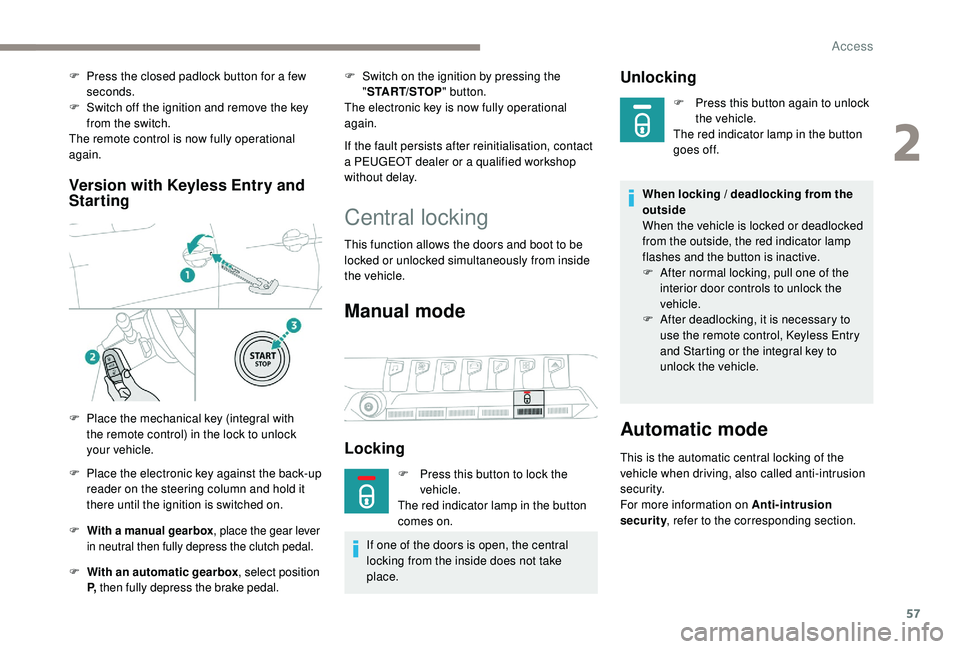
Version with Keyless Entry and
Starting
F With a manual gearbox , place the gear lever
in neutral then fully depress the clutch pedal.
F With an automatic gearbox , select position
P, then fully depress the brake pedal.
F Switch on the ignition by pressing the
"START/STOP " button.
The electronic key is now fully operational
again.
If the fault persists after reinitialisation, contact
a PEUGEOT dealer or a qualified workshop
without delay.
F
P
ress the closed padlock button for a few
seconds.
F
S
witch off the ignition and remove the key
from the switch.
The remote control is now fully operational
again.
F
P
lace the mechanical key (integral with
the remote control) in the lock to unlock
your vehicle.
F
P
lace the electronic key against the back-up
reader on the steering column and hold it
there until the ignition is switched on.
Central locking
This function allows the doors and boot to be
locked or unlocked simultaneously from inside
the vehicle.
Manual mode
Locking
F Press this button to lock the vehicle.
The red indicator lamp in the button
comes on.
If one of the doors is open, the central
locking from the inside does not take
place.
Unlocking
F Press this button again to unlock the vehicle.
The red indicator lamp in the button
goes off.
When locking / deadlocking from the
outside
When the vehicle is locked or deadlocked
from the outside, the red indicator lamp
flashes and the button is inactive.
F
A
fter normal locking, pull one of the
interior door controls to unlock the
vehicle.
F
A
fter deadlocking, it is necessary to
use the remote control,
K
eyless Entry
and Starting or the integral key to
unlock the vehicle.
Automatic mode
This is the automatic central locking of the
vehicle when driving, also called anti-intrusion
s e c u r i t y.
For more information on Anti-intrusion
security , refer to the corresponding section.
2
Access
Page 69 of 360
67
Panoramic opening
sunroof
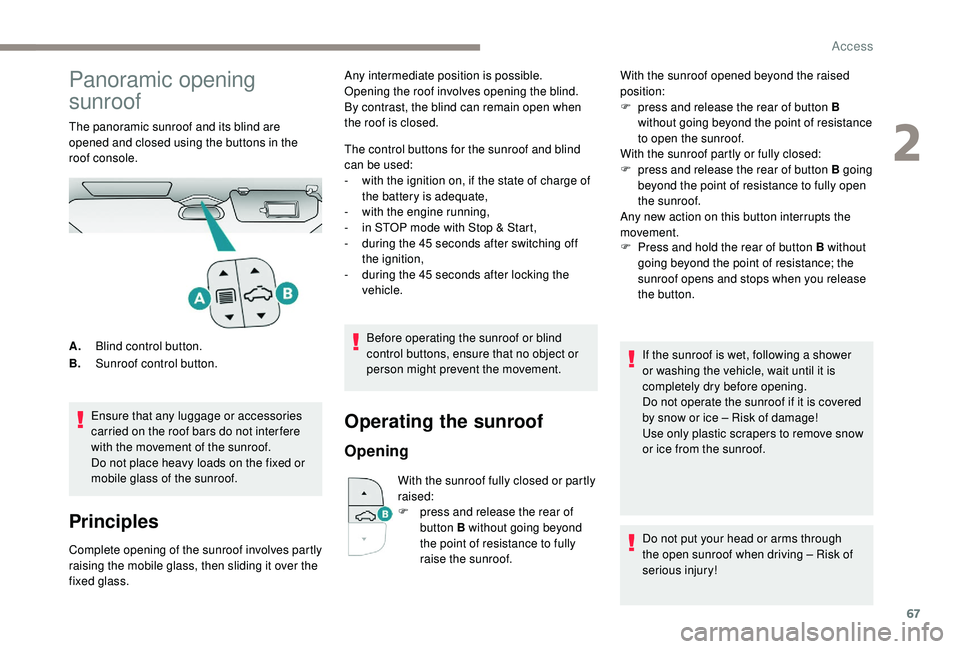
The panoramic sunroof and its blind are
opened and closed using the buttons in the
roof console.Ensure that any luggage or accessories
carried on the roof bars do not inter fere
with the movement of the sunroof.
Do not place heavy loads on the fixed or
mobile glass of the sunroof.
Principles
Complete opening of the sunroof involves partly
raising the mobile glass, then sliding it over the
fixed glass. The control buttons for the sunroof and blind
can be used:
-
w
ith the ignition on, if the state of charge of
the battery is adequate,
-
w
ith the engine running,
-
i
n STOP mode with Stop & Start,
-
d
uring the 45 seconds after switching off
the ignition,
-
d
uring the 45 seconds after locking the
vehicle.
Before operating the sunroof or blind
control buttons, ensure that no object or
person might prevent the movement.
Operating the sunroof
Opening
With the sunroof fully closed or partly
raised:
F
p
ress and release the rear of
button B without going beyond
the point of resistance to fully
raise the sunroof. F
P
ress and hold the rear of button B without
going beyond the point of resistance; the
sunroof opens and stops when you release
the button.
A. Blind control button.
B. Sunroof control button. Any intermediate position is possible.
Opening the roof involves opening the blind.
By contrast, the blind can remain open when
the roof is closed.
With the sunroof opened beyond the raised
position:
F
p
ress and release the rear of button B
without going beyond the point of resistance
to open the sunroof.
With the sunroof partly or fully closed:
F
p
ress and release the rear of button B going
beyond the point of resistance to fully open
the sunroof.
Any new action on this button interrupts the
movement.
If the sunroof is wet, following a shower
or washing the vehicle, wait until it is
completely dry before opening.
Do not operate the sunroof if it is covered
by snow or ice – Risk of damage!
Use only plastic scrapers to remove snow
or ice from the sunroof.
Do not put your head or arms through
the open sunroof when driving – Risk of
serious injury!
2
Access
Page 75 of 360
73
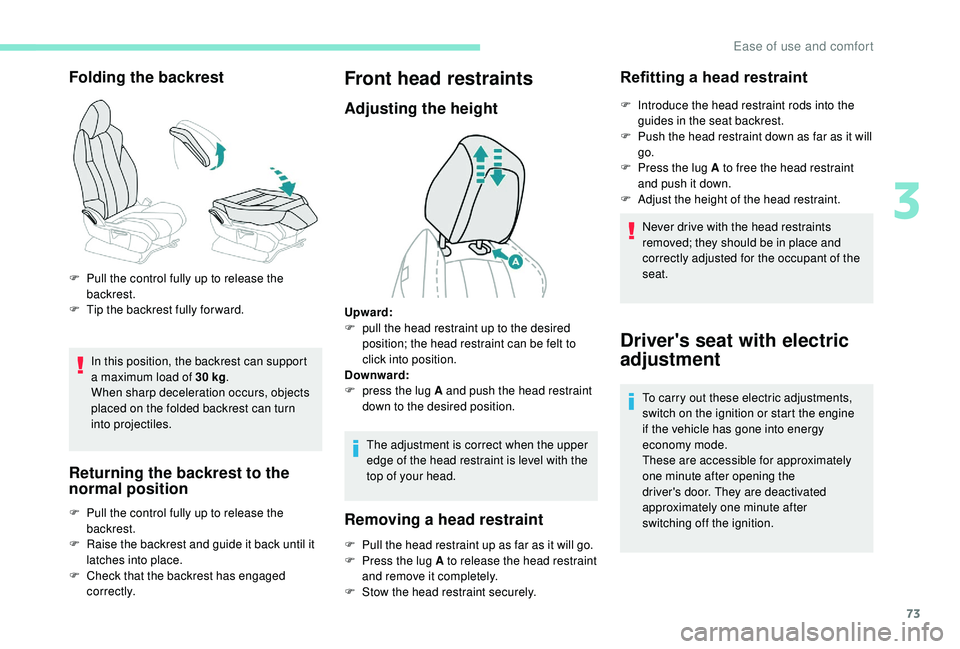
Folding the backrest
In this position, the backrest can support
a maximum load of 30 kg.
When sharp deceleration occurs, objects
placed on the folded backrest can turn
into projectiles.
Returning the backrest to the
normal position
F Pull the control fully up to release the backrest.
F
T
ip the backrest fully for ward.
F
P
ull the control fully up to release the
backrest.
F
R
aise the backrest and guide it back until it
latches into place.
F
C
heck that the backrest has engaged
c o r r e c t l y.
Front head restraints
Adjusting the height
The adjustment is correct when the upper
edge of the head restraint is level with the
top of your head.
Removing a head restraint
F Pull the head restraint up as far as it will go.
F P ress the lug A to release the head restraint
and remove it completely.
F
S
tow the head restraint securely.
Refitting a head restraint
F Introduce the head restraint rods into the guides in the seat backrest.
F
P
ush the head restraint down as far as it will
go.
F
P
ress the lug A to free the head restraint
and push it down.
F
A
djust the height of the head restraint.
Never drive with the head restraints
removed; they should be in place and
correctly adjusted for the occupant of the
seat.
Upward:
F
p
ull the head restraint up to the desired
position; the head restraint can be felt to
click into position.
Downward:
F
p
ress the lug A and push the head restraint
down to the desired position.
Driver's seat with electric
adjustment
To carry out these electric adjustments,
switch on the ignition or start the engine
if the vehicle has gone into energy
economy mode.
These are accessible for approximately
one minute after opening the
driver's door. They are deactivated
approximately one minute after
switching off the ignition.
3
Ease of use and comfort
Page 89 of 360
87
�$�8�7�2
�)�$�6�7
�$�8�7�2
�1�2�5�0�$�/
�6�2�)�7
�$�8�7�2
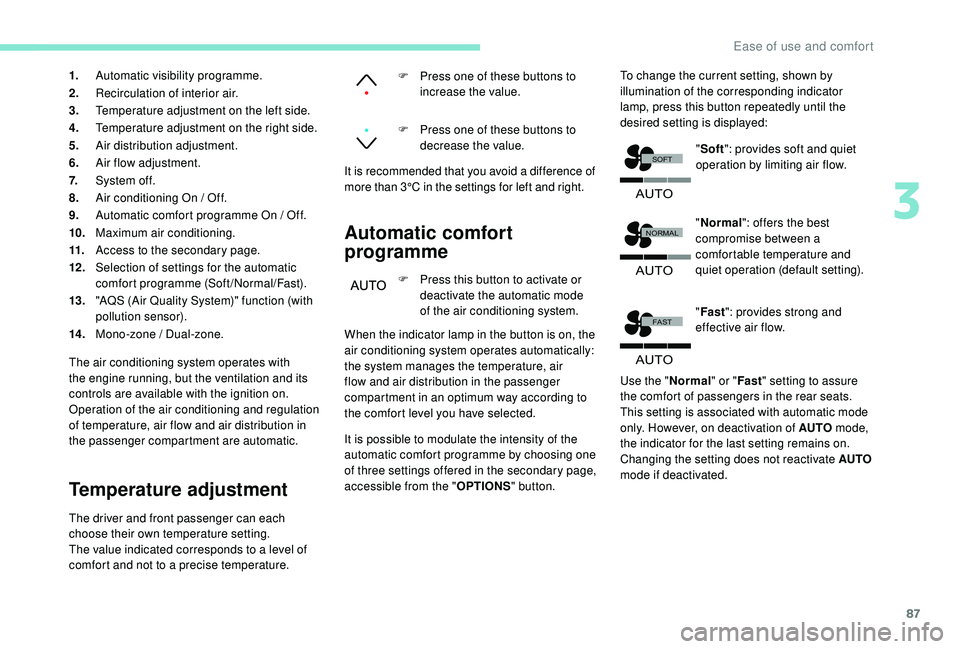
1.Automatic visibility programme.
2. Recirculation of interior air.
3. Temperature adjustment on the left side.
4. Temperature adjustment on the right side.
5. Air distribution adjustment.
6. Air flow adjustment.
7. System of f.
8. Air conditioning On / Off.
9. Automatic comfort programme On / Off.
10. Maximum air conditioning.
11. Access to the secondary page.
12 . Selection of settings for the automatic
comfort programme (Soft/Normal/Fast).
13. "AQS (Air Quality System)" function (with
pollution sensor).
14 . Mono-zone / Dual-zone.
The air conditioning system operates with
the engine running, but the ventilation and its
controls are available with the ignition on.
Operation of the air conditioning and regulation
of temperature, air flow and air distribution in
the passenger compartment are automatic.
Temperature adjustment
The driver and front passenger can each
choose their own temperature setting.
The value indicated corresponds to a level of
comfort and not to a precise temperature.
Automatic comfort
programme
F Press this button to activate or deactivate the automatic mode
of the air conditioning system.
F
P
ress one of these buttons to
increase the value.
F
P
ress one of these buttons to
decrease the value.
It is recommended that you avoid a difference of
more than 3°C in the settings for left and right.
When the indicator lamp in the button is on, the
air conditioning system operates automatically:
the system manages the temperature, air
flow and air distribution in the passenger
compartment in an optimum way according to
the comfort level you have selected.
It is possible to modulate the intensity of the
automatic comfort programme by choosing one
of three settings offered in the secondary page,
accessible from the " OPTIONS" button. To change the current setting, shown by
illumination of the corresponding indicator
lamp, press this button repeatedly until the
desired setting is displayed:
"Normal ": offers the best
compromise between a
comfortable temperature and
quiet operation (default setting).
" Fast ": provides strong and
effective air flow.
Use the " Normal" or "Fast" setting to assure
the comfort of passengers in the rear seats.
This setting is associated with automatic mode
only. However, on deactivation of AUTO mode,
the indicator for the last setting remains on.
Changing the setting does not reactivate AUTO
mode if deactivated. "
Soft ": provides soft and quiet
operation by limiting air flow.
3
Ease of use and comfort
Page 91 of 360
89
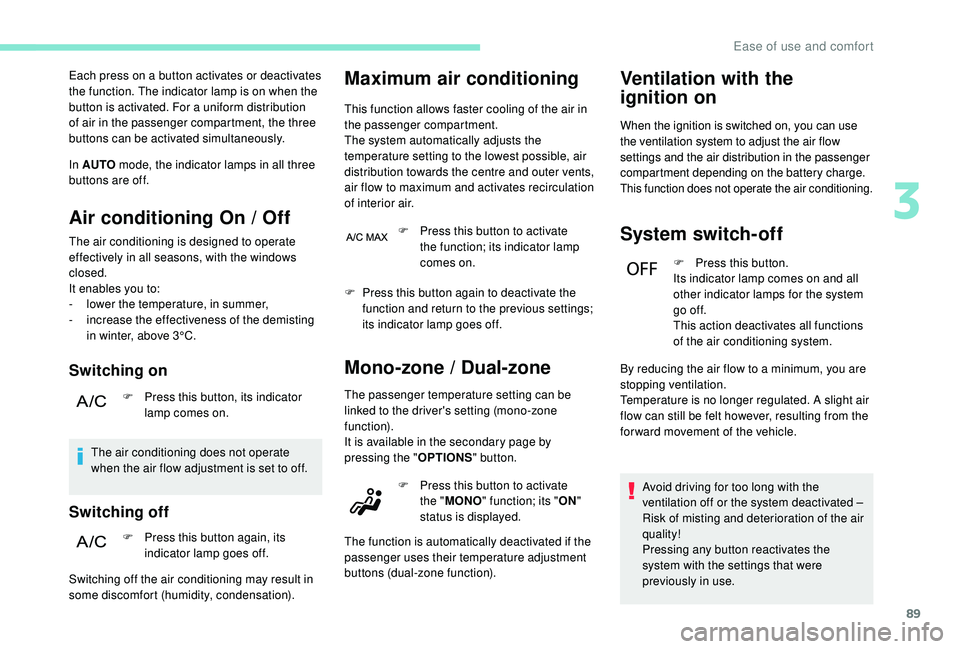
Each press on a button activates or deactivates
the function. The indicator lamp is on when the
button is activated. For a uniform distribution
of air in the passenger compartment, the three
buttons can be activated simultaneously.
In AUTO mode, the indicator lamps in all three
buttons are off.
Air conditioning On / Off
The air conditioning is designed to operate
effectively in all seasons, with the windows
closed.
It enables you to:
-
l
ower the temperature, in summer,
-
i
ncrease the effectiveness of the demisting
in winter, above 3°C.
Switching on
F Press this button, its indicator lamp comes on.
The air conditioning does not operate
when the air flow adjustment is set to off.
Switching off
F Press this button again, its indicator lamp goes off.
Maximum air conditioning
This function allows faster cooling of the air in
the passenger compartment.
The system automatically adjusts the
temperature setting to the lowest possible, air
distribution towards the centre and outer vents,
air flow to maximum and activates recirculation
of interior air.
Switching off the air conditioning may result in
some discomfort (humidity, condensation). F
P
ress this button to activate
the function; its indicator lamp
comes on.
F
P
ress this button again to deactivate the
function and return to the previous settings;
its indicator lamp goes off.
Mono-zone / Dual-zone
The passenger temperature setting can be
linked to the driver's setting (mono-zone
function).
It is available in the secondary page by
pressing the " OPTIONS" button.
Ventilation with the
ignition on
When the ignition is switched on, you can use
the ventilation system to adjust the air flow
settings and the air distribution in the passenger
compartment depending on the battery charge.
This function does not operate the air conditioning.
System switch-off
F Press this button.
Its indicator lamp comes on and all
other indicator lamps for the system
go of f.
This action deactivates all functions
of the air conditioning system.
Avoid driving for too long with the
ventilation off or the system deactivated
–
Risk of misting and deterioration of the air
quality!
Pressing any button reactivates the
system with the settings that were
previously in use.
F
P
ress this button to activate
the " MONO " function; its " ON"
status is displayed.
The function is automatically deactivated if the
passenger uses their temperature adjustment
buttons (dual-zone function). By reducing the air flow to a minimum, you are
stopping ventilation.
Temperature is no longer regulated. A slight air
flow can still be felt however, resulting from the
for ward movement of the vehicle.
3
Ease of use and comfort