2018 PEUGEOT 3008 tow
[x] Cancel search: towPage 5 of 360
3
bit.ly/helpPSA
.
.
Driving recommendations 151
Anti-theft protection 1 52
Starting / Switching off the engine
with the key
1
52
Starting / Switching off the engine
with
K
eyless Entry and Starting
1
54
Electric parking brake
1
57
Manual gearbox
1
60
Automatic gearbox
1
61
Hill start assist
1
65
Dynamic pack
1
66
Gear shift indicator
1
67
Stop & Start
1
67
Under-inflation detection
1
70
Memorising speeds
1
72
Recognition of speed limit signs and recommendation
172
Speed limiter
1
76
Cruise control
1
78
Adaptive cruise control
1
80
Distance alert and Active Safety Brake
1
89
Fatigue detection system
1
92
Lane Departure Warning System
1
94
Active Lane Departure Warning System
1
95
Blind Spot Monitoring System
2
00
Parking sensors
2
02
Visiopark 1 – Visiopark 2
2
04
Park Assist
2
09Fuel
216
Misfuel prevention (Diesel) 2 16
Compatibility of fuels
2
18
Towing device
2
19
Towbar with quickly detachable towball
2
20
Load reduction mode
2
23
Energy economy mode
2
23
Very cold climate screen
2
24
Snow chains
2
25
Fitting roof bars
2
25
Bonnet
226
Engine compartment
2
28
Checking levels
2
29
Checks
231
AdBlue
® (BlueHDi engines) 2 34
Warning triangle
2
37
Running out of fuel (Diesel)
2
37
Tool kit
2
38
Temporary puncture repair kit
2
40
Spare wheel
2
43
Changing a bulb
2
47
Changing a wiper blade
2
52
Changing a fuse
2
53
12 V battery
2
57
Towing the vehicle
2
61Engine technical data and towed loads
2
63
Petrol engines and towed loads
2
64
Diesel engines and towed loads
2
65
Dimensions
2
68
Identification markings
2
69
Driving
Practical information
In the event of a breakdown Technical data
Alphabetical index
Audio equipment and telematics
PEUGEOT Connect Nav
PEUGEOT Connect Radio
Bluetooth audio system
Access to additional videos
.
Contents
Page 8 of 360
6
As a passenger, if you avoid connecting your
multimedia devices (film, music, video game
etc.), you will contribute towards limiting the
consumption of electrical energy, and so of fuel.
Disconnect your portable devices before
leaving the vehicle.
Eco- driving
Eco-driving is a range of everyday practices that allow the motorist to optimise their fuel consumption and CO2 emissions.
Optimise the use of your
gearbox
With a manual gearbox, move off gently
and change up without waiting. During
acceleration change up early.
With an automatic gearbox, give preference
to automatic mode and avoid pressing the
accelerator pedal heavily or suddenly.
The gear shift indicator invites you to engage
the most suitable gear: as soon as the
indication is displayed in the instrument panel,
follow it straight away.
For vehicles fitted with an automatic gearbox,
this indicator appears only in manual mode.
Drive smoothly
Maintain a safe distance between vehicles,
use engine braking rather than the
brake pedal, and press the accelerator
progressively. These practices contribute
towards a reduction in fuel consumption and
CO
2 emissions and also help reduce the
background traffic noise.
If your vehicle has cruise control, make use of
the system at speeds above 25
mph (40 km/h)
when the traffic is flowing well.
Control the use of your electrical
equipment
Before moving off, if the passenger
compartment is too warm, ventilate it by
opening the windows and air vents before
using the air conditioning.
Above 31
mph (50 km/h), close the windows
and leave the air vents open.
Consider using equipment that can help
keep the temperature in the passenger
compartment down (sunroof blind and
window blinds, etc.). Switch off the headlamps and front foglamps
when the ambient light level does not require
their use.
Avoid running the engine before moving off,
particularly in winter; your vehicle will warm up
much faster while driving. Unless it has automatic regulation, switch off
the air conditioning as soon as the desired
temperature has been reached.
Switch off the demisting and defrosting
controls, if these are not automatically
managed.
Switch off the heated seat as soon as possible.
Eco-driving
Page 28 of 360
26
+
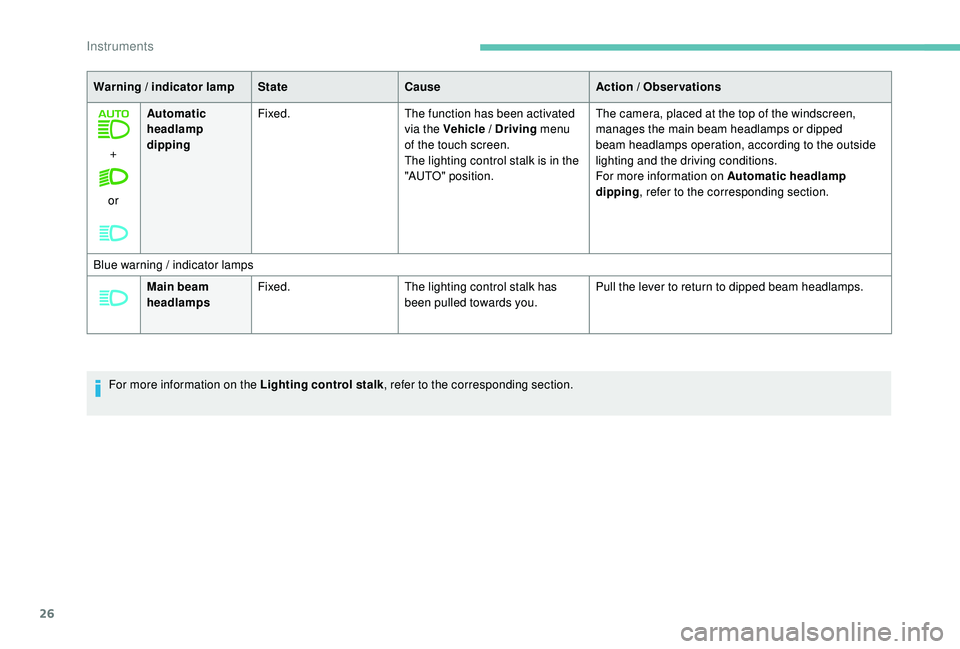
or Automatic
headlamp
dipping
Fixed.
The function has been activated
via the Vehicle / Driving menu
of the touch screen.
The lighting control stalk is in the
"AUTO" position. The camera, placed at the top of the windscreen,
manages the main beam headlamps or dipped
beam headlamps operation, according to the outside
lighting and the driving conditions.
For more information on Automatic headlamp
dipping
, refer to the corresponding section.
Warning / indicator lamp
StateCause Action / Observations
Blue warning / indicator lamps Main beam
headlamps Fixed.
The lighting control stalk has
been pulled towards you. Pull the lever to return to dipped beam headlamps.
For more information on the Lighting control stalk , refer to the corresponding section.
Instruments
Page 57 of 360
55
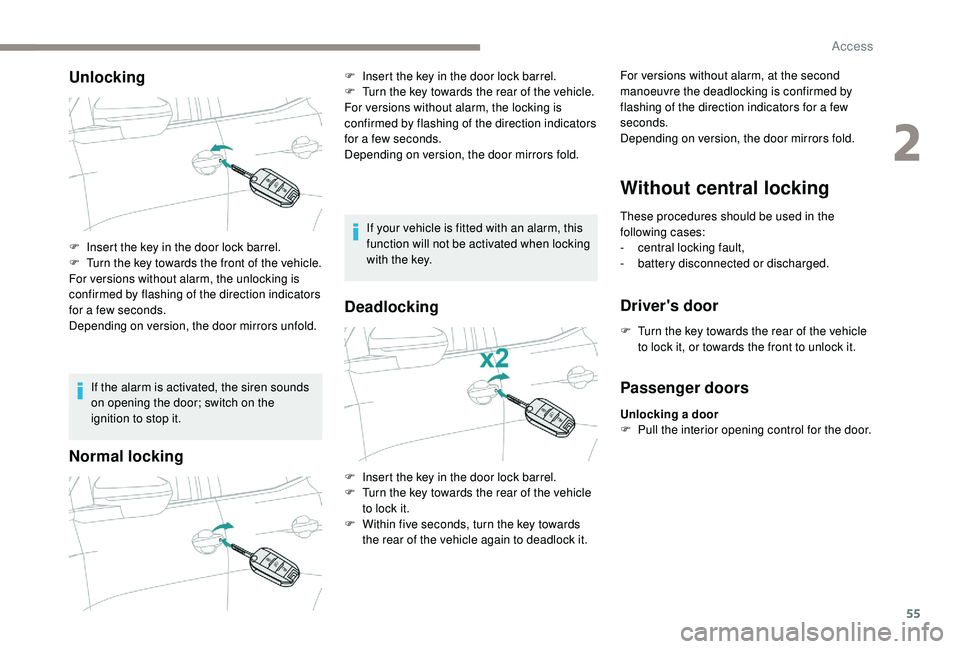
Unlocking
If the alarm is activated, the siren sounds
on opening the door; switch on the
ignition to stop it.
Normal locking
If your vehicle is fitted with an alarm, this
function will not be activated when locking
with the key.
Deadlocking
F Insert the key in the door lock barrel.
F T urn the key towards the front of the vehicle.
For versions without alarm, the unlocking is
confirmed by flashing of the direction indicators
for a few seconds.
Depending on version, the door mirrors unfold. F
I
nsert the key in the door lock barrel.
F
T
urn the key towards the rear of the vehicle.
For versions without alarm, the locking is
confirmed by flashing of the direction indicators
for a few seconds.
Depending on version, the door mirrors fold.
Without central locking
These procedures should be used in the
following cases:
-
c
entral locking fault,
-
b
attery disconnected or discharged.
Driver's door
F Turn the key towards the rear of the vehicle to lock it, or towards the front to unlock it.
F
I
nsert the key in the door lock barrel.
F
T
urn the key towards the rear of the vehicle
to lock it.
F
W
ithin five seconds, turn the key towards
the rear of the vehicle again to deadlock it. For versions without alarm, at the second
manoeuvre the deadlocking is confirmed by
flashing of the direction indicators for a few
seconds.
Depending on version, the door mirrors fold.
Passenger doors
Unlocking a door
F
P ull the interior opening control for the door.
2
Access
Page 58 of 360
56
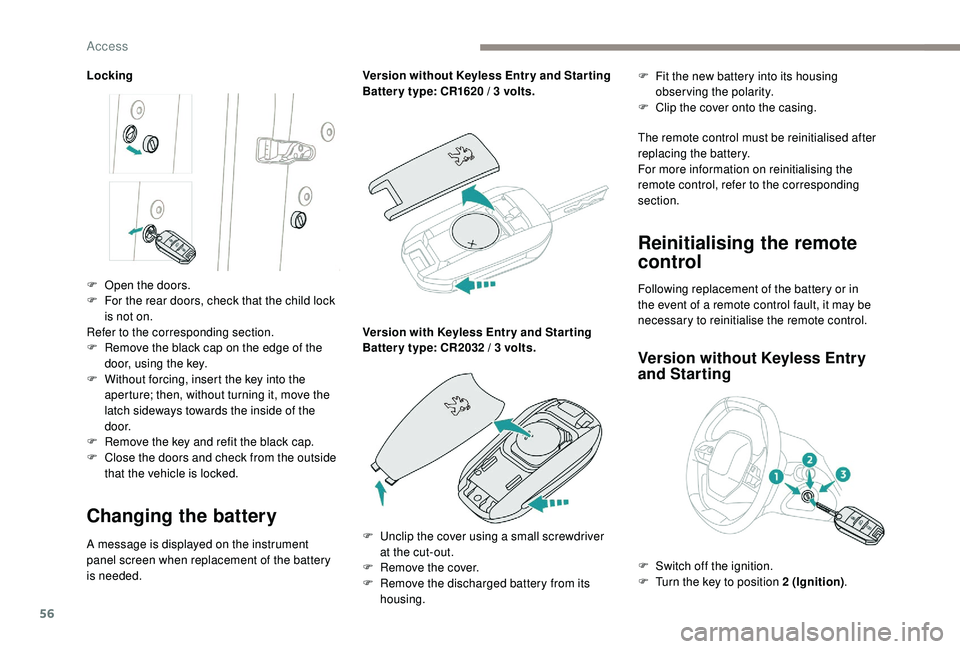
Locking
Changing the battery
A message is displayed on the instrument
panel screen when replacement of the battery
is needed.Version without
K
eyless Entr y and Star ting
Batter y type: CR1620 / 3 volts.
Version with
K
eyless Entr y and Star ting
Batter y type: CR2032 / 3 volts.F
F
it the new battery into its housing
observing the polarity.
F
C
lip the cover onto the casing.
The remote control must be reinitialised after
replacing the battery.
For more information on reinitialising the
remote control, refer to the corresponding
section.
Reinitialising the remote
control
Following replacement of the battery or in
the event of a remote control fault, it may be
necessary to reinitialise the remote control.
Version without K eyless Entry
and Starting
F Open the doors.
F
F or the rear doors, check that the child lock
is not on.
Refer to the corresponding section.
F
R
emove the black cap on the edge of the
door, using the key.
F
W
ithout forcing, insert the key into the
aperture; then, without turning it, move the
latch sideways towards the inside of the
d o o r.
F
R
emove the key and refit the black cap.
F
C
lose the doors and check from the outside
that the vehicle is locked.
F
U
nclip the cover using a small screwdriver
at the cut-out.
F
R
emove the cover.
F
R
emove the discharged battery from its
housing. F
S
witch off the ignition.
F
T
urn the key to position 2 (Ignition).
Access
Page 61 of 360

59
Locking the vehicle with full
alarm system
Activation
Following a vehicle locking request, the
perimeter monitoring is activated after
5 seconds and the interior volumetric and
anti-tilt monitoring after 45
seconds.
F
T
urn the ignition off and exit the vehicle.
F
L
ock the vehicle using the remote control or
the "
K
eyless Entry and Starting" system.
The monitoring system is active: the red
indicator lamp in the button flashes once per
second and the direction indicators come on for
about 2
seconds. If an opening (door, boot or bonnet) is not
fully closed, the vehicle is not locked but
the exterior perimeter monitoring will be
activated after a delay of 45 seconds at
the same time as the interior volumetric
and anti-tilt monitoring.
Deactivation
F Press the unlocking button on the remote control.
or
F
U
nlock the vehicle with the "
K
eyless Entry
and Starting" system.
The monitoring system is deactivated: the
indicator lamp in the button goes off and the
direction indicators flash for about 2
seconds.
When the vehicle automatically locks itself
again (as happens if a door or boot is not
opened within 30
seconds of unlocking),
the monitoring system is also reactivated
automatically.
Locking the vehicle
with exterior perimeter
monitoring only
Deactivate the interior volumetric and anti-tilt
monitoring to avoid unwanted triggering of the
alarm in certain cases such as:
Deactivating the interior
volumetric and anti-tilt
monitoring
F Switch off the ignition and within 10 seconds, press the button until the red
indicator lamp is on continuously.
F
G
et out of the vehicle.
F
I
mmediately lock the vehicle using the
remote control or the "
K
eyless Entry and
Starting" system.
The exterior perimeter monitoring alone is
activated: the indicator lamp in the button
flashes once per second. -
l
eaving a pet in the vehicle,
-
l
eaving a window or sunroof partially open,
-
w
ashing your vehicle,
-
c
hanging a wheel,
-
h
aving your vehicle towed,
-
t
ransport by ship.
2
Access
Page 65 of 360
63
To avoid the risk of injury through pinching
or trapping, before and during operation of
the motorised tailgate:
-
e
nsure that there is no person close to
the rear of the vehicle,
-
w
atch the activity of your passengers,
particularly any children.
Bicycle carrier / Towbar
The motorised tailgate is not designed to
support a bicycle carrier.
When installing a bicycle carrier on a towbar
with connection of a cable to the towbar socket,
the motorised operation of the tailgate will be
automatically deactivated.
If using a towbar or bicycle carrier not
recommended by PEUGEOT, it is essential
to deactivate the motorised operation of the
tailgate.
Motorised operation
Activation / deactivation of the
motorised operation of the tailgate is
done in the Vehicle / Driving
menu
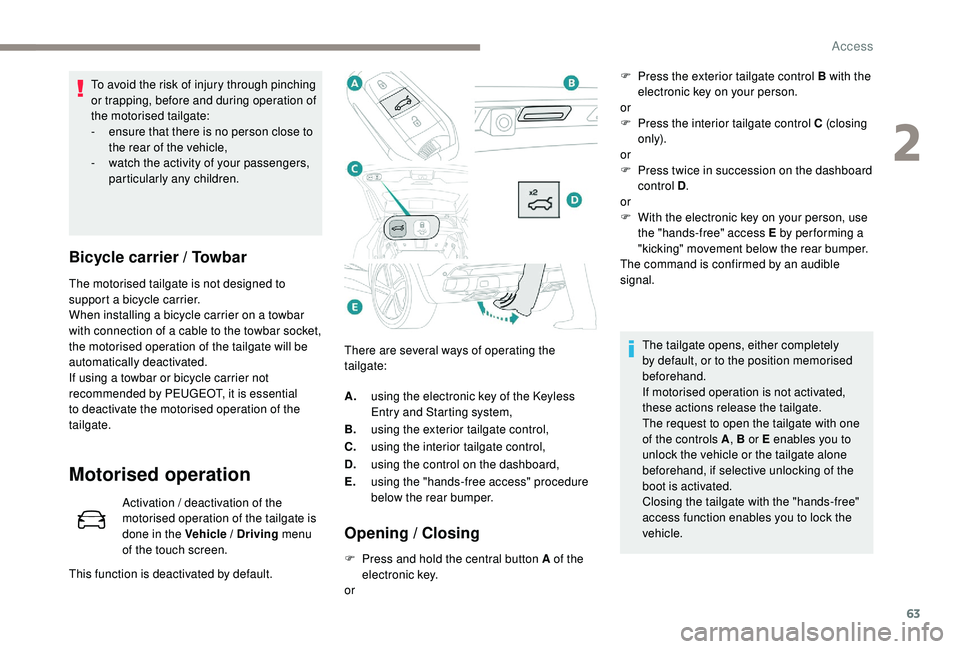
of the touch screen. There are several ways of operating the
tailgate:
Opening / Closing
F Press and hold the central button A of the
electronic key.
or
This function is deactivated by default. A.
using the electronic key of the
K
eyless
Entry and Starting system,
B. using the exterior tailgate control,
C. using the interior tailgate control,
D. using the control on the dashboard,
E. using the "hands-free access" procedure
below the rear bumper. F
P
ress the exterior tailgate control B with the
electronic key on your person.
or
F
P
ress the interior tailgate control C (closing
only).
or
F
P
ress twice in succession on the dashboard
control D .
or
F
W
ith the electronic key on your person, use
the "hands-free" access E by per forming a
"kicking" movement below the rear bumper.
The command is confirmed by an audible
signal.
The tailgate opens, either completely
by default, or to the position memorised
beforehand.
If motorised operation is not activated,
these actions release the tailgate.
The request to open the tailgate with one
of the controls A , B or E enables you to
unlock the vehicle or the tailgate alone
beforehand, if selective unlocking of the
boot is activated.
Closing the tailgate with the "hands-free"
access function enables you to lock the
vehicle.
2
Access
Page 67 of 360
65
Reinitialising the
motorised tailgate
This operation is necessary where there is no
movement – after detection of an obstacle,
connecting or recharging the battery, etc.
F
O
pen the tailgate manually, if necessary.
F
F
ully close the tailgate manually.
If the problem persists, contact a PEUGEOT
dealer or a qualified workshop.
Precautions in use
In wintry conditions
In the event of an accumulation of snow
on the tailgate, clear the snow before
commanding a motorised opening of the
tailgate.
The formation of ice can block the tailgate
and prevent its opening: wait until the ice
melts with the heating of the passenger
compartment.
When washing
When washing the vehicle in an automatic
car wash, do not forget to lock your vehicle
to avoid the risk of unexpected opening.
Recommendations related
to the "Hands-Free Tailgate
Access" function
If several kicking movements to operate the
tailgate have no effect, wait a few seconds
before trying again.
The function automatically deactivates in heavy
rain or following a build-up of snow.
If it does not work, check that the electronic key
is not exposed to a source of electromagnetic
pollution (smartphone, etc.).
The function may not work correctly with a
prosthetic leg.
The function may not work correctly if your
vehicle is fitted with a towbar. -
y
our vehicle is being serviced,
-
y
ou are accessing the spare wheel
(depending on version).
To avoid such operating problems, keep the
electronic key away from the recognition
zone or deactivate the "Hands-Free Tailgate
Access" function.
In some circumstances, the tailgate may open
or close by itself, particularly if:
-
y
ou hitch or unhitch a trailer,
-
y
ou fit or remove a bicycle carrier,
-
y
ou load or unload bicycles from a bicycle
c a r r i e r,
-
y
ou place or lift something behind the
vehicle,
-
an
animal approaches the rear bumper,
-
y
ou are washing your vehicle,
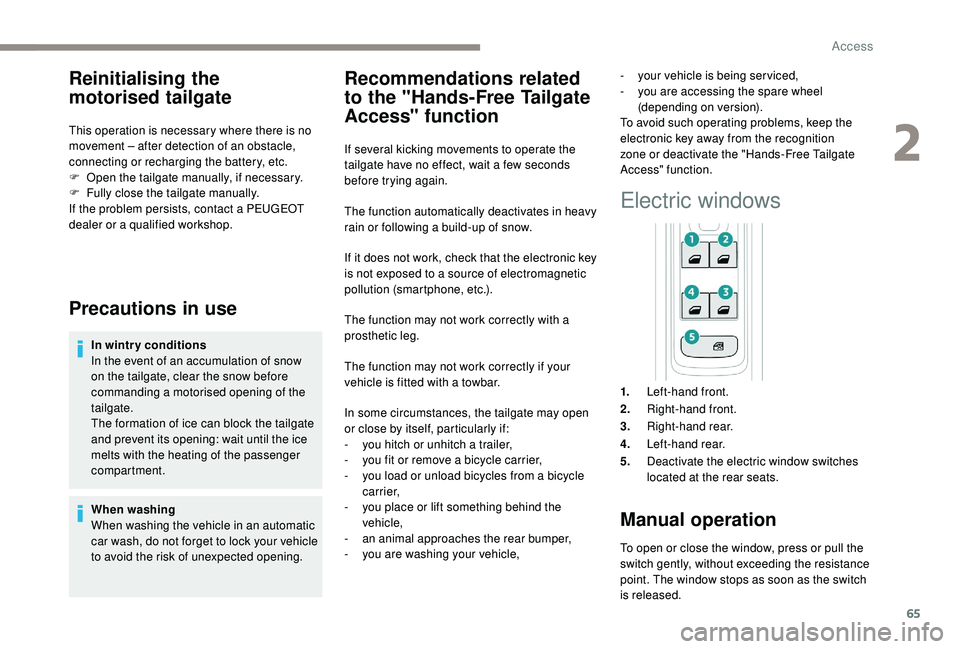
Electric windows
1. Left-hand front.
2. Right-hand front.
3. Right-hand rear.
4. Left-hand rear.
5. Deactivate the electric window switches
located at the rear seats.
Manual operation
To open or close the window, press or pull the
switch gently, without exceeding the resistance
point. The window stops as soon as the switch
is released.
2
Access