2018 PEUGEOT 3008 steering
[x] Cancel search: steeringPage 183 of 360
181
Principle of operation
The system automatically adapts the speed of
your vehicle to that of the vehicle in front, to
maintain a constant distance.
If the vehicle in front is driving more slowly, the
system slows, or even stops your vehicle, using
engine braking and the braking system (for
versions fitted with an automatic gearbox).The brake lamps illuminate as soon as
the braking system is activated with
deceleration of the vehicle.
Primarily designed for driving on main
roads and motor ways, this system only
works on moving vehicles
, driving in the
same direction as your vehicle. If the vehicle in front accelerates or changes
lane, the cruise control progressively
accelerates your vehicle to return to the
programmed speed.
If the driver operates a direction indicator to
overtake a slower vehicle, the cruise control
allows your vehicle to temporarily approach
the vehicle in front to assist the overtaking
manoeuvre, though never exceeding the
programmed speed.
The adaptive cruise control system
is a driving aid that cannot, in any
circumstances, replace the need to obser ve
speed limits and safety distances, nor the
need for vigilance on the part of the driver.
It is recommended that you always keep
your feet close to the pedals.
The driver must be ready to take back
control of their vehicle at any time,
using the brake or accelerator pedal as
appropriate.
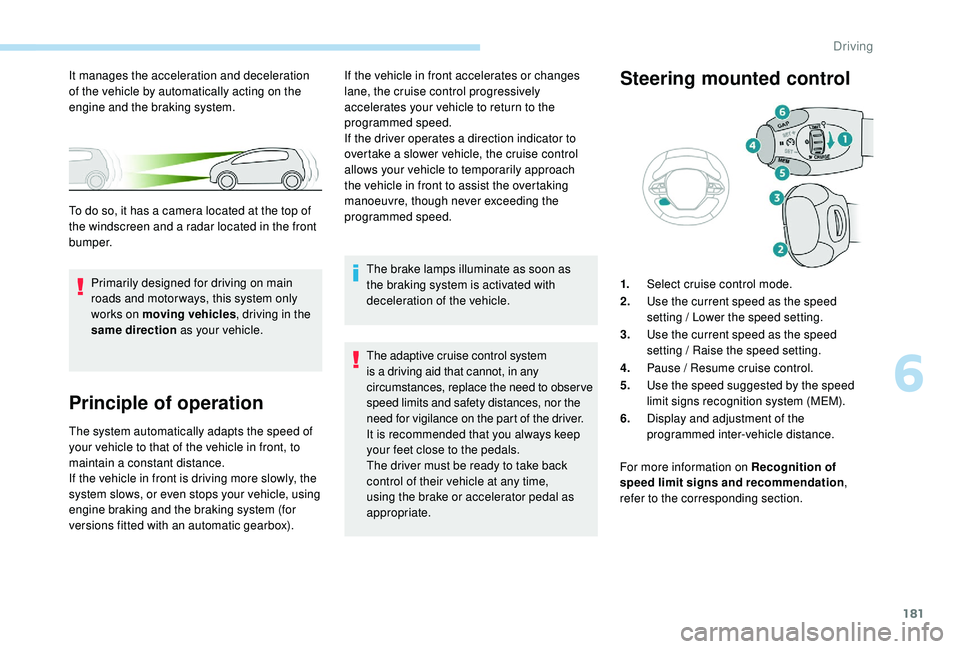
Steering mounted control
1.
Select cruise control mode.
2. Use the current speed as the speed
setting / Lower the speed setting.
3. Use the current speed as the speed
setting / Raise the speed setting.
4. Pause / Resume cruise control.
5. Use the speed suggested by the speed
limit signs recognition system (MEM).
6. Display and adjustment of the
programmed inter-vehicle distance.
For more information on Recognition of
speed limit signs and recommendation ,
refer to the corresponding section.
It manages the acceleration and deceleration
of the vehicle by automatically acting on the
engine and the braking system.
To do so, it has a camera located at the top of
the windscreen and a radar located in the front
b u m p e r.
6
Driving
Page 193 of 360

191
If the camera and/or radar have
confirmed the presence of a vehicle
or a pedestrian, this warning lamp
flashes once the function is acting
on the vehicle's brakes.
This function, also called automatic emergency
braking, aims to reduce the speed of impact or
avoid a frontal collision by your vehicle where
the driver fails to react.
Using a camera and, depending on the version,
radar, this function acts on the vehicle's braking
system.
Important : if operation of the
automatic emergency braking is
triggered, you should take back
control of your vehicle and brake
with the pedal to add to or finish the
automatic braking action. The driver can take back control of the vehicle
at any time by sharply turning the steering
wheel and/or pressing the accelerator pedal.
The point at which braking is triggered
may be adjusted depending on the driving
actions of the driver, such as movement
of the steering wheel or actions at the
accelerator pedal.
Operation of the function may be felt by
slight vibration in the brake pedal.
If the vehicle comes to a complete stop,
the automatic braking is maintained for 1
to 2 seconds.
With a manual gearbox, in the event of
automatic emergency braking until the
vehicle comes to a complete stop, the
engine may stall.
With an automatic gearbox, in the event
of automatic emergency braking until the
vehicle comes to a complete stop, keep
the brake pedal pressed down to prevent
the vehicle from starting off again.
Specific conditions for
operation
The vehicle's speed must be between 3 mph
a nd 53 mph (5 km/h and 85 km/h) (versions
with camera alone) or 87
mph (140 km/h)
(versions with camera and radar) when a
moving vehicle is detected.
The vehicle's speed must not exceed 50
mph
(80
k
m/h) when a stationary vehicle is detected.
The vehicle's speed must not exceed 37
mph
(60
km/h) when a pedestrian is detected.
The ESC system must not be defective.
The DSC system must not be deactivated.
All passenger seat belts must be fastened.
Driving at a steady speed on roads with few
bends is required.
After an impact, the function automatically
stops operating. Consult a PEUGEOT
dealer or a qualified workshop to have the
system checked.
Deactivation / Activation
By default, the system is automatically
activated at every engine start.
The system can be deactivated or activated via
the vehicle settings menu.
6
Driving
Page 197 of 360

195
The detection may be impeded:
- i f the markings on the road are worn,
-
i
f there is little contrast between the
markings on the road and the road
sur face,
-
i
f the windscreen is dirty,
-
i
n certain weather conditions: fog,
heavy rain, snow, shade, bright
sunlight or direct exposure to the sun
(low sun, leaving a tunnel, etc.).
Active Lane Departure
Warning System
Using a camera placed at the top of the
windscreen to identify lane markings on the
ground, this system corrects the trajectory of
the vehicle while alerting the driver if it detects
a risk of involuntary crossing of a line.
This system is particularly useful on motor ways
and main roads.
Conditions for operation
The speed of the vehicle must be between 40
and 112 mph (65 and 180 km/h).
The carriageway must have at least one lane
marking (solid or broken) on the ground.
The driver must hold the wheel with both
hands.
The change of trajectory must not be
accompanied by operation of the direction
indicators.
The ESC system must be activated.
This system is a driving aid which cannot,
in any circumstances, replace the need
for vigilance on the part of the driver.
The driver should remain in control of the
vehicle in all circumstances.
The system helps the driver only when
there is a risk of the vehicle involuntarily
wandering from the lane it is being driven
on. It does not manage the safe driving
distance, the speed of the vehicle or the
brakes.
The driver must hold the steering wheel
with both hands in a way that allows
control to be taken back in circumstances
where the system is not able to inter vene
(if lane markings disappear, for example).
It is necessary to obser ve the driving
regulations and take a break every two
hours. This warning lamp flashes during
trajectory correction.
If the driver wishes to maintain the
trajectory of the vehicle, they can prevent
the correction by keeping a firm grip on
the wheel (during an avoiding manoeuvre,
for example).
The correction is interrupted if the
direction indicators are operated.
Operation
Once the system identifies a risk of the vehicle
involuntarily crossing one of the lane markings
detected, it makes the correction to the
trajectory required to return the vehicle to its
initial path.
The driver will then notice a turning movement
of the steering wheel.
6
Driving
Page 207 of 360
205
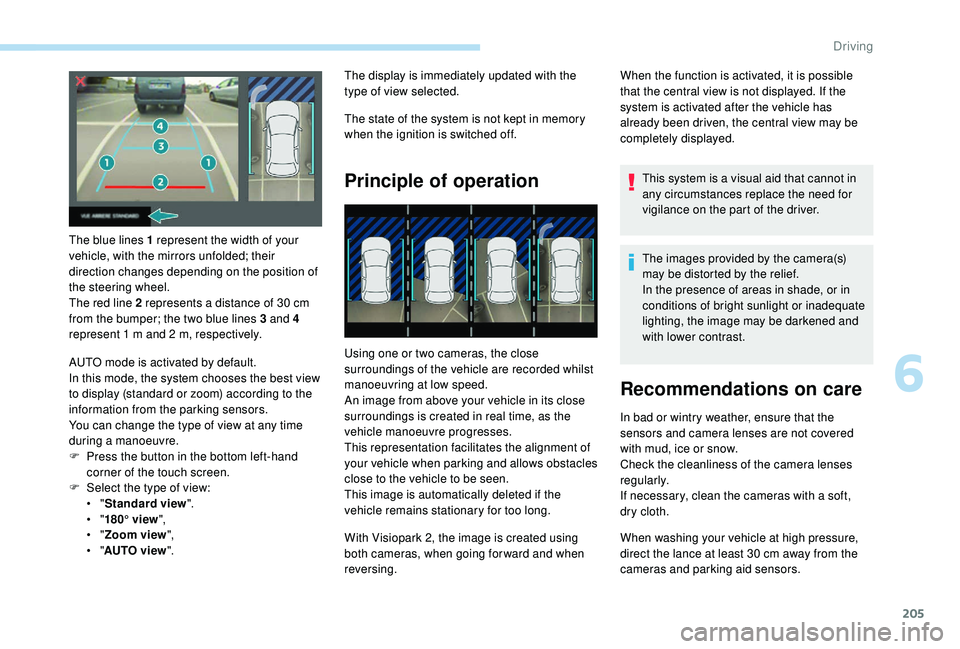
The blue lines 1 represent the width of your
vehicle, with the mirrors unfolded; their
direction changes depending on the position of
the steering wheel.
The red line 2 represents a distance of 30 cm
from the bumper; the two blue lines 3 and 4
represent 1
m and 2 m, respectively.
AUTO mode is activated by default.
In this mode, the system chooses the best view
to display (standard or zoom) according to the
information from the parking sensors.
You can change the type of view at any time
during a manoeuvre.
F
P
ress the button in the bottom left-hand
corner of the touch screen.
F
Sel
ect the type of view:
•
"Standard view ".
•
"180° view ",
•
"Zoom view ",
•
"AUTO view ". The display is immediately updated with the
type of view selected.
The state of the system is not kept in memory
when the ignition is switched off.
Principle of operation
Using one or two cameras, the close
surroundings of the vehicle are recorded whilst
manoeuvring at low speed.
An image from above your vehicle in its close
surroundings is created in real time, as the
vehicle manoeuvre progresses.
This representation facilitates the alignment of
your vehicle when parking and allows obstacles
close to the vehicle to be seen.
This image is automatically deleted if the
vehicle remains stationary for too long.
When the function is activated, it is possible
that the central view is not displayed. If the
system is activated after the vehicle has
already been driven, the central view may be
completely displayed.
This system is a visual aid that cannot in
any circumstances replace the need for
vigilance on the part of the driver.
The images provided by the camera(s)
may be distorted by the relief.
In the presence of areas in shade, or in
conditions of bright sunlight or inadequate
lighting, the image may be darkened and
with lower contrast.
Recommendations on care
In bad or wintry weather, ensure that the
sensors and camera lenses are not covered
with mud, ice or snow.
Check the cleanliness of the camera lenses
regularly.
If necessary, clean the cameras with a soft,
dry cloth.
With Visiopark 2, the image is created using
both cameras, when going for ward and when
reversing. When washing your vehicle at high pressure,
direct the lance at least 30
cm away from the
cameras and parking aid sensors.
6
Driving
Page 208 of 360
206
Visiopark 1
Rear vision
To activate the camera, located in the tailgate,
engage reverse and keep the speed of the
vehicle below 6 mph (10 km/h).
The system is deactivated:
-
a
utomatically above about 6 mph (10 km/h),
-
a
utomatically on opening the tailgate,
-
w
hen shifting out of reverse (the image
remains displayed for 7
seconds),
-
b
y pressing the red cross in the top left-
hand corner of the touch screen.
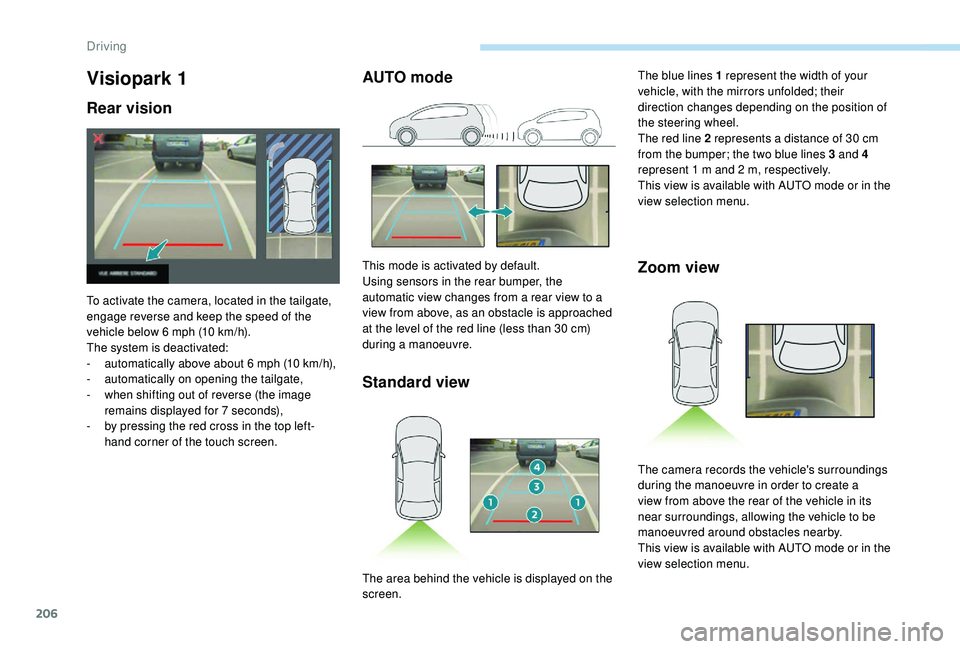
AUTO mode
Standard view
This mode is activated by default.
Using sensors in the rear bumper, the
automatic view changes from a rear view to a
view from above, as an obstacle is approached
at the level of the red line (less than 30
cm)
during a manoeuvre.Zoom view
The blue lines 1 represent the width of your
vehicle, with the mirrors unfolded; their
direction changes depending on the position of
the steering wheel.
The red line 2 represents a distance of 30
cm
from the bumper; the two blue lines 3 and 4
represent 1
m and 2 m, respectively.
This view is available with AUTO mode or in the
view selection menu.
The area behind the vehicle is displayed on the
screen. The camera records the vehicle's surroundings
during the manoeuvre in order to create a
view from above the rear of the vehicle in its
near surroundings, allowing the vehicle to be
manoeuvred around obstacles nearby.
This view is available with AUTO mode or in the
view selection menu.
Driving
Page 210 of 360
208
With the engine running and the
speed below 12 mph (20 km/h), the
system is activated via the Vehicle /
Driving menu of the touch screen:
F
Sel
ect " Panoramic visual aid ".
AUTO mode is displayed by default, with front
vision, if the gearbox is in neutral or with a
gear engaged, or with rear vision, if reverse is
engaged.
The system is deactivated:
-
a
utomatically above about 19 mph (30 km/h)
(the image disappears temporarily from
12
mph (20 km/h)),
-
b
y pressing the red cross in the top left-
hand corner of the touch screen.
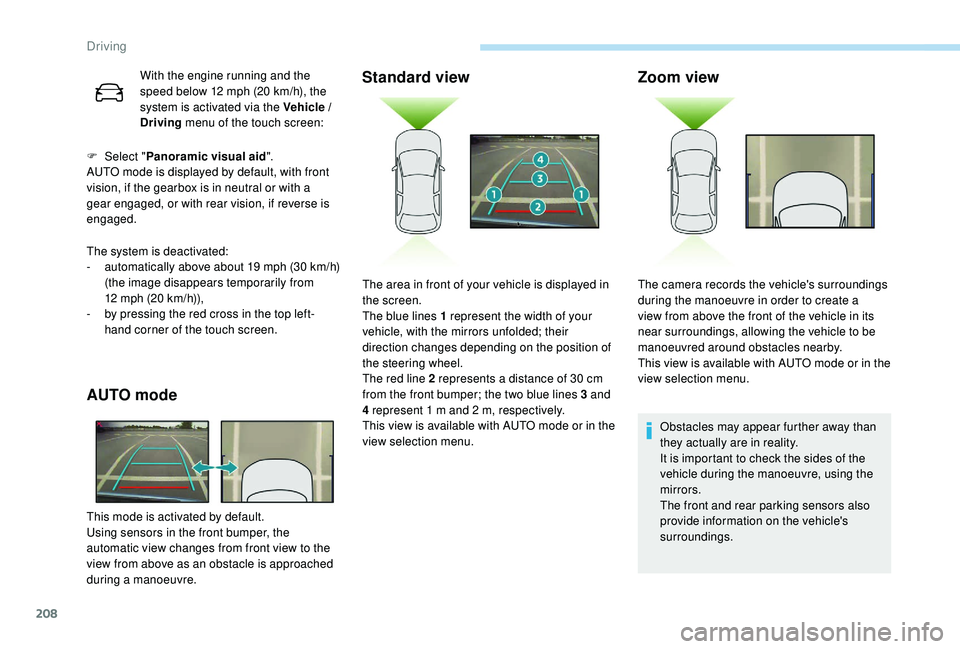
AUTO mode
This mode is activated by default.
Using sensors in the front bumper, the
automatic view changes from front view to the
view from above as an obstacle is approached
during a manoeuvre.
Standard view Zoom view
Obstacles may appear further away than
they actually are in reality.
It is important to check the sides of the
vehicle during the manoeuvre, using the
mirrors.
The front and rear parking sensors also
provide information on the vehicle's
surroundings.
The area in front of your vehicle is displayed in
the screen.
The blue lines 1 represent the width of your
vehicle, with the mirrors unfolded; their
direction changes depending on the position of
the steering wheel.
The red line 2 represents a distance of 30
cm
from the front bumper; the two blue lines 3 and
4 represent 1
m and 2
m, respectively.
This view is available with AUTO mode or in the
view selection menu. The camera records the vehicle's surroundings
during the manoeuvre in order to create a
view from above the front of the vehicle in its
near surroundings, allowing the vehicle to be
manoeuvred around obstacles nearby.
This view is available with AUTO mode or in the
view selection menu.
Driving
Page 211 of 360
209
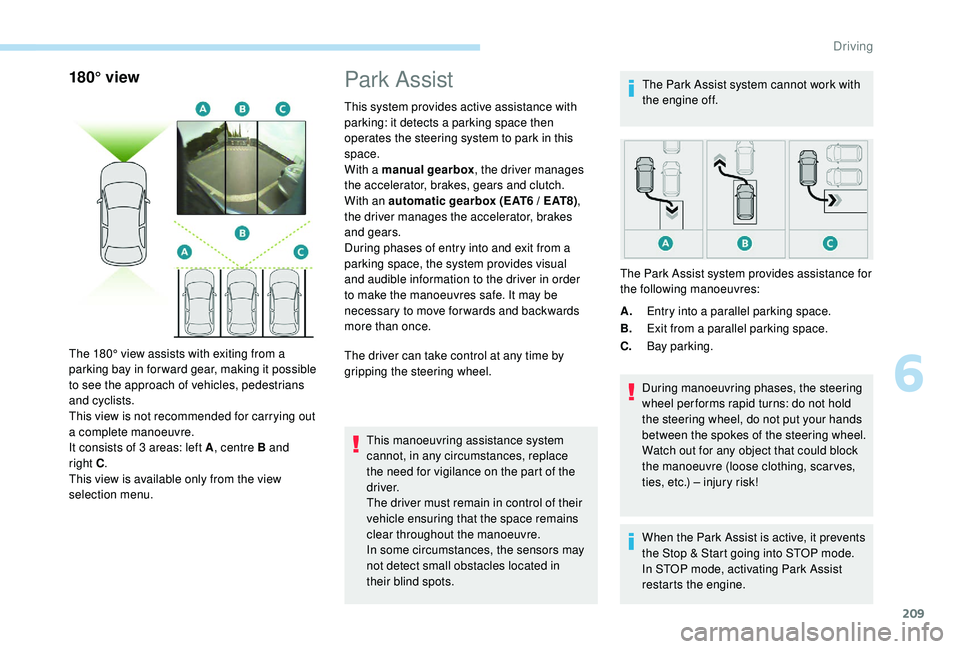
180° view
The 180° view assists with exiting from a
parking bay in forward gear, making it possible
to see the approach of vehicles, pedestrians
and cyclists.
This view is not recommended for carrying out
a complete manoeuvre.
It consists of 3 areas: left A, centre B and
right
C.
This view is available only from the view
selection menu.
Park Assist
This system provides active assistance with
parking: it detects a parking space then
operates the steering system to park in this
space.
With a manual gearbox , the driver manages
the accelerator, brakes, gears and clutch.
With an automatic gearbox (EAT6 / EAT8) ,
the driver manages the accelerator, brakes
and gears.
During phases of entry into and exit from a
parking space, the system provides visual
and audible information to the driver in order
to make the manoeuvres safe. It may be
necessary to move for wards and backwards
more than once.
The driver can take control at any time by
gripping the steering wheel.
This manoeuvring assistance system
cannot, in any circumstances, replace
the need for vigilance on the part of the
driver.
The driver must remain in control of their
vehicle ensuring that the space remains
clear throughout the manoeuvre.
In some circumstances, the sensors may
not detect small obstacles located in
their blind spots. The Park Assist system cannot work with
the engine off.
A. Entry into a parallel parking space.
B. Exit from a parallel parking space.
C. Bay parking.
During manoeuvring phases, the steering
wheel per forms rapid turns: do not hold
the steering wheel, do not put your hands
between the spokes of the steering wheel.
Watch out for any object that could block
the manoeuvre (loose clothing, scar ves,
ties, etc.) – injury risk!
When the Park Assist is active, it prevents
the Stop & Start going into STOP mode.
In STOP mode, activating Park Assist
restarts the engine.
The Park Assist system provides assistance for
the following manoeuvres:
6
Driving
Page 212 of 360
210
The Park Assist system takes control
of the assistance for a maximum of
4 manoeuvre cycles. The function is
deactivated after these 4 cycles. If you
think that your vehicle is not positioned
correctly, you should then take control of
the steering to carry out the manoeuvre.
The sequence of manoeuvres and the
driving instructions are displayed in the
instrument panel.You should always check the surroundings
of your vehicle before starting a
manoeuvre.
The parking sensors function is
not available during parking space
measurement. It intervenes later when
manoeuvring to warn you that your
vehicle is approaching an obstacle: the
audible signal becomes continuous
when the obstacle is less than thirty
centimetres away.
If you have deactivated the parking
sensors, they are automatically
reactivated during assisted parking
manoeuvres.
Activation of the Park Assist deactivates
the Blind Spot Monitoring System.During parking and exit from parking
manoeuvres, Visiopark 1 and Visiopark 2
functions may come into operation. They
facilitate monitoring of the surroundings
of the vehicle, by displaying additional
information in the instrument panel.
For more information on Visiopark 1
and
Visiopark 2 , refer to the corresponding
section.
Operation
Assistance with parallel parking
manoeuvres
F When you have detected a parking space.
F
Sel
ect "Park Assist " in the
Vehicle / Driving menu of the
touch screen to activate the
function.
This indicator lamp comes on in
the instrument panel to confirm the
activation of the system.
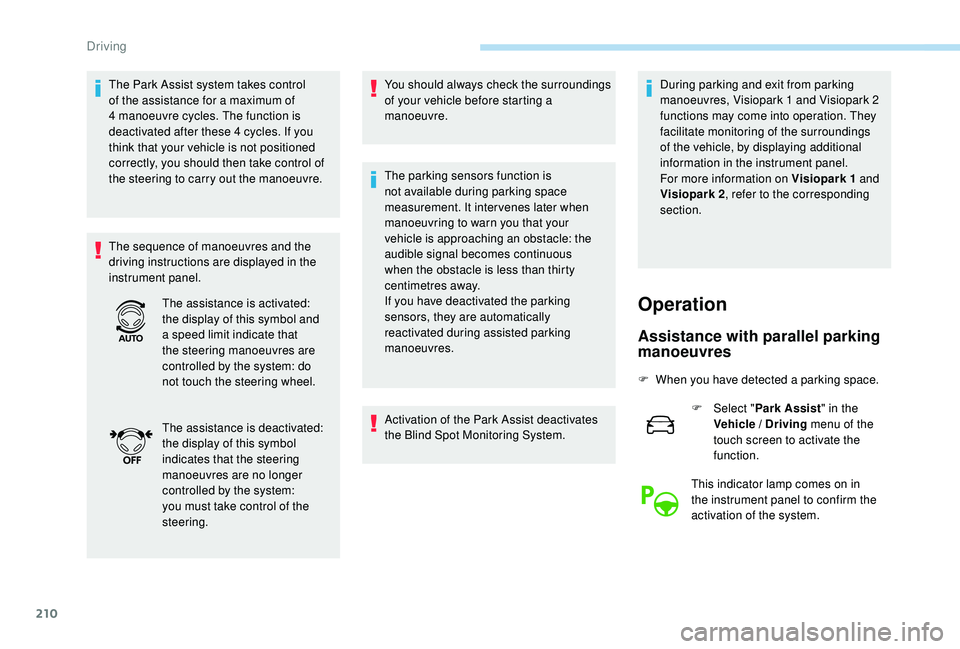
The assistance is activated:
the display of this symbol and
a speed limit indicate that
the steering manoeuvres are
controlled by the system: do
not touch the steering wheel.
The assistance is deactivated:
the display of this symbol
indicates that the steering
manoeuvres are no longer
controlled by the system:
you must take control of the
steering.
Driving