2018 PEUGEOT 3008 window
[x] Cancel search: windowPage 87 of 360
85
The air conditioning system operates only with
the engine running.
The temperature at the nozzles and vents
is regulated by the system according to the
temperature in the passenger compartment
and the temperature setting.
Temperature adjustment
F Press one of these buttons to decrease (blue) or increase
(red) the value. The value indicated corresponds to a level of
comfort and not to a precise temperature.
Air flow adjustment
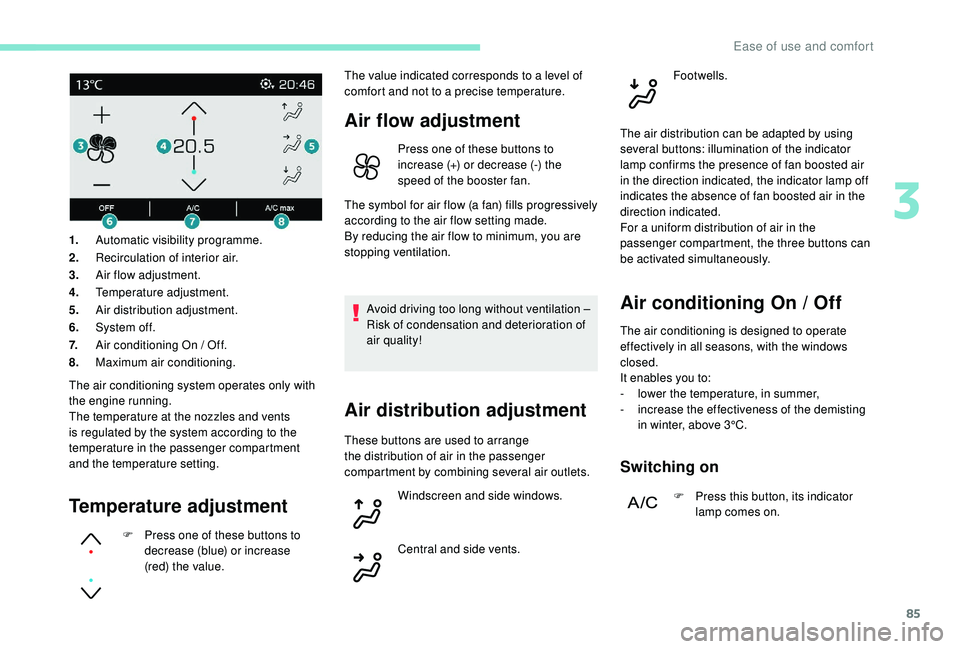
1.
Automatic visibility programme.
2. Recirculation of interior air.
3. Air flow adjustment.
4. Temperature adjustment.
5. Air distribution adjustment.
6. System of f.
7. Air conditioning On / Off.
8. Maximum air conditioning. Press one of these buttons to
increase (+) or decrease (-) the
speed of the booster fan.
The symbol for air flow (a fan) fills progressively
according to the air flow setting made.
By reducing the air flow to minimum, you are
stopping ventilation.
Air distribution adjustment
Avoid driving too long without ventilation –
Risk of condensation and deterioration of
air quality! Footwells.
These buttons are used to arrange
the distribution of air in the passenger
compartment by combining several air outlets. Windscreen and side windows.
Central and side vents. The air distribution can be adapted by using
several buttons: illumination of the indicator
lamp confirms the presence of fan boosted air
in the direction indicated, the indicator lamp off
indicates the absence of fan boosted air in the
direction indicated.
For a uniform distribution of air in the
passenger compartment, the three buttons can
be activated simultaneously.Air conditioning On / Off
The air conditioning is designed to operate
effectively in all seasons, with the windows
closed.
It enables you to:
-
l
ower the temperature, in summer,
-
i
ncrease the effectiveness of the demisting
in winter, above 3°C.
Switching on
F Press this button, its indicator lamp comes on.
3
Ease of use and comfort
Page 90 of 360
88
In cold weather with the engine cold, the
air flow is increased gradually until the
comfort setting has been reached, in order
to limit the delivery of cold air into the
passenger compartment.
On entering the vehicle, if the interior
temperature is much colder or warmer
than the comfort setting requested, there
is no need to alter the value displayed
in order to reach more quickly the
required level of comfort. The system
compensates automatically and corrects
the temperature difference as quickly as
possible.
Automatic visibility
programme
For more information on Front demist –
defrost, refer to the corresponding section.
Air Quality System (AQS)
function
Using a pollution sensor, this function
automatically activates recirculation of the
interior air once it detects a certain level of
polluting substances in the exterior air. To activate or deactivate the function, go to the
secondary page by pressing the "
OPTIONS"
button.
Manual control
You can manually adjust one or more settings,
while retaining automatic control of the other
functions:
-
a
ir flow,
-
a
ir distribution.
As soon as you modify a setting, the indicator
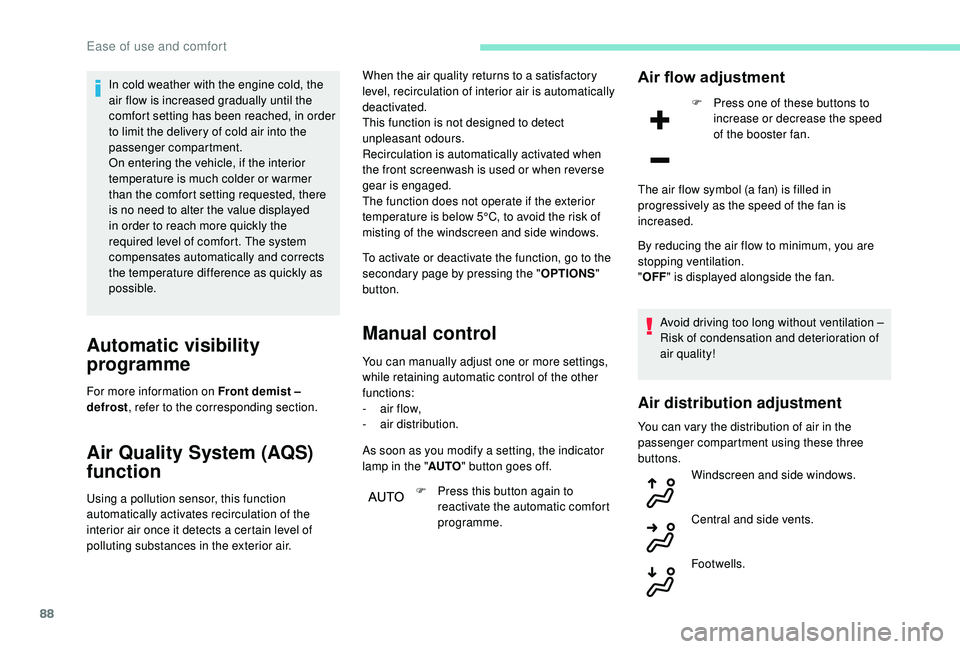
lamp in the " AUTO" button goes off.
F
P
ress this button again to
reactivate the automatic comfort
programme.
Air flow adjustment
F Press one of these buttons to increase or decrease the speed
of the booster fan.
By reducing the air flow to minimum, you are
stopping ventilation.
" OFF " is displayed alongside the fan.
Avoid driving too long without ventilation –
Risk of condensation and deterioration of
air quality!
Air distribution adjustment
You can vary the distribution of air in the
passenger compartment using these three
buttons. Windscreen and side windows.
Central and side vents.
When the air quality returns to a satisfactory
level, recirculation of interior air is automatically
deactivated.
This function is not designed to detect
unpleasant odours.
Recirculation is automatically activated when
the front screenwash is used or when reverse
gear is engaged.
The function does not operate if the exterior
temperature is below 5°C, to avoid the risk of
misting of the windscreen and side windows.
The air flow symbol (a fan) is filled in
progressively as the speed of the fan is
increased.
Footwells.
Ease of use and comfort
Page 91 of 360
89
Each press on a button activates or deactivates
the function. The indicator lamp is on when the
button is activated. For a uniform distribution
of air in the passenger compartment, the three
buttons can be activated simultaneously.
In AUTO mode, the indicator lamps in all three
buttons are off.
Air conditioning On / Off
The air conditioning is designed to operate
effectively in all seasons, with the windows
closed.
It enables you to:
-
l
ower the temperature, in summer,
-
i
ncrease the effectiveness of the demisting
in winter, above 3°C.
Switching on
F Press this button, its indicator lamp comes on.
The air conditioning does not operate
when the air flow adjustment is set to off.
Switching off
F Press this button again, its indicator lamp goes off.
Maximum air conditioning
This function allows faster cooling of the air in
the passenger compartment.
The system automatically adjusts the
temperature setting to the lowest possible, air
distribution towards the centre and outer vents,
air flow to maximum and activates recirculation
of interior air.
Switching off the air conditioning may result in
some discomfort (humidity, condensation). F
P
ress this button to activate
the function; its indicator lamp
comes on.
F
P
ress this button again to deactivate the
function and return to the previous settings;
its indicator lamp goes off.
Mono-zone / Dual-zone
The passenger temperature setting can be
linked to the driver's setting (mono-zone
function).
It is available in the secondary page by
pressing the " OPTIONS" button.
Ventilation with the
ignition on
When the ignition is switched on, you can use
the ventilation system to adjust the air flow
settings and the air distribution in the passenger
compartment depending on the battery charge.
This function does not operate the air conditioning.
System switch-off
F Press this button.
Its indicator lamp comes on and all
other indicator lamps for the system
go of f.
This action deactivates all functions
of the air conditioning system.
Avoid driving for too long with the
ventilation off or the system deactivated
–
Risk of misting and deterioration of the air
quality!
Pressing any button reactivates the
system with the settings that were
previously in use.
F
P
ress this button to activate
the " MONO " function; its " ON"
status is displayed.
The function is automatically deactivated if the
passenger uses their temperature adjustment
buttons (dual-zone function). By reducing the air flow to a minimum, you are
stopping ventilation.
Temperature is no longer regulated. A slight air
flow can still be felt however, resulting from the
for ward movement of the vehicle.
3
Ease of use and comfort
Page 92 of 360
90
Recirculation of the
interior air
The intake of exterior air prevents the formation
of mist on the windscreen and the side windows.
The recirculation of the interior air isolates the
passenger compartment from exterior odours
and fumes.
This function also allows the desired
temperature in the passenger compartment to
be reached in the shortest time.F
P
ress this button to activate the
function; its orange indicator
lamp comes on.
F
P
ress this button again to deactivate the
function; its indicator lamp goes off.
Avoid prolonged use of the recirculation of
interior air – Risk of formation of mist and
deterioration of the air quality!
The system activates automatically when
reverse gear is engaged.
Front demist – defrost
With manual air
conditioning
F Adjust the temperature to maximum (red).
F A djust the air flow to maximum; all of the
orange indicator lamps come on.
F
A
djust the air distribution to the
" Windscreen" position; its associated
orange indicator lamp comes on.
F
C
heck that the recirculation of interior air is
deactivated; its indicator lamp must be off.
F
S
witch on the air conditioning by pressing
the " A/C" button; its orange indicator lamp
comes on.
With Stop & Start, when the demisting,
air conditioning and air flow functions are
activated, STOP mode is not available.
With semi-automatic and
automatic air conditioning
Automatic visibility programme
F Press this button to demist or defrost the windscreen and side
windows more quickly; its orange
indicator lamp comes on.
The system automatically manages the air
conditioning (depending on version), air
flow and air intake, and provides optimum
distribution towards the windscreen and side
windows.
F
T
o switch it off, press this button; its
indicator lamp goes off.
The system allows the manual modification of
air flow without causing automatic deactivation
of the automatic visibility programme.
With Stop & Start, when demisting –
defrosting has been activated, STOP
mode is not available.
In wintry conditions, remove all snow or
ice on the camera on the windscreen
before moving off.
Other wise, this can affect the function
of the equipment associated with the
camera.
Ease of use and comfort
Page 136 of 360
134
Deactivating the front passenger
airbag
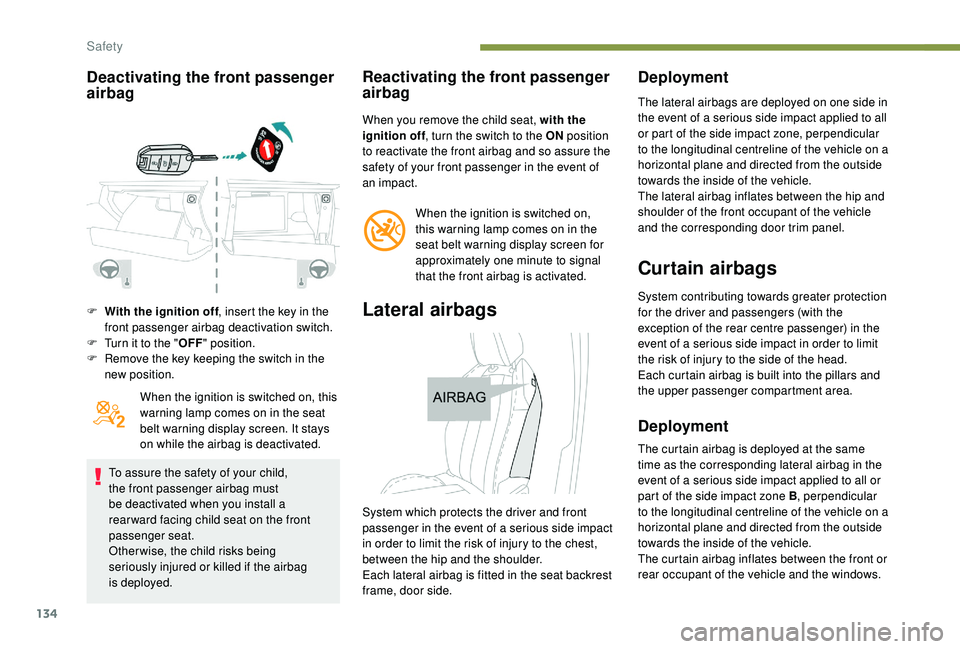
F With the ignition off, insert the key in the
front passenger airbag deactivation switch.
F
T
urn it to the " OFF" position.
F
R
emove the key keeping the switch in the
new position.
When the ignition is switched on, this
warning lamp comes on in the seat
belt warning display screen. It stays
on while the airbag is deactivated.
To assure the safety of your child,
the front passenger airbag must
be deactivated when you install a
rear ward facing child seat on the front
passenger seat.
Otherwise, the child risks being
seriously injured or killed if the airbag
is deployed.
Reactivating the front passenger
airbag
When you remove the child seat, with the
ignition off , turn the switch to the ON position
to reactivate the front airbag and so assure the
safety of your front passenger in the event of
an impact.
When the ignition is switched on,
this warning lamp comes on in the
seat belt warning display screen for
approximately one minute to signal
that the front airbag is activated.
Lateral airbags
Deployment
The lateral airbags are deployed on one side in
the event of a serious side impact applied to all
or part of the side impact zone, perpendicular
to the longitudinal centreline of the vehicle on a
horizontal plane and directed from the outside
towards the inside of the vehicle.
The lateral airbag inflates between the hip and
shoulder of the front occupant of the vehicle
and the corresponding door trim panel.
Curtain airbags
System contributing towards greater protection
for the driver and passengers (with the
exception of the rear centre passenger) in the
event of a serious side impact in order to limit
the risk of injury to the side of the head.
Each curtain airbag is built into the pillars and
the upper passenger compartment area.
Deployment
The curtain airbag is deployed at the same
time as the corresponding lateral airbag in the
event of a serious side impact applied to all or
part of the side impact zone B , perpendicular
to the longitudinal centreline of the vehicle on a
horizontal plane and directed from the outside
towards the inside of the vehicle.
The curtain airbag inflates between the front or
rear occupant of the vehicle and the windows.
System which protects the driver and front
passenger in the event of a serious side impact
in order to limit the risk of injury to the chest,
between the hip and the shoulder.
Each lateral airbag is fitted in the seat backrest
frame, door side.
Safety
Page 150 of 360
148
Advice
The incorrect installation of a child seat in a
vehicle compromises the child's protection
in the event of an accident.
Ensure that there is no seat belt or seat
belt buckle under the child seat, as this
could destabilise it.
Remember to fasten the seat belts or the
child seat harnesses keeping the slack
relative to the child's body to a minimum,
even for short journeys.
When installing a child seat using the seat
belt, ensure that the seat belt is tightened
correctly on the child seat and that it
secures the child seat firmly on the seat
of your vehicle. If your passenger seat is
adjustable, move it forwards if necessary.
At rear seating positions, always leave
sufficient space between the front seat
and:
-
a r
ear ward facing child seat,
-
t
he child's feet for a child seat fitted
forward facing.
To do this, move the front seat for wards
and, if necessary, move its backrest into
the upright position.
For optimal installation of the forward
facing child seat, verify that its backrest is
as close as possible to the backrest of the
vehicle seat, if possible in contact with it. The head restraint must be removed before
installing a child seat with a backrest on a
passenger seat.
Ensure that the head restraint is stored or
attached securely to prevent it from being
thrown around the vehicle in the event of
sharp braking. Refit the head restraint when
the child seat is removed.
Children in front
The legislation on carrying children on the
front passenger seat is specific to each
country. Refer to the legislation in force in
your country.
Deactivate the front passenger airbag when
a
rear ward facing child seat is installed on
the front passenger seat.
Otherwise, the child would risk being seriously
injured or killed if the airbag were deployed.
Installing a booster seat
The chest part of the seat belt must be
positioned on the child's shoulder without
touching the neck.
Ensure that the lap part of the seat belt
passes correctly over the child's thighs.
PEUGEOT recommends using a booster seat
with a backrest equipped with a belt guide at
shoulder level. As a safety precaution, do not leave:
-
a c hild or children alone and unattended in
a vehicle,
-
a c
hild or an animal in a vehicle which
is exposed to the sun, with the windows
closed,
-
t
he keys within reach of children inside the
vehicle.
To prevent accidental opening of the doors
and rear windows, use the child lock.
Take care not to open the rear windows by
more than one third.
To protect young children from the rays of the
sun, fit side blinds on the rear windows.
Safety
Page 262 of 360
260
Some functions, including Stop & Start,
are not available if the battery is not
sufficiently charged.
Disconnecting the battery
In order to maintain an adequate state
of charge for starting the engine, it is
recommended that the battery be disconnected
if the vehicle is taken out of ser vice for a long
period.
Before disconnecting the battery:
F
c
lose all openings (doors, tailgate, windows,
sunroof),
F
s
witch off all electrical consumers (audio
system, wipers, lighting, etc.),
F
s
witch off the ignition and wait for four
minutes.
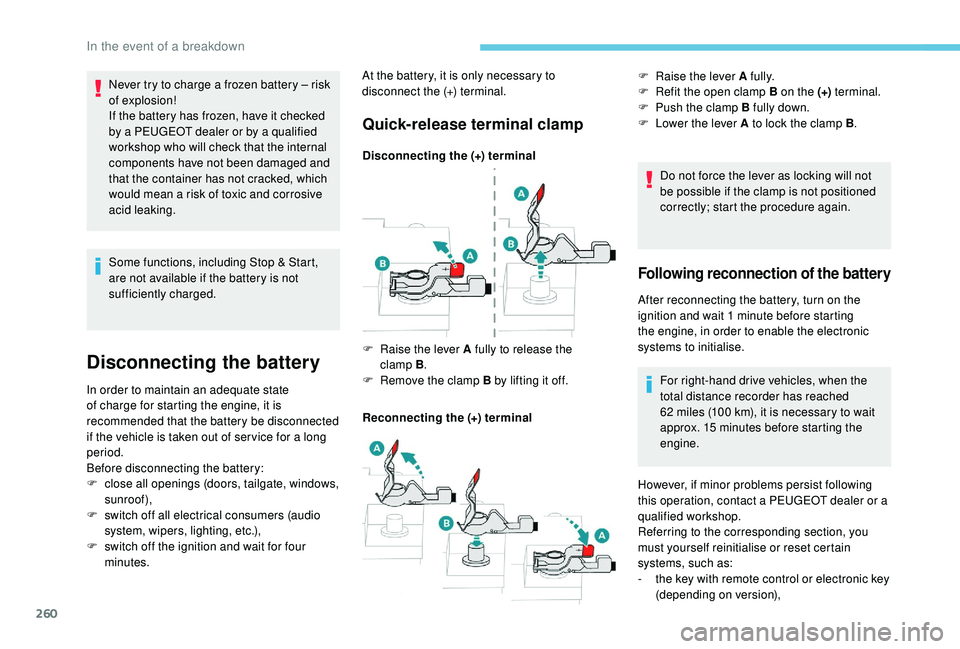
Quick-release terminal clamp
Disconnecting the (+) terminal
Reconnecting the (+) terminal Do not force the lever as locking will not
be possible if the clamp is not positioned
correctly; start the procedure again.
F
Ra
ise the lever A fully to release the
clamp
B.
F
R
emove the clamp B by lifting it off. F
Ra
ise the lever A fully.
F
R
efit the open clamp B on the (+)
terminal.
F
P
ush the clamp B fully down.
F
L
ower the lever A to lock the clamp B
.
Following reconnection of the battery
After reconnecting the battery, turn on the
ignition and wait 1
minute before starting
the engine, in order to enable the electronic
systems to initialise.
For right-hand drive vehicles, when the
total distance recorder has reached
62
miles (100 km), it is necessary to wait
approx. 15
minutes before starting the
engine.
Never try to charge a frozen battery
– risk
of explosion!
If the battery has frozen, have it checked
by a PEUGEOT dealer or by a qualified
workshop who will check that the internal
components have not been damaged and
that the container has not cracked, which
would mean a risk of toxic and corrosive
acid leaking. At the battery, it is only necessary to
disconnect the (+) terminal.
However, if minor problems persist following
this operation, contact a PEUGEOT dealer or a
qualified workshop.
Referring to the corresponding section, you
must yourself reinitialise or reset certain
systems, such as:
-
t
he key with remote control or electronic key
(depending on version),
In the event of a breakdown
Page 263 of 360
261
The Stop & Start system may not be
operational during the trip following the
first engine start.
In this case, the system will only be
available again after a continuous
period of immobilisation of the vehicle,
a period which depends on the exterior
temperature and the state of charge of
the battery (up to about 8 hours).
-
t
he sunroof and its electric blind,
-
t
he electric windows,
-
t
he date and time,
-
t
he preset radio stations.
Towing the vehicle
Procedure for having your vehicle towed or
for towing another vehicle using a removable
towing eye.
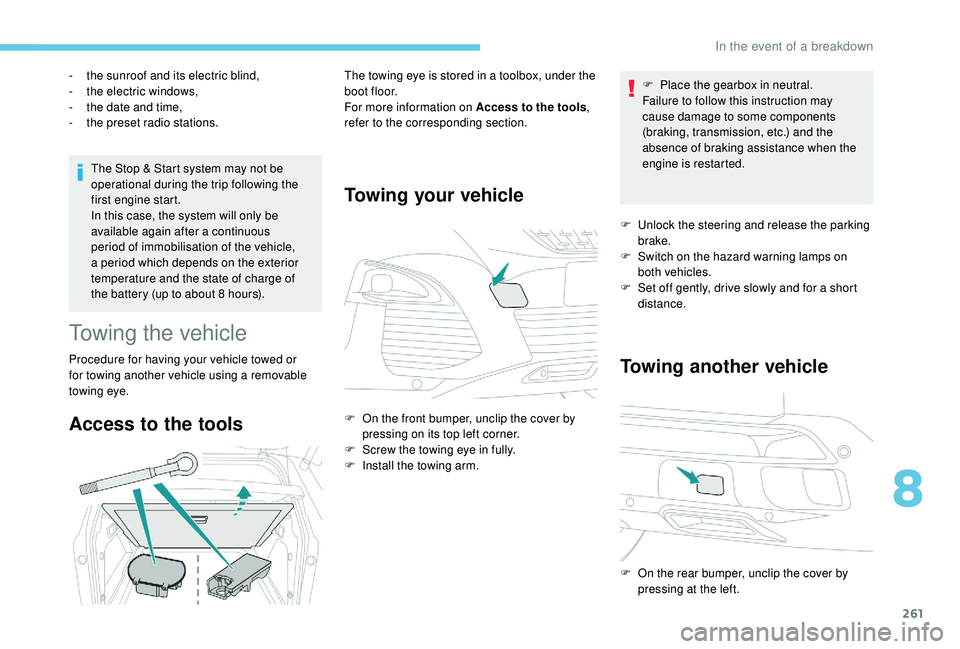
Access to the tools
The towing eye is stored in a toolbox, under the
boot floor.
For more information on Access to the tools
,
refer to the corresponding section.
Towing your vehicle
F On the front bumper, unclip the cover by pressing on its top left corner.
F
S
crew the towing eye in fully.
F
I
nstall the towing arm. F
P
lace the gearbox in neutral.
Failure to follow this instruction may
cause damage to some components
(braking, transmission, etc.) and the
absence of braking assistance when the
engine is restarted.
F
U
nlock the steering and release the parking
brake.
F
S
witch on the hazard warning lamps on
both vehicles.
F
S
et off gently, drive slowly and for a short
distance.
Towing another vehicle
F On the rear bumper, unclip the cover by pressing at the left.
8
In the event of a breakdown