2018 PEUGEOT 3008 ad blue
[x] Cancel search: ad bluePage 42 of 360

40
Touch screen
Define the vehicle parameters
This menu allows the activation or deactivation
of the following equipment, depending on
version:
-
"
Access to the vehicle" :
•
"
Remote control action".
For more information on the Remote control
and driver door selective unlocking in
particular, refer to the "Access" section.
-
"
Comfort" :
•
"
Rear wipe in reverse gear".
For more information on the Wipers ,
refer to the "Lighting and visibility"
section.
•
"
Parking assistance".
For more information on Parking
assistance , refer to the "Driving"
section.
•
"
Fatigue Detection System".
For more information on the Fatigue
detection system , refer to the "Driving"
section.
-
"
Driving assistance" :
•
"
Auto. emergency braking".
For more information on the Active
Safety Brake , refer to the "Driving"
section.
•
"
Speed recommendation".
For more information on Speed limit
recognition , refer to the "Driving"
section. •
"
Tyre inflation".
For more information on Under-
inflation detection and reinitialisation in
particular, refer to the "Driving" section.
Choice of language
This menu allows selection of the language
used by the screen and the instrument panel.
Display configuration
This menu gives access to the following
settings:
-
"
Choice of units",
-
"
Date and time adjustment",
-
"
Display parameters",
-
"Brightness".
Adjusting the date and time
F
P
ress the " 7" or " 8" button to display the
"Display configuration" menu, then press
OK.
F
P
ress the " 5" or " 6" button to select the
"Date and time adjustment" button, then
press OK.
F
P
ress the " 7" or " 8" button to select the
setting to modify. Confirm by pressing OK,
then modify the setting and confirm again to
save the modification.
F
A
djust the settings one by one, confirming
with the OK button. F
P
ress the "
5" or " 6" button, then the OK
button to select the OK box and confirm or
the Back button to cancel.
As a safety measure, the driver must only
carry out operations that require sustained
attention when stationary.
This system gives access to:
-
t
he permanent display of the time and
the exterior temperature (a blue symbol
appears when there is a risk of ice),
-
t
he heating/air conditioning controls,
-
m
enus for adjusting settings for vehicle
functions and systems,
-
a
udio system and telephone controls and
the display of associated information,
-
t
he display of visual parking aids (visual
parking sensor information, Park Assist,
e t c .),
-
I
nternet ser vices and the display of
associated information.
and, depending on equipment, allows:
-
a
ccess to the navigation system controls
and the display of associated information.
Instruments
Page 44 of 360

42
Upper bar
Certain information is always displayed in the
upper bar of the touch screen:
-
T
ime and exterior temperature (a blue
warning lamp appears when there is a risk
of i c e).
-
R
epeat of the air conditioning information,
and direct access to the corresponding
menu.
-
S
ummary of information from the Radio
Media , Telephone menus and navigation
instructions*.
-
Notifications.
-
A
ccess to the Settings for the touch screen
and the digital instrument panel (date/time,
languages, units, etc.).
*
D
epending on equipment
Telephone.
See the "Audio equipment and
telematics" section.
Applications.
Allows direct access to certain
i-Cockpit Amplify
functions
(scented air freshener, etc.).
You can also press with three fingers
on the touch screen to display the menu
carousel. Volume adjustment / mute.
See the "Audio equipment and
telematics" section.
For more information on the Scented air
freshener
, refer to the corresponding section.
For the other functions, refer to the "Audio
equipment and telematics" section.
Instruments
Page 86 of 360
84
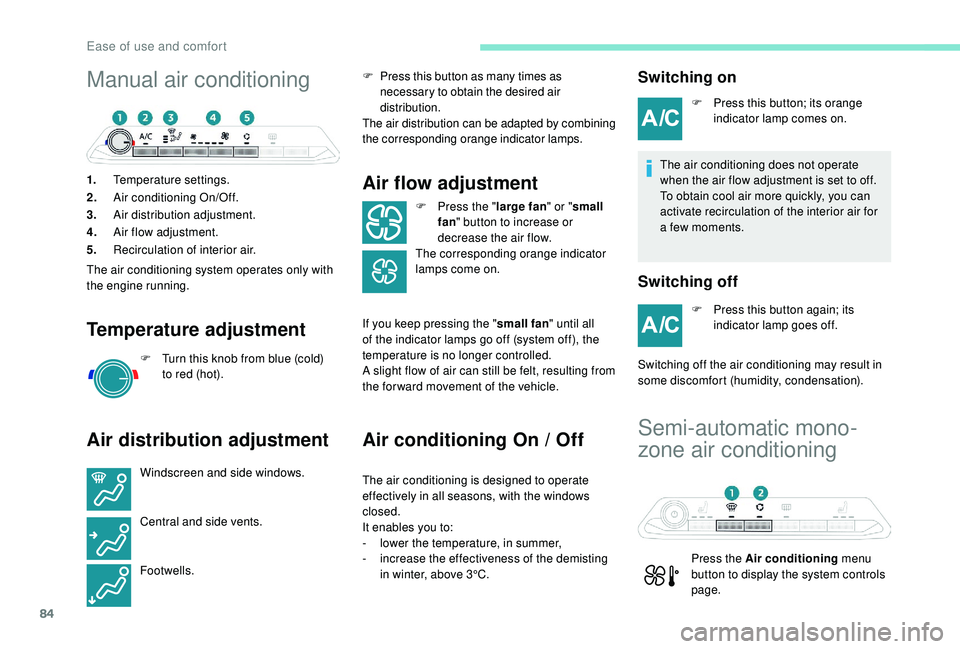
Manual air conditioning
1.Temperature settings.
2. Air conditioning On/Off.
3. Air distribution adjustment.
4. Air flow adjustment.
5. Recirculation of interior air.
The air conditioning system operates only with
the engine running.
Temperature adjustment
F Turn this knob from blue (cold) to red (hot).
Air distribution adjustment
Windscreen and side windows.
Central and side vents.
Footwells. F
P
ress this button as many times as
necessary to obtain the desired air
distribution.
The air distribution can be adapted by combining
the corresponding orange indicator lamps.
Air flow adjustment
F Press the " large fan" or "small
fan " button to increase or
decrease the air flow.
The corresponding orange indicator
lamps come on.
If you keep pressing the " small fan" until all
of the indicator lamps go off (system off), the
temperature is no longer controlled.
A slight flow of air can still be felt, resulting from
the for ward movement of the vehicle.
Air conditioning On / Off
The air conditioning is designed to operate
effectively in all seasons, with the windows
closed.
It enables you to:
-
l
ower the temperature, in summer,
-
i
ncrease the effectiveness of the demisting
in winter, above 3°C.
Switching on
F Press this button; its orange indicator lamp comes on.
The air conditioning does not operate
when the air flow adjustment is set to off.
To obtain cool air more quickly, you can
activate recirculation of the interior air for
a few moments.
Switching off
F Press this button again; its indicator lamp goes off.
Switching off the air conditioning may result in
some discomfort (humidity, condensation).
Semi-automatic mono-
zone air conditioning
Press the Air conditioning menu
button to display the system controls
page.
Ease of use and comfort
Page 87 of 360
85
The air conditioning system operates only with
the engine running.
The temperature at the nozzles and vents
is regulated by the system according to the
temperature in the passenger compartment
and the temperature setting.
Temperature adjustment
F Press one of these buttons to decrease (blue) or increase
(red) the value. The value indicated corresponds to a level of
comfort and not to a precise temperature.
Air flow adjustment
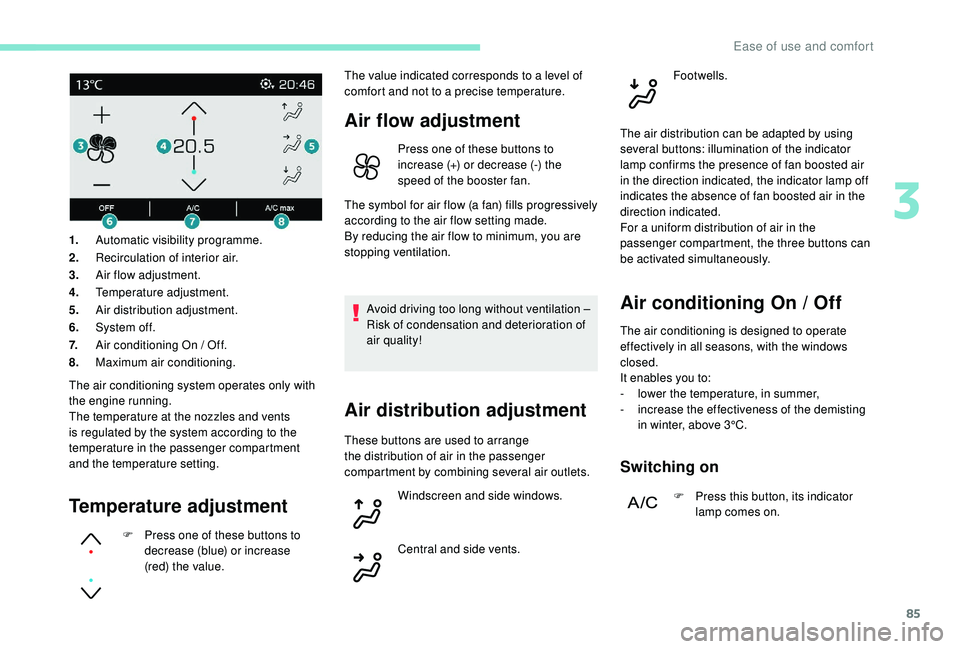
1.
Automatic visibility programme.
2. Recirculation of interior air.
3. Air flow adjustment.
4. Temperature adjustment.
5. Air distribution adjustment.
6. System of f.
7. Air conditioning On / Off.
8. Maximum air conditioning. Press one of these buttons to
increase (+) or decrease (-) the
speed of the booster fan.
The symbol for air flow (a fan) fills progressively
according to the air flow setting made.
By reducing the air flow to minimum, you are
stopping ventilation.
Air distribution adjustment
Avoid driving too long without ventilation –
Risk of condensation and deterioration of
air quality! Footwells.
These buttons are used to arrange
the distribution of air in the passenger
compartment by combining several air outlets. Windscreen and side windows.
Central and side vents. The air distribution can be adapted by using
several buttons: illumination of the indicator
lamp confirms the presence of fan boosted air
in the direction indicated, the indicator lamp off
indicates the absence of fan boosted air in the
direction indicated.
For a uniform distribution of air in the
passenger compartment, the three buttons can
be activated simultaneously.Air conditioning On / Off
The air conditioning is designed to operate
effectively in all seasons, with the windows
closed.
It enables you to:
-
l
ower the temperature, in summer,
-
i
ncrease the effectiveness of the demisting
in winter, above 3°C.
Switching on
F Press this button, its indicator lamp comes on.
3
Ease of use and comfort
Page 164 of 360
162
SPORT
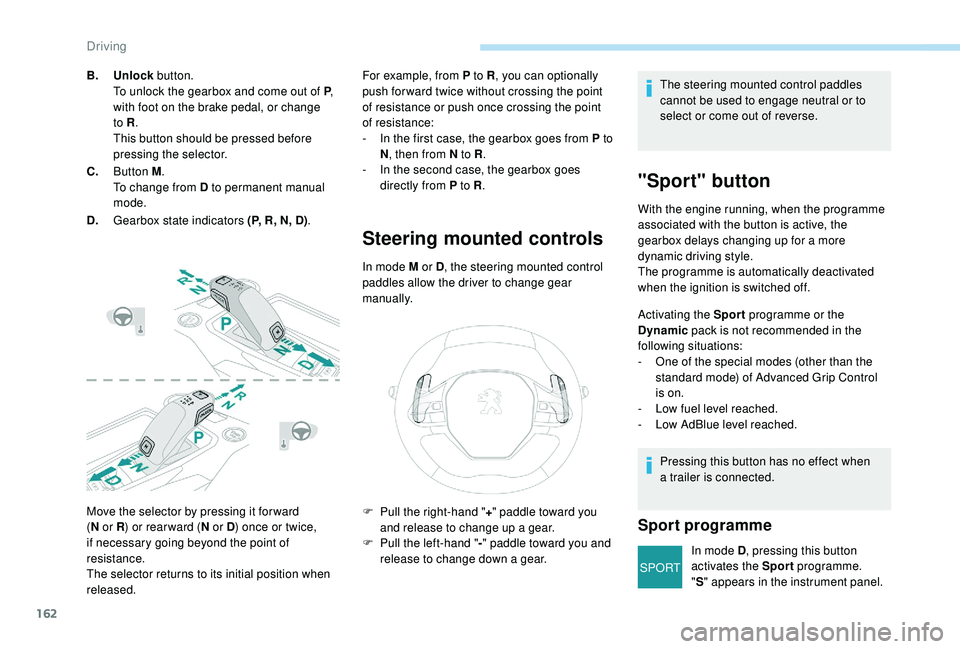
Move the selector by pressing it for ward
(N
or R ) or rear ward ( N or D) once or twice,
if necessary going beyond the point of
resistance.
The selector returns to its initial position when
released. For example, from P to R
, you can optionally
push for ward twice without crossing the point
of resistance or push once crossing the point
of resistance:
-
I
n the first case, the gearbox goes from P to
N , then from N to R .
-
I
n the second case, the gearbox goes
directly from P to R .
Steering mounted controls
In mode M or D, the steering mounted control
paddles allow the driver to change gear
manually.
B.
Unlock button.
To unlock the gearbox and come out of P ,
with foot on the brake pedal, or change
to R .
This button should be pressed before
pressing the selector.
C. Button M .
To change from D to permanent manual
mode.
D. Gearbox state indicators (P, R, N, D) . The steering mounted control paddles
cannot be used to engage neutral or to
select or come out of reverse.
"Sport" button
With the engine running, when the programme
associated with the button is active, the
gearbox delays changing up for a more
dynamic driving style.
The programme is automatically deactivated
when the ignition is switched off.
Activating the Sport
programme or the
Dynamic pack is not recommended in the
following situations:
-
O
ne of the special modes (other than the
standard mode) of Advanced Grip Control
is on.
-
L
ow fuel level reached.
-
L
ow AdBlue level reached.
Pressing this button has no effect when
a trailer is connected.
Sport programme
In mode D , pressing this button
activates the Sport programme.
" S " appears in the instrument panel.
F
P
ull the right-hand "
+" paddle toward you
and release to change up a gear.
F
P
ull the left-hand "
-"
paddle toward
you and
release to change down a gear.
Driving
Page 169 of 360
167
Displays
To show this information on the instrument
panel, select the "PERSONAL" mode and then
the type of information required.This telemetry information (power
output, turbocharger pressure, torque,
longitudinal and lateral acceleration, etc.)
is given as a guide only.
Gear shift indicator
(Depending on engine.)
System which reduces fuel consumption by
recommending the most appropriate gear.
Operation
remains responsible for deciding whether or not
to follow the indications issued by the system.
This function cannot be deactivated.
With an automatic gearbox, the system is
only active in manual mode.
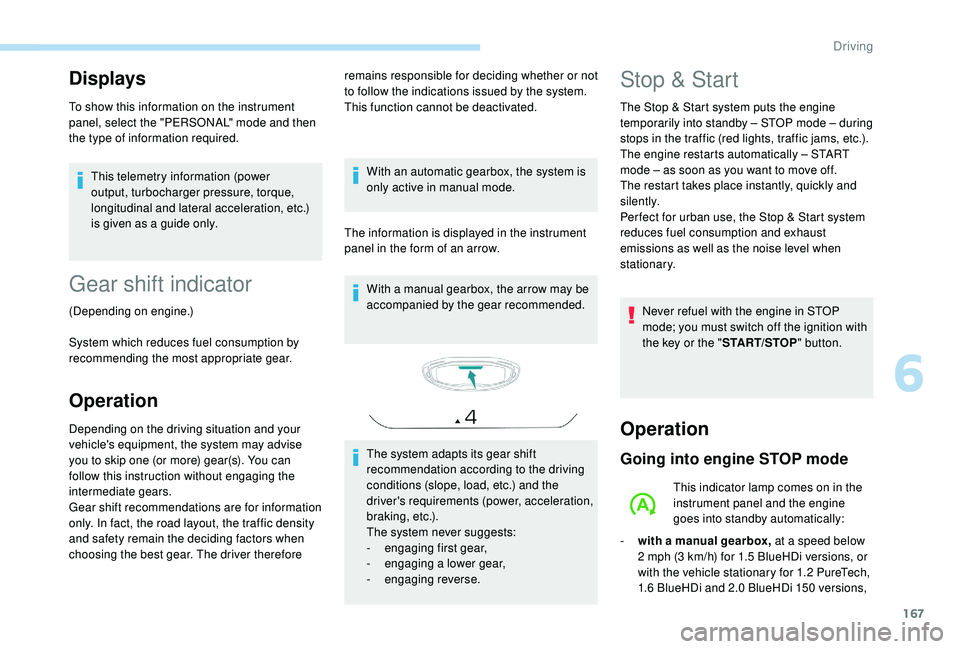
The information is displayed in the instrument
panel in the form of an arrow. With a manual gearbox, the arrow may be
accompanied by the gear recommended.
The system adapts its gear shift
recommendation according to the driving
conditions (slope, load, etc.) and the
driver's requirements (power, acceleration,
b r a k i n g , e t c .) .
The system never suggests:
-
e
ngaging first gear,
-
enga
ging a lower gear,
-
enga
ging reverse.
Depending on the driving situation and your
vehicle's equipment, the system may advise
you to skip one (or more) gear(s). You can
follow this instruction without engaging the
intermediate gears.
Gear shift recommendations are for information
only. In fact, the road layout, the traffic density
and safety remain the deciding factors when
choosing the best gear. The driver therefore Stop & Start
The Stop & Start system puts the engine
t emporarily into standby – STOP mode – during
stops in the traffic (red lights, traffic jams, etc.).
The engine restarts automatically – START
mode – as soon as you want to move off.
The restart takes place instantly, quickly and
silently.
Per fect for urban use, the Stop & Start system
reduces fuel consumption and exhaust
emissions as well as the noise level when
stationary.
Never refuel with the engine in STOP
mode; you must switch off the ignition with
the key or the " START/STOP" button.
Operation
Going into engine STOP mode
This indicator lamp comes on in the
instrument panel and the engine
goes into standby automatically:
-
w
ith a manual gearbox, at a speed below
2
mph (3 km/h) for 1.5 BlueHDi versions, or
with the vehicle stationary for 1.2
PureTech,
1.6
BlueHDi and 2.0 BlueHDi 150 versions,
6
Driving
Page 170 of 360
168
when you place the gear lever in neutral and
release the clutch pedal,
-
w
ith an automatic gearbox, at a speed
below 12
mph (20 km/h) for 1.5 BlueHDi
and 2.0
BlueHDi 180 versions, or with the
vehicle stationary for other versions, when
you depress the brake pedal or place the
gear selector to mode N .
A time counter calculates the time spent in
STOP mode during the journey. It is reset to
zero every time the ignition is switched on with
the key or the " START/STOP" button.
For your comfort, during parking
manoeuvres, STOP mode is not available
for a few seconds after coming out of
reverse gear.
The Stop & Start does not affect the
operation of vehicle systems such as
braking, power steering, etc.
Special cases: STOP mode not
available
- the driver's seat belt is not fastened,
- t he vehicle has not exceeded 6 mph
(10
km/h) since the last engine start (with
the key or the " START/STOP" b u t to n),
-
t
he electric parking brake is applied or
being applied,
-
t
he engine is needed to maintain a
comfortable temperature in the passenger
compartment,
-
d
emisting is active,
-
s
ome temporary conditions (battery charge,
engine temperature, braking assistance,
exterior temperature, etc.) make this
necessary to ensure control of a system.
Going into engine START mode
This indicator lamp goes off and the
engine starts automatically:
Special cases: START mode
triggered automatically
As a safety measure or to maintain comfort
levels in the vehicle, START mode is triggered
automatically when:
-
y
ou open the driver's door,
-
y
ou unfasten the driver's seat belt,
-
t
he speed of the vehicle exceeds 16 mph
(25
km/h) with the 2.0 BlueHDi 180 version
with automatic gearbox in mode D , or 2
mph
(3
km/h) with other versions,
-
t
he electric parking brake is being applied,
-
s
ome specific conditions (battery charge,
engine temperature, braking assistance, air
conditioning setting, etc.) require it for the
control of a system or the vehicle.
In this case, this indicator lamp
flashes for a few seconds, then goes
of f.
STOP mode is not invoked when:
-
t
he vehicle is on a steep slope (rising or
falling),
-
t
he driver's door is open, In this case, this indicator lamp
flashes for a few seconds then goes
of f.
This operation is perfectly normal.
-
w
ith a manual gearbox , when you fully
depress the clutch pedal,
-
W
ith an automatic gearbox:
•
g
ear selector in mode D or M , when you
release the brake pedal, •
o
r gear selector in mode N and brake
pedal released, when you place the gear
selector in mode D or M ,
•
o
r when you engage reverse.
This operation is perfectly normal.
Driving
Page 207 of 360
205
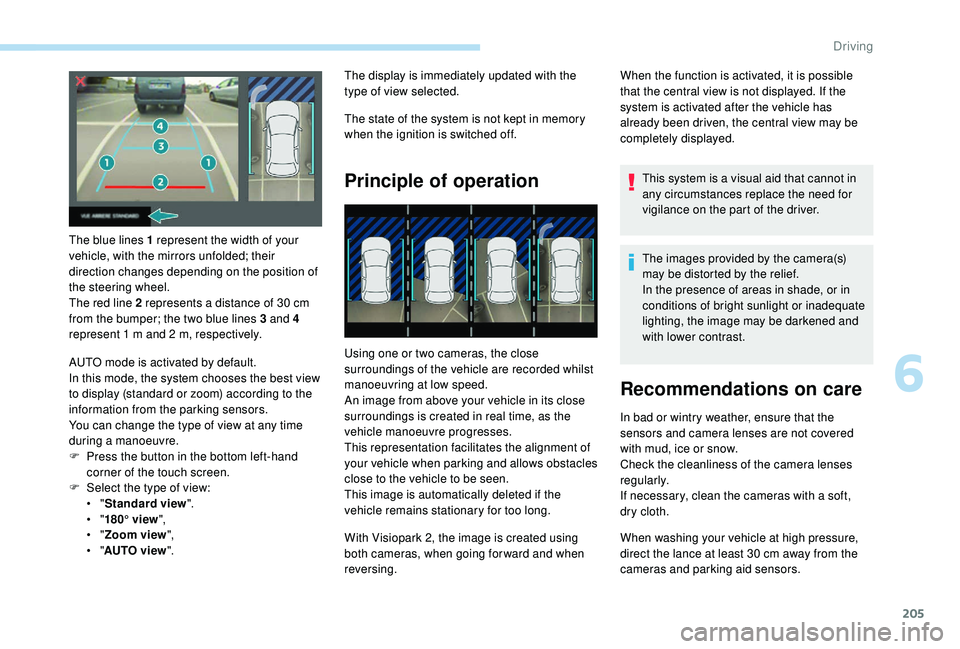
The blue lines 1 represent the width of your
vehicle, with the mirrors unfolded; their
direction changes depending on the position of
the steering wheel.
The red line 2 represents a distance of 30 cm
from the bumper; the two blue lines 3 and 4
represent 1
m and 2 m, respectively.
AUTO mode is activated by default.
In this mode, the system chooses the best view
to display (standard or zoom) according to the
information from the parking sensors.
You can change the type of view at any time
during a manoeuvre.
F
P
ress the button in the bottom left-hand
corner of the touch screen.
F
Sel
ect the type of view:
•
"Standard view ".
•
"180° view ",
•
"Zoom view ",
•
"AUTO view ". The display is immediately updated with the
type of view selected.
The state of the system is not kept in memory
when the ignition is switched off.
Principle of operation
Using one or two cameras, the close
surroundings of the vehicle are recorded whilst
manoeuvring at low speed.
An image from above your vehicle in its close
surroundings is created in real time, as the
vehicle manoeuvre progresses.
This representation facilitates the alignment of
your vehicle when parking and allows obstacles
close to the vehicle to be seen.
This image is automatically deleted if the
vehicle remains stationary for too long.
When the function is activated, it is possible
that the central view is not displayed. If the
system is activated after the vehicle has
already been driven, the central view may be
completely displayed.
This system is a visual aid that cannot in
any circumstances replace the need for
vigilance on the part of the driver.
The images provided by the camera(s)
may be distorted by the relief.
In the presence of areas in shade, or in
conditions of bright sunlight or inadequate
lighting, the image may be darkened and
with lower contrast.
Recommendations on care
In bad or wintry weather, ensure that the
sensors and camera lenses are not covered
with mud, ice or snow.
Check the cleanliness of the camera lenses
regularly.
If necessary, clean the cameras with a soft,
dry cloth.
With Visiopark 2, the image is created using
both cameras, when going for ward and when
reversing. When washing your vehicle at high pressure,
direct the lance at least 30
cm away from the
cameras and parking aid sensors.
6
Driving