2018 PEUGEOT 3008 tow bar
[x] Cancel search: tow barPage 203 of 360
201
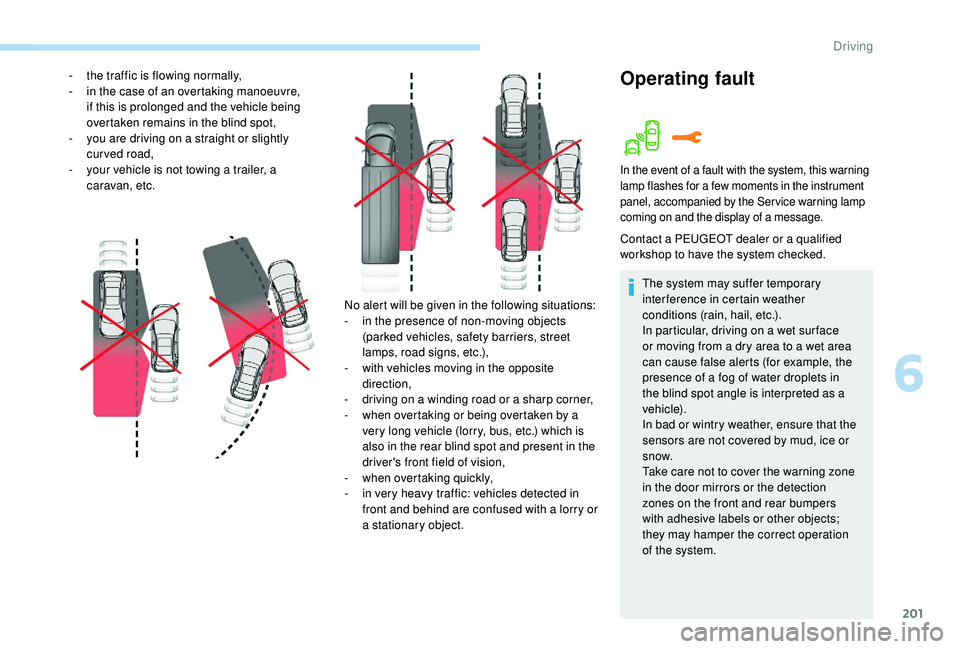
No alert will be given in the following situations:
- i n the presence of non-moving objects
(parked vehicles, safety barriers, street
lamps, road signs, etc.),
-
w
ith vehicles moving in the opposite
direction,
-
d
riving on a winding road or a sharp corner,
-
w
hen overtaking or being overtaken by a
very long vehicle (lorry, bus, etc.) which is
also in the rear blind spot and present in the
driver's front field of vision,
-
w
hen overtaking quickly,
-
i
n very heavy traffic: vehicles detected in
front and behind are confused with a lorry or
a stationary object.
-
t
he traffic is flowing normally,
-
i
n the case of an overtaking manoeuvre,
if this is prolonged and the vehicle being
overtaken remains in the blind spot,
-
y
ou are driving on a straight or slightly
curved road,
-
y
our vehicle is not towing a trailer, a
caravan, etc.
Operating fault
In the event of a fault with the system, this warning
lamp flashes for a few moments in the instrument
panel, accompanied by the Service warning lamp
coming on and the display of a message.
Contact a PEUGEOT dealer or a qualified
workshop to have the system checked.
The system may suffer temporary
interference in certain weather
conditions (rain, hail, etc.).
In particular, driving on a wet sur face
or moving from a dry area to a wet area
can cause false alerts (for example, the
presence of a fog of water droplets in
the blind spot angle is interpreted as a
vehicle).
In bad or wintry weather, ensure that the
sensors are not covered by mud, ice or
snow.
Take care not to cover the warning zone
in the door mirrors or the detection
zones on the front and rear bumpers
with adhesive labels or other objects;
they may hamper the correct operation
of the system.
6
Driving
Page 204 of 360

202
Active Blind Spot
Monitoring System
In addition to the fixed warning lamp in the door
mirror on the side in question, a correction of
trajectory will be felt if you cross a lane marking
with the direction indicators on, to help you
avoid a collision.
Conditions for operation
The following systems must be activated:
-
B
lind Spot Monitoring System,
-
A
ctive Lane Departure Warning System.
For more information on the Blind Spot
Monitoring System and the Active Lane
Departure Warning System , refer to the
corresponding sections.
Parking sensors
This function is a manoeuvring aid which
cannot, in any circumstances, replace
the need for vigilance on the part of the
driver.
The driver must remain attentive and stay
in control of their vehicle.
They must always check the vehicle's
surroundings before undertaking a
manoeuvre.
During the entire manoeuvre, the driver
must ensure that the space remains clear.
Rear parking sensors
The system is switched on by engaging reverse
g e a r.
This is confirmed by an audible signal.
The system is switched off when you come out
of reverse gear.
Audible assistance
The proximity information is given by an
intermittent audible signal, the frequency of
which increases as the vehicle approaches the
obstacle.
The sound emitted by the speaker (right or
left) indicates the side on which the obstacle is
located.
When the distance between the vehicle and
the obstacle becomes less than approximately
thirty centimetres, the audible signal becomes
continuous.
Using sensors located in the bumper, this
function warns of the proximity of obstacles
(e.g. pedestrian, vehicle, tree, barrier) entering
their field of detection.
The system is automatically deactivated
when towing with a towbar approved by
P E U G E O T.
High pressure jet wash
When washing your vehicle, direct the
lance at least 30
cm away from the
sensors.
Driving
Page 205 of 360
203
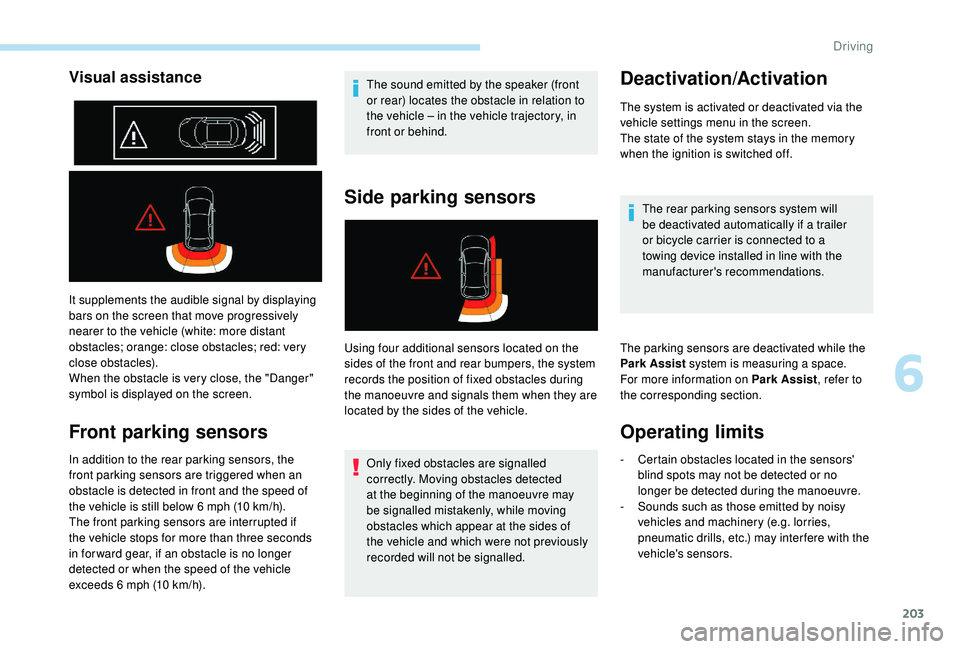
Visual assistance
It supplements the audible signal by displaying
bars on the screen that move progressively
nearer to the vehicle (white: more distant
obstacles; orange: close obstacles; red: very
close obstacles).
When the obstacle is very close, the "Danger"
symbol is displayed on the screen.
Front parking sensors
In addition to the rear parking sensors, the
front parking sensors are triggered when an
obstacle is detected in front and the speed of
the vehicle is still below 6 mph (10 km/h).
The front parking sensors are interrupted if
the vehicle stops for more than three seconds
in for ward gear, if an obstacle is no longer
detected or when the speed of the vehicle
exceeds 6
mph (10 km/h). The sound emitted by the speaker (front
or rear) locates the obstacle in relation to
the vehicle
– in the vehicle trajectory, in
front or behind.
Side parking sensors
Using four additional sensors located on the
sides of the front and rear bumpers, the system
records the position of fixed obstacles during
the manoeuvre and signals them when they are
located by the sides of the vehicle.
Only fixed obstacles are signalled
correctly. Moving obstacles detected
at the beginning of the manoeuvre may
be signalled mistakenly, while moving
obstacles which appear at the sides of
the vehicle and which were not previously
recorded will not be signalled.
Deactivation/Activation
The system is activated or deactivated via the
vehicle settings menu in the screen.
The state of the system stays in the memory
when the ignition is switched off.
The rear parking sensors system will
be deactivated automatically if a trailer
or bicycle carrier is connected to a
towing device installed in line with the
manufacturer's recommendations.
The parking sensors are deactivated while the
Park Assist system is measuring a space.
For more information on Park Assist , refer to
the corresponding section.
Operating limits
- Certain obstacles located in the sensors' blind spots may not be detected or no
longer be detected during the manoeuvre.
-
S
ounds such as those emitted by noisy
vehicles and machinery (e.g. lorries,
pneumatic drills, etc.) may inter fere with the
vehicle's sensors.
6
Driving
Page 221 of 360
219
Travelling abroad
Cer tain fuels could damage the engine of
your vehicle.
In cer tain countries, the use of a par ticular
fuel may be required (specific octane
rating, specific trade name, etc.) to ensure
correct operation of the engine.
For any additional information, contact a dealer.
Towing device
Load distribution
F Distribute the load in the trailer so that the
heaviest items are as close as possible to
the axle and the nose weight approaches the
maximum permitted without exceeding it.
Air density decreases with altitude, thus
reducing engine performance. The maximum
towed load must be reduced by 10% for every
1,000
metres of altitude. Use towing devices and their genuine
harnesses approved by PEUGEOT. It
is recommended that the installation be
per formed by a PEUGEOT dealer or a
qualified workshop.
If the towbar is not fitted by a
PEUGEOT dealer, it must still be
fitted in accordance with the vehicle
manufacturer's instructions.
Important: for versions equipped with
the motorised tailgate with Hands-Free
Tailgate Access function, if a towing
device other than a genuine PEUGEOT
one is installed, it is imperative to visit
a PEUGEOT dealer or a qualified
workshop to recalibrate the detection
system: risk of Hands-Free Tailgate
Access function failure.
Certain driving assistance or
manoeuvring assistance functions are
automatically disabled if an approved
towbar is used. Observe the maximum authorised
towable weight, indicated on your
vehicle's registration certificate, the
manufacturer's label as well as in the
Technical data
section of this guide.
Complying with the maximum
authorised nose weight (ball joint)
also includes the use of accessories
(bicycle carriers, tow boxes, etc.).
Obser ve the legislation in force in the
country in which you are driving.
Vehicle equipped with motorised
tailgate with "Hands-Free Tailgate
Access" function
To avoid unwanted opening of the tailgate
when using the towing device:
-
d
eactivate the Hands-Free Tailgate
Access function in advance in your
vehicle's configuration menu,
-
o
r remove the electronic key from the
recognition zone, with the tailgate
closed.
7
Practical information
Page 222 of 360
220
Towbar with quickly
detachable towball
No tools are required to install or remove the
towball on this genuine towbar system.
Presentation
Trailers with LED lamps are not
compatible with the wiring harness of this
device.To know the Technical data
, and, in
particular, the towable weights for your
vehicle, refer to the corresponding
section.
To ensure complete safety while driving
with a Towbar system , refer to the
corresponding section.
Before each use
Check that the towball is correctly fitted,
verifying the follow points:
-
t
he green mark on the locking wheel
is in line with the green mark on the
towball,
-
t
he locking wheel is in contact with the
towball (position A ),
-
t
he security key lock is on and the key
removed; the locking wheel can no
longer be operated,
- t he towball must not be able to move
in its carrier; test by shaking it with
your hand.
If the towball is not locked, the trailer can
detach
– accident risk!
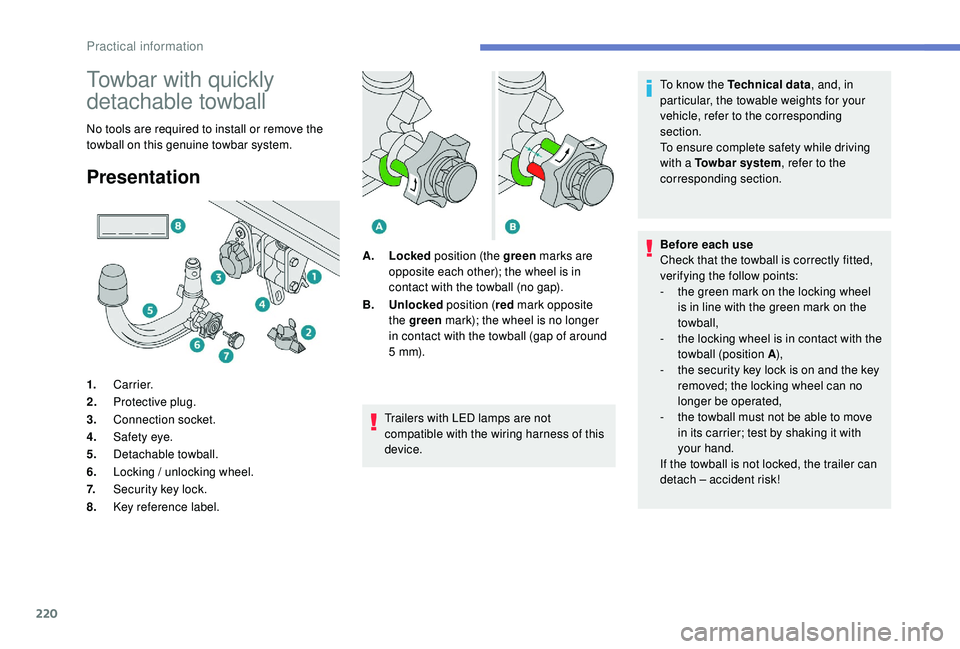
1.
Carrier.
2. Protective plug.
3. Connection socket.
4. Safety eye.
5. Detachable towball.
6. Locking / unlocking wheel.
7. Security key lock.
8. Key reference label. A.
Locked position (the green marks are
opposite each other); the wheel is in
contact with the towball (no gap).
B. Unlocked position (red mark opposite
the green mark); the wheel is no longer
in contact with the towball (gap of around
5
m m).
Practical information
Page 223 of 360
221
During use
Never release the locking system with a
trailer or load carrier on the towball.
Never exceed the maximum authorised
weight for the vehicle – the Gross Train
Weight or GTW.
It is essential that the maximum
authorised load be complied with on
the towing device: if it is exceeded, this
device may detach from the vehicle,
which is a serious accident risk.
Check that the trailer lamps work
c o r r e c t l y.
Before setting off, check the adjustment
of the headlamp beam height.
For more information on Headlamp
adjustment , refer to the corresponding
section.
Following use
When travelling without a trailer or load
on a towbar-mounted carrier, the towball
must be removed and the protective plug
inserted in the carrier. This measure
applies particularly where the towball
might obscure visibility of the number
plate or its lighting.Fitting the towball
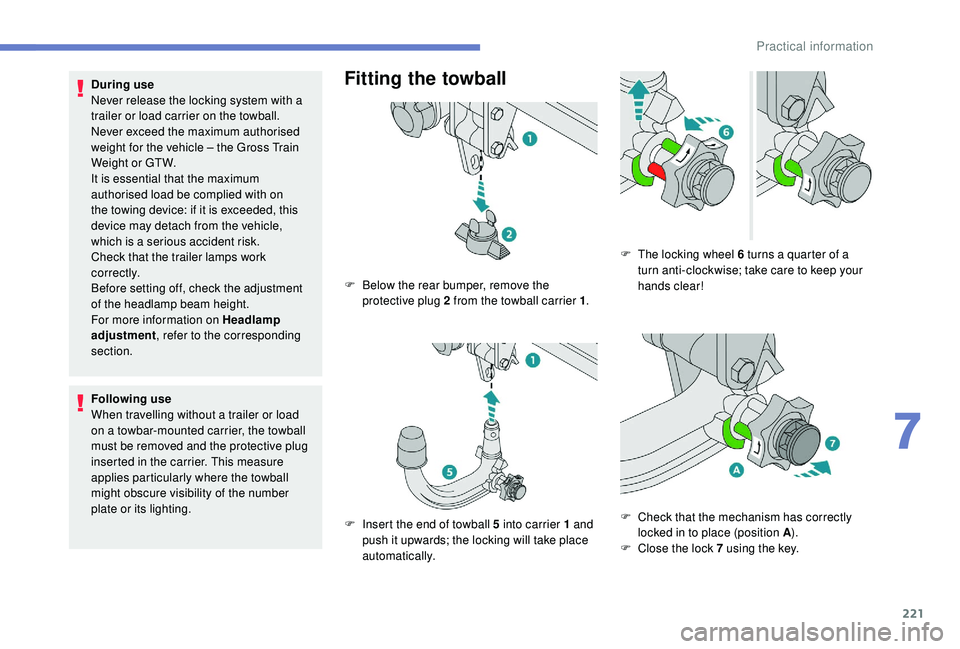
F Below the rear bumper, remove the protective plug 2 from the towball carrier 1 .
F
I
nsert the end of towball 5 into carrier 1 and
push it upwards; the locking will take place
automatically. F
T
he locking wheel 6 turns a quarter of a
turn anti-clockwise; take care to keep your
hands clear!
F
C
heck that the mechanism has correctly
locked in to place (position A ).
F
C
lose the lock 7 using the key.
7
Practical information
Page 225 of 360
223
Maintenance
Correct operation is only possible if the towball
and its carrier are kept clean.
Before cleaning the vehicle with a high-
pressure jet wash, the towball must be removed
and the protective plug fitted to the carrier.Apply the label provided to a clearly visible
area, close to the carrier or in the boot.
Go to a PEUGEOT dealer or a qualified
workshop for any work on the towbar
system.
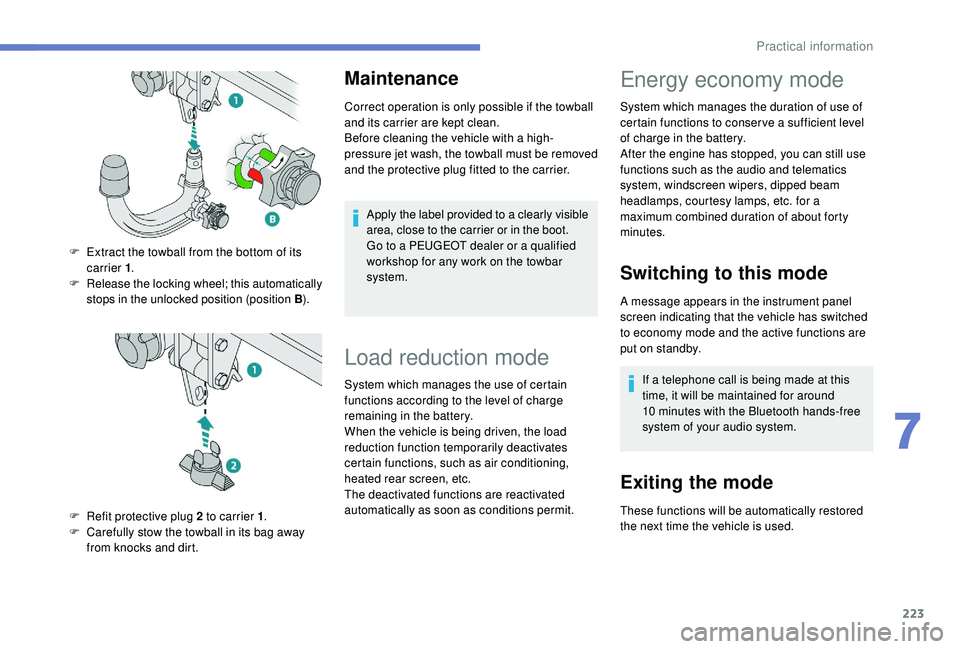
F
E
xtract the towball from the bottom of its
carrier 1 .
F
R
elease the locking wheel; this automatically
stops in the unlocked position (position B ).
F
R
efit protective plug 2 to carrier 1 .
F
C
arefully stow the towball in its bag away
from knocks and dirt.
Load reduction mode
System which manages the use of certain
functions according to the level of charge
remaining in the battery.
When the vehicle is being driven, the load
reduction function temporarily deactivates
certain functions, such as air conditioning,
heated rear screen, etc.
The deactivated functions are reactivated
automatically as soon as conditions permit.
Energy economy mode
System which manages the duration of use of
certain functions to conser ve a sufficient level
of charge in the battery.
After the engine has stopped, you can still use
functions such as the audio and telematics
system,
windscreen wipers, dipped beam
headlamps,
courtesy lamps, etc. for a
maximum combined duration of about forty
minutes.
Switching to this mode
A message appears in the instrument panel
screen indicating that the vehicle has switched
to economy mode and the active functions are
put on standby.
If a telephone call is being made at this
time, it will be maintained for around
10
minutes with the Bluetooth hands-free
system of your audio system.
Exiting the mode
These functions will be automatically restored
the next time the vehicle is used.
7
Practical information
Page 244 of 360

242
F Switch on the ignition.If a pressure of 2 bars is not reached
after about 7
minutes, this indicates
that the tyre is not repairable; contact a
PEUGEOT dealer or a qualified workshop
for assistance. F
R eplace the cap on the valve.
F R emove the kit.
F
R
emove and then store the bottle of sealant.
Take care, the sealant product is harmful
if swallowed and causes irritation to the
eyes.
Keep this product out of the reach of
children.
The use-by date of the fluid is marked on
the bottle.
After use, do not discard the bottle in
standard waste, take it to a PEUGEOT
dealer or an authorised waste disposal
site.
Do not forget to obtain a new bottle of
sealant, available from a PEUGEOT
dealer or a qualified workshop. Do not exceed the speed of 50
mph
(80
km/h) when driving with a tyre
repaired using this type of kit.
Checking / adjusting tyre
pressures
You can also use the compressor,
without injecting sealant, to check and, if
necessary, adjust the tyre pressures.
F
R
emove the valve cap from the tyre and
keep it in a clean place.
F
U
ncoil the pipe stowed under the
compressor.
F
S
tart the compressor by turning the switch
to position " l" until the pressure of the tyre
reaches 2.0
bars. The sealant product is
injected under pressure into the tyre; do not
disconnect the pipe of the valve during this
operation (risk of blowback).
F
P
lace the switch in the " O" position.
F
D
isconnect the compressor's electric plug
from the vehicle's 12
V socket. F
D
rive immediately for approximately three
miles (five kilometres), at reduced speed
(between 12 and 37
mph (20 and 60
km/h)),
to plug the puncture. F
S
top to check the repair and measure the
tyre pressure using the kit.
F
S
crew the pipe onto the valve and tighten
f i r m l y.
In the event of a breakdown