2018 PEUGEOT 3008 wheel
[x] Cancel search: wheelPage 245 of 360
243
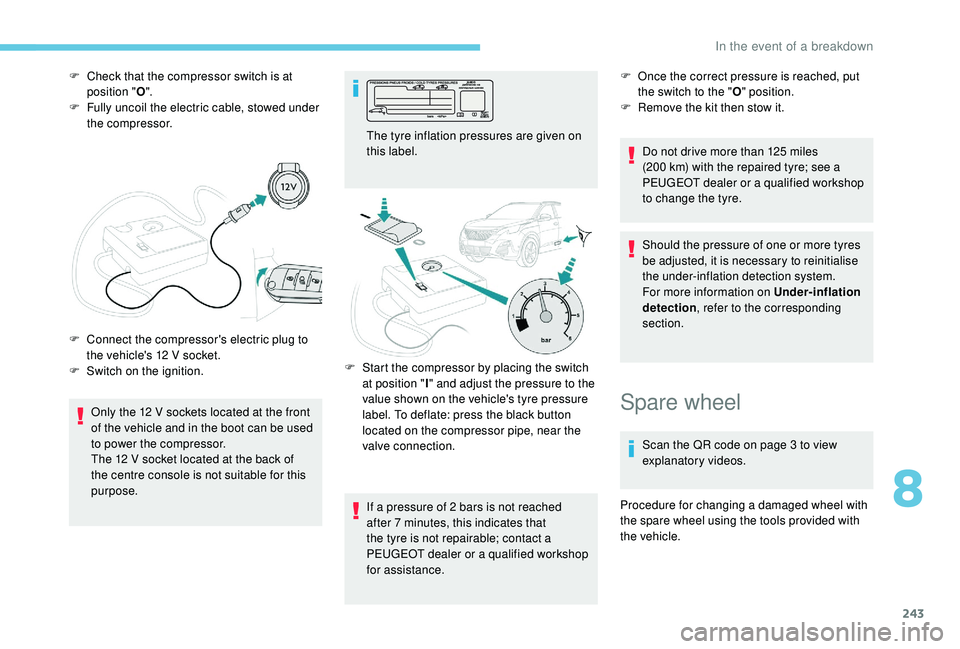
F Check that the compressor switch is at position " O".
F
F
ully uncoil the electric cable, stowed under
the compressor.
Only the 12
V sockets located at the front
of the vehicle and in the boot can be used
to power the compressor.
The 12
V socket located at the back of
the centre console is not suitable for this
purpose.
F
C
onnect the compressor's electric plug to
the vehicle's 12
V socket.
F
S
witch on the ignition. The tyre inflation pressures are given on
this label.
If a pressure of 2
bars is not reached
after 7
minutes, this indicates that
the tyre is not repairable; contact a
PEUGEOT dealer or a qualified workshop
for assistance. F
O nce the correct pressure is reached, put
the switch to the " O" position.
F
R
emove the kit then stow it.
Do not drive more than 125
miles
(200
km) with the repaired tyre; see a
PEUGEOT dealer or a qualified workshop
to change the tyre.
Should the pressure of one or more tyres
be adjusted, it is necessary to reinitialise
the under-inflation detection system.
For more information on Under-inflation
detection , refer to the corresponding
section.
F
S
tart the compressor by placing the switch
at position " I" and adjust the pressure to the
value shown on the vehicle's tyre pressure
label. To deflate: press the black button
located on the compressor pipe, near the
valve connection.
Spare wheel
Scan the QR code on page 3 to view
explanatory videos.
Procedure for changing a damaged wheel with
the spare wheel using the tools provided with
the vehicle.
8
In the event of a breakdown
Page 246 of 360
244
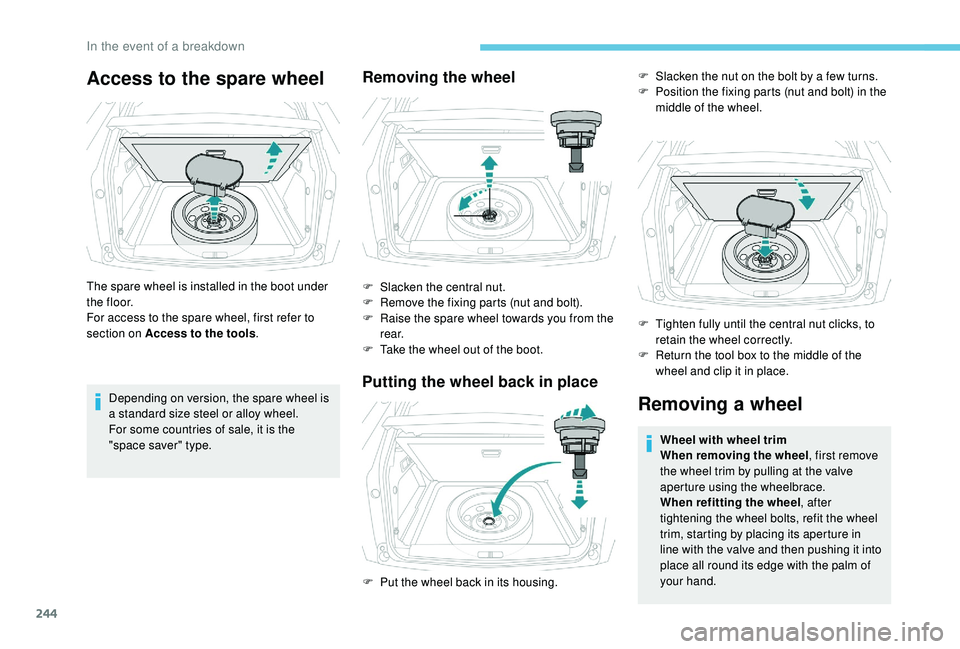
Access to the spare wheel
The spare wheel is installed in the boot under
t h e f l o o r.
For access to the spare wheel, first refer to
section on Access to the tools.
Depending on version, the spare wheel is
a standard size steel or alloy wheel.
For some countries of sale, it is the
"space saver" type.
Removing the wheel
F Slacken the central nut.
F R emove the fixing parts (nut and bolt).
F
R
aise the spare wheel towards you from the
r e a r.
F
T
ake the wheel out of the boot.
Putting the wheel back in place
Removing a wheel
Wheel with wheel trim
When removing the wheel , first remove
the wheel trim by pulling at the valve
aperture using the wheelbrace.
When refitting the wheel , after
tightening the wheel bolts, refit the wheel
trim, starting by placing its aperture in
line with the valve and then pushing it into
place all round its edge with the palm of
your hand.
F
P
ut the wheel back in its housing. F
S
lacken the nut on the bolt by a few turns.
F
P
osition the fixing parts (nut and bolt) in the
middle of the wheel.
F
T
ighten fully until the central nut clicks, to
retain the wheel correctly.
F
R
eturn the tool box to the middle of the
wheel and clip it in place.
In the event of a breakdown
Page 247 of 360
245
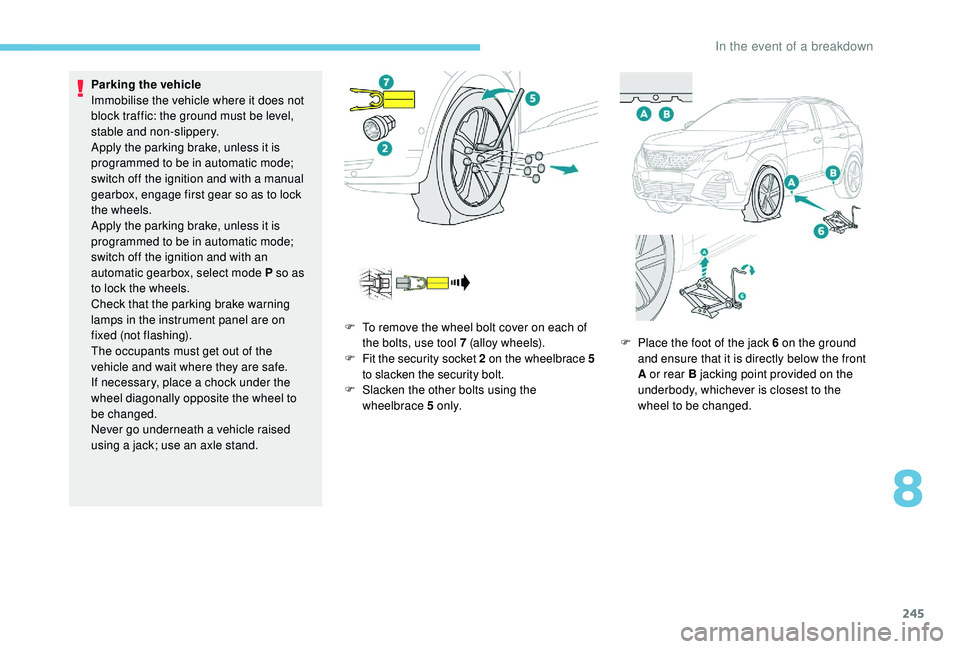
Parking the vehicle
Immobilise the vehicle where it does not
block traffic: the ground must be level,
stable and non-slippery.
Apply the parking brake, unless it is
programmed to be in automatic mode;
switch off the ignition and with a manual
gearbox, engage first gear so as to lock
the wheels.
Apply the parking brake, unless it is
programmed to be in automatic mode;
switch off the ignition and with an
automatic gearbox, select mode P so as
to lock the wheels.
Check that the parking brake warning
lamps in the instrument panel are on
fixed (not
flashing).
The occupants must get out of the
vehicle and wait where they are safe.
If necessary, place a chock under the
wheel diagonally opposite the wheel to
be changed.
Never go underneath a vehicle raised
using a jack; use an axle stand. F
T
o remove the wheel bolt cover on each of
the bolts, use tool 7 (alloy wheels).
F
F
it the security socket 2 on the wheelbrace
5
to slacken the security bolt.
F
S
lacken the other bolts using the
wheelbrace 5 o n l y. F
P
lace the foot of the jack 6 on the ground
and ensure that it is directly below the front
A or rear B jacking point provided on the
underbody, whichever is closest to the
wheel to be changed.
8
In the event of a breakdown
Page 248 of 360
246
Fitting a wheel
Ensure that the jack is stable. If the
ground is slippery or loose, the jack may
slip or drop – Risk of injury!
Take care to position the jack strictly at
one of the jacking points A or B under
the vehicle, ensuring that the head of the
jack is centred under the contact area on
the vehicle. Other wise, there is a risk of
damage to the vehicle and/or of the jack
dropping
– Risk of injury!
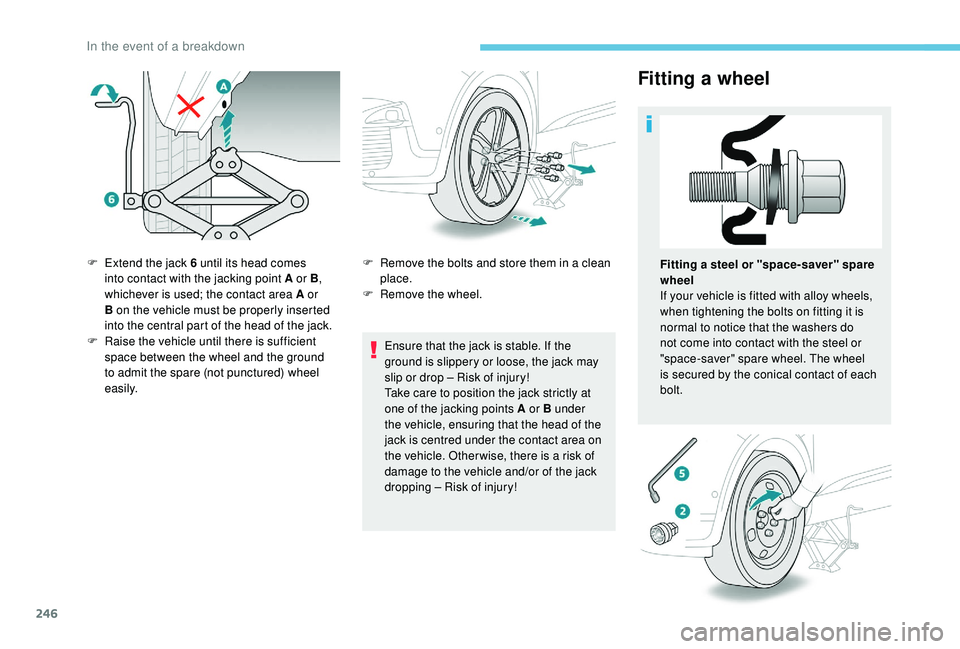
F
E
xtend the jack 6 until its head comes
into contact with the jacking point A or B ,
whichever is used; the contact area A or
B on the vehicle must be properly inserted
into the central part of the head of the jack.
F
Ra
ise the vehicle until there is sufficient
space between the wheel and the ground
to admit the spare (not punctured) wheel
easily. F
R
emove the bolts and store them in a clean
place.
F
R
emove the wheel.
Fitting a steel or "space-saver" spare
wheel
If your vehicle is fitted with alloy wheels,
when tightening the bolts on fitting it is
normal to notice that the washers do
not come into contact with the steel or
"space-saver" spare wheel. The wheel
is secured by the conical contact of each
bolt.
In the event of a breakdown
Page 249 of 360
247
After changing a wheel
Put the punctured wheel in the boot or,
depending on version, remove the central cover
first to store it beneath the floor in place of the
spare wheel.With a "space-saver" type spare wheel Visit a PEUGEOT dealer or a qualified
workshop as soon as possible to have the
tightness of the bolts and the pressure of
the spare wheel checked.
Have the punctured tyre examined. After
inspection, the technician will advise you
on whether the tyre can be repaired or if it
must be replaced.
The following is recommended:
-
d
eactivate some driving aid functions
(Active Safety Brake, Adaptive cruise
control with Stop function, etc.), as
indicated on the label attached to the
wheel,
-
d
o not exceed the maximum
authorised speed of 50
mph
(80
km/h).
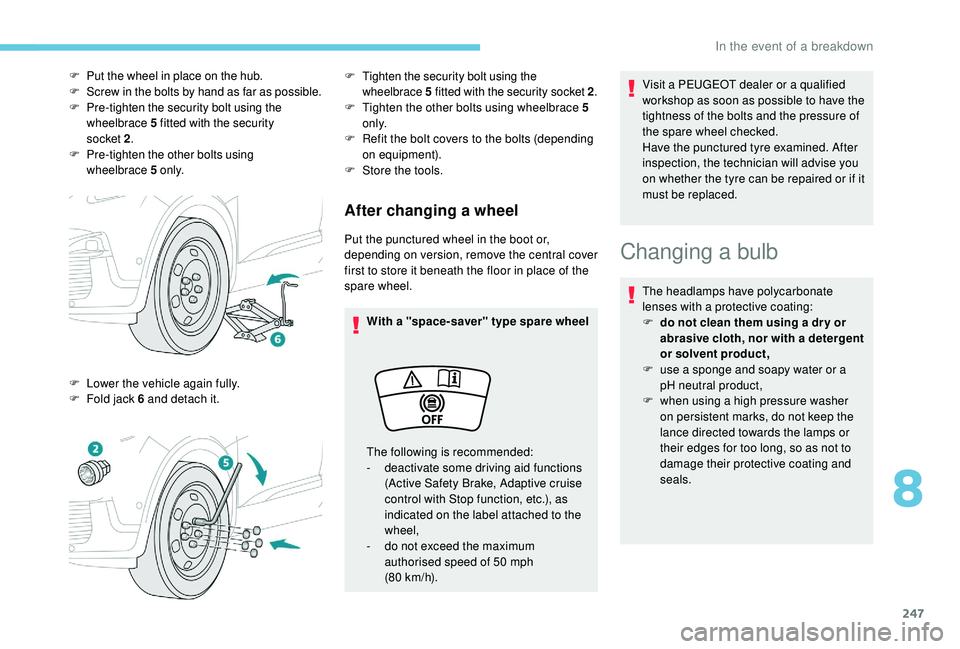
F
P
ut the wheel in place on the hub.
F
S
crew in the bolts by hand as far as possible.
F
P
re-tighten the security bolt using the
wheelbrace 5 fitted with the security
socket
2 .
F P
re-tighten the other bolts using
wheelbrace
5 o
n l y.
F
L
ower the vehicle again fully.
F
F
old jack 6 and detach it.
F Tighten the security bolt using the wheelbrace 5 fitted with the security socket 2 .
F Tighten the other bolts using wheelbrace 5
o n l y.
F
R
efit the bolt covers to the bolts (depending
on equipment).
F
S
tore the tools.
Changing a bulb
The headlamps have polycarbonate
lenses with a protective coating:
F
d
o not clean them using a dr y or
abrasive cloth, nor with a detergent
or solvent product,
F
u
se a sponge and soapy water or a
pH neutral product,
F
w
hen using a high pressure washer
on persistent marks, do not keep the
lance directed towards the lamps or
their edges for too long, so as not to
damage their protective coating and
seals.
8
In the event of a breakdown
Page 264 of 360
262
F Screw the towing eye in fully.
F I nstall the towing arm.
F
S
witch on the hazard warning lamps on
both vehicles.
F
M
ove off gently, drive slowly and for a short
distance. General recommendations
Obser ve the legislation in force in your
c o u nt r y.
Ensure that the weight of the towing
vehicle is higher than that of the towed
vehicle.
The driver must remain at the wheel of
the towed vehicle and must have a valid
driving licence.
When towing a vehicle with all four
wheels on the ground, always use an
approved towing arm; rope and straps are
prohibited.
The towing vehicle must move off gently.
When the vehicle is towed with its
engine off, there is no longer braking and
steering assistance.
In the following cases, you must always
call on a professional recovery ser vice:
-
v
ehicle broken down on a motor way
or fast road,
-
f
our-wheel drive vehicle,
-
w
hen it is not possible to put the
gearbox into neutral, unlock the
steering, or release the parking brake,
-
w
hen it is not possible to tow a vehicle
with an automatic gearbox, engine
running,
-
t
owing with only two wheels on the
ground,
-
w
here there is no approved towbar,
etc. available.
In the event of a breakdown
Page 275 of 360
3
21,518,5
12:1323 °C
In the "Settings" menu you can create
a profile for just one person or a group
of people with common points, with the
possibility of entering a multitude of
settings (radio presets, audio settings,
navigation history, contact favourites,
etc.); these settings are taken into
account automatically.
In very hot conditions, the volume may
be limited to protect the system. It may go
into standby (screen and sound off) for at
least 5
minutes.
The return to normal takes place after
the temperature in the passenger
compartment drops.
Steering mounted controls
Depending on model
Voice commands :
This control is located on the
steering wheel or at the end of the
lighting control stalk (depending on
model).
Short press, system voice
commands.
Long press, smartphone voice
commands via the system. or
Increase volume.
or Mute / Restore the sound.
Or
Mute by pressing the volume
increase and decrease buttons
simultaneously.
Restore the sound by pressing one
of the two volume buttons.
or Decrease volume.
or Media
(short press): change the
multimedia source.
Telephone (short press): start
telephone call.
Call in progress (short press):
access telephone menu.
Telephone (long press): reject an
incoming call, end call; when no call
is in progress, access telephone
menu. or
Radio
(rotate): automatic search for
the previous / next station.
Media (rotate): previous / next track,
move in a list.
Short press : confirm a selection; if
nothing selected, access to presets.
Radio : display the list of stations.
Media : display the list of tracks.
Radio (press and hold): update the
list of stations received.
Menus
Depending on model / Depending on version
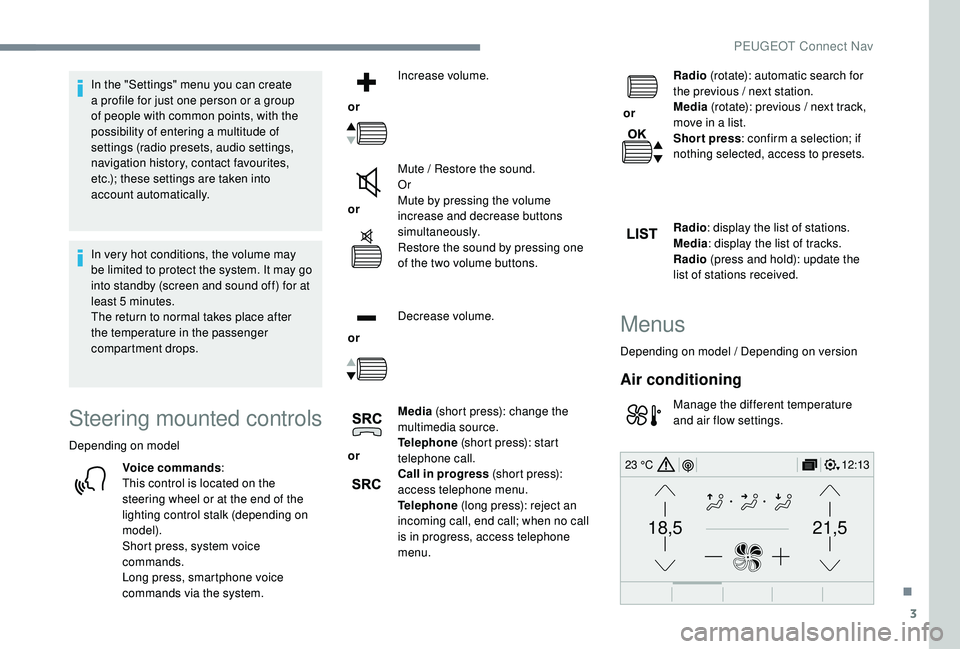
Air conditioning
Manage the different temperature
and air flow settings.
.
PEUGEOT Connect Nav
Page 278 of 360
6
Information – Using the system
Press the Push To Talk voice
command button and tell me
what you'd like after the tone.
Remember you can interrupt
me at any time by pressing
this button. If you press it
again while I'm waiting for
you to speak, it'll end the
conversation. If you need to
start over, say "cancel". If you
want to undo something, say
"undo". And to get information
and tips at any time, just say
"help". If you ask me to do
something and there's some
information missing that I need,
I'll give you some examples
or take you through it step by
step. There's more information
available in "beginner" mode.
You can set the dialogue mode
to "expert" when you feel
comfortable.
Global voice commands
These commands can be made from any
screen page after pressing the " Voice
command" or "Telephone" button located
on the steering wheel, as long as there is
no telephone call in progress.Voice commands Help messages
Help There are lots of topics I can help you with.
You can say: "help with phone", "help with
navigation", "help with media" or "help with
radio". For an over view on how to use voice
controls, you can say "help with voice controls".
Voice command help
Navigation help
Radio help
Media help
Telephone help
Set dialogue mode as <…>
Choose "beginner" or "expert" mode.
Select profile <…> Select profile 1, 2 or 3.
Ye s Say "yes" if I got that right. Other wise, say "no"
and we'll start that again.
No
PEUGEOT Connect Nav