Page 84 of 354
18. Cruise control switches
(if so equipped) (P. 5-19)
19. Tilt steering (P. 3-15)
20. Audio control switches (P. 4-48)
Bluetooth® Hands-Free Phone
System switches (P. 4-50)
21. Vehicle Dynamic Control (VDC) OFF
switch (P. 2-25)
21. Fuel-filler door release lever (P. 3-13)
Hood release lever (P. 3-10)
23. Electronic outside rearview mirror
control switch (P. 3-17)
Refer to the page number indicated in
parentheses for operating details.
1. Tachometer
2. Speedometer
3. Fuel gauge
4. Odometer
Twin trip odometer
Trip computer5. Continuously Variable Transmission
(CVT) position indicator
6. Instrument brightness control
knob
7. Change/reset button
Type A (if so equipped)
LIC3131
METERS AND GAUGES
Instruments and controls2-3
Page 85 of 354
CAUTION
∙ To clean the meter lens, use a sof t
cloth, dampened with water. Never
use a rough cloth, alcohol, benzine,
thinner or any kind of solvent or paper
towel with a chemical cleaning agent.
They will scratch or cause discolor-
ation to the lens.
∙ Do not spray any liquid such as water
on the meter lens. Spraying liquid
may cause the systems to
malfunction.
1. Tachometer
2. Temperature gauge
3. Odometer
Twin trip odometer
Trip computerOutside air temperature (if so
equipped)
4. Fuel gauge
5. Speedometer
6. Change/reset button
Type B (if so equipped)
LIC2146
2-4Instruments and controls
Page 87 of 354

Odometer/Twin trip odometer
The odometer/twin trip odometer is dis-
played when the ignition switch is placed in
the ON position.
The odometer
�1records the total dis-
tance the vehicle has been driven.
The twin trip odometer
�2records the dis-
tance of individual trips.
Changing the display
Press the change/reset button
�3to
change the display as follows:Odometer (ODO)→Trip
→Trip→Instant fuel consumption→Average fuel
consumption→DTE (cruising range)→
Odometer (ODO)
Resetting the trip odometer
Pushing the TRIP RESET switch
�3for more
than 1 second resets the currently dis-
played trip odometer to zero.
Average fuel economy and distance to
empty information is also available. For ad-
ditional information, refer to “Trip com-
puter” in this section.
Loose fuel cap warning message
Push the reset button�Afor more than
1 second to reset the LOOSE FUEL CAP
warning message af ter the fuel cap has
been tightened. For additional information,
refer to “Fuel-filler cap” in the “Pre-driving
checks and adjustments” section of this
manual.
Type A (if so equipped)
LIC3305
Type B (if so equipped)
LIC2139
Type A (if so equipped)
LIC3306
2-6Instruments and controls
Page 88 of 354

The CHECK TIRE PRES warning message is
displayed when the low tire pressure warn-
ing light is illuminated and low tire pressure
is detected. Check")
Check tire pressure warning
message (if so equipped)
The CHECK TIRE PRES warning message is
displayed when the low tire pressure warn-
ing light is illuminated and low tire pressure
is detected. Check and adjust the tire pres-
sure to the recommended COLD tire pres-
sure shown on the Tire and Loading Infor-
mation label. The CHECK TIRE PRES
warning message can be turned off using
the reset button
�Aon the meter, the low
tire pressure warning light will not be
turned off.The low tire pressure warning light remains
illuminated until the tires are inflated to the
recommended COLD tire pressure. The
CHECK TIRE PRES warning message is dis-
played each time the ignition switch is
placed in the ON position as long as the low
tire pressure warning light remains illumi-
nated. For additional information, refer to
“Low tire pressure warning light” in this sec-
tion, “Tire Pressure Monitoring System
(TPMS)” in the “Starting and driving” section,
and “Wheels and tires” in the “Do-it-yourself ”
section of this manual.
Type B (if so equipped)
LPD2025
Type A (if so equipped)
LIC3307
Type B (if so equipped)
LPD2128
Instruments and controls2-7
Page 91 of 354
CAUTION
∙ If the vehicle runs out of fuel, thecheck engine light may come on. Re-
fuel as soon as possible. Af ter a few
driving trips, the
light should
turn off. If the light remains on af ter a
few driving trips, have the vehicle in-
spected. It is recommended that you
visit a NISSAN dealer for this service.
∙ For additional information, refer to
“Malfunction Indicator Light (MIL)” in
this section.
TRIP COMPUTER
When the ignition switch is placed in the ON
position, modes of the trip computer can
be selected by pushing the change/reset
button
�Aon the instrument panel located
near the speedometer. The following
modes can be selected in the display
�B:
∙ Odometer
∙ Trip A
∙ Trip B
∙ Instant fuel consumption
∙ Average fuel consumption∙ Distance to empty
∙ Outside air temperature (if so equipped)
Type A (if so equipped)
LIC2470
Type B (if so equipped)
LIC2138
2-10Instruments and controls
Page 92 of 354

Odometer
The odometer records the total distance
the vehicle has been driven.
Trip A
Measures the distance of one specific trip.
Trip B
Measures the distance of a second specific
trip.
Instant fuel consumption
The instant fuel consumption mode shows
the instant fuel economy. The display up-
dates instantly when driving.
Average fuel consumption (mpg
or l (liter)/100 km)
The average fuel consumption mode
shows the average fuel consumption since
the last reset. Resetting is done by pressing
the trip or change button for more than
approximately 1 second. The display is up-
dated every 30 seconds. At about the first
1/3 mi (500 m) af ter a reset, the display
shows (----).
Distance to empty
The distance to empty mode provides you
with an estimation of the distance that can
be driven before refueling. The range is
constantly being calculated, based on the
amount of fuel in the fuel tank and the
actual fuel consumption.
The distance to empty includes a low
range warning feature: when the fuel level
is low, the distance to empty is automati-
cally selected and the digits blink in order
to draw the driver’s attention. Press the trip
computer change/reset button
�Aif you
wish to return to the mode that was se-
lected before the warning occurred.
When the fuel level drops even lower, the
distance to empty will display (----).
Outside air temperature (°F or °C)
(if so equipped)
The outside air temperature is displayed in
°F or °C.
The ambient temperature sensor is lo-
cated in front of the radiator. The sensor
may be affected by road or engine heat,
wind directions and other driving condi-
tions. The display may differ from the ac-
tual ambient temperature or the tempera-
ture displayed on various signs or
billboards.
Trip computer reset
Pressing the change/reset button for
more than 3 seconds will reset all modes
except Trip A and distance to empty.
Instruments and controls2-11
Page 97 of 354
” in the
“Starting and driving” section and “Tire
pressure” in the “Do-it-yourself ” section of
this manual.")
For additional information, refer to “Tire
Pressure Monitoring System (TPMS)” in the
“Starting and driving” section and “Tire
pressure” in the “Do-it-yourself ” section of
this manual.
WARNING
∙ Radio waves could adversely affect
electric medical equipment. Those
who use a pacemaker should contact
the electric medical equipment
manufacturer for the possible influ-
ences before use.
∙ If the light does not illuminate with
the ignition switch placed in the ON
position, have the vehicle checked as
soon as possible. It is recommended
that you visit a NISSAN dealer for this
service.∙ If the light illuminates while driving,
avoid sudden steering maneuvers or
abrupt braking, reduce vehicle speed,
pull off the road to a safe location and
stop the vehicle as soon as possible.
Driving with under-inflated tires may
permanently damage the tires and in-
crease the likelihood of tire failure. Se-
rious vehicle damage could occur and
may lead to an accident and could re-
sult in serious personal injury or
death. Check the tire pressure for all
four tires. Adjust the tire pressure to
the recommended COLD tire pressure
show on the Tire and Loading Infor-
mation label located in the driver’s
door opening to turn the low tire pres-
sure warning light off. If the light still
illuminates while driving af ter adjust-
ing the tire pressure, a tire may be flat
or the TPMS may be malfunctioning. If
you have a flat tire, replace it with a
spare tire as soon as possible. If no tire
is flat and all tires are properly in-
flated, have the vehicle checked. It is
recommended that you visit a NISSAN
dealer for this service.∙ When replacing a wheel without the
TPMS such as the spare tire, the TPMS
will not function and the low tire pres-
sure warning light will flash for ap-
proximately 1 minute. The light will re-
main on af ter 1 minute. Have your
tires replaced and/or TPMS system
reset as soon as possible. It is recom-
mended that you visit a NISSAN dealer
for these services.
∙ Replacing tires with those not origi-
nally specified by NISSAN could affect
the proper operation of the TPMS.
CAUTION
∙ The TPMS is not a substitute for the
regular tire pressure check. Be sure to
check the tire pressure regularly.
∙ If the vehicle is being driven at speeds
of less than 16 mph (25 km/h), the
TPMS may not operate correctly.
∙ Be sure to install the specified size of
tires to the four wheels correctly.
2-16Instruments and controls
Page 125 of 354
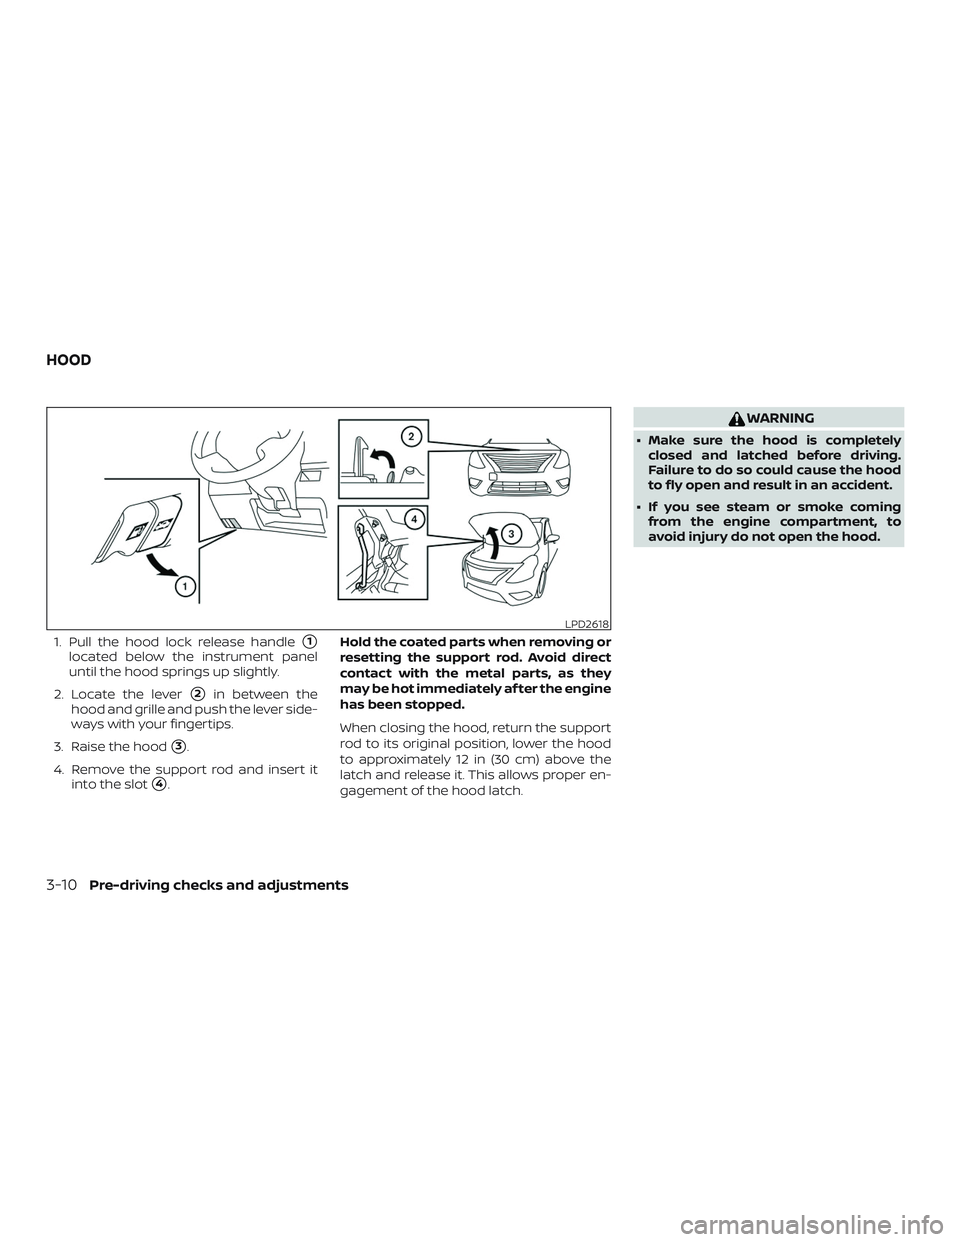
1. Pull the hood lock release handle�1
located below the instrument panel
until the hood springs up slightly.
2. Locate the lever
�2in between the
hood and grille and push the lever side-
ways with your fingertips.
3. Raise the hood
�3.
4. Remove the support rod and insert it
into the slot
�4.Hold the coated parts when removing or
resetting the support rod. Avoid direct
contact with the metal parts, as they
may be hot immediately af ter the engine
has been stopped.
When closing the hood, return the support
rod to its original position, lower the hood
to approximately 12 in (30 cm) above the
latch and release it. This allows proper en-
gagement of the hood latch.
WARNING
∙ Make sure the hood is completely
closed and latched before driving.
Failure to do so could cause the hood
to fly open and result in an accident.
∙ If you see steam or smoke coming
from the engine compartment, to
avoid injury do not open the hood.
LPD2618
HOOD
3-10Pre-driving checks and adjustments
 (P. 5-19)
19. Tilt steering (P. 3-15)
20. Audio control switches (P. 4-48)
Bluetooth® Hands-Free Phone
System switches (P. 4-50)
21. Vehicle Dynamic Contr")