Page 111 of 354

WARNING
∙ Make sure that all passengers have
their hands, etc., inside the vehicle
while it is in motion and before closing
the windows. Use the window lock
switch to")
POWER WINDOWS (if so equipped)
WARNING
∙ Make sure that all passengers have
their hands, etc., inside the vehicle
while it is in motion and before closing
the windows. Use the window lock
switch to prevent unexpected use of
the power windows.
∙ To help avoid risk of injury or death
through unintended operation of the
vehicle and/or its systems, including
entrapment in windows or inadver-
tent door lock activation, do not leave
children, people who require the as-
sistance of others or pets unattended
in your vehicle. Additionally, the tem-
perature inside a closed vehicle on a
warm day can quickly become high
enough to cause a significant risk of
injury or death to people and pets.
The power windows operate when the ig-
nition switch is placed in the ON position, or
for a period of time af ter the ignition switch
is placed in the OFF position. If the driver’s
or passenger’s door is opened during this
period of time, the power to the windows is
canceled.
1. Window lock button
2. Power door lock switch
3. Front passenger’s side window
switch
4. Right rear passenger’s window
switch
5. Lef t rear passenger’s window
switch
6. Driver’s side automatic switch
Driver’s side power window
switch
The driver’s side control panel is equipped
with switches to open or close the front
and rear passenger windows.
To open a window, push the switch and
hold it down. To close a window, pull the
switch and hold it up. To stop the opening
or closing function at any time, simply re-
lease the switch.
Locking passengers’ windows
When the window lock switch is depressed,
only the driver’s side window can be
opened or closed. Push it again to cancel
the window lock function.LIC1329
WINDOWS
2-30Instruments and controls
Page 112 of 354
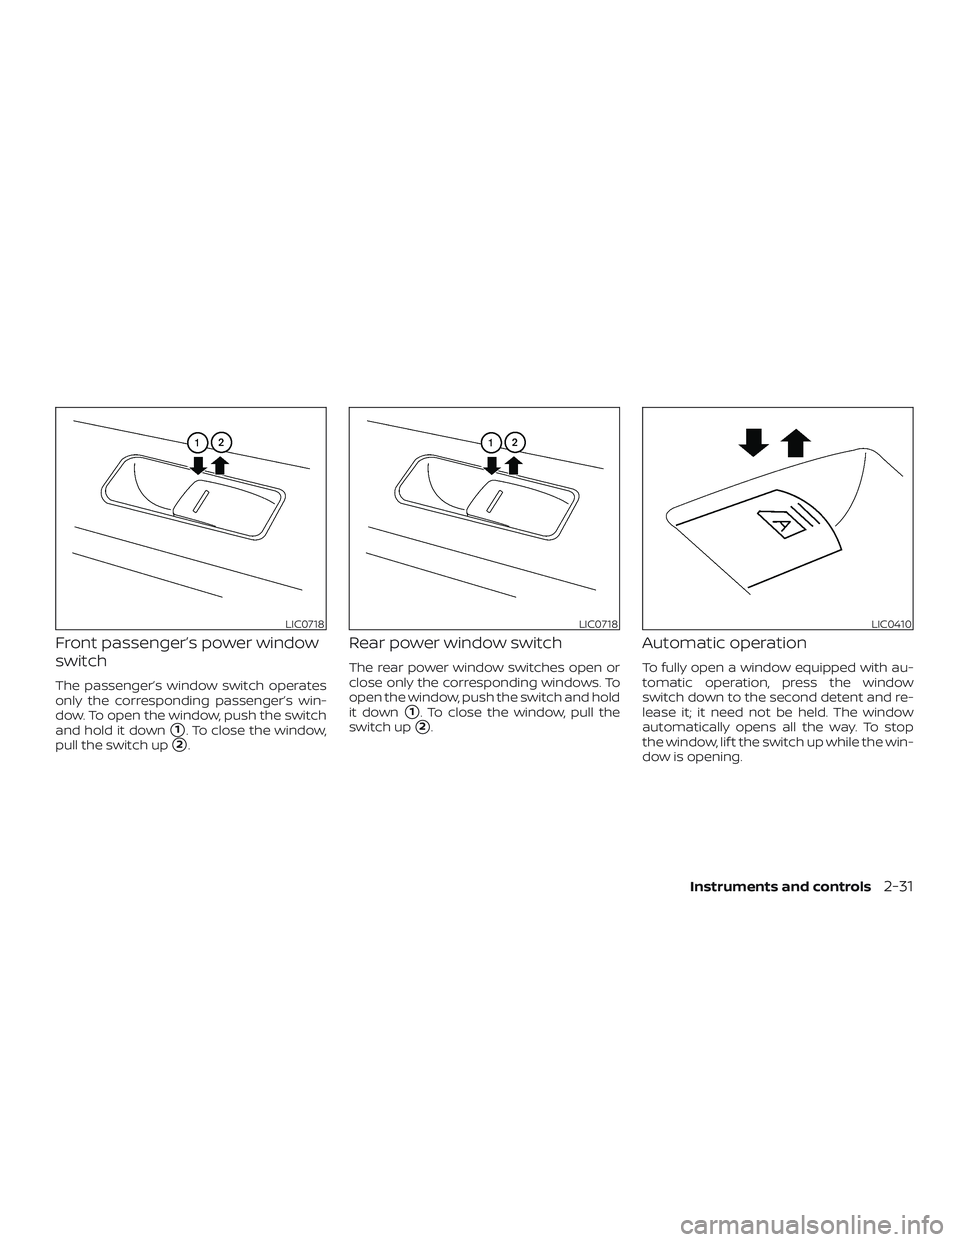
Front passenger’s power window
switch
The passenger’s window switch operates
only the corresponding passenger’s win-
dow. To open the window, push the switch
and hold it down
�1. To close the window,
pull the switch up
�2.
Rear power window switch
The rear power window switches open or
close only the corresponding windows. To
open the window, push the switch and hold
it down
�1. To close the window, pull the
switch up
�2.
Automatic operation
To fully open a window equipped with au-
tomatic operation, press the window
switch down to the second detent and re-
lease it; it need not be held. The window
automatically opens all the way. To stop
the window, lif t the switch up while the win-
dow is opening.
LIC0718LIC0718LIC0410
Instruments and controls2-31
Page 113 of 354

The side windows can be opened or closed
by turning the hand crank on each door.The interior light has a three-position
switch and operates regardless of ignition
switc")
MANUAL WINDOWS (if so
equipped)
The side windows can be opened or closed
by turning the hand crank on each door.The interior light has a three-position
switch and operates regardless of ignition
switch position.
When the switch is in the ON position�1,
the interior lights illuminate, regardless of
door position. The lights will go off af ter a
period of time unless the ignition switch is
placed in the ACC or ON position.
When the switch is in the DOOR position
�2,
the interior lights will stay on for a period of
time when:∙ The doors are unlocked by the key fob (if
so equipped), a key or the power door
lock switch (if so equipped) while all
doors are closed and the ignition switch
is placed in the OFF position.
∙ The driver’s door is opened and then
closed while the key is removed from
the ignition switch.
∙ The key is removed from the ignition
switch while all doors are closed.
The lights will turn off while the timer is
activated when:
∙ The driver’s door is locked by the key fob
(if so equipped), a key, or the power door
lock switch (if so equipped).
∙ The ignition switch is placed in the ON
position.
When the switch is in the OFF position
�3,
the interior lights do not illuminate, regard-
less of door position.
The lights will turn off automatically af ter a
period of time while doors are open to pre-
vent the battery from becoming dis-
charged.
LIC3352SIC2063A
INTERIOR LIGHTS
2-32Instruments and controls
Page 118 of 354
, not in the
vehicle. If you lose your keys, it is recom-
mended that you visit a")
A key number plate is supplied with your
keys. Record the key number and keep it in
a safe place (such as your wallet), not in the
vehicle. If you lose your keys, it is recom-
mended that you visit a NISSAN dealer for
duplicates by using the key number.
NISSAN does not record key numbers so it
is very important to keep track of your key
number plate.
A key number is only necessary when you
have lost all your keys. If you still have a key,
it can be duplicated without knowing the
key number.When the doors are locked using one of the
following methods, the doors cannot be
opened using the inside or outside door
handles. The doors must be unlocked to
open the doors.
WARNING
∙ Always have the doors locked while
driving. Along with the use of seat
belts, this provides greater safety in
the event of an accident by helping to
prevent persons from being thrown
from the vehicle. This also helps keep
children and others from unintention-
ally opening the doors, and will help
keep out intruders.
∙ Before opening any door, always look
for and avoid oncoming traffic.∙ To help avoid risk of injury or death
through unintended operation of the
vehicle and/or its systems, including
entrapment in windows or inadver-
tent door lock activation, do not leave
children, people who require the as-
sistance of others or pets unattended
in your vehicle. Additionally, the tem-
perature inside a closed vehicle on a
warm day can quickly become high
enough to cause a significant risk of
injury or death to people and pets.
DOORS
Pre-driving checks and adjustments3-3
Page 122 of 354

HOW TO USE REMOTE KEYLESS
ENTRY SYSTEM
Locking doors
1. Close all windows.
2. Remove the key from the ignition
switch.
3. Close all doors.4. Press the
button on the key fob.
All the doors lock. The hazard warning
lights flash twice and the horn beeps
once to indicate all doors are locked.
∙ When the
button is pressed
with all doors locked, the hazard
warning lights flash twice and the
horn beeps once as a reminder that
the doors are already locked.
∙ If a door is open and you press
the
button, the doors will lock
but the horn will not beep and the
hazard lights will not flash.
The horn may or may not beep. For addi-
tional information, refer to “Silencing the
horn beep feature” in this section.
Unlocking doors
Press thebutton on the key fob once.
∙ Only the driver’s door unlocks.
∙ The hazard warning lights flash once if
all doors are completely closed with the
ignition switch in any position except
the ON position.
∙ The interior light turns on and the light
timer activates for 30 seconds when
the interior light switch is in the DOOR
position with the ignition switch in any
position except the ON position.
LPD2028LPD2029
Pre-driving checks and adjustments3-7
Page 137 of 354
WARNING
∙ Failure to follow the warnings and in-
structions for proper use of the Rear-
View Monitor system could result in
serious injury or death.∙
RearView Monitor is a convenience fea-
ture and is not a substitute for proper
backing. Always turn and look out the
windows and check mirrors to be sure
that it is safe to move before operating
the vehicle. Always back up slowly.∙ The system is designed as an aid to
the driver in showing large stationary
objects directly behind the vehicle, to
help avoid damaging the vehicle.
LHA4456
REARVIEW MONITOR (if so
equipped)
4-2Display screen, heater, air conditioner, audio and phone systems
Page 145 of 354
∙ When parking, set the heater and air
conditioner controls to turn off air recir-
culation to allow fresh air into the pas-
senger compartment. This should help
reduce odors inside the vehicle.
1.Rear window defroster switch
2.
Fan control dial
3.
Air conditioner button
4. Temperature control dial
5. Air intake lever (Air recirculation
and Fresh air)
6. Air flow control dial
CONTROLS
Fan control dial
Thefan control dial turns the fan on
and off, and controls fan speed.
Air flow control dial
The air flow control dial allows you to select
the air flow outlets.
— Air flows from center and side
vents.
— Air flows from center and side
vents and foot outlets.
— Air flows mainly from foot
outlets.
— Air flows from defroster outlets
and foot outlets.
— Air flows mainly from defroster
outlets.
LHA3655
4-10Display screen, heater, air conditioner, audio and phone systems
Page 146 of 354

Temperature control dial
The temperature control dial allows you to
adjust the temperature of the outlet air. To
lower the temperature, turn the dial to the
lef t. To increase the temperature, turn the
dial to the right.
Fresh air
Move the air intake lever to theposi-
tion. The air flow is drawn from outside the
vehicle.
Air recirculation
Move the air intake lever to theposi-
tion to recirculate air inside the vehicle.
Use the
selection:
∙ when driving on a dusty road.
∙ to prevent traffic fumes from entering
passenger compartment.
∙ for maximum cooling when using the
air conditioner.
Air conditioner button
Start the engine, turn the fan control dial to
the desired position and press the
button to turn on the air conditioner. The
indicator light comes on when the air con-ditioner is operating. To turn off the air con-
ditioner, press the
button again.
The air conditioner cooling function op-
erates only when the engine is running.
Rear window defroster switch
For additional information, refer to “Rear
window defroster switch” in the “Instru-
ments and controls” section of this manual.
HEATER OPERATION
Heating
This mode is used to direct heated air to
the foot outlets. Some air also flows from
the defrost outlets.
1. Move the air intake lever to the
position for normal heating.
2. Turn the air flow control dial to
the
position.
3. Turn the
fan control dial to the
desired position.
4. Turn the temperature control dial to
the desired position between the
middle and the hot position.
Ventilation
This mode directs outside air to the side
and center vents.
1. Move the air intake lever to the
position.
2. Turn the air flow control dial to
the
position.
3. Turn the
fan control dial to the
desired position.
4. Turn the temperature control dial to
the desired position.
Defrosting or defogging
This mode directs the air to the defrost
outlets to defrost/defog the windows.
1. Move the
air intake lever to the
position.
2. Turn the air flow control dial to
the
position.
3. Turn the
fan control dial to the
desired position.
4. Turn the temperature control dial to
the desired position between the
middle and the hot position.
Display screen, heater, air conditioner, audio and phone systems4-11