2018 NISSAN SENTRA audio
[x] Cancel search: audioPage 238 of 507

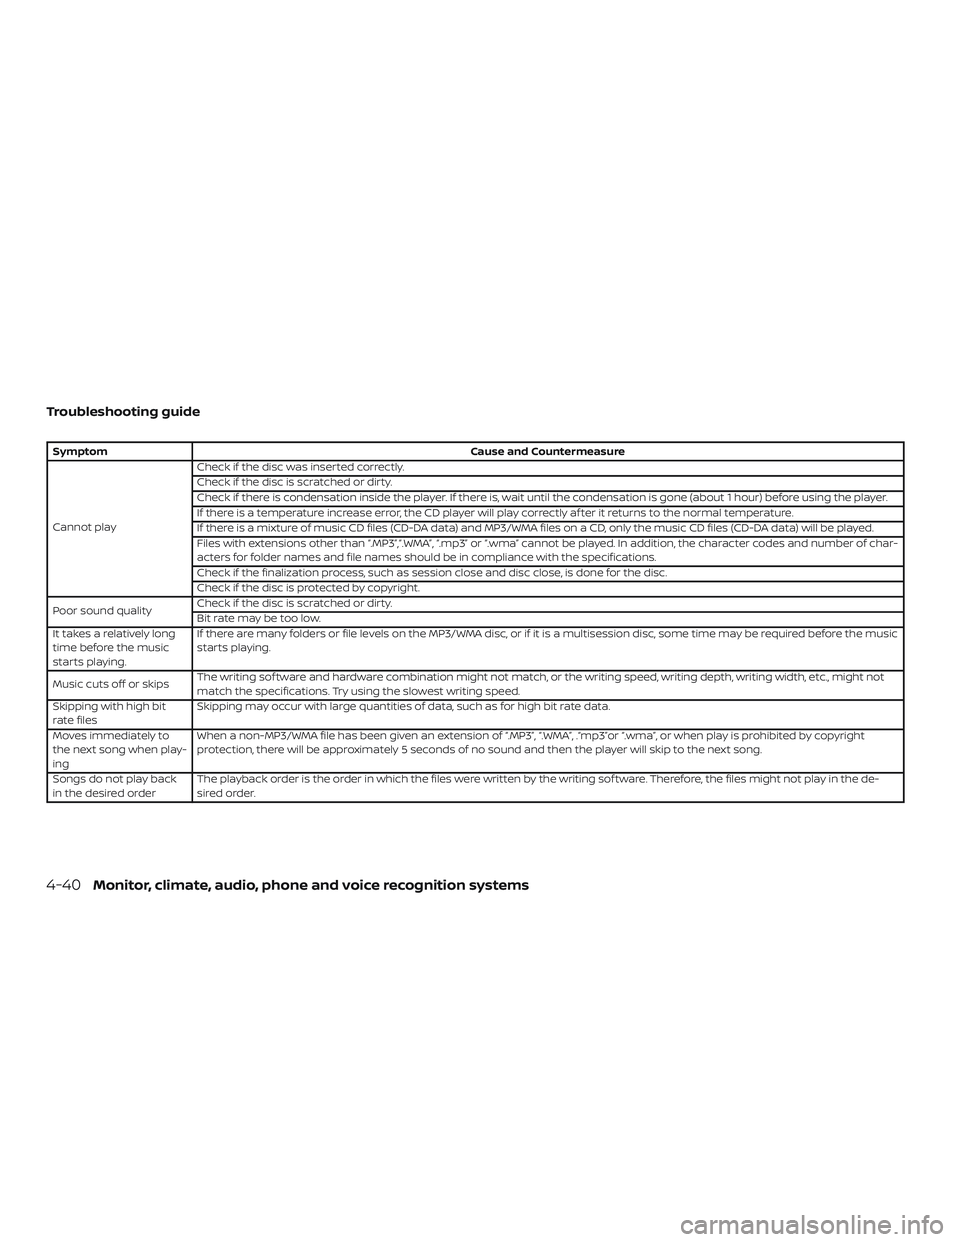
Troubleshooting guide
SymptomCause and Countermeasure
Cannot play Check if the disc was inserted correctly.
Check if the disc is scratched or dirty.
Check if there is condensation inside the player. If there is, wait until the condensation is gone (about 1 hour) before using the player.
If there is a temperature increase error, the CD player will play correctly af ter it returns to the normal temperature.
If there is a mixture of music CD files (CD-DA data) and MP3/WMA files on a CD, only the music CD files (CD-DA data) will be played.
Files with extensions other than “.MP3”,“.WMA”, “.mp3” or “.wma” cannot be played. In addition, the character codes and number of char-
acters for folder names and file names should be in compliance with the specifications.
Check if the finalization process, such as session close and disc close, is done for the disc.
Check if the disc is protected by copyright.
Poor sound quality Check if the disc is scratched or dirty.
Bit rate may be too low.
It takes a relatively long
time before the music
starts playing. If there are many folders or file levels on the MP3/WMA disc, or if it is a multisession disc, some time may be required before the music
starts playing.
Music cuts off or skips The writing sof tware and hardware combination might not match, or the writing speed, writing depth, writing width, etc., might not
match the specifications. Try using the slowest writing speed.
Skipping with high bit
rate files Skipping may occur with large quantities of data, such as for high bit rate data.
Moves immediately to
the next song when play-
ing When a non-MP3/WMA file has been given an extension of “.MP3”, “.WMA”, .“mp3”or “.wma”, or when play is prohibited by copyright
protection, there will be approximately 5 seconds of no sound and then the player will skip to the next song.
Songs do not play back
in the desired order The playback order is the order in which the files were written by the writing sof tware. Therefore, the files might not play in the de-
sired order.
4-40Monitor, climate, audio, phone and voice recognition systems
Page 239 of 507

USB (Universal Serial Bus)
Connection Port
WARNING
Do not connect, disconnect, or operate
the USB device while driving. Doing so
can be a distraction. If distracted you
could lose control of your vehicle and
cause an accident or serious injury.
CAUTION
∙ Do not force the USB device into theUSB port. Inserting the USB device
tilted or up-side-down into the port
may damage the port. Make sure that
the USB device is connected correctly
into the USB port.
∙ Do not grab the USB port cover (if so equipped) when pulling the USB de-
vice out of the port. This could dam-
age the port and the cover.
∙ Do not leave the USB cable in a place where it can be pulled unintentionally.
Pulling the cable may damage the
port. The vehicle is not equipped with a USB de-
vice. USB devices should be purchased
separately as necessary.
This system cannot be used to format USB
memory devices. To format a USB device,
use a personal computer.
In some jurisdictions, the USB device for the
front seats plays only sound without im-
ages for regulatory reasons, even when the
vehicle is parked.
This system supports various USB
memory devices, USB hard drives and
iPod® players. Some USB devices may not
be supported by this system.
∙ Partitioned USB devices may not play correctly.
∙ Some characters used in other lan- guages (Chinese, Japanese, etc.) may
not appear properly in the display. Using
English language characters with a USB
device is recommended.
General notes for USB use ∙ For additional information, refer to your device manufacturer’s owner informa-
tion regarding the proper use and care
of the device. Notes for iPod® use
iPod® is a trademark of Apple Inc., regis-
tered in the U.S. and other countries.
∙ Improperly plugging in the iPod® may cause a check mark to be displayed on
and off (flickering). Always make sure
that the iPod® is connected properly.
∙
An iPod® nano (1st Generation) may re-
main in fast forward or rewind mode if it is
connected during a seek operation. In this
case, please manually reset the iPod®.
∙ An iPod® nano (2nd Generation) will continue to fast-forward or rewind if it is
disconnected during a seek operation.
∙ An incorrect song title may appear when the Play Mode is changed while
using an iPod® nano (2nd Generation).
∙ Audiobooks may not play in the same order as they appear on an iPod®.
∙ Large video files cause slow responses in an iPod®. The vehicle center display
may momentarily black out, but will
soon recover.
∙ If an iPod® automatically selects large video files while in the shuffle mode, the
vehicle center display may momen-
tarily black out, but will soon recover.
Monitor, climate, audio, phone and voice recognition systems4-41
Page 240 of 507

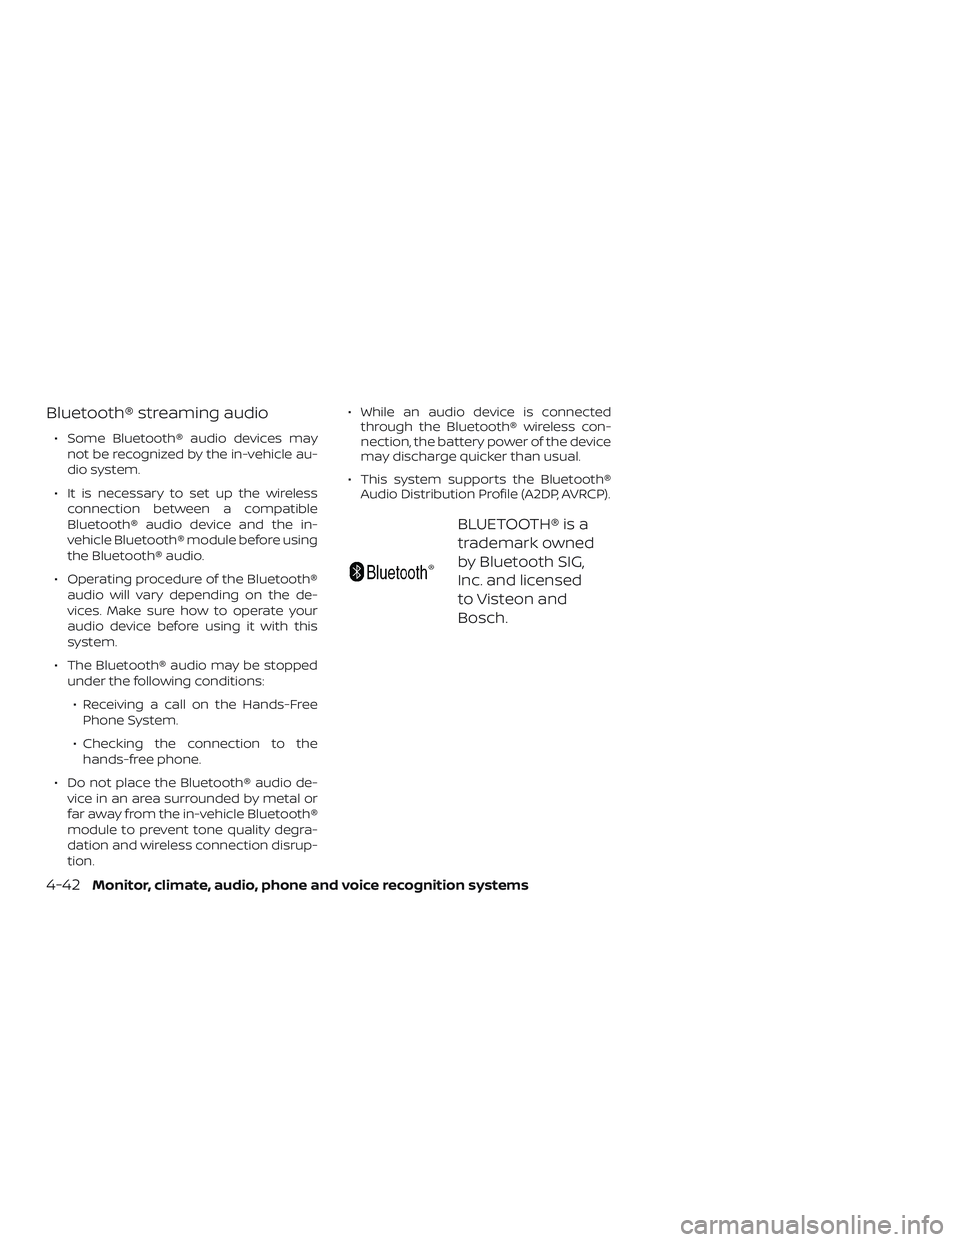
Bluetooth® streaming audio
∙ Some Bluetooth® audio devices maynot be recognized by the in-vehicle au-
dio system.
∙ It is necessary to set up the wireless connection between a compatible
Bluetooth® audio device and the in-
vehicle Bluetooth® module before using
the Bluetooth® audio.
∙ Operating procedure of the Bluetooth® audio will vary depending on the de-
vices. Make sure how to operate your
audio device before using it with this
system.
∙ The Bluetooth® audio may be stopped under the following conditions:
∙ Receiving a call on the Hands-Free Phone System.
∙ Checking the connection to the hands-free phone.
∙ Do not place the Bluetooth® audio de- vice in an area surrounded by metal or
far away from the in-vehicle Bluetooth®
module to prevent tone quality degra-
dation and wireless connection disrup-
tion. ∙ While an audio device is connected
through the Bluetooth® wireless con-
nection, the battery power of the device
may discharge quicker than usual.
∙ This system supports the Bluetooth® Audio Distribution Profile (A2DP, AVRCP).
BLUETOOTH® is a
trademark owned
by Bluetooth SIG,
Inc. and licensed
to Visteon and
Bosch.
4-42
Monitor, climate, audio, phone and voice recognition systems
Page 241 of 507

FM/AM RADIO WITH COMPACT
DISC (CD) PLAYER (if so equipped)
For additional information, refer to “Audio
operation precautions” in this section.1.
CD eject button 2. FM•AM button
3. CD insert slot
4. Display screen
5. SCAN button 6.
SEEK/TRACK buttons
7. iPod MENU button
8.
BACK button
9. ENTER/SETTING button and TUNE/ FOLDER control knob
10. Station select (1–6) buttons
11. RDM button
12. RPT button
13.
VOL (volume) knob /(power) button
14. DISP button
15. MEDIA button
16. CD button
Audio main operation
VOL (volume) knob /(power)
button
Place the ignition switch in the ACC or ON
position and press the VOL (volume) knob
/
(power) button while the system is
off to call up the mode that was playing
immediately before the system was turned
off.
LHA3026
Monitor, climate, audio, phone and voice recognition systems4-43
Page 242 of 507

To turn the system off, press the VOL (vol-
ume) knob /
(power) button.
Turn the VOL (volume) knob /
(power)
to adjust the volume. ENTER/SETTING button
Press the ENTER/SETTING button to show
the Settings screen on the display. Turn the
TUNE/FOLDER knob to navigate the op-
tions and then press the ENTER/SETTING
button to make a selection.
Audio
Bass Adjusts the bass to the desired level.
Treble Adjusts the treble to the desired level.
Balance Adjusts the balance to the desired level. Balance adjusts the sound level between the lef t and right speakers.
Fade Adjusts the fade to the desired level. Fade adjusts the sound level between the front and rear
speakers.
Speed Sens Vol. (Speed Sensitive Volume) Adjusts the speed sensitive volume function, which increases the volume of the audio system as
the speed of the vehicle increases. Set to “OFF” to disable the feature. The higher the setting, the
more the volume increases in relation to vehicle speed.
AUX Vol. Choose a setting from 0 to +3 to control the boost of incoming auxiliary device volume. A setting
of 0 provides no additional boost in volume. A setting of +3 provides the greatest boost in volume.
Brightness and Contrast Adjust the brightness or contrast to adjust the appearance of the display screen.
Clock Allows the user to set time manually.
On-Screen Clock Toggles ON or OFF the clock display on the upper right corner of the display screen.
RDS Display Toggles ON or OFF the RDS information displayed on the screen while the radio is playing.
Language Select the desired language for the system from the available options.
Bass, treble, balance and fade can also be adjusted by pressing the ENTER/SETTING button and turning the TUNE/FOLDER control knob
to select the item to adjust. When the desired item is shown on the display, turn the tuning to adjust and then press the ENTER/SETTING
button until the display returns to the main audio screen. If the button is not pressed for approximately 10 seconds, the radio or CD display
will automatically reappear.
4-44Monitor, climate, audio, phone and voice recognition systems
Page 243 of 507

Clock Set1. Press the ENTER/SETTING button.
2. Turn the TUNE/FOLDER knob to select CLOCK.
3. Press the ENTER/SETTING button.
4. Turn the TUNE/FOLDER knob to select “set time”.
5. Press the ENTER/SETTING button.
6. Rotate the TUNE/FOLDER knob to ad- just hours.
7. Press the ENTER/SETTING button.
8. Turn the TUNE/FOLDER knob to adjust minutes.
9. Press the ENTER/SETTING button.
10. Press the
BACK button to finish.
iPod MENU button
This button can only be used for iPod® op-
erations. For additional information, refer to
“iPod® player operation without Navigation
System” in this section. DISP (display) button
Press the DISP (display) button while a CD is
playing to change the text shown in the
audio display as follows:
For CDs:
Running Time
→Album Title: →Artist
Name: →Song Title
For MP3 CDs:
Running Time →Folder Title: →Album Title:
→ Artist Name: →Song Title:
If the text information is too long to fully be
displayed on the screen; press and hold the
DISP button for longer than 1.5 seconds to
scroll through the rest of the text.
Press the DISP (display) button while the
radio is playing to toggle the audio display
between station number and RDS.
MEDIA button
Press the MEDIA button to toggle between
different media options connected to the
system.
BACK button
Press the
BACK button to return to
the previous menu screen.
FM/AM radio operation
FM·AM button
Press the FM·AM button to change the
band as follows:
AM →FM1 →FM2 →AM
If another audio source is playing when the
FM·AM button is pressed, the audio source
playing will automatically be turned off and
the last radio station played will begin play-
ing.
TUNE/FOLDER knob tuning
Turn the TUNE/FOLDER knob to the lef t or
right for manual tuning.
SEEK tuning
Press the SEEK•TRACK button
orto tune from low to high or high to
low frequencies and to stop at the next
broadcasting station.
SCAN tuning
Press the SCAN button to stop at each
broadcasting station for 5 seconds. SCAN
will appear on the screen while the radio is
scan tuning.
Monitor, climate, audio, phone and voice recognition systems4-45
Page 244 of 507

Pressing the button again during this
5 second period will stop SCAN tuning and
the radio will remain tuned to that station. If
the SCAN button is not pressed within
5 seconds, SCAN tuning moves to the next
station.
1 to 6 Station memory operations
Twelve stations can be set for the FM band
(6 for FM1, 6 for FM2) and six stations can be
set for the AM band.1. Choose the radio band AM, FM1 or FM2 using the AM or FM button.
2. Tune to the desired station using manual, SEEK or SCAN tuning. Press
and hold any of the desired station
memory buttons (1 – 6) until a beep
sound is heard.
3. The channel indicator will then come on and the sound will resume. Pro-
gramming is now complete.
4. Other buttons can be set in the same manner.
If the battery cable is disconnected or if the
fuse opens, the radio memory will be can-
celed. In that case, reset the desired sta-
tions.Compact disc (CD) player
operation
If the radio is already operating, it automati-
cally turns off and the compact disc begins
to play.
CD button
When the CD button is pressed with a com-
pact disc loaded and the radio playing, the
radio turns off and the last used compact
disc starts to play.
CD/MP3 display mode
While listening to an MP3/WMA CD, certain
text may be displayed on the screen if the
CD has been encoded with text informa-
tion. Depending on how the MP3/WMA CD
is encoded, information such as Artist,
Song and Folder will be displayed.
The track number and the total number of
tracks in the current folder or on the cur-
rent disc are displayed on the screen as
well.
SEEK/TRACK (Reverse or Fast Forward) button
Press and hold the SEEK/TRACK
button
orfor 1.5 seconds while
the compact disc is playing to reverse or fast forward the track being played. The
compact disc plays at an increased speed
while reversing or fast forwarding. When
the button is released, the compact disc
returns to normal play speed.
SEEK/TRACK button
Press the SEEK/TRACK button
while a
CD or MP3/WMA CD is playing to return to
the beginning of the current track. Press
the SEEK/TRACK button
several
times to skip backward several tracks.
Press the SEEK/TRACK button
while a
CD or MP3/WMA CD is playing to advance
one track. Press the SEEK/TRACK
button
several times to skip forward
several tracks. If the last track on a CD is
skipped, the first track on the disc is played.
If the last track in a folder of an MP3/WMA
CD is skipped, the first track of the next
folder is played.
TUNE/FOLDER knob (MP3/WMA CD only)
If an MP3/WMA CD with multiple folders is
playing, turn the TUNE/FOLDER knob to
change folders. Turn the knob to the lef t to
skip back a folder. Turn the knob to the right
to skip ahead a folder.
4-46Monitor, climate, audio, phone and voice recognition systems
Page 245 of 507

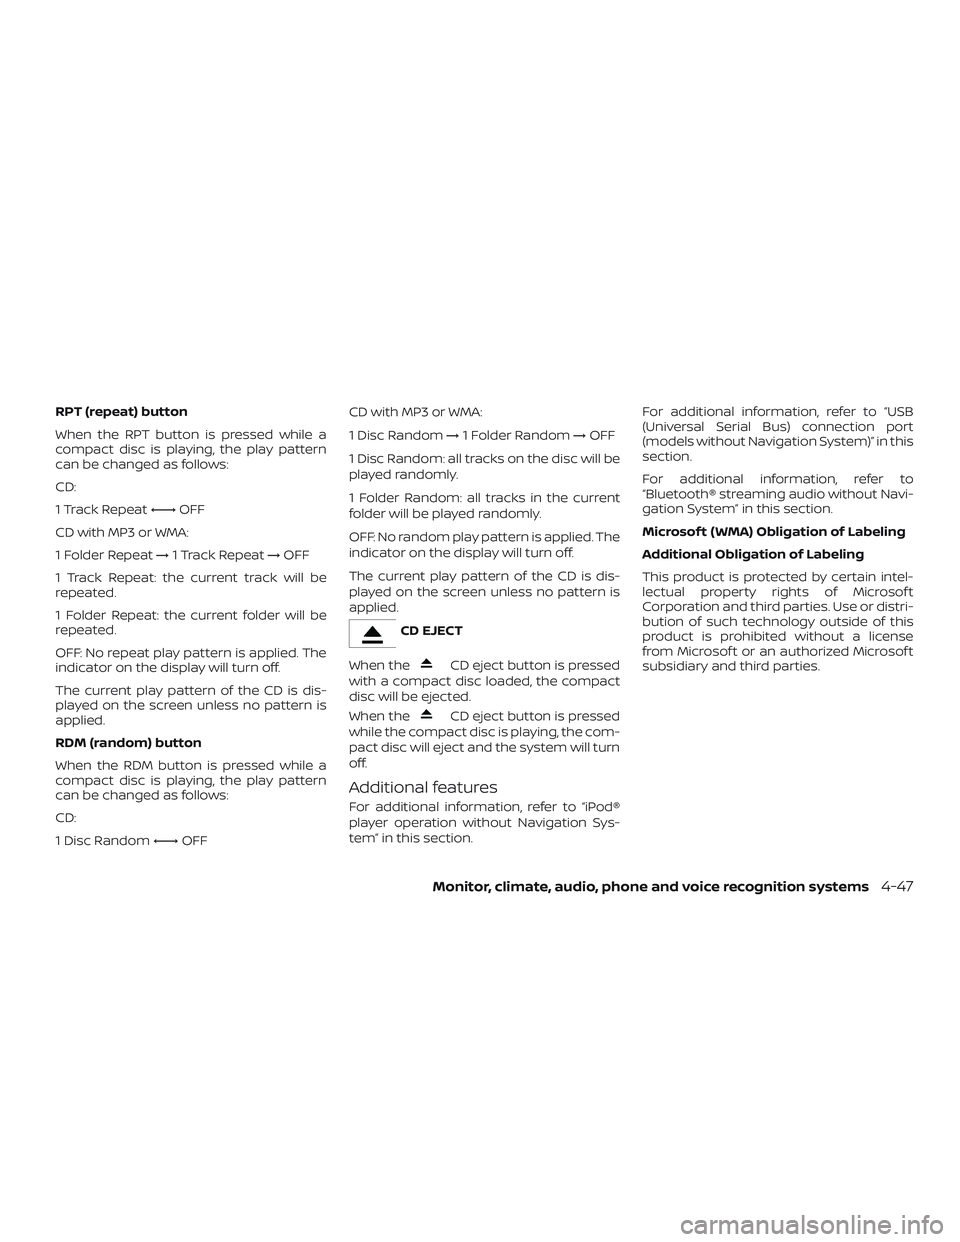
RPT (repeat) button
When the RPT button is pressed while a
compact disc is playing, the play pattern
can be changed as follows:
CD:
1 Track Repeat←→OFF
CD with MP3 or WMA:
1 Folder Repeat →1 Track Repeat →OFF
1 Track Repeat: the current track will be
repeated.
1 Folder Repeat: the current folder will be
repeated.
OFF: No repeat play pattern is applied. The
indicator on the display will turn off.
The current play pattern of the CD is dis-
played on the screen unless no pattern is
applied.
RDM (random) button
When the RDM button is pressed while a
compact disc is playing, the play pattern
can be changed as follows:
CD:
1 Disc Random ←→OFF CD with MP3 or WMA:
1 Disc Random
→1 Folder Random →OFF
1 Disc Random: all tracks on the disc will be
played randomly.
1 Folder Random: all tracks in the current
folder will be played randomly.
OFF: No random play pattern is applied. The
indicator on the display will turn off.
The current play pattern of the CD is dis-
played on the screen unless no pattern is
applied.
CD EJECT
When the
CD eject button is pressed
with a compact disc loaded, the compact
disc will be ejected.
When the
CD eject button is pressed
while the compact disc is playing, the com-
pact disc will eject and the system will turn
off.
Additional features
For additional information, refer to “iPod®
player operation without Navigation Sys-
tem” in this section. For additional information, refer to “USB
(Universal Serial Bus) connection port
(models without Navigation System)” in this
section.
For additional information, refer to
“Bluetooth® streaming audio without Navi-
gation System” in this section.
Microsof t (WMA) Obligation of Labeling
Additional Obligation of Labeling
This product is protected by certain intel-
lectual property rights of Microsof t
Corporation and third parties. Use or distri-
bution of such technology outside of this
product is prohibited without a license
from Microsof t or an authorized Microsof t
subsidiary and third parties.
Monitor, climate, audio, phone and voice recognition systems4-47