Page 298 of 507

TROUBLESHOOTING GUIDE
The system should respond correctly to all
voice commands without difficulty. If prob-
lems are encountered, try the following so-
lutions.
Where the solutions are listed by number,
try each solution in turn, starting with num-
ber 1, until the problem is resolved.
SymptomSolution
System fails to interpret the command correctly. 1. Ensure that the command is valid. For additional information, refer to “Voice commands” in this
section.
2. Ensure that the command is spoken af ter the tone.
3. Speak clearly without pausing between words and at a level appropriate to the ambient noise level in
the vehicle.
4. Ensure that the ambient noise level is not excessive (for example, windows open or defroster on).
NOTE: If it is too noisy to use the phone, it is likely that the voice commands will not be recognized.
5. If more than one command was said at a time, try saying the commands separately.
The system consistently selects the wrong entry from
the phone book. 1. Ensure that the phone book entry name requested matches what was originally stored. For additional
information, refer to “Vehicle phonebook” in this section.
2. Replace one of the names being confused with a new name.
3. Please speak both first and last name of contact to improve recognition accuracy.
4-100Monitor, climate, audio, phone and voice recognition systems
Page 413 of 507

8 Do-it-yourself
Maintenance precautions.......................8-2
Engine compartment check locations ...........8-3
Engine cooling system ..........................8-5
Checking engine coolant level ................8-6
Changing engine coolant .....................8-6
Engine oil ........................................8-7
Checking engine oil level .....................8-7
Changing engine oil ..........................8-8
Changing engine oil filter ....................8-10
Continuously Variable Transmission (CVT)
fluid (if so equipped) ............................. 8-11
Brake and clutch (if so equipped) fluid ..........8-12
Brake fluid ................................... 8-12
Clutch (if so equipped) fluid ..................8-12
Windshield-washer fluid ........................8-13
Windshield-washer fluid reservoir ............8-13
Battery......................................... 8-14
Jump starting ............................... 8-15
Variable voltage control system ................8-16
Drive belt ....................................... 8-16
Spark plugs .................................... 8-17
Replacing spark plugs ....................... 8-17
Air cleaner ...................................... 8-18In-cabin microfilter
.......................... 8-19
Windshield wiper blades ........................8-19
Cleaning .................................... 8-19
Replacing ................................... 8-19
Brakes.......................................... 8-21
Fuses ........................................... 8-22
Engine compartment .......................8-22
Passenger compartment ....................8-24
Battery replacement ........................... 8-25
Key fob (if so equipped) ......................8-26
NISSAN Intelligent Key® (if so equipped) ......8-27
Lights .......................................... 8-29
Headlights ................................... 8-29
Turn signal bulb ............................. 8-31
Fog lights (if so equipped) ...................8-31
Ex
terior and interior lights ...................8-33
Wheels and tires ................................ 8-35
Tire pressure ................................ 8-35
Tire labeling ................................. 8-39
Types of tires ................................ 8-41
Tire chains .................................. 8-42
Changing wheels and tires ..................8-43
Page 415 of 507
MRA8DE engine
1. Engine oil filler cap
2. Brake and clutch (if so equipped)fluid reservoir
3. Air cleaner
4. Battery
5. Fuse and relay box
6. Engine coolant reservoir
7. Radiator cap
8. Engine oil dipstick
9. Drive belt location
10. Windshield-washer fluid reservoir
LDI2931
ENGINE COMPARTMENT CHECK
LOCATIONS
Do-it-yourself8-3
Page 416 of 507
MR16DDT engine
1. Engine oil filler cap
2. Brake and clutch (if so equipped)fluid reservoir
3. Air cleaner
4. Battery
5. Fuse and relay box
6. Engine coolant reservoir
7. Radiator cap
8. Engine oil dipstick
9. Drive belt location
10. Windshield-washer fluid reservoir
11. Relay box (DTRL) (if so equipped)
LDI3011
8-4Do-it-yourself
Page 434 of 507
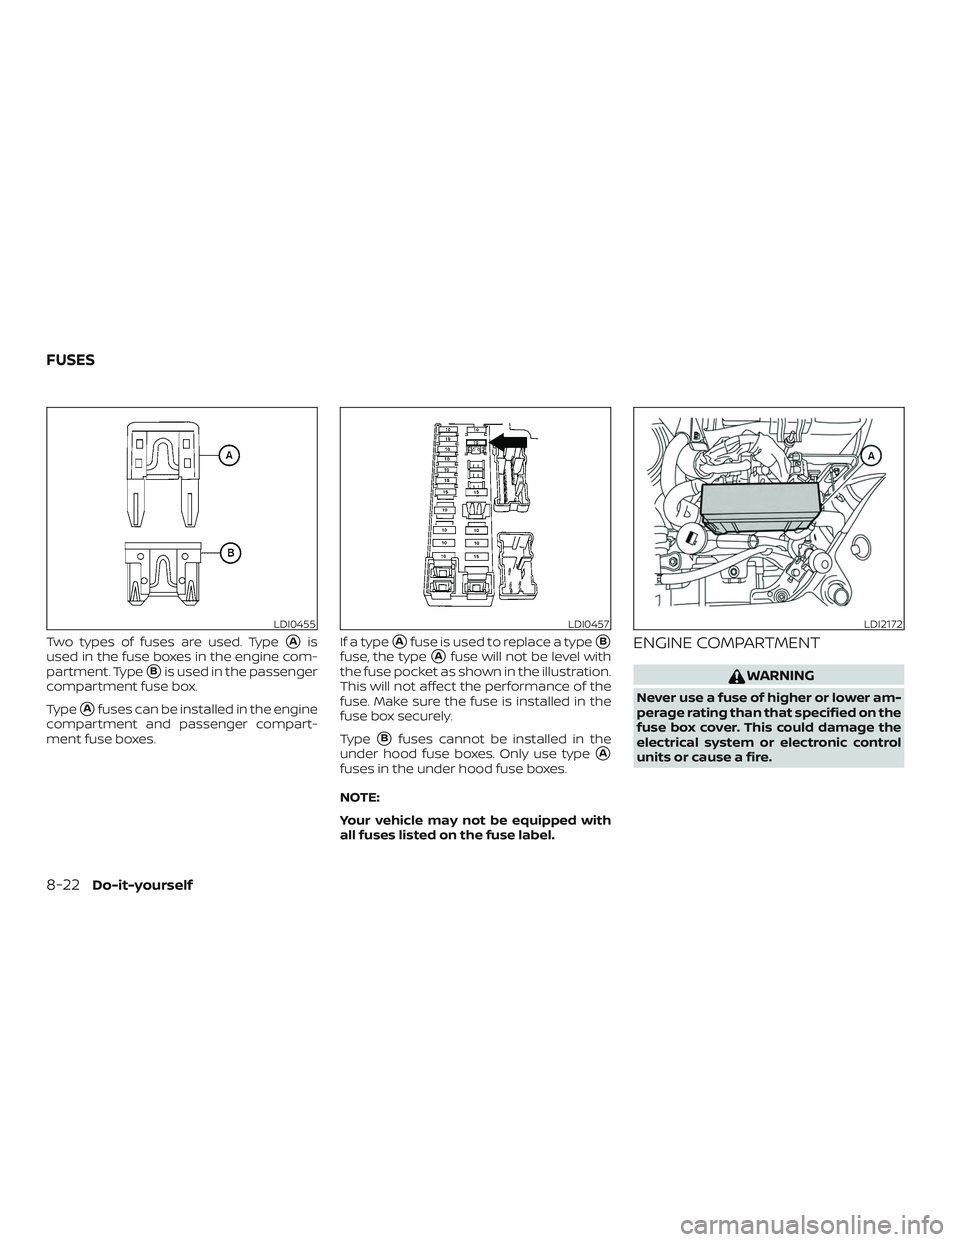
Two types of fuses are used. Type�Ais
used in the fuse boxes in the engine com-
partment. Type
�Bis used in the passenger
compartment fuse box.
Type
�Afuses can be installed in the engine
compartment and passenger compart-
ment fuse boxes. If a type
�Afuse is used to replace a type�B
fuse, the type�Afuse will not be level with
the fuse pocket as shown in the illustration.
This will not affect the performance of the
fuse. Make sure the fuse is installed in the
fuse box securely.
Type
�Bfuses cannot be installed in the
under hood fuse boxes. Only use type
�A
fuses in the under hood fuse boxes.
NOTE:
Your vehicle may not be equipped with
all fuses listed on the fuse label.
ENGINE COMPARTMENT
WARNING
Never use a fuse of higher or lower am-
perage rating than that specified on the
fuse box cover. This could damage the
electrical system or electronic control
units or cause a fire.
LDI0455LDI0457LDI2172
FUSES
8-22Do-it-yourself
Page 435 of 507
If any electrical equipment does not come
on, check for an open fuse.1. Be sure the ignition switch and the headlight switch are OFF.
2. Open the engine hood.
3. Remove the fuse box cover by pushing the tab
�Aand lif ting the cover up.
4. Remove the fuse with the fuse puller, which is located in the center of the
fuse block in the passenger compart-
ment.
5. If the fuse is open
�B, replace it with a
new fuse
�C.
6. If a new fuse also opens, have the elec- trical system checked and repaired. It is
recommended that you visit a NISSAN
dealer for this service.
NOTE:
Your vehicle may not be equipped with
all fuses listed on the fuse label.
Fusible links
If the electrical equipment does not oper-
ate and fuses are in good condition, check
the fusible links. If any of these fusible links
are melted, replace with only Genuine
NISSAN parts.
LDI2746
Do-it-yourself8-23
Page 436 of 507
PASSENGER COMPARTMENT
WARNING
Never use a fuse of higher or lower am-
perage rating than that specified on the
fuse box cover. This could damage the
electrical system or electronic control
units or cause a fire.
If any electrical equipment does not oper-
ate, check for an open fuse. NOTE:
The fuse box is located on the driver’s
side of the instrument panel.
1. Be sure the ignition switch and the headlight switch are OFF.
2. Remove the fuse box cover
�Awith a
suitable tool. Use a cloth to avoid dam-
aging the trim.
3. Locate the fuse that needs to be re- placed.
4. Remove the fuse with the fuse puller
�B. 5. If the fuse is open
�C, replace it with an
equivalent good fuse
�D.
6. Push the fuse box cover to install.
If a new fuse also opens, have the electrical
system checked and repaired. It is recom-
mended that you visit a NISSAN dealer for
this service.
NOTE:
Your vehicle may not be equipped with
all fuses listed on the fuse label.
LDI2712LDI2713
8-24Do-it-yourself
Page 437 of 507
Extended storage switch
If any electrical equipment does not oper-
ate, remove the extended storage switch
and check for an open fuse.
NOTE:
The extended storage switch is used for
long term vehicle storage. Even if the ex-
tended storage switch is broken it is not
necessary to replace it. Replace only the
open fuse in the switch with a new fuse.How to replace the extended storage
switch:
1. To remove the extended storage switch, be sure the ignition switch is in
the OFF or LOCK position.
2. Be sure the headlight switch is in the OFF position.
3. Remove the fuse box cover.
4. Pinch the locking tabs
�Aand�Bfound
on each side of the storage switch.
5. Pull the storage switch straight out from the fuse box
�C.
CAUTION
Be careful not to allow children to swal-
low the battery or removed parts.
LDI2747
BATTERY REPLACEMENT
Do-it-yourself8-25
fluid reservoir
3. Air cleaner
4. Battery
5. Fuse and relay box
6. Engine coolant reservoir
7. Radiator cap
8. Engine oil dip")
fluid reservoir
3. Air cleaner
4. Battery
5. Fuse and relay box
6. Engine coolant reservoir
7. Radiator cap
8. Engine oil di")