Page 193 of 507
 to illumi-
nate. If the
light illuminates be-
cause the fuel-filler cap is loose or
missing, tighte")
∙ Failure to tighten the fuel-filler capproperly may cause the
Mal-
function Indicator Light (MIL) to illumi-
nate. If the
light illuminates be-
cause the fuel-filler cap is loose or
missing, tighten or install the cap and
continue to drive the vehicle.
The
light should turn off af ter a
few driving trips. If the
light does
not turn off af ter a few driving trips,
have the vehicle inspected. It is rec-
ommended that you visit a NISSAN
dealer for this service.
∙ For additional information, refer to “Malfunction Indicator Light (MIL)” in
the “Instruments and controls” sec-
tion of this manual.
∙ If fuel is spilled on the vehicle body, flush it away with water to avoid paint
damage. To remove the fuel-filler cap:
1. Turn the fuel-filler cap counterclock- wise to remove.
2. Put the fuel-filler cap on the cap holder
�1while refueling.
To install the fuel-filler cap: 1. Insert the fuel-filler cap straight into the fuel-filler tube.
2. Turn the fuel-filler cap clockwise until a single click is heard.
LOOSE FUEL CAP warning
The LOOSE FUEL CAP warning appears in
the odometer or vehicle information dis-
play (if so equipped) when the fuel-filler cap
is not tightened correctly af ter the vehicle
has been refueled. It may take a few driving
trips for the message to be displayed. To
turn off the warning, do the following:
1. Remove and install the fuel-filler cap as previously described as soon as pos-
sible.
2. Tighten the fuel-filler cap until it clicks.
LPD2125
Type A (if so equipped)
LPD2124
Pre-driving checks and adjustments3-29
Page 194 of 507
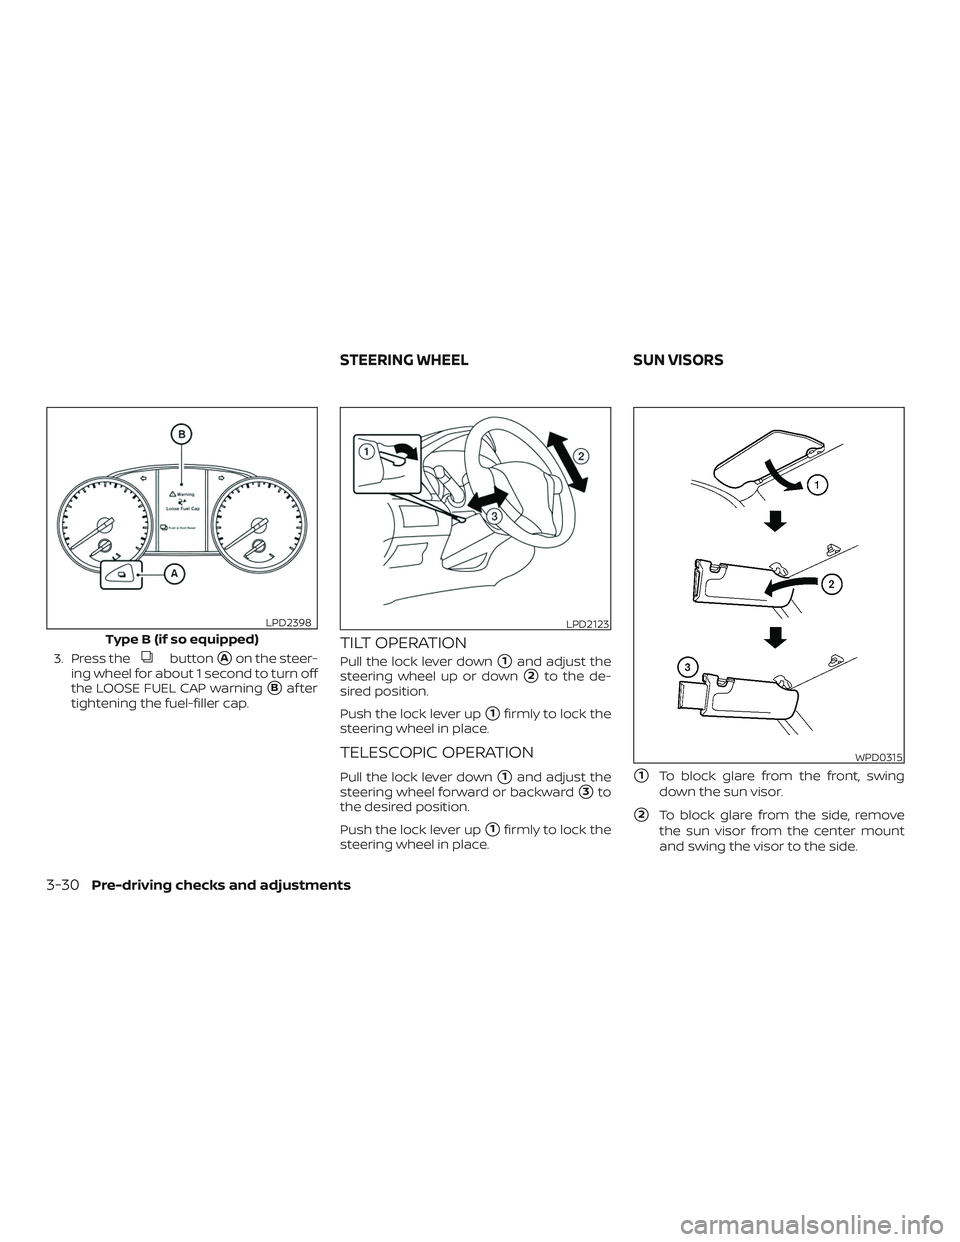
3. Press thebutton�Aon the steer-
ing wheel for about 1 second to turn off
the LOOSE FUEL CAP warning
�Baf ter
tightening the fuel-filler cap.
TILT OPERATION
Pull the lock lever down�1and adjust the
steering wheel up or down
�2to the de-
sired position.
Push the lock lever up
�1firmly to lock the
steering wheel in place.
TELESCOPIC OPERATION
Pull the lock lever down�1and adjust the
steering wheel forward or backward
�3to
the desired position.
Push the lock lever up
�1firmly to lock the
steering wheel in place.
�1To block glare from the front, swing
down the sun visor.
�2To block glare from the side, remove
the sun visor from the center mount
and swing the visor to the side.
Type B (if so equipped)
LPD2398LPD2123
WPD0315
STEERING WHEEL SUN VISORS
3-30Pre-driving checks and adjustments
Page 196 of 507
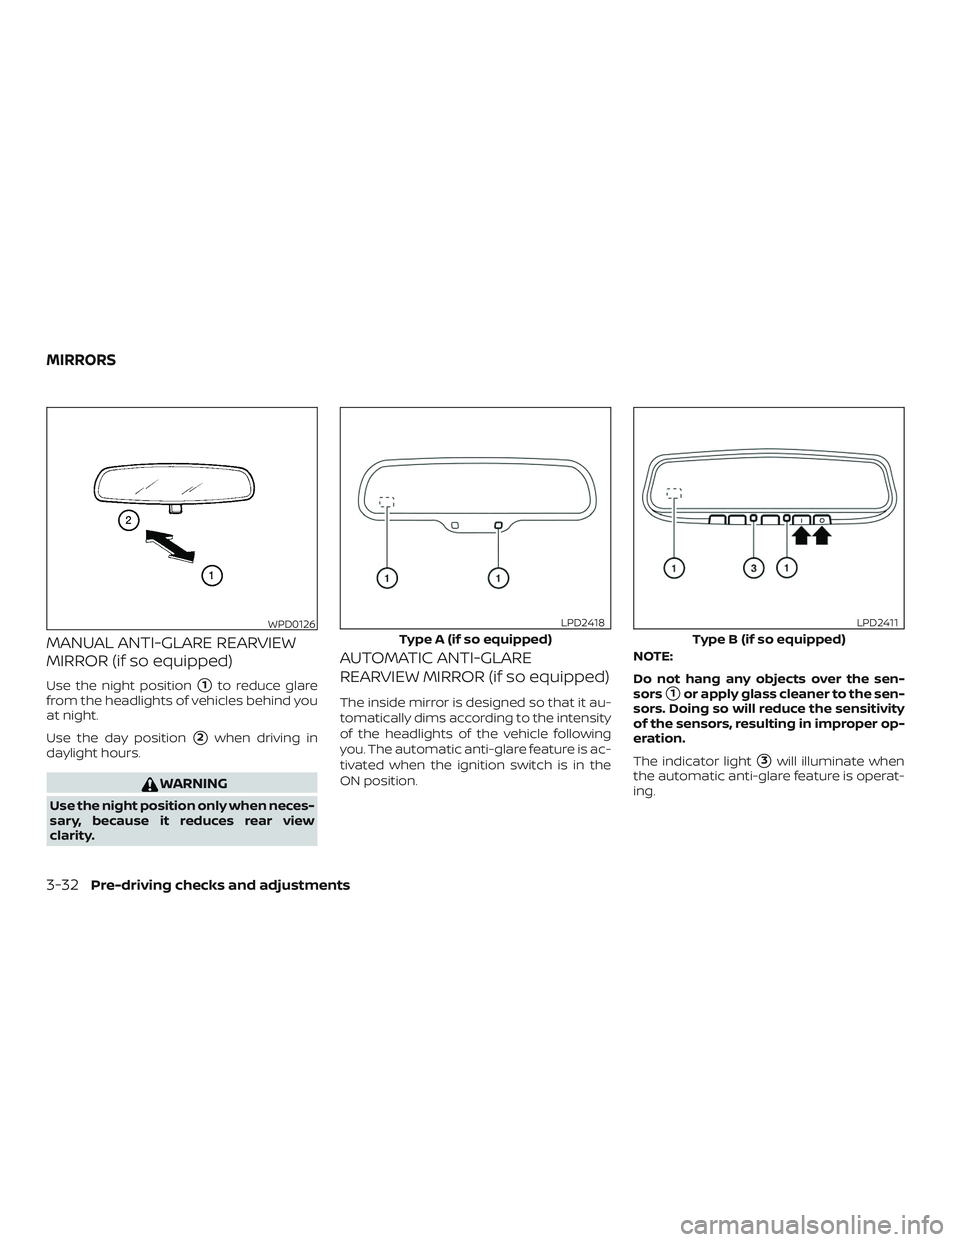
MANUAL ANTI-GLARE REARVIEW
MIRROR (if so equipped)
Use the night position�1to reduce glare
from the headlights of vehicles behind you
at night.
Use the day position
�2when driving in
daylight hours.
WARNING
Use the night position only when neces-
sary, because it reduces rear view
clarity.
AUTOMATIC ANTI-GLARE
REARVIEW MIRROR (if so equipped)
The inside mirror is designed so that it au-
tomatically dims according to the intensity
of the headlights of the vehicle following
you. The automatic anti-glare feature is ac-
tivated when the ignition switch is in the
ON position. NOTE:
Do not hang any objects over the sen-
sors�1or apply glass cleaner to the sen-
sors. Doing so will reduce the sensitivity
of the sensors, resulting in improper op-
eration.
The indicator light
�3will illuminate when
the automatic anti-glare feature is operat-
ing.
WPD0126
Type A (if so equipped)
LPD2418
Type B (if so equipped)
LPD2411
MIRRORS
3-32Pre-driving checks and adjustments
Page 197 of 507
∙ To turn off the anti-glare feature, press and hold the O button for 3-6 seconds.
The indicator light will turn off.
∙ To turn on the anti-glare feature, press and hold the")
Type B (if so equipped)∙ To turn off the anti-glare feature, press and hold the O button for 3-6 seconds.
The indicator light will turn off.
∙ To turn on the anti-glare feature, press and hold the | button for 3-6 sec-
onds. The indicator light will turn on.
For additional information on HomeLink®
Universal Transceiver operation, refer to
“HomeLink® Universal Transceiver” in the
“Instruments and controls” section of this
manual.
OUTSIDE MIRRORS
The outside mirror remote control will op-
erate only when the ignition switch is in the
ACC or ON position.
Move the small switch
�1to select the right
or lef t mirror. Adjust each mirror to the de-
sired position using the large switch
�2.
Move the switch to the center (neutral) po-
sition to prevent accidentally moving the
mirror.
WARNING
∙ Objects viewed in the outside mirror on the passenger side are closer than
they appear. Be careful when moving
to the right. Using only this mirror
could cause an accident. Use the in-
side mirror or glance over your shoul-
der to properly judge distances to
other objects.
∙ Do not adjust the mirrors while driv- ing. You could lose control of your ve-
hicle and cause an accident.
LPD0237
Pre-driving checks and adjustments3-33
Page 202 of 507

WARNING
∙ Positioning of the heating or air con-ditioning controls and display con-
trols should not be done while driving
in order that full attention may be
given to the driving operation.
∙ Do not disassemble or modif y this system. If you do, it may result in acci-
dents, fire, or electrical shock.
∙ Do not use this system if you notice any abnormality, such as a frozen
screen or lack of sound. Continued
use of the system may result in acci-
dent, fire or electric shock.
∙ In case you notice any foreign object in the system hardware, spill liquid on
it, or notice smoke or smell coming
from it, stop using the system imme-
diately. Ignoring such conditions may
lead to accidents, fire or electrical
shock. It is recommended that you
visit a NISSAN dealer for servicing.
1. MAP button*
2. Display screen
3.
button**
4.
button 5.
(brightness control) button
6. BACK button
7. ON-OFF button/VOL (volume) control knob
8. CAMERA button
LHA2898
CONTROL PANEL BUTTONS — COLOR
SCREEN WITH NAVIGATION SYSTEM
(if so equipped)
4-4Monitor, climate, audio, phone and voice recognition systems
Page 203 of 507

9. NAV button*
* For additional information regarding the
navigation system control buttons, refer to
the separate NissanConnect® Owner’s
Manual.
** For additional information regarding the
Bluetooth® Hands-Free Phone System
control button, refer to “Bluetooth® Hands-
Free Phone System with navigation sys-
tem” in this section.
When you use this system, make sure the
engine is running.
If you use the system with the engine not
running (ignition ON or ACC) for a long
time, it will discharge the battery, and
the engine will not start.
Reference symbols:
“Example” — Words marked in quotes refer
to a key shown only on the display. These
keys can be selected by touching the
screen.HOW TO USE THE TOUCH-SCREEN
CAUTION
∙ The glass display screen may break if it is hit with a hard or sharp object. If
the glass screen breaks, do not touch
it. Doing so could result in an injury.
∙ To clean the display, never use a rough cloth, alcohol, benzine, thinner or any
kind of solvent or paper towel with a
chemical cleaning agent. They will
scratch or deteriorate the panel.
∙ Do not splash any liquid such as water or car fragrance on the display. Con-
tact with liquid will cause the system
to malfunction.
To help ensure safe driving, some functions
cannot be operated while driving.
The on-screen functions that are not avail-
able while driving will be “grayed out” or
muted.
Park the vehicle in a safe location and then
operate the navigation system.
WARNING
∙ ALWAYS give your full attention to driving.
∙ Avoid using vehicle features that could distract you. If distracted, you
could lose control of your vehicle and
cause an accident.
Monitor, climate, audio, phone and voice recognition systems4-5
Page 209 of 507

WARNING
∙ Failure to follow the warnings and in-structions for proper use of the Rear-
View Monitor system could result in
serious injury or death.
∙ RearView Monitor is a convenience feature and is not a substitute for
proper backing. Always turn and look
out the windows and check mirrors to
be sure that it is safe to move before
operating the vehicle. Always back up
slowly.
∙ The system is designed as an aid to the driver in showing large stationary
objects directly behind the vehicle, to
help avoid damaging the vehicle.
∙ The distance guide line and the ve- hicle width line should be used as a
reference only when the vehicle is on a
level paved surface. The distance
viewed on the monitor is for reference
only and may be different than the
actual distance between the vehicle
and displayed objects.
CAUTION
Do not scratch the camera lens when
cleaning dirt or snow from the front of
the camera.
The RearView Monitor system automati-
cally shows a rear view of the vehicle when
the shif t lever is shif ted into the R (Reverse)
position. Press the CAMERA button (if so
equipped) while in the R (Reverse) position
to cycle through guideline options. The ra-
dio can still be heard while the RearView
Monitor is active.
To display the rear view, the RearView Moni-
tor system uses a camera located just
above the vehicle’s license plate
�1.
REARVIEW MONITOR SYSTEM
OPERATION
With the ignition switch in the ON position,
move the shif t lever to the R (Reverse) po-
sition to operate the RearView Monitor.
LHA3819
Monitor, climate, audio, phone and voice recognition systems4-11
Page 213 of 507
.
2. Press the
button on the control
panel.
3. The screen will display the Night set- tings.
4. T")
For vehicles with navigation system:1. Firmly apply the brake and place the shif t lever in R (Reverse).
2. Press the
button on the control
panel.
3. The screen will display the Night set- tings.
4. Turn the TUNE knob to adjust the set- ting up or down.
5. Press the
button again to access
the Auto settings.
6. Turn the TUNE knob to adjust the set- ting up or down.
NOTE:
Do not adjust any of the display settings
of the RearView Monitor while the ve-
hicle is moving. Make sure the parking
brake is firmly applied.
REARVIEW MONITOR SYSTEM
LIMITATIONS
WARNING
Listed below are the system limitations
for RearView Monitor. Failure to operate
the vehicle in accordance with these
system limitations could result in seri-
ous injury or death.
∙ The system cannot completely elimi- nate blind spots and may not show
every object.
∙ Underneath the bumper and the cor- ner areas of the bumper cannot be
viewed on the RearView Monitor be-
cause of its monitoring range limita-
tion. The system will not show small
objects below the bumper, and may
not show objects close to the bumper
or on the ground.
∙ Objects viewed in the RearView Moni- tor differ from actual distance be-
cause a wide-angle lens is used.
∙ Objects in the RearView Monitor will appear visually opposite compared to
when viewed in the rearview and out-
side mirrors. ∙ Use the displayed lines as a reference.
The lines are highly affected by the
number of occupants, fuel level, ve-
hicle position, road conditions and
road grade.
∙ Make sure that the trunk is securely closed when backing up.
∙ Do not put anything on the rearview camera. The rearview camera is in-
stalled above the license plate.
∙ When washing the vehicle with high pressure water, be sure not to spray it
around the camera. Otherwise, water
may enter the camera unit causing
water condensation on the lens, a
malfunction, fire or an electric shock.
∙ Do not strike the camera. It is a preci- sion instrument. Otherwise, it may
malfunction or cause damage result-
ing in a fire or an electric shock.
The following are operating limitations and
do not represent a system malfunction: ∙ When the temperature is extremely high or low, the screen may not clearly
display objects.
Monitor, climate, audio, phone and voice recognition systems4-15