2018 NISSAN ROGUE SPORT Lug nut
[x] Cancel search: Lug nutPage 407 of 512

6-8In case of emergency
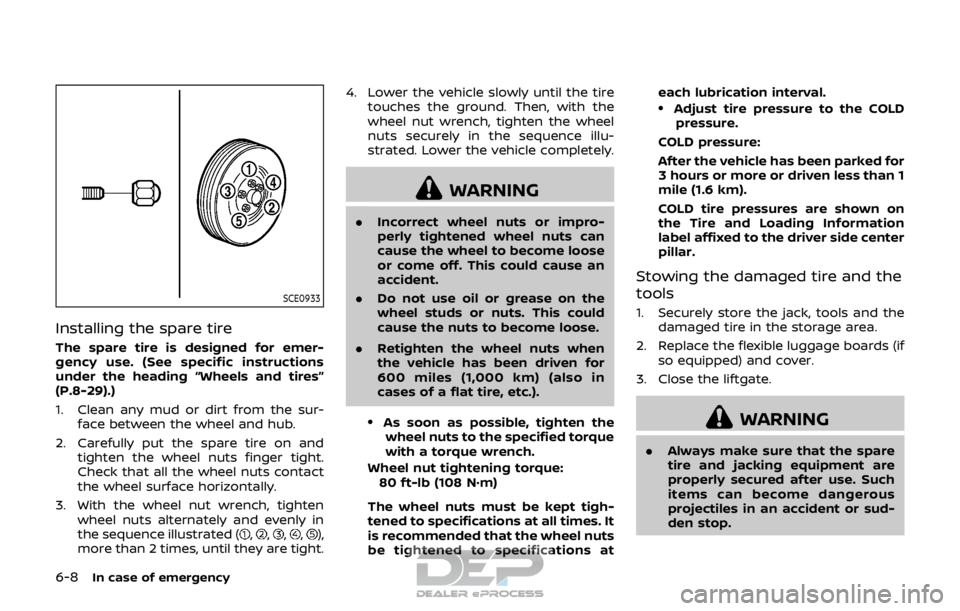
SCE0933
Installing the spare tire
The spare tire is designed for emer-
gency use. (See specific instructions
under the heading “Wheels and tires”
(P.8-29).)
1. Clean any mud or dirt from the sur-face between the wheel and hub.
2. Carefully put the spare tire on and tighten the wheel nuts finger tight.
Check that all the wheel nuts contact
the wheel surface horizontally.
3. With the wheel nut wrench, tighten wheel nuts alternately and evenly in
the sequence illustrated (
,,,,),
more than 2 times, until they are tight. 4. Lower the vehicle slowly until the tire
touches the ground. Then, with the
wheel nut wrench, tighten the wheel
nuts securely in the sequence illu-
strated. Lower the vehicle completely.
WARNING
.Incorrect wheel nuts or impro-
perly tightened wheel nuts can
cause the wheel to become loose
or come off. This could cause an
accident.
. Do not use oil or grease on the
wheel studs or nuts. This could
cause the nuts to become loose.
. Retighten the wheel nuts when
the vehicle has been driven for
600 miles (1,000 km) (also in
cases of a flat tire, etc.).
.As soon as possible, tighten the
wheel nuts to the specified torque
with a torque wrench.
Wheel nut tightening torque: 80 ft-lb (108 N·m)
The wheel nuts must be kept tigh-
tened to specifications at all times. It
is recommended that the wheel nuts
be tightened to specifications at each lubrication interval.
.Adjust tire pressure to the COLD
pressure.
COLD pressure:
After the vehicle has been parked for
3 hours or more or driven less than 1
mile (1.6 km).
COLD tire pressures are shown on
the Tire and Loading Information
label affixed to the driver side center
pillar.
Stowing the damaged tire and the
tools
1. Securely store the jack, tools and the damaged tire in the storage area.
2. Replace the flexible luggage boards (if so equipped) and cover.
3. Close the liftgate.
WARNING
. Always make sure that the spare
tire and jacking equipment are
properly secured after use. Such
items can become dangerous
projectiles in an accident or sud-
den stop.
Page 433 of 512

8-8Do-it-yourself
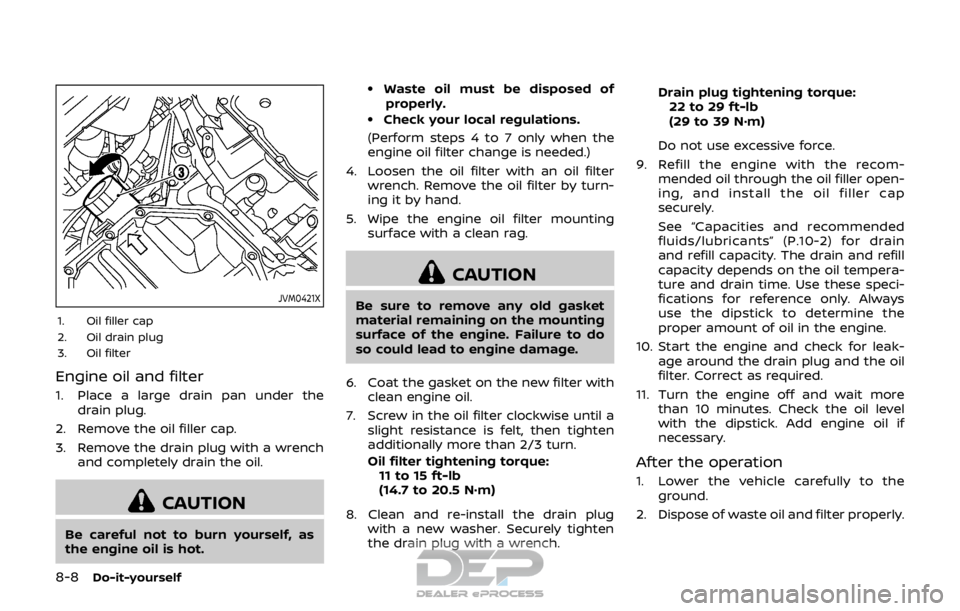
JVM0421X
1. Oil filler cap
2. Oil drain plug
3. Oil filter
Engine oil and filter
1. Place a large drain pan under thedrain plug.
2. Remove the oil filler cap.
3. Remove the drain plug with a wrench and completely drain the oil.
CAUTION
Be careful not to burn yourself, as
the engine oil is hot.
.Waste oil must be disposed ofproperly.
.Check your local regulations.
(Perform steps 4 to 7 only when the
engine oil filter change is needed.)
4. Loosen the oil filter with an oil filter wrench. Remove the oil filter by turn-
ing it by hand.
5. Wipe the engine oil filter mounting surface with a clean rag.
CAUTION
Be sure to remove any old gasket
material remaining on the mounting
surface of the engine. Failure to do
so could lead to engine damage.
6. Coat the gasket on the new filter with clean engine oil.
7. Screw in the oil filter clockwise until a slight resistance is felt, then tighten
additionally more than 2/3 turn.
Oil filter tightening torque:11 to 15 ft-lb
(14.7 to 20.5 N·m)
8. Clean and re-install the drain plug with a new washer. Securely tighten
the drain plug with a wrench. Drain plug tightening torque:
22 to 29 ft-lb
(29 to 39 N·m)
Do not use excessive force.
9. Refill the engine with the recom- mended oil through the oil filler open-
ing, and install the oil filler cap
securely.
See “Capacities and recommended
fluids/lubricants” (P.10-2) for drain
and refill capacity. The drain and refill
capacity depends on the oil tempera-
ture and drain time. Use these speci-
fications for reference only. Always
use the dipstick to determine the
proper amount of oil in the engine.
10. Start the engine and check for leak- age around the drain plug and the oil
filter. Correct as required.
11. Turn the engine off and wait more than 10 minutes. Check the oil level
with the dipstick. Add engine oil if
necessary.
After the operation
1. Lower the vehicle carefully to the
ground.
2. Dispose of waste oil and filter properly.
Page 470 of 512

other corrosive materials, check lubrica-
tion frequently.
Lights*:Clean the headlights on a regular
basis. Make sure that the headlights, stop
lights, tail lights, turn signal lights, and
other lights are all operating properly and
installed securely. Also check headlight
aim.
Road wheel nuts (lug nuts)*: When
checking the tires, make sure no wheel
nuts are missing, and check for any loose
wheel nuts. Tighten if necessary.
Tire rotation*: Tires should be rotated
every 5,000 miles (8,000 km).
Tires*: Check the pressure with a gauge
often and always prior to long distance
trips. If necessary, adjust the pressure in
all tires, including the spare, to the
pressure specified. Check carefully for
damage, cuts or excessive wear.
Tire Pressure Monitoring System (TPMS)
transmitter components: Replace the
TPMS transmitter grommet seal, valve
core and cap when the tires are replaced
due to wear or age.
Wheel alignment and balance: If the
vehicle should pull to either side while
driving on a straight and level road, or if
you detect uneven or abnormal tire wear,
there may be a need for wheel alignment.
If the steering wheel or seat vibrates at normal highway speeds, wheel balancing
may be needed.
For additional information regarding tires,
refer to “Important Tire Safety Informa-
tion” (US) or “Tire Safety Information”
(Canada) in the NISSAN Warranty Infor-
mation Booklet.
Windshield:
Clean the windshield on a
regular basis. Check the windshield at
least every six months for cracks or other
damage. Have a damaged windshield
repaired by a qualified repair facility.
Windshield wiper blades*: Check for
cracks or wear if they do not wipe
properly.
Inside the vehicle
The maintenance items listed here should
be checked on a regular basis, such as
when performing scheduled mainte-
nance, cleaning the vehicle, etc.
Accelerator pedal: Check the pedal for
smooth operation and make sure the
pedal does not catch or require uneven
effort. Keep the floor mat away from the
pedal.
Brake pedal: Check the pedal for smooth
operation. If the brake pedal suddenly
goes down further than normal, the pedal
feels spongy or the vehicle seems to take
longer to stop, have your vehicle checked immediately. It is recommended you visit
a NISSAN dealer for this service. Keep the
floor mat away from the pedal.
Brakes:
Check that the brakes do not pull
the vehicle to one side when applied.
Continuously Variable Transmission
(CVT) P (Park) mechanism: On a fairly
steep hill, check that the vehicle is held
securely with the shift lever in the P (Park)
position without applying any brakes.
Parking brake: Check the parking brake
operation regularly. The vehicle should be
securely held on a fairly steep hill with
only the parking brake applied. If the
parking brake needs adjusted, it is re-
commended you visit a NISSAN dealer for
this service.
Seat belts: Check that all parts of the seat
belt system (for example, buckles, an-
chors, adjusters and retractors) operate
properly and smoothly, and are installed
securely. Check the belt webbing for cuts,
fraying, wear or damage.
Seats: Check seat position controls such
as seat adjusters, seatback recliners, etc.
to ensure they operate smoothly and that
all latches lock securely in every position.
Check that the head restraints move up
and down smoothly and that the locks (if
so equipped) hold securely in all latched
positions.
Maintenance and schedules9-3